Rufus - Create Bootable USB Drives Easily
Change language: English (International) Albanian (Shqip) Arabic (العربية) Armenian (Հայերեն) Azerbaijani (Azərbaycan) Bangla (বাংলা) Bosnian (Bosánski) Bulgarian (Български) Cantonese [Hong Kong] (香港粵文) Catalan (Català) Chinese Simplified (简体中文) Chinese Traditional (正體中文) Croatian (Hrvatski) Czech (Čeština) Danish (Dansk) Dutch (Nederlands) Estonian (eesti keel) Finnish (Suomi) French (Français) Galician (Galego) German (Deutsch) Greek ( Ελληνικά) Hebrew (עברית) Hindi (हिंदी) Hungarian (Magyar) Indonesian (Bahasa Indonesia) Irish (Gaeilge) Italian (Italiano) Japanese (日本語) Korean (한국어) Latvian (Latviešu) Lithuanian (Lietu) vių) Malay (Bahasa Malaysia) Norwegian (Norsk) Odia (ଓଡ଼ିଆ) Persian (پارسی) Polish (Polski) Portuguese [BR] (Português [BR]) Portuguese [PT] (Português [PT]) Romanian (Română) Russian (Russian) Serbian [Latin] (Srpski [ Latinica]) Slovak (Slovensky) Slovenian (Slovenščina) Spanish (Español) Swedish (Svenska) Thai (ไทย) Turkish (Türkçe) Ukrainian (Ukrainian) Urdu (اُردُو) Vietnamese (Tiếng Việt) Welsh (Cymraeg) (Advertising space - How and you, I would like the site to exist without it...)
Easy creation of bootable USB drives
Rufus is a utility that helps you format and create bootable Flash/Pen/Key disks, memory cards, etc.
Rufus will be especially useful in cases where:
- you need to create a bootable USB disk from a bootable ISO image (Windows, Linux, UEFI, etc.)
- need to work on systems that do not have an installed OS
- you need to flash the BIOS or other firmware from DOS
- you need to run a low-level utility
Despite its small size, Rufus can do everything you need!
Rufus also works very well
fast. For example, twice as fast as UNetbootin, Universal USB Installer or Windows 7 USB download tool when creating a bootable Windows 7 USB disk from an ISO image. Rufus is also slightly faster at creating a bootable Linux USB from an ISO image. (1) A partial list of ISO images that Rufus can work with is presented at the bottom of the page. (2)
Download
Last update 2020.06.18:
Supported languages:
| Bahasa Indonesia | , | Bahasa Malaysia | , | Bulgarian | , | Čeština | , | Dansk | , | Deutsch | , | Ελληνικά | , |
| English | , | Español | , | Français | , | Hrvatski | , | Italiano | , | Latviešu | , | Lietuvių | , | Magyar | , | Netherlands | , | Norsk | , |
| Polski | , | Português | , | Português do Brasil | , | Russian | , | Romana | , | Slovensky | , | Slovenia | , | Srpski | , |
| Suomi | , | Svenska | , | Tiếng Việt | , | Türkçe | , | Ukrainian | , | 简体中文 | , | 正體中文 | , | 日本語 | , | 한국어 | , | ไทย | , |
System requirements:
Windows 7 or later, no matter 32 or 64 bit. Once downloaded, the application is ready to use.
I would like to express my gratitude to the translators who have translated Rufus as well as this web page into various languages. If you find that you can use Rufus in your own language, you have them to thank!
Usage
Download the executable and run it - no installation required.
The executable file has a digital signature containing:
- "Akeo Consulting"
(v1.3.0 or later) - "Pete Batard - Open Source Developer"
(v1.2.0 or earlier)
A few words about DOS support:
If you create a DOS boot disk and use a non-US keyboard, Rufus will select a keyboard layout based on your system's regional settings. In this case, FreeDOS, which is the default, is recommended over MS-DOS because it supports more keyboard layouts.
A few words about ISO support:
All versions of Rufus since 1.1.0 allow you to create a bootable USB drive from an ISO image (.iso).
Creating an ISO image from a physical disc or a set of files is very easy using CD burning software such as the freely available InfraRecorder or CDBurnerXP.
Frequently asked questions (FAQ)
Rufus FAQ available HERE
.
To provide feedback, report a bug, or suggest an idea, please use the github issue tracker. You can also send an e-mail.
License
GNU General Public License (GPL) version 3 or later. You are free to redistribute, modify, or even sell the software under the GPLv3 license.
Rufus is created 100% open source in the MinGW32 environment.
Changes
- Version 3.11
(2020.06.18) Add Rock Ridge deep directory support - Add an option to write small ISOs to an ESP (GPT only)
- Add a cheat mode (Ctrl-SELECT) to extract content from an additional zip archive on top of the ISO
- Add a cheat mode (Alt-G) to disable Virtual Hard Disk listing
- Add a cheat mode (Alt-P) to toggle a GPT ESP to Basic Data (Windows 10 only)
- Fix improper x86 32-bit NTFS driver being used for UEFI:NTFS
- Improve UEFI:NTFS compatibility with older UEFI firmwares
- Improve startup time by running the ISO download feature check in the background
- Remove Ubuntu's splash screen for persistent UEFI drives
- Enable ASLR for the Rufus executable
Basic steps to create a bootable USB Flash Drive
To create a bootable USB flash drive with Windows 7/8 , you need to do three main things:
- Prepare a USB Flash Drive: create the required partition, format it, mark the partition as “Active” (why you need to mark a partition as “Active” and what partitions there are, you can see in the article “Stages of booting a computer”);
- Copy all necessary files to USB Flash Drive;
- Register the appropriate bootloader in the boot sector of the USB Flash Drive.
Actually, it is the last point that makes the flash drive bootable.
If we are talking about Windows 7 and higher, then the easiest ways to create a bootable flash drive include the methods described on the Microsoft in this article.
The first stage of creating a bootable flash drive, namely formatting it, Microsoft suggests doing in the command window of the diskpart ; however, you can create a partition on the Flash Drive (if it doesn’t already exist) and format it in the Windows graphical environment.
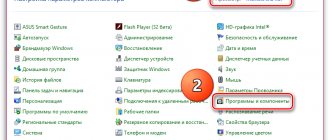
We connect a USB flash drive of suitable size to the computer (to record the Windows 7/8 distribution , you need at least 4 GB). Open “ Computer Management”
” –> “
Disk Management
”, find the volume corresponding to the connected USB Flash Drive and format it to NTFS here.
A similar result can be achieved by running “ Format...
” from the device context menu in Windows Explorer:
In order to be able to boot from a flash drive, the created and formatted partition must be marked as active .
You can do this in “ Disk Management”
”, however, most likely for a flash drive the “
Make partition active
” option will not be available:
diskpart in an elevated command window and run the following commands:
diskpart::start program; list disk :: displays a list of computer disks by number: Find in it the number corresponding to the flash drive:
In the example presented, this will be Disk 5
. Flash Drive is not difficult to identify due to its characteristic volume.
sel disk N :: select disk number N corresponding to the flash drive (“5”); list part :: displays a list of volumes. In the vast majority of cases, there will be only one partition, so you can immediately run the following command: sel part 1 :: select the partition; active :: mark the selected section as active; exit :: exit diskpart
For those who prefer to perform all operations, including creating and formatting a volume on Flash Drive, in diskpart , the sequence of commands will be as follows:
diskpart :: launch the program list disk :: display a list of computer disks by number Find in it the number corresponding to the flash drive (5); sel disk N :: select disk number N corresponding to the flash drive (“5”); The previous command must be carried out very carefully and not make a mistake in choosing the disk number corresponding to the flash drive. Otherwise, subsequent commands may lead to extremely undesirable consequences.
If the partitions on the Flash Drive must first be deleted and created again, then run the commands: clean :: disk cleanup; convert mbr :: initialize the flash drive as MBR; create partition primary :: create a partition; sel part 1 :: set focus to the first section; format fs=ntfs quick :: format the partition; active :: mark the selected section as active; assign :: mount Flash Drive (the drive letter will be assigned); exit :: exit diskpart
The second stage depends on the form in which the distribution is available. If it is on a DVD, then simply copy all the files from the DVD to the flash drive using any usual method: Windows Explorer, FAR, XCOPY command, etc.
Variations begin when the distribution is presented in an ISO disk image. The task is to get to its contents in any possible way. It is easily solved today, for example, with the help of archiving programs. These include: 7-Zip, Hamster (I do not mention WinRar, since it is paid, although it can also work with ISO).
I think there is no point in describing in detail the process of expanding an ISO file due to its triviality. The only recommendation is to save time by unpacking the ISO image of the desired disk distribution directly onto a USB Flash Drive.
As another, somewhat exotic option, we can suggest using a VirtualBox guest machine to copy files from ISO to USB Flash (why not, if the virtualization platform from Oracle is probably already installed on the computer). To do this, in a running guest machine, you need to “insert” the ISO image into the virtual optical drive and transfer the previously connected Flash Drive to the machine in “USB Devices”.
Then absolutely all the required operations to create a bootable flash drive can be done in the guest machine.
At the third stage of “manually” creating a bootable flash drive, you cannot do without the command line. You need to run it as an administrator (select in the context menu with the right mouse button) and execute one single command, the name of which eloquently speaks about its purpose: X:\boot\bootsect /nt60 X: - where X: the letter of the USB Flash connected to the computer Drive.
If we are talking about Windows 7, then you can replace all of the above steps for writing a bootable USB flash drive by downloading and installing the free application from Microsoft Windows 7 DVD/USB Download Tool.
COMSS Boot USB
COMSS Boot USB is an excellent solution for checking and repairing faulty computers and laptops. The assembly includes anti-virus scanners, utilities for checking and troubleshooting HDD and SSD drives, as well as utilities for testing memory and disk, and obtaining detailed information about the equipment.
Full and Lite versions
The Full version includes 11 anti-virus scanners and additional system utilities. The Lite version contains only two anti-virus scanners - Dr.Web LiveDisk and Kaspersky Rescue Disk, and all other programs.
In UEFI mode, only Dr.Web LiveDisk and Kaspersky Rescue Disk are available for launch.
New in version 2020-06:
- AntivirusLiveCD 33.2-0.102.2 (2020)
- ASTRA 6.70 (2019)
- Avira Rescue System (2020-06-24)
- DFSee 16.6 (2020)
- DiskGenius 5.2.0.878 (2019)
- Dr.Web LiveDisk (2020-06-23)
- GParted 1.1.0-1-i686 (2020)
- HDClone 9 Free Edition 9.6.1 (2019)
- HDAT2 7.0 (2020)
- HWiNFO 6.1.1 (2020)
- Kaspersky Rescue Disk (2020-06-23)
- Norton Bootable Recovery Tool (2020-03-31)
- PCI ID's for Hardware Detection Tool (2020-05-29)
- Sophos Bootable (2020-06-23)
- Windows Defender Offline (2020-06-23)
Composition of the bootable flash drive:
Antivirus utilities:
- Antivirus Live CD 33.2-0.102.2 (2020, zk1234) - ClamAV console anti-virus scanner.
- Avira Rescue System (2020-06-24, Avira) - Ubuntu OS with Avira antivirus scanner, file manager, web browser, Gparted, RegEdit. The virus database can be updated over the Internet.
- Comodo Rescue Disk (2013-04-16, Comodo) - Linux OS with Comodo virus scanner, file manager and web browser. The virus database can be updated over the Internet.
- Dr.Web LiveDisk (2020-06-23, Doctor Web) - Linux OS with Dr.Web anti-virus scanner, file manager and web browser. The virus database can be updated over the Internet.
- ESET SysRescue (2019-06-07, ESET) - Linux OS with ESET antivirus scanner, file manager, web browser, Gparted. The virus database can be updated over the Internet.
- F-Secure Rescue CD (2014-09-01, F-Secure) - F-Secure antivirus scanner. The virus database can be updated over the Internet.
- Kaspersky Rescue Disk (2020-06-2, Kaspersky Lab) - Linux OS with Kaspersky anti-virus scanner, file manager, web browser, RegEdit. The virus database can be updated over the Internet.
- Norton Bootable Recovery Tool (2020-03-31, Symantec) - Linux OS with Norton virus scanner, file manager and web browser. The virus database can be updated over the Internet.
- Sophos Bootable (2020-06-2, Sophos) - Sophos antivirus scanner.
- Tencent Rescue Disk (2017-05-17, Tencent) - Linux OS with Tencent antivirus scanner, file manager, web browser, RegEdit, FixMBR.
- Windows Defender Offline (2020-06-2, Microsoft) - Windows Defender Offline antivirus scanner. The virus database can be updated over the Internet.
HDD/SSD Utilities
- AOMEI Backupper 4.0.3 (2017, AOMEI) - Backup and restore.
- Darik's Boot and Nuke 2.3.0 (2015, dban.org) - Data erase.
- DFSee 16.6 (2020, Jan van Wijk) - Working with hard disk partitions.
- DiskCheck 4.3.0 (2013, Miray Software) - Testing hard drives.
- DiskGenius 5.2.0.878 (2019, Eassos Technology) - Working with hard drive partitions from manufacturers.
- GParted 1.1.0-1-i686 (2020, gparted.org) - Working with hard disk partitions (creating, changing, deleting).
- HDAT2 7.0 (2020, CBL) - Testing and diagnostics of hard drives.
- HDClone 9 Free Edition 9.6.1 (2019, Miray Software) - A program for creating backup copies and images from physical and logical disks.
- HDD Regenerator (2011, Dmitriy Primochenko) - Diagnosis and repair of hard drives.
- Hitachi Feature Tool 2.16 (2009, Hitachi) - Working with Hitachi hard drives.
- Hitachi Drive Fitness Test 4.16 (2009, Hitachi) - Testing Hitachi drives.
- MHDD32 4.6 (2005, Dmitry Postrigan) - Low-level analysis of the hard drive.
- Partition-Saving 4.60 (2019, Damien Guibouret) - Working with disks and partitions.
- PhotoRec 7.2 (2019, Christofer Grenier) - Data recovery.
- SeaTools Bootable v2.1.2 (2018, Seagate Technology) - Diagnostics of Seagate, LaCie, Maxtor, Samsung drives and hard drives made by other manufacturers.
- SeaTools for DOS 2.23 (2011, Seagate Technology) - Working with SeaGate hard drives.
- TestDisk 7.2 (2019, Christofer Grenier) - Testing disks.
- Victoria 3.52с (2005, Sergey Kazansky) - Checking the hard drive for errors.
- WD Data Lifeguard Diagnostics 5.27 (2016, Western Digital) - Diagnostics of Western Digital hard drives.
Linux, Rescue or Windows bootable USB without formatting
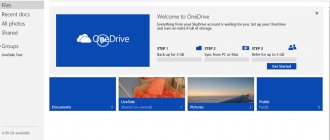
Hello!
I'm WinUSB, a simple application which helps you create multi-Windows bootable USB drive using any ISO or DVD with Windows 7,8,10 distribution and make it without formatting in most cases!
I support both UEFI/BIOS for FAT32/NTFS/ExFAT USB flash drives.
- You will need to overcome just three steps:
- Choose USB drive to make bootable
- Choose several distributions on ISO or DVD
- Choose operation system, if you want to format drive initially
Click “Yes” and enjoy you own Windows bootable USB stick!
Easy to use
Create Windows multi-bootable USB flash drive with just three ease steps in intuitive user interface.
- Choose USB pen drive.
- Select necessary Windows distros. ISO and DVD supported.
- Define new file system of USB drive, if you want format it firstly.
Mutiboot USB
You can choose any number of Windows or Linux distributives, rescue live programs and Driver Pack to create your own multiboot USB flash drive.
After flashing USB will finished, you can add more distros to your flash drive by repeat the process…
Without formatting
Formatting your flash drive will not be required, when free space on it is enough.
With WinUSB, you no longer need to transfer many files to hard drive of your PC when you need to create Windows bootable USB stick.
But with Drivers, Linux and Rescue..
DriverPack Network will let you install WiFi and LAN drivers right after Windows installation will finished.
Add network drivers for your PC to multi-bootable USB drive in two clicks!
Boot Manager
Starting from WinUSB version 3.5 you can manage already flashed distributions!
- Create multiboot USB drive
- Browse distros on your bootable USB drive
- Remove any distibutive from multiboot USB stick by one click
Source: https://www.winusb.net/
Rufus: how to create a bootable USB flash drive for Windows 10
Nowadays, it is simply necessary to have a bootable USB flash drive with an operating system in case of emergency. The software market for working with drives is very large and has hundreds of utilities. Some are aimed at diagnosis and treatment, some are universal and can do a little bit of everything, and some are designed to work with images. One of the most popular programs for creating a flash drive with an operating system is Rufus. Today we will tell you how to create a bootable USB flash drive for Windows 10.
Creating a bootable USB flash drive for Windows 10 rufus: program description
The utility itself is very simple, distributed free of charge and dates back to 2011 (then the first official release took place). You can download it, as usual, on the developers’ website. No installation is required, because the software is made in a portable version format. You can also find open source code and previous versions of the software on the official portal. If you understand program code, you will be able to understand by what principles the program works and what its advantages are over analogues.
The developers themselves claim that their creation works faster than its competitors: UNetbootin, Universal USB Installer or Windows 7 USB download tool. A big advantage is also the support for a large number of languages, including Russian. Users who speak English can read the full instructions, which, unfortunately, are not available on our great and mighty one.
How to make a bootable USB flash drive for Windows 10 rufus: algorithm of actions
First of all, you will need to download the files of the operating system that you want to install. On the official Microsoft website you can download the utility for downloading the image completely free of charge. By the way, you can use it to create a bootable USB drive, but its functionality is much inferior to the capabilities of Rufus, which we will discuss below.
After the image is downloaded, run the Rufus executable file (at the time of writing, the current version is 3.8). Please note that the portable version should not be located on the media from which you plan to make the boot device.
In the “Device” column, as you might guess, you need to select a flash drive, which will be the installation media. You can focus on the name and letter displayed in the list of connected devices and drives in Explorer. And also on volume. If your removable storage device does not appear in the list of devices in the program, there may be several reasons for this.
In this article with practical advice, we talked about how you can solve this problem.
Then specify the path to the location where you downloaded the operating system image by clicking the “Select” button. In the “Partition scheme” and “Target system” items, the program itself will select the best options depending on which OS version the media is planned to use. You can, of course, change them if you wish. There are two options available in the partition scheme: MBR and GPT. Both technologies perform the same function - they serve to store information about the structure of the HDD and ensure that the operating system loads when the computer starts.
MBR and GPT technologies are similar to each other, but there are also fundamental differences between them. For example, MBR technology is not suitable for using hard drives larger than 2 TB (unlike GPT), but it is supported by almost all existing operating systems, which is undoubtedly a huge plus. Just as the classic BIOS was replaced by the EFI interface, the MBR was replaced by the improved GPT.
One way or another, in order for the bootable media to perform the intended functionality on the target computer, there must be compliance between the standards they use.
The “Image Options” section opens only after you have specified the path to the operating system files. If the OS has advanced capabilities, then in addition to the standard Windows installation, you can also choose Windows To Go. Windows To Go is a feature included with Windows 8 Enterprise, Windows 8.
1 Enterprise, Windows 10 Enterprise, Windows 10 Education, which allows the OS to boot and run from certain USB storage devices, such as USB flash drives and external hard drives, that have been certified by Microsoft as compatible.
This is a fully managed Windows enterprise environment.
Rufus how to create a bootable USB flash drive for Windows 10: formatting
A distinctive feature of this utility is its wide formatting options, which are found at the bottom of the window. In the “New volume label” column, specify the name that will be displayed for the drive in the system. It is better not to touch “Cluster size” and leave it at default. The software supports working with different types of file systems: NTFS, FAT32, UFD, exFAT. By default, FAT32 is selected for the GPT partition scheme, and it is better to leave it. However, for UEFI you can select NTFS, but in this case, in order to boot from the drive, you will have to disable the Secure Boot option in the BIOS settings.
Please also note that after formatting, all data on the media will be erased. Therefore, copy all the necessary data from the flash drive to your computer. If you wish, you can check the device for the presence of bad blocks. Bad block - a bad (unreadable) or unreliable sector of a hard drive or flash drive; a cluster containing bad sectors.
The more such sectors, the less suitable the drive is for use. For a thorough check, it is better to do several runs rather than just one. Please note that depending on the number of runs and the type of device memory, the process can take a very long time, up to several hours, especially if the flash drive is large. After all the settings have been applied, you can press the “Start” button.
The program will issue a notification that the drive will be completely cleaned.
After confirmation, the process of formatting, checking bad sectors and burning the image will begin. You don’t have to wait until the operation is completed to use your computer, but it may slow down a lot. When everything is ready, you will hear a sound notification. After this, you can close the utility.
If, after reinstalling the system, you encounter errors when reading/writing the drive, one of the possible reasons is service files created on the bootable flash drive. Regular formatting does not solve the problem. What to do in this case, we described in this material.
Bootable USB flash drive Windows 10 rufus: possible errors
And although in most cases the software works flawlessly, sometimes you can encounter errors that are very easy to fix.
- 0x00000005 is an error code that indicates that the utility does not have enough rights to work with the drive. Most often, this occurs due to an antivirus or on a corporate network, when the administrator restricts the user’s ability to access folders. Change the corporate network settings and disable the antivirus.
- 0x00000015 - Automatic mounting of volumes is disabled in Windows. To solve the problem, run Command Prompt as an administrator and enter the command mountvol /e. Close Command Prompt and reconnect the media. It is also not recommended to use USB hubs when working with boot devices. Connect the flash drive directly to the motherboard and the error will disappear.
Source: https://ichip.ru/sovety/ekspluataciya/rufus-kak-sozdat-zagruzochnuyu-fleshku-windows-10-686332
Types of bootable media
When disks were finally replaced by USB devices, many possibilities for their use opened up. They are primarily due to differences from previous products in a number of characteristics. For example:
Increased size - Modern flash drives can hold significantly more information on their memory chips.
- Compact - some types can be the size of a fingernail, but at the same time replace several stacks of DVDs with distributions or utilities.
- Speed - reading and writing compared to optics and working with it with a laser beam is much higher. And modern USB 3.1 interfaces of new generations, their Type-C and Thunderbolt varieties can provide data transmission channel width at the level of some PCI-Express ports. And this further expands the scope of their application. For example, you can connect a discrete video card to your laptop using a special Thunderbolt adapter. This allows you to play modern demanding games at the highest settings without leaving behind the portable properties of the laptop.
- Reliability - discs have always been prone to mechanical damage to their surface. Due to scratches, they lost the ability to reproduce content, which led to irreversible loss of valuable information.
All this gave impetus to enthusiasts to create new opportunities for using USB devices for service or even repair purposes. They did not limit themselves to simply placing sufficient volumes of distribution kits of several operating systems of different architectures or even families on flash drives. Today, there are several completely new types of images on the basis of which you can create bootable or self-deploying flash drives:
- Automatic program installers - packages like Beloff and others. They allow you to tick all the applications that the user wants to install and automatically install them sequentially. At the same time, human participation in the process is minimal; even his direct presence is not required. Such packages have very large volumes - 30 gigabytes or more.
- Multiboot media. They are capable of not only running multiple versions of "pocket" versions of Windows and Linux OS, but also automatically installing full versions of these OSes using a customized answer file.
- Bootable flash drives with utilities, reminiscent of expanded versions of the once popular Hiren's Boot CD.
- Rescue discs. For example, a Linux shell with an antivirus utility built into it. These are good means of leaving the infected system alone, removing the threat of dynamic infection when the virus jumps from one file to another. It is very effective in combating malware.
All this can be used by both ordinary users and repairmen. With the advent of special pockets for hard drives that support mounting images copied to them as separate files, the process has become even simpler.