12/05/2016 windows | for beginners
Many Windows 10 users are faced with the fact that the TiWorker.exe or Windows Modules Installer Worker process loads the processor, disk or RAM. Moreover, the load on the processor can be such that any other actions in the system become difficult.
This guide will detail what TiWorker.exe is, why it can overload your computer or laptop, and what you can do in this situation to fix the problem, as well as how to disable this process.
What is the process Windows Modules Installer Worker (TiWorker.exe)
First of all, what is TiWorker.exe - this is a process launched by the TrustedInstaller service (Windows Module Installer) when searching for and installing Windows 10 updates, during automatic system maintenance, as well as when enabling and disabling Windows components (in Control Panel - Programs and components - Enable or disable components).
This file cannot be deleted: it is necessary for the system to function properly. Even if you somehow delete this file, it will most likely lead to the need to restore the operating system.
It is possible to disable the service that starts it, which we will also talk about, but usually, in order to fix the problem described in the current guide and reduce the load on the processor of a computer or laptop, this is not required.
Why is the TiWorker.exe process needed?
The TiWorker process (Windows Modules Installer Worker) is an important system process that runs during the search and installation of Windows updates, activation or deactivation of Windows components in the Control Panel, as well as during automatic system maintenance.
Windows Update itself automatically downloads and installs system updates thanks to the TiWorker process
In other words, this is one of the processes necessary for the operation of Windows Update, which installs all the latest updates on the PC. It is impossible to remove this process from the system, since due to its absence, system recovery may be necessary, but it is still allowed to disable it - this will not affect the operation of the computer.
Why TiWorker.exe can load the Windows 10 system
Basically, the load on the processor from TiWorker.exe is a natural phenomenon during a regular search for updates for Windows or their installation . In some cases, the load is noticeable when servicing the device. In this situation, the slowdown is temporary and should stop after all important system procedures are completed.
TiWorker can load the CPU during normal operation of the Update Center
Typically, excessive resource consumption over a long period (up to several hours) occurs due to a slow hard drive or in a situation where updates have not been checked or downloaded for a long time.
The load from this process may also have an anomalous constant character (from 70–80%) due to:
- Connecting incompatible devices or the presence of proprietary utilities in startup. For example, your PC may have older printer drivers or HP Support Assistant installed on it. After removing this kind of utilities, the load disappears.
- Programs to disable Windows spyware options. If you have previously installed such software, deactivate it for a while, update the system and enable it again if necessary.
- Errors occur in the Update Center. For example, some update may have been installed incorrectly, or the system may not be able to download updates due to a full cache—the update takes a long time to download.
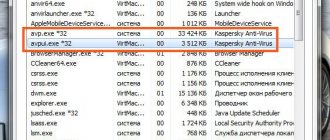
- Viruses in the system. The TiWorker process itself may also be malware.
Normal operation of TiWorker.exe may cause high CPU load
In most cases, the fact that TiWorker.exe loads the processor is the normal operation of the Windows Modules Installer. Typically, this happens when Windows 10 automatically or manually searches for updates or installs them. Sometimes - when servicing a computer or laptop.
In this case, it is usually enough just to wait until the module installer completes its work, which on slow laptops with slow hard drives, as well as in cases where updates have not been checked or downloaded for a long time, can take a long time (up to hours).
If you don’t want to wait, and you’re not sure that the above is the case, you should start with the following steps:
- Go to Settings (Win+I keys) - Update and Recovery - Windows Update.
- Check for updates and wait for them to download and install.
- Restart your computer to finish installing the updates.
And one more option, probably for the normal operation of TiWorker.exe, which I had to encounter several times: after the next turn on or reboot of the computer, you see a black screen (but not like in the article Black Screen Windows 10), using Ctrl+Alt+Del you can open the task manager and there you can see the Windows Modules Installer Worker process, which heavily loads the computer. In this case, it may seem that something is wrong with the computer: but in fact, after 10-20 minutes everything returns to normal, the desktop loads (and does not happen again). Apparently, this happens when the download and installation of updates was interrupted by restarting the computer.
Problems with Windows 10 Update
The next most common reason for the strange behavior of the TiWorker.exe process in the Windows 10 Task Manager is the incorrect operation of the Update Center.
Here you should try the following methods to fix the problem.
Automatic error correction
The built-in troubleshooting tools may be able to help resolve the issue by following these steps:
- Go to Control Panel - Troubleshoot and select "View all categories" on the left.
- Run the following fixes one by one: System Maintenance, Background Intelligent Transfer Service, Windows Update.
Once completed, try searching for and installing updates in Windows 10 settings, and after installing and restarting your computer, see if the problem with Windows Modules Installer Worker has been fixed.
Manually fixing Update Center problems
If the previous steps did not solve your TiWorker problem, try the following:
- Method for manually clearing the update cache (SoftwareDistribution folder) from the article Windows 10 updates are not downloaded.
- If the problem appeared after installing any antivirus or firewall, and possibly a program to disable the spyware features of Windows 10, this could also affect the ability to download and install updates. Try disabling them temporarily.
- Check and restore the integrity of system files by launching the command line as Administrator through the right-click menu on the “Start” button and entering the command dism /online /cleanup-image /restorehealth (more: Checking the integrity of Windows 10 system files).
- Perform a clean boot of Windows 10 (with third-party services and programs disabled) and check if searching for and installing updates in OS settings will work.
If everything is generally in order with your system, then one of the methods should have helped by now. However, if this does not happen, you can try alternative options.
How to solve the load problem due to the TiWorker.exe process
What specific steps can be taken to correct the situation of unnecessary burden from this process? Let's consider all possible solutions.
Reboot the system to speed up the update
First of all, it is recommended to check whether the system is currently downloading updates. If the update has already been downloaded, you can speed up the update process by restarting your computer:
- Press the Win + I combination on the keyboard to open the “Windows Settings” window. If it does not work, open this window through the Start menu - the gear icon located above the virtual power button.
From the Start menu, click the gear to open the Settings window.
- Among all the tiles, select “Update and Security”.
Select the Update & Security tile
- In the “Windows Update” tab, see if updates are currently being downloaded. If they are still loading, wait for it to finish. After this, we reboot the PC so that the system can install them (the process will take some time).
- If nothing is downloaded, click on the “Check for updates” button. If they are online, the system will start downloading. After this, we also restart the PC. After the update, look at the TiWorker process in the “Task Manager”. If the load is the same, other measures must be taken.
In Windows Update, click on the “Check for updates” button, and after downloading the package, restart your computer
Automatic error correction
Restarting the device may not help: the process continues to consume resources, and the download of updates itself takes a very long time and does not want to end. Most likely, this indicates that there was some kind of failure in the work of the Update Center for one reason or another. The easiest way out of this situation is to use the built-in Windows troubleshooting tool. Let's look at the step-by-step procedure for launching this tool:
- First, launch the “Control Panel”: simultaneously press the two keys Win and R and in the “Run” menu write the short command control. We perform it using the OK button in the window itself or Enter on the keyboard.
In the "Open" line, enter control to open the "Control Panel"
- On the panel, if necessary, set the value “Small icons” in the “View” drop-down menu in the upper right corner of the window. In the last column of the main list we find the “Troubleshooting” item and open it.
In the list, find the “Troubleshooting” section and open it with one click
- In the left column, click on the “View all categories” link.
Click on the "View all categories" link
- We are waiting for the system to find diagnostic packages.
Wait while the system finds all available diagnostic packages
- Now we will run three types of fixes in turn: “System Maintenance”, “Background Intelligent Transfer Service”, “Windows Update”.
Run the System Maintenance package first
- Launch “System Maintenance”, click “Next”. We are waiting for the system to finish checking for errors.
Click “Next” to run system diagnostics
- We are waiting for the problem search to complete.
Wait while the tool finds problems and fixes them
- The troubleshooter may prompt you to run the scan as an administrator. We agree - click on the appropriate link.
If you are prompted to run diagnostics as an administrator, agree and wait further.
- If any problems are detected, the tool will immediately try to solve them itself. Some fixes will be made automatically, but to fix serious problems, confirmation from the user will be required, for example, if the Update Center databases are damaged. In this case, click on the “Apply this fix” button - the system will remove, download and install the updates again.
Click on “Apply fix” so that the tool can solve the problem with the operation of the Windows component
- If no problems are found, a corresponding message will appear in the window. Click “Close” and move on to other diagnostic processes.
If no problems are found, the tool will notify you in a separate window.
- At the end of the diagnostic process, the system will provide you with a progress report with a list of problems that were successfully resolved.
Check out the list of fixed issues in the report list
- After this, if necessary, search for and install updates and reboot the device using the instructions from the previous section of this article.
Solving a problem with Windows Update manually
If the automatic tool did not detect any problems or could not fix them, you need to manually clear the update cache and check the system files for integrity.
Manually clearing the update cache
The update may be slow and difficult if the update cache is full. Cache files are stored in the SoftwareDistribution directory on the system drive. However, you cannot simply delete files from there. The cleaning procedure must be carried out simultaneously with the execution of certain codes in the Command Line console:
- Turn off the Internet: click on the corresponding icon on the “Taskbar” on the right and click on the Wi-Fi tile. If you have wired internet, you can simply disconnect from your network.
Turn off your Internet connection in the panel that opens via the tray icon
- In the “Search” panel (the icon in the form of a magnifying glass on the “Taskbar”), write the cmd code in the line, which corresponds to launching the command line.
In Windows Search, enter the command cmd or the query “Command Prompt”
- Right-click on the desired result and select “Run as administrator” from the context menu.
Run Command Prompt as Administrator
- Click “Yes” to confirm allowing Command Prompt to make changes on your computer.
Allow Command Prompt to make changes to your OS
- In the editor, on a dark background, we write two commands in turn: net stop wuauserv and net stop bits (after each, press Enter). If the first command does not work (a message appears stating that it was not possible to stop the service), restart the device and repeat the command.
Type the command net stop wuauserv and press Enter
- Now go to “Windows Explorer” through the “This PC” icon on the “Desktop”. Open the directory in it: C:\Windows\SoftwareDistribution.
Open the SoftwareDistribution folder on your system drive
- We delete the contents of the directory using the corresponding option in the context menu.
Use the context menu to remove files from the SoftwareDistribution directory
- Go to the “Command Line” again. This time we also enter the following codes one by one: net start bits and net start wuauserv.
- We close the console, connect to the network and try to download and install the update in Windows Update.
Video: how to clear the update cache yourself
Restoring the integrity of system files
Checking the system for damaged files is carried out in the “Command Line”. The sfc /scanow command is commonly used, but it may not detect and fix all file problems. For more efficient recovery we will use other codes:
- Launch the Command Prompt console with administrator rights (detailed instructions are in the previous section of this article).
- Enter the following commands one by one (after each press Enter on the keyboard):
- dism /Online /Cleanup-Image /CheckHealth - checks previously recorded values of Windows components;
Paste the code dism /Online /Cleanup-Image /CheckHealth into the Command Prompt and press Enter
- dism /Online /Cleanup-Image /ScanHealth - checks for damage to system files (will take some time);
Run the command dism /Online /Cleanup-Image /ScanHealth in the console
- dism /Online /Cleanup-Image /RestoreHealth - automatic restoration of damaged components, if any (can also take quite a long time).
- dism /Online /Cleanup-Image /CheckHealth - checks previously recorded values of Windows components;
- We are waiting for the restoration of system files to complete, if it turns out that they still exist. After that, install system updates in the center.
Video: how to restore system files in the Command Line
Clean Boot Windows
If all the previous methods fail, you can install updates in Windows clean boot mode (with third-party services and utilities deactivated). Please note that in this case you must work on the PC under an administrator account . If you have a regular profile, log in using an administrator account, or create one if you don't have one. After this, follow the instructions:
- Press the Win and R buttons simultaneously to bring up the Run panel on the display. In the input field, write the msconfig command and execute it using the OK button.
Paste or write your own msconfig code in the “Open” line
- In the “System Configuration” window in the first tab, click on the “Selective startup” value and uncheck the “Load startup items” checkbox. Click “Apply”.
In the "General" section, select "Selective startup" and remove
- In the “Services” section, check the box next to “Do not display Microsoft services”, and then click on the “Disable all” button. Click “Apply” again.
Using the appropriate button, disable all third-party services that are not Microsoft
- In the “Startup” block, launch “Task Manager”.
In the “Startup” tab, click on the “Open task manager” link
- In the manager window, we disable each of the items using the option in the context menu or the key located at the bottom of the window. We close all windows, reboot the system and try to install all updates in class=”aligncenter” width=”1366″ height=”768″[/img] Using the “Disable” button, deactivate the launch of third-party services in the “Task Manager”
- After successful installation of the update, we return to the usual Windows boot in the “System Configuration” window and observe the operation of the TiWorker.exe process.
Video: how to perform a clean boot in 10
Setting Low Priority
If the load from the TiWorker.exe process is temporary and is only a side effect of the regular operation of the Update Center, but you still want to somehow reduce it in order to work quietly on your PC without crashes and slowdowns, reduce the priority for this process:
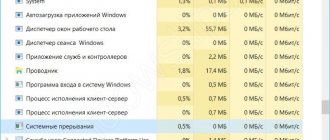
- Open the “Task Manager” window on the display using the keyboard shortcut Ctrl + Alt + Delete or through the “Taskbar” context menu.
In the context menu of the “Taskbar”, select “Task Manager” to launch its window
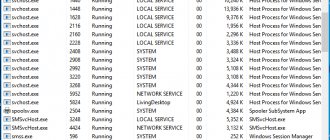
- Go to the Details tab. Find the TiWorker process in the large list. For easier searching, you can click on the “Name” column header so that all processes are ordered alphabetically.
- Right-click on the process and in the short list, move the arrow to “Set priority”. In the additional list, select “Low” or “Below Average”.
Select Low or Below Average from the Set Priority menu
Disabling the TiWorker.exe process
If none of the above methods worked, you need to take a drastic measure - disable the TiWorker.exe process. In this case, you deactivate automatic system updates - you will have to constantly update the “OS” manually. Most often, this situation occurs on old and weak laptops that cannot quickly update. To disable a process, follow these steps:
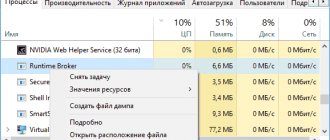
- Open the “Task Manager”, find the Windows Modules Installer Worker process there and remove the task from it using the special button (“End task” or End Task) located at the bottom of the window.
Click on the “End Task” button to end the process at the moment
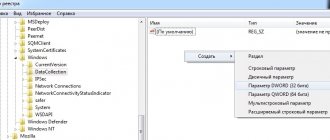
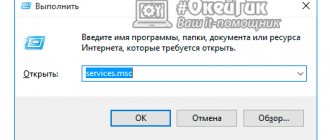
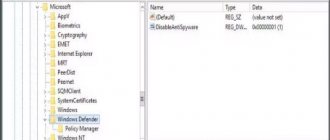
- Now you need to make sure that the process does not start again every time you turn on the PC. To do this, launch the “Run” panel on the display again. In the line we write and execute the command services.msc.
- In the long list of services we find “Windows Module Installer”. The item will be the penultimate one, so let’s immediately scroll down the list.
- Double-click on this service or right-click on it and click on the “Properties” option in the context menu.
In the context menu of the “Windows Modules Installer” item, select “Properties”
- In the “Startup Type” block, set the value to “Disabled” or “Manual”.
Set the startup type to “Manual” or “Disabled” in the drop-down menu
- To save everything, click “Apply” and then OK.
How to disable TiWorker.exe
The last thing I can suggest in terms of solving the problem is to disable TiWorker.exe in Windows 10. To do this, follow these steps:
- In Task Manager, clear the Windows Modules Installer Worker task
- Press Win+R keys on your keyboard and type services.msc
- In the list of services, find “Windows Module Installer” and double-click on it.
- Stop the service and set the startup type to “Disabled”.
After this, the process will not start. Another option for the same method is to disable the Windows Update service, but in this case, the ability to install updates manually will disappear (as described in the mentioned article about Windows 10 updates not downloading).