If you're a gamer (or just a PC user) with an NVIDIA graphics card, then NVIDIA drivers are probably cluttering up gigabytes of memory on your hard drive. NVIDIA leaves old installer files stuck on your hard drive. Until you get tired of it and delete them manually. If you decide, of course, that you need it.
As someone who has been using NVIDIA graphics hardware for many years, this has gotten pretty boring for me over this long period of time. I've seen these files use over 4GB of space, and although that may not seem like a lot of space to some. But they take up a lot of unnecessary space on small SSD drives. And you'll probably only notice this if you use a disk space analysis tool.
Where are these files stored?
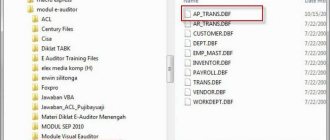
Currently, NVIDIA stores these graphics driver installation files in C:\ProgramData\NVIDIA Corporation\Downloader. The ProgramData directory is hidden by default, so you'll need to either view hidden files or enter C:\ProgramData into your file manager's prompt to go there.
To see how much space these files are using on your PC, open the NVIDIA Corporation directory here, right-click the Downloader folder and select Properties.
In the screenshot below, these files only use 1.4GB of space on our test system. However, this is only because we cleared these files a few months ago. This folder weighed much more in the past.
Previous versions of NVIDIA software stored these driver installation files in the C:\Program Files\NVIDIA Corporation\Installer2 folder, C:\ProgramData\NVIDIA Corporation\NetService, and only in the C:\NVIDIA folder. If you haven't reinstalled Windows or deleted these files after some time, they may still be saved in these folders. We are not sure if NVIDIA software removed them.
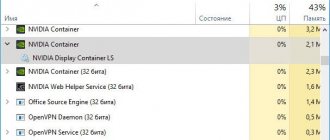
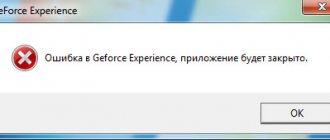
GeForce Experience Update
NVIDIA Share also stops responding as a result of a damaged graphics driver or when it is very outdated. Therefore, try to completely remove your current drivers. To do this, we use the Display Driver Uninstaller utility. Then download the latest version of GFE from the NVIDIA website and install it on your computer.
Once you download and install the Display Driver Uninstaller (DDU) utility from the official source, you need to restart your computer in Safe Mode.
Then run the utility, select the GPU and click on the “Remove and Reboot” button. The application will remove installed drivers and restart the PC.
Now install the latest version of GeForce Experience. Then open the program and go to the “Drivers” tab. Here, update your drivers by following the on-screen instructions.
Once the latest graphics driver is installed, restart your PC and check if the problem is resolved.
What are these files?
If you open the Downloader folder, you will see several folders with random names. Double-click one of these folders and you'll see exactly what's inside: an NVIDIA driver update in .exe form.
Basically, whenever the NVIDIA GeForce Experience software downloads a driver update, a complete copy of that update's installer is stored here. Even after successful driver installation, the installers remain here.
The "latest" folder stores an uncompressed copy of the latest driver update. This is only necessary during driver installation. And it may only be needed if you need to reinstall the latest driver.
What to do if NVIDIA Share is not working or responding on your Windows 10 PC
If the first two options above didn't work, you can try disabling NVIDIA Share. If you haven't made any changes to the driver, chances are your driver is missing data or there are some problems installing your drivers. To find out if you need to first check if you actually have NVIDIA drivers installed. Once confirmed, you can disable the NVIDIA Share feature. Just refer to the below steps to do so.
- Search for NVIDIA GeForce Experience in the search box, and then click the corresponding result to open it.
- Once you open NVIDIA GeForce Experience, go to the General tab.
- Then scroll down to the NVIDIA Sharing section and select the toggle to disable this feature.
- Now restart your computer and try to check if there are any updates for your NVIDIA graphics card and install them again if there are any.
You can also try using a program that is known to fix not only the NVIDIA sharing feature issue but also other issues in Windows 10. This program called Restoro is often cited as a one-click solution as it solves tons of system issues with one click. This program is a useful tool that can repair damaged registries and optimize the overall performance of your PC. Apart from this, it also cleans your computer of any unwanted or corrupted files which will help you remove any unwanted files from your system. It's basically a solution that's at your fingertips with just one click. It is easy to use and convenient to use. For a complete set of download and usage instructions, please refer to the steps below.
Perform a full system scan with Restoro. To do this, follow the instructions below.
- Turn on your computer. If it is already enabled, you must reboot
- After this, the BIOS screen will appear, but if Windows appears instead, restart your computer and try again. Once you are on the BIOS screen, press F8 , thereby the Advanced option appears.
- To navigate the Advanced option, use the arrow keys and select Secure Network-enabled mode then press
- Windows will now boot into Safe Mode with Networking.
- Press and hold both the R key and the Windows key.
- If everything is done correctly, the Windows Startup window will appear
- Enter the URL in the Run dialog box, and then press Enter or OK.
- After that it will download the program. Wait until the download completes and open the launcher to install the program.
- Once the installation process is complete, launch Restoro to perform a full system scan.
- Once the scan is complete, click the “ Fix, Clean & Optimize Now ” button .
Why is NVIDIA stockpiling them?
We reached out to NVIDIA to ask why GeForce Experience stores copies of all these installers in such a folder, but NVIDIA did not respond.
However, we can imagine what they are intended for. If there is a problem updating your driver, you can go to this folder to reinstall the previous driver update. They're all here and ready to go, so you can easily go back to your previous driver without major downloads.
This is all well and good, but how often do users really need to reinstall these drivers? And wouldn't it be better to keep one or two of the latest "good" drivers rather than keeping 4GB of drivers returning many versions? After all, even if a user needs to revert to an old driver, they can always download the old version from the NVIDIA website. There is no need to waste 4 GB of hard drive space “just in case.”
This matters even less when you consider that the NVIDIA GeForce Experience software doesn't make it easy to revert to a different driver version. They don't even tell users that these installers exist. It's unlikely that anyone will ever find and run them, so why keep them? If these files have to be held back, GeForce Experience should offer a way to manage them so that users don't have to go into the ProgramData folder to free up space.
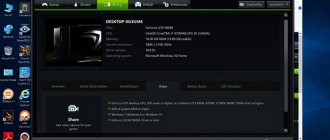
Possibilities
Recording gameplay is not a new phenomenon, but quite often users encounter problems. With hardware recording, you need to spend a lot on a screen capture card, and in the software case, be content with terrible quality and reduced frame rates. NVIDIA created Shadow Play to make gamers and streamers forget about these moments forever.
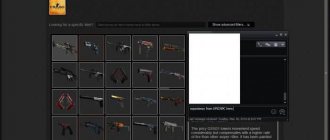
The program works with GeForce 650, 750, 960 video cards, as well as newer versions of software for laptops. In the settings of the GeForce Experience program, you can find the “Shadow Play” option and enable it. Shadow Play doesn't just record videos: you can choose the maximum parameters for high-quality output video. In the program menu you will find the following settings:
- selection of video quality (HD, FullHD, 2K and 4K);
- sound recording (sound from the game, sound from the game + microphone);
- game recording (from the very beginning or from a selected period, last 5 minutes);
- video display (gameplay, gameplay + display from the webcam at the bottom of the screen).
Regarding the last option, it has been relevant for a long time in the field of streamers on the Twitch and YouTube platforms. If previously this required complex utilities with many settings and processes, in NVIDIA Shadow Play it is available in a few mouse clicks. Also, you can easily record your desktop. This means that the program is not just for games. This function is perfect for creating guides for complex software.
This program has several analogues: Fraps and Bandicam. In almost all respects, Shadow Play is ahead of its competitors, and its main advantage is the volume of video output. While other programs take up more than 900 megabytes, NVIDIA's software uses a highly compressed codec.
Features of the program:
- Instant recording, replay.
- Broadcast of gameplay.
- Recording key points.
- Creation of GIF animations.
- Creating 4K screenshots.
How to remove them?
While the default Windows permissions won't allow you to delete the entire Downloader folder, we found that you can simply open the Downloader folder and delete the "last" folder and other randomly named folders. Leave the "config" folder and the "status.json" file.
This will free up space used by NVIDIA installer files on your system. However, when GeForce Experience downloads new driver files and installs them, those new driver files will be stored here until you delete them.
CCleaner can also automatically erase these NVIDIA installer files. Useless installers that greedily consume disk space without giving users control are a big reason why so many Windows users end up with tools like CCleaner. If software developers had behaved better, many users would not have suffered from the CCleaner hack.
Translation of the article: “Why Does NVIDIA Store Gigabytes of Installer Files On Your Hard Drive?”
How to Record with GeForce Experience
Record game only
In Settings drag the In-Game Overlay to the Enabled . Now you can record gameplay, take screenshots and photos in all games.
In-game, press Alt+Z to share your gameplay or adjust its settings. Select Recording > Start (or use the hotkey Alt+F9 ).
In any case, it is recommended to go to the settings and select the video quality for yourself. The higher their quality, the more disk space they occupy. Specify the desired Quality , your Resolution , the desired Frame Rate and the appropriate Bit Rate .
Save the best moments
To enable background recording, press Alt+Z and turn on Instant Replay . You can press the combination Alt+Shift+F10 . In the settings, see the size of the outgoing file.
Now you can save the best moment of your games at any time. This may affect the overall quality of the gameplay. The selected period of time is stored in memory. To save it you need to press Save or Alt+F10 . By default, 5 minutes of game play are saved.
Record desktop
With GeForce Experience, you can record both your gameplay and your entire desktop. For example, Game Mode only allows you to record video directly from a game on Windows 10.
You can simply try to record your desktop by clicking Record and confirming the action by selecting Yes . Everything will now record everything that happens on the desktop. And transitions from the desktop to the game.
You can cancel the action by opening the game overlay ( Share or Alt+Z ) and going to Settings> Privacy Settings . Drag the Desktop Recording to the Disabled .
What is NVIDIA Freestyle
NVIDIA lets you personalize your gaming experience with Freestyle game filters. You can change the look and feel of your game by adjusting color, saturation, or using post-processing filters.
The user has 15 filters, 38 different settings and many possible combinations in his hands. This allows you to create a truly unique type of gameplay. The Freestyle feature is integrated at the driver level for better compatibility.
| Minimum requirements: | Computers (Desktop graphics) | Laptops (Mobile graphics) |
| GPU | not lower than GTX 700 series | GTX 850M, 950M series and above |
| operating system | Windows 7, Windows 8 or Windows 10 | |
| Graphics driver | GeForce version 430.64 or later | |
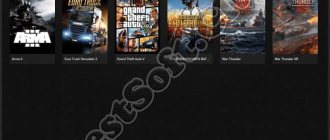
Check the official list to see if Freestyle filters are supported in your game. Don't be upset if your game is not on the supported list. The NVIDIA team is collaborating more and more with game developers.
What do you need to use NVIDIA ShadowPlay?
First of all, we must have a graphics card that is compatible with the Shadowplay feature. This option is only available on GeForce GTX 600, 700 and 900 graphics cards or for laptops - on 600M, 700M, 800M and 900M models.
The next step is to make sure we have the GeForce Experience software installed. It is part of the GeForce GameReady , so it should be installed by default on our system. We can search for GeForce Experience in the Start menu. However, if we don't have it, we can download it separately.
Download GeForce Experience