3 Best Sites to Download Virtual Disk Images for VirtualBox
A virtual machine allows you to emulate another operating system without leaving the working one. Be it Windows, macOS, Linux or anything else. This can be useful for testing software, downloading old games, or analyzing for malware. But instead of downloading operating system images and installing them, you can download pre-built virtual machine images to save time. So, here are three sites from which you can download virtual disk images for VirtualBox.
What is a virtual disk image?
A virtual disk image (VDI) is an image of a VirtualBox . You can download the VDI, load it into VirtualBox (or another virtual machine tool), and load the finished operating system. This allows users to save time on downloading and installing the operating system in VirtualBox, as well as configuring it.
VDI is a virtual disk image container for VirtualBox. However, VirtualBox virtual disk images are not the only type of virtual machine disk image. You may also encounter:
- VMDK: VMDK was once a VMware virtual disk image container, but is now an open standard that can be used by virtually all virtual machine applications.
- VHD: VHD is a virtual disk image container from Microsoft.
- HDD: No, this is not your hard drive. HDD is a disk image format created using Parallels, a virtual machine application running the MacOS operating system.
Okay, now let's move on to the three VDI download sites.
How to install Windows 10
In the main VirtualBox window, click “Create”.
Assign a name to the virtual machine “Windows XP”
choose:
Type: "Microsoft Windows".
Version: "Windows XP (32-bit)".
and click “Next”
If you have at least 6 GB of RAM on your laptop, then I advise you to allocate 1 GB (1024 MB) of RAM to the virtual machine.
"Next"
Oh and click on the explorer button on the right.
In the explorer that opens, find the VHD virtual disk file on the portable USB hard drive, select it with the left mouse and click “Open”.
"Create"
The Windows XP virtual machine has been created, launch it, double-click on it with the left mouse.
But Windows XP most likely won’t boot and here’s why. If only Windows XP was installed on the old computer, then the system boot code is NTLDR, but when creating a VHD, the Disk2vhd program installs a different boot code - BOOTMGR, which means an XP boot error is inevitable. That is, when loading Win XP you will get a black screen.
Note: Some possible solutions to problems that may occur when starting a Windows XP virtual machine from a VHD virtual disk file are described at the end of the article.
There are two ways to restore booting of Windows XP, the first is using the P2V Settings Wizard of the Paragon Hard Disk Manager 15 Professional program (you can follow the link and read it), the second is using the original installation ISO image or Windows XP disk (details later in article).
In the main VirtualBox window, select our “Windows XP” virtual machine and click “Configure”
System Tab
Changing the loading order:
1. Optical disk.
2. Hard drive.
"OK".
Media Tab
The first media is a VHD virtual disk that acts as a hard drive.
The second media needs to be selected; it will be an ISO image of Windows XP.
Select the empty field with the left mouse and click on the disk drive icon.
"Select optical disk image"
In the explorer that opens, find the ISO image of Windows XP, select it with the left mouse and click “Open”.
The virtual machine is configured.
"OK".
Restoring the Windows XP bootloader
Let's start the virtual machine.
We press any key on the keyboard, the virtual machine boots from the ISO image of Windows XP.
"Welcome to the installer."
We will restore the system boot using the recovery console, so select “To restore Windows XP using the recovery console, press (R)”
Press (R).
Note: If you have a non-original image of Windows XP, but a pirated assembly, then this option to restore Win XP using the recovery console may not be available and you will immediately be taken to the window for a new installation of the operating system, so it is very important to always use original Windows XP images from Microsoft.
The Recovery Console opens.
1: C:\WINDOWS
To the question
— Which copy of Windows should I sign in to?
Type 1, press Enter. A message appears:
Enter the administrator password:
Enter the password, press Enter, if there is no password, just press Enter.
Enter fixmbr
— A message appears: **WARNING** There is a non-standard or invalid master boot record on this computer...
Enter y (which means Yes).
— A message appears: A new master boot record is being created on the physical disk \Device\Harddisk0\Partition0...
Type fixboot
— A message will appear: Destination partition: C:. Do you want to write a new boot sector to the C: partition?
Enter y (which means Yes).
— A message will appear: File system on boot partition: NTFS. The FIXBOOT command writes a new boot sector. The new boot sector was successfully written.
Enter exit, the PC will restart.
After these recovery steps, Windows XP should boot, but in some cases this does not happen and we again get a black screen when loading XP.
This means we boot again from the ISO image of Windows XP and select “To begin installing Windows XP, press enter”, press Enter on the keyboard.
Accept the license agreement and press F8.
Select "To try to restore a selected copy of Windows XP, press (R)"
The Windows XP update process begins, your files and programs will not be affected, damaged system files and the operating system loader will be restored
.
Initializing the Windows XP configuration.
Keep up with the times.
Further
Enter the key and click Next.
Windows XP is loading.
For more stable operation of the virtual machine and expanding its capabilities, be sure to install “Guest OS Add-ons”, after which the virtual machine will work much more stable and you will have new features, for example, creating shared folders, adjusting the size of the guest OS screen and others.
For ease of use, you can switch to “Full screen mode”.
And then it will be impossible to understand what you have installed, Windows XP or Windows 10!
What errors may occur during operation?
Friends, at the end of the article there are some tips.
If, after transferring Windows XP to a virtual machine, you cannot boot, use only the original Win XP ISO images for recovery.
If you have a VHD file on a portable USB hard drive, then in some cases the virtual machine may not accept it and an error will appear; in this case, copy it directly to the laptop’s hard drive.
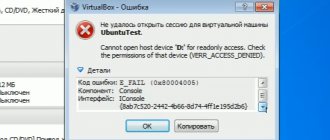
If, when loading, the virtual machine displays a blue screen with the error: STOP 0×0000007B, then this indicates a problem with the virtual disk or incorrect VirtualBox settings in the “Media” tab.
In the "Media" tab, the controller must be IDE, since Windows XP does not know SATA.
If the controller is SATA, then when loading Windows XP it will go to a blue screen.
Friends, read our next article on this topic: “Transferring Windows XP to a VirtualBox virtual machine using Paragon Hard Disk Manager 15 Professional.”
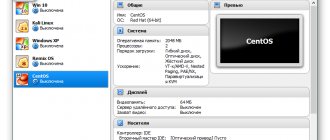
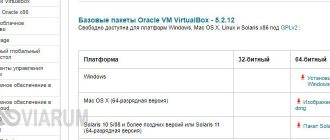
OS Boxes
OS Boxes is a user-friendly site containing almost 60 different virtual disk images. VDI includes the most popular Linux distributions, as well as several little-known ones. The service offers relatively modern versions of Linux operating systems, which is one of the best features of OS Boxes.
First settings in installing Windows 7 in Virtualbox. Part No. 1
In the last article about Virtualbox, we talked about how to install Virtualbox and what it is. Now we will talk about how to install Windows 7 in Virtualbox. If you have not installed any systems yet, then you need to set where exactly the created systems will be stored (on drive C: or D:, in general, set before installing Winows 7 and Vitualbox the place where more space and all that) First, create some folder on some drive (for example, the Virtualbox folder on drive D)
Installing Windows 7 or Windows 7 64 bit in Virtualbox
To do this, open our Virtualbox and go to Settings and specify your path in Folder for machines (For example D:Virtualbox) and click OK
Installing Windows 7 or Windows 7 64 bit in Virtualbox Installing Windows 7 or Windows 7 64 bit in Virtualbox Installing Windows 7 or Windows 7 64 bit in Virtualbox
Now we need a new car, select the type and design it and click Next. We indicate (for Win Xp: min 256 rivers: 1024, for Win 7 min: 512 rivers 1024-2048 for Win8 min: 512 rivers 1024-2048) -> Next. Now click and click create. Type: You can specify VDI and click Next. If you need more space on the disk and the speed of the virtual machine is not so important, then select , if you don’t care how much space is occupied but the speed is important, select Fixed size (Fixed - it doesn’t matter how much is occupied on the operating system in Virtualbox, you will always be occupied by the number of gigabytes specified in the next step. Dynamic - this means that as the operating system installed in Virtualbox fills up, the occupied space on the disk that you specified also changes) In general, determine the option that is convenient for you and click Next. Now specify the operating system on Vitualbox and click Next (For Xp min: 2gb, rec: 10gb, for 7-8 min: 10gb rec: 20-40gb) and wait 5-20 minutes. After creation, the Virtualbox menu window with Windows 7 will open. Now we need to select the Windows 7 iso image (or another for other systems) in our system settings. By this action we will indicate that the system will boot from ISO and without it we will not be able to install Windows 7 in Virtualbox . To do this, go to , select Media, click where IDE Controller on the green plus sign and select the ISO image with Windows 7 (this way we said that you should start loading not from an empty hard drive, but from an ISO image). After this, you can begin installing Windows 7 in Virtualbox . By the way, many people ask me about Windows 7 images. Below is a link to a tracker with Windows 7 PRO 732+764! I highly recommend it because it came out very high quality (more) and effective (there is really high-quality information there) So don’t waste time and be sure to subscribe Download Win7 SP1 x86-x64 [13in1] MD5: B3A5E4306D0FB85A40C0543C7026D1A6
Virtual Disk Images
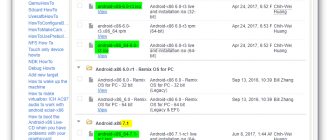
Virtual Disk Images offers a different selection from the previous two VDI sites. Instead of Linux distributions, Virtual Disk Images gives you the choice of Windows. For example, you can download Windows 98, Windows NT 4.0, and Windows ME, to name a few. But you won't find VDI for Windows 10 here.
A second computer is real
Virtual machine is software. With its help, a copy of a real computer is created with:
- hard virtual disks;
- optical software drive;
- analogue of network adapters;
- BIOS, etc.
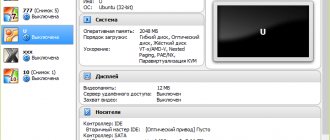
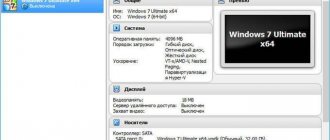
A virtual laptop with its own operating system runs in a separate window and occupies a certain amount of space on the physical hard drive. It looks like this:
The example shows how in a real operating system with Windows 7 Professional installed, the program runs with the virtual Windows XP operating system. And it performs the same actions as on a real device.
How to install VDI in VirtualBox
Not sure what to do with your virtual disk image now that you have one? Here's a quick guide to installing VDI in VirtualBox.
- In VirtualBox, select New.
- Enter a Name, then change the Type and Version to match the VDI you want to use.
- Select Use a existing virtual hard disk file, and then navigate to the location of the virtual disk image that you want to use. Select Create.
- Right click on the newly created VDI in VirtualBox Manager. Change VDI settings to suit your system.
- Double-click VDI and boot into the pre-installed operating system.
Thanks for reading! Subscribe to my channel on Telegram and Yandex.Zen . Only there are the latest blog updates and news from the world of information technology.
Also, read me on social networks: Facebook , Twitter , VK , OK .
How to transfer Windows 7 installed on your computer to a VirtualBox virtual machine
It’s been a while since I wrote articles related to a virtual machine, I’d like to fix that. This article will be of interest to anyone who has ever worked with the Virtualbox program because a very interesting topic is being discussed, on transferring the Windows 7 operating system installed on a computer to a virtual machine, with all installed programs and files.
Let's get started. I’ll say right away that I have two operating systems installed on my computer, Windows 7 with which we will work and Windows 10 on which the virtualbox program is installed, into which we will transfer our virtual image.
To create a virtual disk image, we need a small utility called Disk2vhd, you can download it from the link https://technet.microsoft.com/ru-ru/sysinternals/ee656415. After launching, uncheck the use vhdx item, in the volume to include window, select the disk on which the operating system is installed, then click on the browse button.
In the explorer that opens, select the local disk where our virtual image will be saved. It is advisable that the disk have at least 100 GB of free space, but it can be less depending on the size of your local disk. And so we have decided where we will save the created image, all that remains is to enter the name and click save.
As you can see the path is registered, click create.
We wait about 30 minutes for our virtual image to be created.
After finishing, we will see a success message, now you can close the program.
We go to the folder where we planned to save the image to make sure that it was created.
Now I switch to another system, which is also located on my computer. You can, of course, switch to another computer, you just need a portable hard drive to transfer the created image. If virtualbox is not yet installed on your computer, then follow the link https://www.virtualbox.org/wiki/Downloads and download this software product.
Open the program and click create.
In the window that opens, write the name of the system, select the version, in my case it is 64-bit. Next, we indicate the amount of RAM that our virtual machine will use. And in the hard disk section, select to use an existing virtual hard disk, where we click on the browse button.
Find the created virtual image in Explorer and click open.
And create.
Now you can try to launch it, select the created item and launch it.
The error fatal: int18: boot failure appeared, which indicates that the bootloader responsible for starting the system was not detected.
To fix this problem, go to settings.
Select the system item, where the boot order is in the window, put the optical disk in first place.
Next, go to the media tab, where we need an iso image of Windows 7 to restore the bootloader. In the storage media window, click on the empty tab and click on the disk icon in the attributes window, click on the item select an optical disk image.
Find this image on your computer and click open.
As we see everything is in place, Ok.
Let's run it on our machine.
We booted from the image and in the initial window press the key combination shift+f10 to call the command line, with which we need to work a little.
So we need to enter some commands.
To get started, enter the command diskpart
then list vol to display all hard drive partitions.
We see that we are missing the hidden System Reserved section, which is directly responsible for the successful boot of the system. So let's create it.
We enter the command select vol 1, thereby selecting the main volume on which our system is located.
shrink desired=100 — shrink the disk volume to 100 mb
create par prim - create a section
format fs=ntfs - format to the NTFS file system
activ - mark as active
assign letter V - assign drive letter V
exit - shut down diskpart
Enter the command bcdboot c:\windows, thereby creating boot files on the hidden partition. And you can restart the virtual machine.
If at startup the so-called blue screen of death appears, with error 0x0000007B, then read the article further.
To eliminate it, again go to settings -> media -> right-click on the SATA controller and delete it.
Now click on the green plus sign and add an IDE controller.
We attach our virtual image to it.
OK.
Let's launch and rejoice
Leave your opinion about this article, and of course, ask your questions if something suddenly went wrong for you.
Thank you for your attention!
Articles recommended for reading:
- Error VirtualBox - This operating system user the Physical Address Extension feature to support systems with more than 4GB of RAM. (13017)
- Error in VirtualBox. Hardware acceleration (VT-x AMD-V) is not available on your system. What to do? (66874)
- Increase VirtualBox disk size (23746)
- Hyper-V Virtual Machine (14069)
- We boot the virtual machine from a flash drive using the Virtual Machine USB Boot program (12119)
- How to transfer Windows 7 installed on your computer to a VirtualBox virtual machine (20987)
- How to mount a shared folder in VirtualBox (11973)
Would you like to thank the author? Share a link to the article!
Respect for the post! Thanks for the work!
Want more posts? Find out technology news? Read reviews of gadgets? For all this, as well as for promoting the site, purchasing a new design and paying for hosting, I need help from you, loyal and grateful readers. Read more about donations on the special page .
It is possible to become a patron to support the blog with a monthly donation, or use Yandex.Money , WebMoney , QIWI or PayPal :
Thank you in advance! All funds raised will be used for the development of the site. Project support is a gift to the site owner.
Setting up a virtual machine
Before setting up, prepare a disk with Windows XP or an iso image with it, and then select the created virtual machine in the VirtualBox window and click on the Properties :
Let's start with the Basic . If desired, you can place the virtual machine menu at the top. This is more convenient:
Go to the System :
Here you can change the amount of RAM that is allocated to the virtual machine, change the boot order of virtual devices, enable or disable the IO-APIC option (needed if you plan to use several processor cores for the virtual machine), and also enable or disable EFI (needed for some OSes, for example MacOS). Go to the Processor :
Here you can specify how many processor cores the virtual machine can use, and also enable or disable PAE/NX (some operating systems support PAE. This mode allows a 32-bit virtual system to use up to 64 GB of RAM). Go to the Acceleration :
On this tab you can enable or disable hardware virtualization. If you are going to install a 64-bit operating system, you need to enable it, and you also need support for virtualization on the laptop. If your laptop does not support this function, then it does not matter. To run 32-bit operating systems on a virtual machine, hardware virtualization is not needed.
Go to the Display tab:
VirtualBox supports 2D and 3D acceleration (OpenGL / DirectX8 / DirectX9). It's worth turning it on. Go to the Network :
When installing VirtualBox, another network card appeared in the system, which is virtually connected to the network card of our virtual machine. We configure the virtual network adapter as shown in the figure above and go to the USB :
At the beginning of the article it was said that using virtualization you can get around the problem of incompatibility of drivers for USB devices with new operating systems. So, VirtualBox allows you to redirect so that any USB device that connects to your computer or laptop connects not to the main operating system, but to the system that runs on the virtual machine. Then on Windows XP, in a virtual machine, drivers are installed on the new USB device and it fully works under Windows XP. The main system will not see that device . Since there are many USB devices in the system, so that when the virtual machine is turned on, they do not all disconnect from the main one and do not connect to the virtual one, a filter system was invented. Filters indicate which USB devices should be disconnected from the main operating system and connected to Windows XP on the virtual one when it is turned on .
To add a new filter, click on the plus sign icon and select the desired USB device from the list. After that it appears in the list. Go to the Public Folders :
Since there is no point in using Windows XP on a virtual machine without the ability to work with files on the main one, you need to organize shared access to certain folders on the hard drive. To do this, click on the plus sign and select the folder on the hard drive of your computer or laptop with which Windows XP will work in a virtual machine:
Enter its name and click OK . Here she is on the list:
Now there is still one last very small touch left. We need to somehow install Windows XP. Go to the Media :
We have two options: install Windows XP from an .iso image or from a regular disk. In the first case, click on the arrow icon and click on the Add :
We indicate where the Windows XP image is located and add it to the list:
Click on the image with Windows XP and click on the Select .
If you just have a disk with Windows XP, then put it in the drive and select your drive from the list:
Click OK . Now you can proceed to installing Windows XP .
In this article we will look at how to install an operating system on a VirtualBox
. This can be useful for testing various programs in an isolated environment so that the work or testing of the application does not affect the main system. And also VirtualBox can be useful if you need another computer (server) on the local network, then you can use the existing hardware by running a “virtual workspace” on it.
Using this example, we will look at installing Windows 10 on VirtualBox, but you can use this example to install any other Windows, Linux, or even Mac operating system. The order of settings does not change, you only need the distribution you need.
1)
The first thing we need to do is download the VirtualBox application itself.
download VirtualBox
from the official website.
You will also need the distribution kit of the operating system you need; you can download Windows distribution kits from our website; our catalog contains all popular versions of distribution kits. You can download them on the next page.
2)
After downloading, install the VirtualBox application and launch it. You will see a similar start window. In order to create a new virtual operating system, you need to click the “Create” button.
And also, if you automatically launched the English interface in the program, then you can change it to Russian, or any other, through the File => Preferences menu.
3)
Next, you will see the following window, in which you need to specify the name of your virtual OS; in the example, we will install Windows 10. The folder where the virtual OS file will be created is initially set by default, but if you wish, you can select any other directory.
The selection of “Type” and “Version” is determined automatically by the name of the virtual machine. But you can select any other OS from the drop-down menu, including Linux and Mac.
You select the amount of RAM depending on the actual hardware you have on your computer; everything marked with a green bar is generally acceptable for correct operation.
In the “Hard disk” item, select “Create a new one”, because in this example we are installing a virtual operating system from scratch.
As an example, you can also choose an OS from the Linux family.
4)
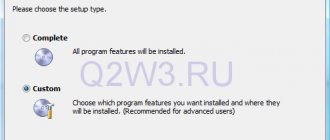
Next, you will see a window for partitioning your hard drive. This item needs to be configured depending on your needs, what you will do on a virtual system. In the example, we will indicate 50GB - this is quite enough for the system itself with a reserve of more than 10GB.
You can leave the type as VDI, but it’s better to make the storage format dynamic, because if you don’t have enough space after the initial layout, the virtual disk will automatically grow. After completing the settings, click the “Create” button.
5)
In the next step, you will need to select the operating system distribution on your hard drive, which you downloaded in advance.
After selecting the distribution and clicking on the “Continue” button, your installation may not start automatically. To begin the installation, you may need to close the new OS installation window and start the created virtual machine again.
6)
Next, the installation of the operating system itself will begin. The installation will be no different from installation on real hardware.
7)
That's all. You can turn off and on your virtual operating system from the VirtualBox main menu by selecting the appropriate OS in the list. You can install various operating systems in unlimited quantities, all of them will be displayed on the left side of the window in a list, you can run them either separately or all together in parallel.
And also, if you install Windows and plan to use them for a long time, then the virtual system must be activated in the same way as a regular one
. To do this, you need a license activation key; you can purchase activation keys for various versions of Windows in our online store at the lowest prices. Many payment options, instant delivery of the key to your email automatically. Warranty and free 24/7 technical support. More details in our catalog on the next page.
VirtualBox Guest Additions
VirtualBox Guest Additions is a software package that is installed into the guest operating system and expands its ability to interact with the virtualization system and the host system. For example, after installing a special “virtual video card” driver, it becomes possible to change the desktop resolution of the guest OS in an arbitrary manner following the size of the VirtualBox window in which the virtual machine is running.
The add-on package contains proprietary components and is distributed under a proprietary PUEL license (free for personal use or evaluation only):
- RDP server - allows you to connect to a virtual system remotely using any RDP compatible client;
- USB support - allows you to transfer USB devices to the virtual machine;
- Intel PXE boot ROM - booting the operating system over the network. Used to create thin clients/diskless workstations.
·