Starting a computer involves checking the BIOS of all equipment, and if the self-test is successful, loading Windows. The system boots thanks to the bootloader, in which special data is recorded for this purpose. This data can be damaged at any time and an error like disk read error occurred and others will appear. If you see a similar error on the screen, or something similar, but the fact is that Windows does not boot, you need to restore the Windows 7 bootloader. By the way, I wrote about restoring the boot record for other systems in the following articles:
- We restore the Windows 10 bootloader
- How to restore bootloader in Windows 8
Now let's get down to business.
Method 1: Using the standard menu
If you don’t know how to restore the bootloader, you can try going into safe mode. It may not be necessary to restore the bootloader at all, and the system does not boot due to other reasons, so this needs to be checked.
NOTE! If the safe mode window does not appear, or something went wrong, proceed to the next method.
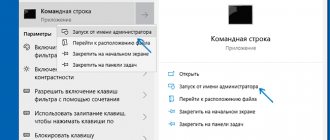
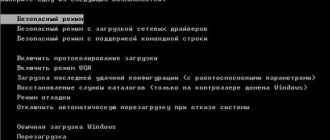
When loading, hold down the “F8” button on your keyboard. After this you should see a menu like this. First, click on the first item, which will try to restore the OS boot. If nothing works, then click “Safe Mode”.
If you managed to launch “Safe Mode”, do the following:
- Click Start and go to Control Panel.
- Find the "Recovery" section.
- Click on the “Start System Restore” button.
- The service will start, at one of the steps you will need to select a restore point - look by date. You can also check the box to see other points. It is best to choose the point with the earliest date.
At the very end, the system will reboot once and try to restore the system files for that period. Recovery will only take place on the system disk. If this method does not work, then most likely there is a problem in the MBR boot file. Don't worry - we'll restore it now.
Restoring the boot environment using bcdboot.exe
The second option involves using the “BCDboot” utility, with which you can restore a damaged system partition and/or return the transferred Windows bootloader to its place.
The first steps are similar to the first method - you need to open the command line console, then:
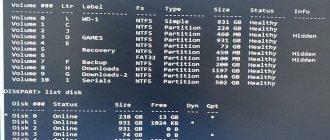
- Using the “diskpart” and “list volume” commands, determine the letter and number of the system partition on which the operating system files are stored. Please note that this information may differ from that presented during actual operation of the system.
- After the system partition has been identified, run the command “bcdboot.exe C:\windows”, where “C” is the number of your system partition.
Once the command completes, restart your computer again and check that the boot loader is working.
Method 2: Through a bootable USB flash drive or disk
You can restore Windows boot using an installation disk or flash drive. Instructions for creating a flash drive or disk can be found here. To restore booting, you will need bootable media with any version of Windows 7, but it is better, of course, to install exactly the version that you have.
After creating the flash drive, insert it into your computer or laptop and reboot (or turn on the device). As soon as the BIOS menu starts to appear, you need to select BOOT MENU (Boot Menu) - the keys most often used for this are F11, F12, F8, etc. After that, select your flash drive or CD/DVD as the boot.
ADVICE! See the hint on the main screen; to “freeze” the initial screen, click on the “Pause” button.
As soon as you get to the installer menu, you need to select the “System Restore” link.
First, the bootable media will try to find and solve the boot problem. In theory, he should discover it on his own.
If this happens, a window will pop up warning that your system is “bad” and needs to be cured. Click on the button to fix and restart. If nothing helps, or such a window does not appear at all, we move on.
To perform a startup restore, you need to select exactly the first checkbox. Also make sure that the system has selected your OS on the hard drive. Click Next
Now this menu will appear in front of us. First of all, we try to do an automatic “Startup Recovery” - just select this item. Next, wait until the procedure ends and the PC reboots.
Restoring Windows 7 startup using Hiren's BootCD
Hiren's BootCD is a real multi-tool for the system administrator. This image contains a large collection of software for diagnosing, repairing and scanning operating systems and hard drives.
One of the Hiren's BootCD download options
Hiren's can boot regardless of the installed OS, so you can perform a Windows 7 system recovery from a bootable USB flash drive. The list of software that is included in the assembly is huge. But we will consider only a couple of utilities that can help restore the bootloader.
How to restore Windows 7 startup using Paragon Hard Disk Manager
Paragon Hard Disk Manager is a set of programs for testing and troubleshooting hard drives. To find this complex in Hiren's BootCD, you need to go to the DOS program launch section, and then to “Disk Partitioning”, for the English version - Disk Partition Tools.
Hiren's main menu in Russian version
Subsection "Disk partitioning"
Paragon Hard Disk Manager is fourth on the list
In the main program window, in the menu bar, go to “Wizards” and find the “Windows Boot Repair” item.
The wizard will offer several options to choose from, among which we are interested in “Search for installed versions of Windows.” Click “Next”, and after scanning and finding the installed OS, the wizard will offer to change the boot record of the partition. Click “Next”. All that remains is to restart the computer, which is what the last wizard window will tell you.
How to repair Windows 7 boot sector using MbrFix utility
To use the small MbrFix utility, we will have to boot into the Live CD system included in Hiren's BootCD build. In version 15.2 it is called Mini Windows XP.
After the system boots, go to the Start menu and call up the HBCD menu. In it we look for the Partition/Boot/MBR section, then Commandline and then MbrFix. The console will immediately open with the command template. To restore the boot of the Windows 7 operating system, the general command should look like this: MbrFix.exe /drive 0 fixmbr /win7 /yes. Press Enter and go into reboot.
Method 3: Command Line (fixmbr and fixboot)
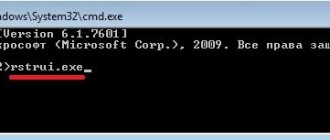
If the previous method did not produce results, then let's try to restore from the command line. We do all the same steps so that the recovery menu appears. Next, select the “Command Line” section.
A black console will open, where you will need to enter only two commands one by one:
bootrec /fixmbr bootrec /fixboot
These commands take the system files that are responsible for booting the system from a bootable flash drive or disk and rewrite them to your hard drive. Therefore, even if they are damaged by programs or viruses, after this procedure the system should boot normally.
Method 4: Activate MBR partition
If this does not help, then run the command line again and enter the following commands:
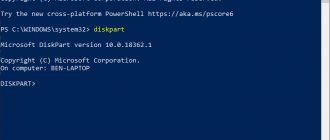
Diskpart
We display a list of all sections:
lis vol
We are interested in two sections. The first one is 100 megabytes in size and contains all Windows boot modules. The second is the disk on which your OS is located. You must find the disk with your operating system yourself - look at the size. Also, the disk name (letter) may differ from the actual one, so we don’t even look at it.
Now we need to select the partition with boot modules (use the volume number):
sel vol 1 activ exit
Enter the command with the letter of the volume where your Windows is located. In my case it is drive "D", but yours may have a completely different letter:
bcdboot D:\Windows
Using the Command Line
In recovery options, open Command Prompt. There we will enter the following command:
bootrec/fixmbr
Using this simple command, you can restore the boot record on Windows 7. If this does not help, move on to the next step:
bootrec/fixboot
Both commands are more likely to restore the Windows 7 bootloader. Close the command prompt, restart the computer and see what happens. In fact, the system should boot without problems. If this is not the case, I have prepared some more methods.
Use the command line #Method 2
We enter the following commands again and one additional one:
- bootrec/fixmbr
- bootrec/fixboot
- bootsect /nt60 ALL /force /mbr
Let's try to boot the system.
Method 5: Command Line (Bootrec.exe)
Again, open the magic console through the bootable media and write the commands:
Bootrec
Bootrec.exe /FixMbr Bootrec.exe /FixBoot exit
At the very end we reboot.
Method 6: System
In general, if we are unable to restore a file manually, then we can force the bootable media to do it. To do this, we need to first delete the file with boot modules, which takes up 100 MB. And then go through standard recovery, through the boot disk - then the system will resuscitate itself.
From the command line we write:
diskpart list vol
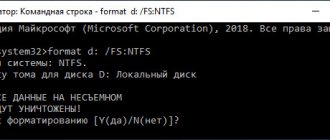
Select the partition with boot modules:
sel vol 1 format fs=ntfs activ
We write the command twice:
exit
Then the system will not be able to boot, since we deleted the file, so we boot from the media again. The program will offer to fix the download - we agree and reboot.
If the system boots, then it’s good, if it still gives an error or freezes, then we boot from the media again, and from the list of methods select “Startup recovery”.
Method 7: There are two operating systems
This method helps when you have two operating systems, but a completely different one is loading. There may also be problems loading both, especially after installing the second OS. We will now try to make both OSes active so that you can select them when booting. Again, through the bootable USB flash drive, go to the console and write magic spells:
Bootrec /ScanOs Bootrec.exe /RebuildBcd
After this, the system will offer to write both systems into the boot menu. In both cases, you need to enter the usual letter “Y” into the console and press “Enter”.
Before exiting with the “exit” command, enter one more command:
bootsect /NT60 SYS
It will help revive some BOOT modules.
How to ensure bootloader security after system recovery
Actually, there is no tricky science in ensuring the safety of the bootloader. The rules are exactly the same as for the entire operating system as a whole. The PC needs to be monitored and looked after.
It is advisable to install one of the reliable and proven antiviruses on your PC
The bootloader is a file like everyone else, so it can be susceptible to virus attacks. This means that a reliable antivirus must be installed on the system. In addition, you need to somehow protect the file from physical damage. For example, an unexpected PC power outage can easily compromise the integrity of both the bootloader itself and the boot record. Therefore, if there are frequent power outages, it is better to get an uninterruptible power supply.
Share Tweet Email Pin
Method 8: “NTLDR is missing” error
If, when loading the system, you see this window: “NTLDR is missing Press ctrl+alt+del to restart,” then do not rush to panic. This error occurs quite rarely on the “seven” and usually the NTLDR file is located on other versions of “windows”. But let’s not go into the essence of the problem and start solving it. As you may have guessed, it can also be solved through the console. You’ve already learned how to run it, so I won’t write about it.
After launch, enter the commands:
diskpart list volume
Here we need to again find the letter to which the system drive is assigned. In my case, this is again the letter “D”.
Exit bcdboot. exe D:\ Windows
Again, you need to enter the letter of the system drive - look at your volume.
So, we have created a loading module. Now you need to activate it. To do this, enter the commands:
list disk
The command displays all connected physical media. I only have one, but you can have two - you need to choose the one on which the system is loaded.
sel disk *HARD DISK NUMBER* list partition
The partitions of the hard drive you selected will be displayed here. Select a partition with a capacity of 100 megabytes and enter the number in the following command:
sel part 1 active exit
Method 9: Error “BOOTMGR is missing”
When loading, you may see this message: “BOOTMGR is missing. Press Ctrl+Alt+Del to restart." As I already said, the system has a so-called MGR boot file, which is called “BOOTMGR”. It weighs, as you understand, only 100 MB. Sometimes this file can break or even be deleted by viruses. Then you see the error that the “BOOTMGR” file was not found.
There are two options here. The first is that it is so broken that it cannot start the system. The second is that it has been deleted or moved to another section. Alternatively, the system could select another partition, disk or device as boot. To solve this particular problem, see the instructions at this link.
The main causes of problems with the Windows 7 boot loader
The bootloader can crash for no apparent reason at all. These include memory errors and errors in reading and writing to the disk.
This is what the black error screen looks like
Since the bootloader is just special software located on the hard drive, it is subject to failures and errors - just like any other file. Including after virus attacks.