How to exit cmd console before Windows 10 boots? Windows, in addition to the familiar and fairly well-thought-out shell that forces manufacturers of other programs to “strictly follow their instructions,” contains a large number of its own system utilities. Their main feature is the console interface, and they are launched by type
path/to/program -{options}
In Windows, they are obtained by regular copying from bootable media during the system installation stage. And most often they are located in the same Windows system directory\system32\ or the Windows folder itself. This allows the user to accurately determine whether to launch any of the utilities by only opening the environment for their launch, i.e. the console itself. She lies there:
In working Windows, working from the console is often the preserve of system administrators only. Or already trying to resolve problems and malfunctions. But the future fate of Windows itself, its settings and the safety of data sometimes depends on the ability to operate system utilities using commands in the console when Windows no longer boots. Let's consider options for how to exit to the cmd console before Windows boots, or when it is no longer functional. Since in my own articles I often refer readers specifically to the console in Windows PE, I decided to display instructions on how to exit to the cmd console before loading Windows separately.
- No bootable flash drive
- Do you have a USB flash drive or disk with Windows?
Commands to restore Windows 7
We will restore our system through safe mode.
As your computer starts, press and hold the F8 key.
In rare cases, its function is taken over by the Delete button.
A boot menu will open in front of us, in which we need to select the “Safe Mode with Command Line Support” item. As shown in the screenshot below:
Additional download options
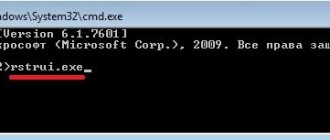
A console will open in front of us in which we need to write the command
rstrui.exe
The “System Restore Wizard” will open in front of us.
It displays a list of saved points to which we can roll back the system.
Among them there will be an automatically created point.
System Repair Wizard
Select the item that interests us and click Next. The recovery process has started.
After this, restart your PC.
This method works even when the system is heavily damaged by viruses. This method can be used if the OS does not load at all.
Interesting videos that will further help you understand the problem:
back to menu
VIDEO: Windows won't boot? Reboot Windows 10, 8 or 7
Windows won't boot? Reboot Windows 10, 8 or 7
Video instruction
back to menu
VIDEO: Restoring windows 7, command line
Windows 7 recovery, command line
Video instruction
return to menu return to menu
Commands to restore Windows 8
The easiest way to start the recovery process is through bootable media.
Similar to the previous option, this can be a regular SD disk or a USB drive.
We insert our system file transferr into the desired connector and reboot the computer.
During startup, press the Delete key to enter the BIOS subsystem.
We find the “boot” tab and install our media in first place.
This is done in order to boot the system from it.
View of the BIOS
While in the BIOS, remember which disk is located first in the “boot” tab. If you have two or more hard drives, the boot will start from the one that does not have operating system data. Put in first place the drive on which you want to install Windows.
Now press the F10 key and click on the Y button in the Latin keyboard layout.
The BIOS configuration was successfully saved. After this, the “Windows 8 Installation Wizard” window will pop up.
At the bottom of the screen we find the “System Restore” item and click on it.
Installing Windows 8
From the list provided, select the desired operating system:
List of available OS
Now go to the “Diagnostics” section and enter “Advanced parameters”:
Advanced options section
Click on “Automatic recovery” and wait for the process to complete.
While in the BIOS, remember which disk is located first in the “boot” tab. If you have two or more hard drives, the boot will start from the one that does not have operating system data. Put in first place the drive on which you want to install Windows. return to menu return to menu
How to start Command Prompt when Windows won't boot
Command Prompt is a powerful tool that can be used for many purposes, including troubleshooting and fixing Windows problems. It's easy to get started if Windows is working properly, but what if Windows refuses to boot? How can I “boot” directly into the command line (cmd.exe) so that I can troubleshoot problems that arise? This tutorial will show you how to do it in all modern versions of Windows.
NOTE. In this guide, we'll look at all modern versions of Windows in the following order: Windows 10, Windows 7, and then Windows 8.1. Scroll down until you find the instructions for the version you are interested in.
How to start Command Prompt when Windows 10 won't boot using installation disc
If you have a Windows 10 installation DVD or USB drive with Windows 10 installer, you can use it to launch Command Prompt.
Start your computer and from the BIOS boot menu, select the DVD drive or removable drive on which Windows 10 is installed as the boot device. Don't boot from your computer's hard drive like before.
Download Windows Setup and select the language and keyboard you want to use. Then click Next.
Don't choose to install Windows 10. Instead, click or tap "Repair your PC."
You will be asked to select a continuation option. Select Troubleshoot.
You are shown several additional options. Here, click or tap Command Prompt.
Command Prompt (cmd.exe) is downloaded and you can use it to repair your broken Windows 10 system or perform any other actions.
How to start Command Prompt when Windows 10 won't boot using a USB recovery drive
If you have a Windows 10 recovery disc, you can use it to launch Command Prompt. Start your computer and from the BIOS boot menu, select the removable drive where Windows 10 is installed as the boot device. Don't boot from your computer's hard drive like you used to.
When the recovery drive boots, it will first ask you to select a keyboard layout. Select the one you want to use.
You can then choose from several options. Select Troubleshoot.
You are shown a list of additional options. Select Command Prompt.
Command Prompt is now loaded and you can use it.
How to Start Command Prompt When Windows 7 Won't Boot Using Rescue Disk
If Windows 7 can't boot correctly, you can boot from a recovery disk, which you can create on a running Windows 7 computer. Here's a tutorial on how to create one: What is a system repair disk and how to create one in Windows.
Start your computer and from the BIOS boot menu, select the DVD drive on which you have recovery tools as the boot device. Don't boot from your computer's hard drive like you used to.
After loading the repair disc, you will be prompted to select the keyboard input method you prefer. Select the language you want for your keyboard and click Next.
The repair disk then scans the operating systems available on your computer and lists them. Select Windows 7 and click Next.
If you have multiple accounts on your computer, you will be asked to select a username and then enter a password for it. Do this and click OK. The System Recovery Options window is now loaded. Click Command Prompt at the bottom of the window.
The command prompt is displayed and you can use it to troubleshoot.
How to start Command Prompt when Windows 7 won't boot using installation disc
If Windows 7 cannot boot correctly, you can boot from the installation disc.
Start your computer and in the BIOS boot menu, select the DVD drive or removable drive on which Windows 10 is installed as the boot device. Do not boot from your computer's hard drive.
Download the Windows 7 installation, select your preferred language, and click Next.
Then click "Repair your computer."
The System Recovery Options window is now loaded. Click Command Prompt at the bottom of the window.
How to start Command Prompt when Windows 8.1 won't start using a recovery disk
If Windows 8.1 cannot boot correctly, you can boot from a recovery disc created on a running Windows 8.1 computer. With it you can launch the command line.
From the BIOS boot menu, select the removable drive that has Windows 8.1 installed on it as the boot device.
When the boot drive boots, it will first ask you to select the keyboard layout you want to use. Select this.
You will be asked to select an option for how you would like to proceed. Click or tap Troubleshoot.
Then click or tap More options.
On the Advanced Options screen, select Command Prompt.
Command Prompt is now running.
Restore point for Windows 10
First, let's look at the possibility of creating a Windows backup using cmd (command line).
To create a copy of the working operating system, you need to restart the computer as follows:
Start menu
Hold down the Shift key and left-click on the “Restart” option.
The following window will appear in front of you. In it, select the “Troubleshooting” item.
Action selection
In the next window, select “Advanced options”, as shown in the screenshot.
Diagnostic window
If you have a custom password set on your PC or there are other accounts on the system besides yours, additional warning screens may appear before loading cmd. In the first case, simply enter the password in the specified field and click OK. In the second, select the desired account and press Enter.
In the additional window parameters, find the “Command Line” item and click on it.
Extra options
Now you need to enter the required commands in order. This will ensure that the backup is done correctly.
Enter the command in the required field
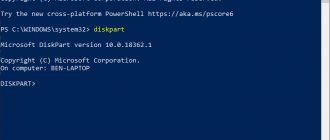
diskpart and press Enter.
The names of all disks existing in the system and their parameters will be displayed here.
Next command
list volume and press the Enter button.
It will give us a list in which we will need to remember the system drive letter.
The system display and the letter from the graphical shell may not match, so write down the letter from this list.
List of disks
To complete, enter
exit and press Enter again.
Now let's start creating an image of the operating system.
We will use the system utility “dism.exe”.
Open cmd again and type the following in the input field:
dism /Capture-Image /ImageFile:D:\Win10refr.wim /CaptureDir:E:\ /Name:”Windows 10”
Command to mount image
This procedure may take some time. Be patient.
The following window will inform us that the process is complete:
Successful completion of the operation
The image is mounted and you can proceed to the next steps.
Exit system recovery mode.
return to menu return to menu
Windows 10 backup
You can also create a backup copy of the operating system in Windows 10 itself.
We launch the console using the Win + X hotkeys provided for this purpose.
Find the item “Command Prompt (Administrator)” and press the left mouse button or Enter.
Launching the console
After this, we create a directory for our copy of Windows.
To do this, enter in the required field:
mkdir С:\Imagen-Restaurar and press the Enter key.
Starting the directory creation process
Your actions will not result in any visible changes. Don't be alarmed.
These are the system settings. The console will give you a response after the manipulation is completed.
Leave the computer quiet for 20-30 minutes without performing any additional actions.
When working with the console, never put spaces between words; it is better to replace them with - (hyphen). In cases with spaces, errors and unexpected failures may occur.
When the process is completed, you will see the copy you created, which will be named “C:”.
You can choose the recording path yourself. You will have two options: an external screw or another local drive.
“Imagen-Restaurar” is the name of the created folder in which our image will be stored.
So, after the process is completed, check for the presence of the “CustomRefresh.wim” file in it.
If it is not detected, then click restart and try again.
If you specified the wrong path, you should look for the mounted image in the System32 folder.
This image is registered as a starting point for Windows system recovery.
It is worth creating a restore point when the operating system is in order. In the future, you can roll back the OS to the last restore point at any time. return to menu return to menu
Starting Windows 10 Recovery Mode
back to menu
Reboot in Safe Mode
Before restoring, you need to make sure that there are no malicious files on the system. If a virus attack has damaged Windows, then it is worth conducting a deep scan of the entire computer.
First of all, we reboot our PC in safe mode. To do this, open the Start menu.
Find the “Options” item and open it by clicking the left mouse button.
Options
Now click on “Update and Security” → “Recovery” → “Special boot options”.
Find the “Restart now” option and select it.
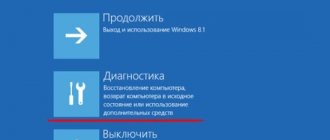
As a result of this, the “Select Action” will open in front of you.
This item gives us three actions to choose from; select the “Diagnostics” position.
Action selection
In the window that opens, select “Advanced options”, and finally “Download options”.
From the proposed list of reboot options, we need to “Enable Safe Mode”.
Boot Options
Click on the “Reboot” button.
This mode can also be selected in a short way: go to “Start”, hold down the Shift key and click on the “Reboot” action. The screenshot describes in detail:
Safe Reboot
The same function can be set by default via the command line.
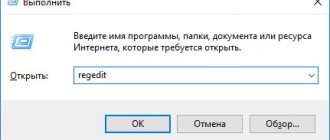
First, open it (it’s shown above exactly how) and enter just one command:
bcdedit /set {default} bootmenupolicy legacy and press Enter.
Place to enter
We close our terminal window and safely restart the computer in the usual way.
During system startup, press the F8 key and a menu for selecting a boot method will appear in front of us.
back to menu
VIDEO: Restoring Windows 10 using the command line
Restoring Windows 10 using the command line
Video instruction
back to menu
Virus cleaning
It doesn’t matter at all what kind of antivirus you use.
Before the system recovery process, be sure to check your PC for harmful programs or files.
Use "Deep Scan" for this.
Computer scan options
back to menu
Safe mode with command line
Let's start our computer. After a few seconds, press the F8 key so that the boot selection window appears on the screen.
We follow the familiar path: “Diagnostics” - “Advanced parameters” - “Command line”.
The screenshots show the entire path in detail.
We can move using mouse clicks or keyboard arrows.
After each selection, methodically press Enter to enter.
Action selection
Advanced Options Menu
In some cases, the “Startup Repair” item can help us. It's also found in advanced options. This is a built-in system utility that can automatically fix or repair Windows boot.
Built-in utility
In the window that opens, simply select the name of the operating system from the list provided (if there are several of them).
After the automatic process of eliminating problems that prevent Windows from loading correctly, our computer will work normally.
If this method does not help, we resort to the command line.
In the input field, write the command
bcdboot.exe, then put a space.
Next we need to specify the system drive letter (mostly C) and enter the name of the operating system (Windows).
Ultimately the command will look like this:
bcdboot.exe C:\Windows
back to menu
VIDEO: Windows 10 Command Line
Windows 10 Command Prompt
Video instruction
back to menu
How to find out the system drive letter?
We will also use the command line for this. Enter the command
diskpart and then press Enter
After opening this command, we write
list disk , press Enter.
We will see information about all the disks that are on the computer.
From this list we need to find the system one. We are recruiting
sel disk 0.
After this, the disk we need should automatically be selected.
To open detailed information about him, write
detail disk
Disk selection
In the new information window we see the name of the required system disk.
Shown in detail in the screenshot:
detailed information
This search is made in order to avoid errors during recovery.
The name of the system drive, which is assigned to it by default, does not always match the letter on the command line.
In our case, D turned out to be systemic:
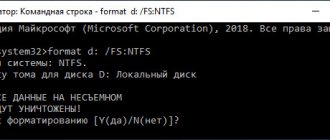
To exit the “diskpart” service, enter the word
Exit and press Enter.
Now we can return to the fixing process by typing the command
bcdboot.exe D:\Windows
Press Enter again.
Ending the process
If you followed all the instructions correctly, a message will appear indicating that the download files were successfully restored.
Close the command line and reboot your device.
back to menu
VIDEO: Windows 10 UEFI recovery using the command line
Repairing Windows 10 UEFI using the command line
10 Ways to Restore Windows Using the Command Line
We hope that our tips helped you effectively deal with problems starting the Windows operating system.
We have described in detail the mechanism for working with the console, which will help you manually enter the necessary configurations.
9.6 Overall Score Restoring the system is easy
The instructions describe all the ways to restore the system via the command line. Options from Windows XP to “ten” are considered.
How to open the command line when the computer boots? — Simply about computers
Many active PC users have more than once encountered problems for which there were recommendations of the following type - “run the command line and do this.” Why, and most importantly, how to call the command line in Windows? Let's figure it out together.
What is the command line used for?
This is a kind of capacious program that allows direct communication between the OS and its user, that is, you. The interface of this line is very simple and looks more like a black screen, at the top of which there is brief information about the system in front of you. At the bottom of this screen, the user can enter the required command to execute it later.
How to open the command line on windows 7
First, let's find out how we can launch the necessary environment for further entering commands. There are several simple (and not so simple) ways to open this function in Windows 7.
Search bar
To use the first method, you need to remember a basic command that looks like this - “cmd”. This is not at all difficult to do if you understand the meaning. This is a short form of the word command or "command". So, actions:
- Click "Start". The main window will open, in which the line “Find programs and files” is visible (this is the bottom empty line);
- This is where you need to enter the three English letters “cmd”;
- An available list will appear with the corresponding icon. To start, use the left mouse button.
Standard programs
Let's start again with the Start button. However, this time you need to pay attention to the list called “All Programs”. Now you need to select the “Standard” folder. By clicking on it, we get a small list of programs. One of them will be to launch “Command Prompt”. It looks something like this.
Using hotkeys
If the above methods seem complicated, then you can try to launch using the “Win” + “R” hotkeys.
Tip: The "Win" key is located on the very bottom row of the keyboard, third from the left, bearing the famous Windows logo. It is not signed, so not many people understand which key we are talking about.
By typing this simple combination, a special window called “Run” will open. In the field provided, you need to re-enter the “cmd” command that you already know. After entering, press the “Enter” key.
When Windows starts
When the system boots, press F8. Next, select safe launch with command line support.
When installing the system
We start downloading in any way convenient for you. Some do this from a disk, others from a flash drive. Next, on the very first Windows 7 installation window, you need to type the key combination “Shift + F10”.
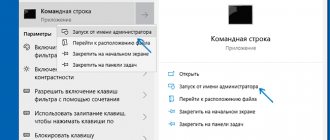
Run with administrator rights
To log in as an administrator, you can use one of the previously described methods. Just click on the black “cmd” icon with the right mouse button instead of the left one. Next, select “Run as administrator” (located at the top of the list). That's the whole difficulty.
Run Command Prompt as Administrator
How to open the command line on windows 8
In Windows 8, the command line itself looks almost the same as in previous versions, but some things look different. The user interface in this system has been significantly changed. Here are some ways.
From desktop
There is no Start menu here. Therefore, to call the desired panel, you must:
- right-click anywhere on the desktop. Afterwards, an additional panel should appear, one of the elements of which will be the “All applications” section, click on it;
- Find the “Command Prompt” item and left-click on it, or right-click if you need to run it with administrator rights.
Via the app
To do this, you need to go to applications and find the already familiar icon with the word “Command Line” in the list that appears. If you double-click on it with the left mouse button, the line will open on behalf of the local user. If you need to run as administrator, then look at the bottom panel, there are all the additional options there, as shown in the picture below.
How to open the command line on windows 10
Although the tenth version has undergone significant changes compared to the seventh and eighth, certain basic principles remain in place.
Warning: Don't confuse "cmd" with the "Run" menu, as some people do. The second is solely responsible for launching programs and system components, although both lines may seem incredibly identical.
In the newly appeared Start menu, we direct our gaze to the applications section. Next, we use the program service menu and find the “Command Line” we need. It all looks like this:
And it can be made even simpler. For example, after clicking the “Start” button, you can enter a corresponding search query.
Using the "Run" menu
But now you can use that very line that many newbies, and oldies too, confuse with the command.
- Click “Start” or “Win” + “R”;
- Click “Run”;
- Enter the command “cmd”, as in any other version of Windows.
Launching the Command Prompt via the Run menu in Windows 10
Calling the command line from a file
It’s not for nothing that we present this method at the end. It is not the most convenient and is rarely used, but we will consider it.
The startup file (cmd.exe) is located in the System32 folder in the Windows root directory. We find him. Double click - the command line is launched as a local user. Right-clicking brings up a context menu where you can choose to run the file as administrator.
Based on the above
Although most experienced users use this feature, virtually anyone can master this simple tool.
Final advice: If you try to install the “help” command in the line, you will get a complete list of features that you can safely use.
Source: https://ruspchelper.com/kak-vyzvat-komandnuyu-stroku-pri-zagruzke-kompyutera/
Installation
Option 1: Using the command line.
Preparing a USB flash drive (flash drive) for future download and installation of Windows 7:
1) Connect a USB flash drive (flash drive) of at least 4 GB to the USB port. 2) In the search bar of the Start menu, enter cmd.exe, right-click on the found one and click Run as administrator 3) Run the diskpart disk management utility, wait for the DISKPART> prompt 4) Run the command list disk (displays a list of all disks on the PC) 5 ) Find your USB drive among them. (Example: Disk 2) 6) Run the select disk # command (where # is the number of your USB drive obtained in the previous command). (Example: select disk 2). This command tells diskpart that all further operations will be performed on this disk.
7) Run the clean command (erases all data and partitions on the USB drive). Run the create partition primary command (creates a new partition on the disk). 9) Execute the command select partition 1 (selects a partition as an object for further manipulation). 10) Execute the active command – makes the selected section active. 11) Run the command format fs=NTFS – formats the partition into the NTFS file system. 12) Execute the assign command - activates the process of connecting the device, obtaining letters for the created partitions (if Autorun is enabled, a window will pop up as if you had just connected a USB drive) 13) exit - exits diskpart to the command line.
14) Insert your existing Windows 7 distribution into the drive, or mount the image into a virtual disk. 15) Let's assume that you have it installed in drive H:, then on the command line (not in diskpart !!!) run the command: H:Bootootsect.exe /nt60 I:
where I: is the letter received by the newly prepared USB drive. This command replaces the bootloader files on disk I: with those that are necessary to boot Windows 7. The bit size of the base OS and the Windows distribution must be the same. 16) Copy all files from your distribution to your USB flash drive (flash drive). To do this, use either Windows Explorer or the command:
xcopy H: I: /s /e /h /k
That's it, the USB drive is ready. Boot your PC from the resulting USB flash drive.
To speed up the copying process, experienced users can use the RichCopy program; it is a graphical shell for the robocopy command and includes a large number of settings. Numerous options include sorting files by attributes and folders, error prevention, changing attributes, copy timing, editing the timestamp, setting the number of threads and the size of the cache to use.
Option 2. Using a program from Microsoft - Windows 7 USB/DVD Download Tool.
1) Download the Windows 7 USB/DVD Download Tool 2) Install and run the program. 3) Specify the path to your ISO file in the first step and click Next. 4) Select the USB Device item in the second step 5) Click the Begin copying button in the third step 6) In the fourth step, the process of creating an installation bootable flash drive will begin. 7) When the creation process is complete, close the program.
Option 3. Using a third-party program - UltraISO.
1) Insert your flash drive into the USB port. 2) Open the Windows ISO image using UltraISO This way: Right-click on the ISO file and select Open using UltraISO Or this way: In UltraISO, in the File menu, click Open, select the Windows 7 image you need and click Open. 3) After making sure that the image is open, select Burn Hard Disk Image from the Boot menu. 4) In the Disk Drive: list, select your flash drive, in the Recording method: USB-HDD+ item and click Burn. 5) In the Hint information destruction window that appears, click Yes. Wait for the recording to complete (5 to 20 minutes). 6) Without removing the flash drive from the USB port, restart the computer. 7) Immediately after the restart begins, press the key on the keyboard to enter the BIOS. The most common are Delete, F2, F10 or Esc. Set the BIOS to boot from USB-HDD first. 9) Save the settings and exit the BIOS. The computer will restart and begin booting from the flash drive. 10) The installation itself is not much different from installing from a bootable DVD, but there is one point. When the copying and unpacking of files is completed, and the computer reboots for the first time, you need to go to the BIOS again and set the boot priority back (from the hard drive by default) or remove the flash drive. Otherwise, it is possible that the download will start from the flash drive again.
Running the Command Prompt on Windows
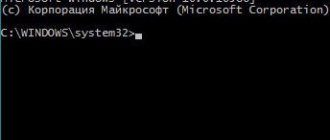
The command line is a special program that allows you to control the operating system using text commands entered in the application window. Its interface is completely text-based, in contrast to the usual appearance of the operating system.
Performing actions using text expressions, of course, is not as convenient as clicking on icons on the screen, selecting menu items, or opening program windows. But sometimes it is simply necessary to open the command line, for example, when there are problems in the system, when working with network and equipment settings, or when calling system applications. Here are some examples of its use:
- The systeminfo command allows you to collect system information, including installed updates and network information. The graphical interface does not provide for receiving such data.
- chkdsk - checks the disk for errors and generates a report.
- sfc /scannow is a useful command to start scanning and repairing damaged files.
- ipconfig - allows you to find out the IP address of your computer in a split second.
- ping - checks network operation in case of problems with the router.
- help - the command line will display a list of possible commands with brief information about them.
These are just a few examples of the useful uses of this application. In addition, through the program window you can quite successfully work on the computer without using a mouse.
Switching methods
There are several options to open the Windows Command Prompt:
- Call using the “Run” item in the “Start” menu. You can use the WinKey+R keys. Next type cmd. The downside is that you cannot run cmd.exe as an administrator.
- For Win 8 and higher, right-clicking the Start button will open a context menu where you can simply call the command line or as an administrator (by selecting the appropriate item).
- For versions prior to Win 8, it is convenient to launch the application through the search window, which appears immediately after clicking the Start button. You need to enter cmd, after which a small window with a file will open. You can simply double-click on it, or you can right-click and click “run as administrator.”
In versions higher than Windows 8, in order to apply this method, you need to click on the magnifying glass next to the user name.
- A universal way to call through a conductor. Go to the “Windows” folder, then “System32”. Find and open cmd.exe. By analogy with the previous method, you can run it as an administrator by calling the context menu.
- In Windows 7 and above, there is a way to call cmd.exe directly from the folder you are currently in. To do this, right-click while holding down the Shift key inside the folder or on its icon. In the context menu, click “Open command window”. The command line will appear from this folder, and there will be no need to manually enter the path to it, as if you launched cmd.exe in a different way.
You can also create a desktop shortcut and hotkeys for quick launch. You can create a shortcut like this:
- In the Explorer window, find the “Windows\System32” folder, right-click on the cmd.exe file in it, then “Create a shortcut” and select a name for it.
- Right-click on an empty space on the screen and find “Create shortcut” in the context menu. In the field that appears, type C:\Windows\System32\cmd.exe. Next, select a name and click OK.
Now you can assign hotkeys. Call the context menu of the created shortcut, click “Properties”, “Shortcut” tab, enter the required combination in the “Shortcut” field.
Please note that when launched using the shortcut, search box and Explorer, the command line is launched from the System32 folder, and using the “Run” item of the Start menu from the Users folder of your computer.
Opening with extended rights
Among the methods discussed, some allow you to enable the command line as an administrator. The fact is that even if you use the Administrator account in your current work, you do not have full rights to manage the system. This is done to improve reliability and reduce the risk of damage from malware.
Running as administrator is a different concept than using an administrator account. It involves increasing the level of rights, giving the program the highest access to changing the system. This way, more functions will become available in the application (in our case, on the command line). When opened normally they are simply locked. For example, if you want to disable User Account Control via cmd.exe, this will not be available in normal mode, only as an administrator.
Thus, the command line is a kind of universal Windows system management tool that allows you to perform various tasks without switching between many windows, menus, and programs. All commands are directed through the text window, you can quickly change network settings, security settings, check or format drives and perform many other functions in seconds.
Source: https://nastroyvse.ru/opersys/win/kak-otkryt-komandnuyu-stroku.html
Creating a bootable USB flash drive.
First of all, we need to create a bootable USB flash drive, that is, write the operating system installation files onto it. In order to later be able to boot from this flash drive and start installing Windows, you need to record it in a certain way. To do this, we need an image of the Windows 7 operating system, recorded in .iso format.
First of all, you need to insert the USB flash drive into the laptop and launch Command Prompt. To do this, select Run from the Start menu. In addition, the hotkey combination Win+R is provided for this operation. Please note that all operations must be performed under the Administrator account, otherwise user rights may be limited and you will not be able to perform all necessary actions.
A command line should appear on the screen, which in text mode informs the user about the progress of working with the system. Now we need to enter the diskpart command, which allows us to work with volumes and partitions on the hard drive.
After this, you should enter the list disk command, which displays on the screen a list of all writable devices that are currently available on the system.
In the list of available devices, you need to find a flash drive on which the Windows distribution will be written. Each device is assigned a personal number; you must remember the number that the flash drive received. After this, you should enter select disk N in the command line, where instead of N is the number of your flash drive in the system.
Now we type the clean command, which starts the cleaning procedure for the selected disk.
Now you need to create a logical partition on the flash drive. To do this, we will use the create partition primary command.
Now you need to select the newly created section. Let's do this by entering the select partition 1 command.
To make the selected section active and in the future perform all operations with it, we will use the active command.
Now you need to format the newly created partition in the NTFS file system. To do this, use the command format fs=NTFS. We remind you that the FAT32 file system does not accept files larger than 4 GB, so it is not suitable for creating a bootable USB flash drive.
We assign an identifier letter to the flash drive, for example, G, with the command assign letter=G. Please note that the assigned letter must not previously be used in the system to designate other logical drives.
After completing all operations in the correct order, the operating system should detect the flash drive and display it in the list of available devices. Use the Exit command to exit the command line.
Now it's time to copy all the files from the Windows distribution to the USB flash drive. If you are working with an ISO image of an installation disk, we recommend that you use the 7-Zip utility for this purpose. In the working window of the program, you need to select the ISO image and click the Extract button.
After this, you need to specify the path to the flash drive, which will act as a boot disk.
After this, you just have to wait until the files are unpacked or copied.
Now the flash drive is ready to install Windows 7. Next, we’ll look at how to install the operating system on your computer from a flash drive.
Activating the Command Line
The Command Line Interface is an application that provides a text-based interface between the user and the OS. The executable file of this program is CMD.EXE. In Windows 7, there are quite a few ways to call the specified tool. Let's find out more about them.
Method 1: Run window
One of the most popular and easiest ways to launch the Command Prompt is to use the Run window.
- Call the Run tool by typing Win+R on your keyboard. In the field of the window that opens, enter:
The main disadvantages of this method are that not all users are accustomed to remembering various combinations of hot keys and launch commands, as well as the fact that activation cannot be performed in this way on behalf of the administrator.
Installing Windows 7.
The process of installing Windows 7 from both a flash drive and a disk is similar. In this article, we will look at the option of installing Windows 7 on a computer from a disk. When the computer boots, the user sees this screen:
In order to start the installation process from the disk, you must press any key. After that, select the desired language for Windows and click Next.
In the window that opens, click on the Install button.
Now you need to accept the terms of the license agreement and click Next.
In the next window you need to select the type of installation of Windiws 7. If you are installing the system from scratch, click on the Full installation item.
We see a window for selecting the hard drive partition on which Windows 7 will be installed. Having selected the desired partition, click on the Disk Settings button.
In the menu that appears, select Format. This is necessary to ensure that the installation of the new system is completed correctly and without errors. The formatting process will erase all data on the partition, so be sure to copy important files before installation.
In the warning window about data deletion, click OK.
After formatting is complete, click Next.
The system installation process begins. You must wait for completion.
At the end of the Windows 7 installation process, you must enter the laptop or computer name and username.
In this window, you can set a Windows login password and hint.
Now you need to enter the serial number of the operating system.
We select security settings that determine the settings for automatic updates and the Windows 7 firewall.
In this window you must specify your time zone.
When installing Windows 7 on a laptop connected to a network, you need to tell the system the network type. This option will be available during the installation process only if Windows 7 was able to automatically detect and install drivers for the network card.
This completes the installation of the system.
We hope that with the help of this article you received the answer to the important question “How to properly install the Windows 7 operating system.”
Always open Command Prompt with Administrator rights
In order for CMD to open as the system administrator by default, you must:
- Right-click on the cmd.exe file shortcut.
- Click on the “Properties” item.
- In the window that appears, go to “Advanced”.
- Check the box next to “Run as administrator”.
- Click "OK" and "OK".
Now, if you use a modified shortcut, CMD will boot with system administrator rights by default.
Installing Windows 7 from a USB flash drive via the command line
Let's say right away that this method does not have any advantages and instead it is better for ordinary users to use the UltraISO and WinSetupFromUSB programs, which is described in detail in the article Installing Windows 7 from a flash drive. But the method in this article will only be needed by real macho men who adore the Windows command line.
Why complicate your life, you ask? Well, there are people who install Linux