A blue screen is not a critical error, as many users believe. It only shows information about serious problems in the installed Windows 10 operating system that can be fixed. A text will appear on the screen saying that the PC is having problems loading the OS. Also, information about a specific error may be displayed there, and after that the system will reboot automatically. To remove the Windows 10 blue screen, it is important to learn about the reasons for its appearance, and only then begin to solve the problem.
Why does a blue screen appear on Windows 10
There are 9 main reasons for the occurrence of Blue Screen on Windows 10 (which you will have to pay primary attention to), which is also called the screen of death:
- Viruses or other programs were downloaded onto the computer and damaged the system.
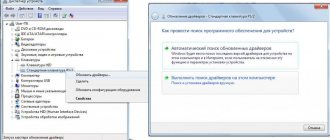
- Some personal device drivers do not work correctly or are incompatible with Windows.
- OS system files have become corrupted.
- The user updated Windows 10 incorrectly.
- Several antivirus programs were loaded onto the computer and came into conflict.
- The BIOS is not configured correctly.
- One of the important parts of the computer overheats (chipset, processor, video card).
- The components are incompatible with each other. This problem often occurs between PC memory modules.
- Malfunction of the hardware components of the personal computer. For example, we can talk about bad sectors located on the hard drive.
Since there can be many reasons for the formation of a blue screen, it is impossible to choose a single and universal solution to the problem. In a specific case, you need to use different methods to eliminate Blue Screen.
Reason 9: Physical defects of components
The last common reason why a blue screen of death may appear is physical problems with the components used. For example, the video card is nearing the end of its service life or the processor has begun to fail due to constant overheating. Additionally, you should pay attention to the hard drive, because bad sectors and other errors may appear on it that affect the correct startup of the OS. We recommend that you refer to the special materials on our website by clicking on the links below to learn everything about testing devices for functionality.
Read more: Checking the processor for functionality How to check the RAM for functionality How to check the functionality of the power supply on a PC Checking the functionality of the video card Checking the functionality of the SSD How to check the hard drive for bad sectors
Windows 10 Blue Screen - Cancel Reboot
The main problem when a blue screen appears on Windows 10 is that the system quickly reboots, and therefore the user is not able to read important information on the monitor. Therefore it is necessary to stop the reboot.
Procedure if Windows does not load correctly:
- Press the following key combination: Win + Break.
- Select "Advanced options".
- In the “Advanced” line, find and activate the “Download and Recovery” tab.
- After that, click on “Options”.
- In the menu that opens, you can stop the reboot in automatic mode by removing the corresponding icon.
After completing these steps, the user will be able to carefully, slowly, familiarize themselves with the information that appears (error code on the blue screen of Windows 10), and only then find a specific solution depending on the cause.
Reason 4: Computer infection with viruses
Infecting your computer with viruses is another reason for the Blue Screen of Death. The fact is that often the actions of such malicious programs affect the overall performance of the system and lead to a critical shutdown with the appearance of corresponding errors on the screen. The user is recommended to check his device for threats from time to time and eliminate them using specialized software. Find more detailed instructions on this below.
Read more: Fighting computer viruses
Windows 10 blue screen - how to get rid of it?
To bring the OS into working condition, you need to follow certain instructions point by point. The procedure was not chosen by chance, since several factors are taken into account:
- The most common reasons (it is difficult to describe them all in one article, and therefore only the most probable ones will be given).
- Difficulty of completing the task. The instructions will start with the simplest methods that even inexperienced PC users can handle. And at the end, a method for solving the problem will be given for advanced computer scientists.
If one of the points does not help solve the problem, you can safely move on to the next one. This way, you will be able to find out the causes of the malfunction and remove the Windows 10 blue screen from the monitor so that you can continue working on your PC without interference.
Search for viruses and programs that harm Windows
Since every PC user accesses the Internet every day, various programs are certainly downloaded onto the computer that can damage the performance of Windows.
Installing the following programs usually helps solve the problem:
- Avast
- Malwarebytes Anti-Malware.
Most likely, you will not be able to install an antivirus or simply download it due to a blue screen appearing during download.
You need to go to system properties, open Windows 10 safe mode (F8) when the OS starts loading.
Our goal is to boot into safe mode or debug mode, depending on the version of Windows. Follow the instructions in the screenshots below.
Next, you need to very quickly restart your personal computer before the Windows 10 blue screen appears on the monitor again.
If malware has entered your PC, switching to safe mode will allow you to save and install a suitable antivirus to scan the OS and clean it of viruses.
How to fix Critical Process Died in Windows 10
Use this method if you are able to boot into Windows in Normal Mode or Safe Mode after the Critical Process Died error occurs.
The first thing you need to do is try to find the cause of the error. There are no tools built into the system for such tasks, so use the WhoCrashed utility, which is free for non-commercial use. The beauty of this application is that it contains a list of all the system driver files used in your operating system. WhoCrashed analyzes memory dump files (these are created when a computer crashes into a blue screen of death) and then finds the files in it that caused the blue screen of death.
Memory dumps are located on the Dump Files , and a list of local drivers is located on the Local Drivers . If you find a problem, try reinstalling the driver in Windows 10, updating to a new version, or rolling back if blue screens of death started to occur after updating to a new version.
Installing drivers from the Update Center is definitely more convenient for the end consumer, but often the drivers in Windows Update are very outdated and are not best suited for the latest versions of Windows or various software or hardware configurations. Therefore, always download drivers from the official websites of manufacturers and install them manually, without the help of various utilities to search, install or update drivers. We also recommend disabling the automatic installation of Windows 10 drivers. Manually controlling the driver installation procedure is your key to the most stable and efficient operation of your computer components.
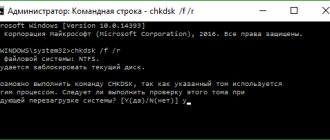
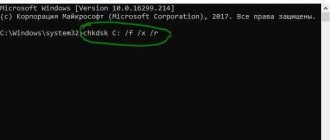
If trying to detect and fix the problematic driver did not produce any results, we recommend checking the integrity of system files using the sfc /scannow and DISM. And although this command can be found in almost any instruction for solving problems when running Windows (more often than not, only reinstalling Windows is mentioned, which also makes sense), in the case of Critical Process Died it is more relevant than ever. A problem in system files can lead to poor performance of drivers, crashes and other problems.
You can also try to restore the Windows registry if the Critical Process Died blue screen of death began to occur after interventions in the registry by the user or some software. “Traditional medicine” also advises disabling hibernation and sleep mode. Testing the effectiveness of this method is difficult (because there is no exact information about the origins of the error), but it is definitely worth a try if you use hibernation and sleep modes.
- Press Win + X and select Power Options .
- On the window that appears, click Advanced power options .
- The Control Panel window will appear in the Power Options . On the left side of the window, click What the power buttons do .
- On the new window, click Change settings that are currently unavailable . This command is executed as Administrator.
- Uncheck the boxes next to Enable Fast Startup , Sleep Mode , and Hibernation Mode
. - Click Save Changes and monitor your computer.
Reverting the system to the required settings
This method is useful if the user knows exactly when the Windows 10 blue screen first interfered with his work on the PC. In this option, you can roll back the system to a day when the computer was functioning without failures. Again, you should boot in safe mode.
To perform the operation, you need to use the built-in system recovery program or find a saved backup image from Ghost, AOMEI Backupper or Acronis. Of course, the second option is feasible if these programs were installed on the computer before the advent of Blue Screen.
It is important to note that Blue Screen may occur if the user has installed a Windows 10 update. If the problem arose precisely after downloading new files to the operating system, you first need to update the drivers for the computer, and only then remove the installed update.
Another useful tip: after successfully restoring the OS, you need to rescan your computer for viruses. This is a kind of safety net - perhaps the backup copy also contains viruses.
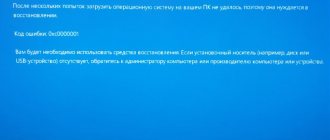
Ways to resolve the error if Windows does not start
If the error “CRITICAL_PROCESS _DIED” appears before entering the usual “tens” workspace, launch Safe Mode. Here you can already try to follow the steps described in the section above (if possible).
You can also use the Recovery Environment if for some reason you cannot enter Safe Mode, or actions in it did not lead to anything. To do this, you need a recovery disk (or bootable flash drive) created earlier on your computer or on another computer with a similar version of the operating system, respecting its bit capacity. Information on how to create a disk and how to use it to launch the Recovery Environment is described in our article - “How to create a recovery disk in Windows 10: on a flash drive, CD and DVD.”
- After starting from the recovery disk, click the “System Restore” button.
- The Recovery Environment will appear, where we are interested in the “Troubleshooting” item, then – “Advanced options” – “System Restore”.
- Thus, it will be possible to roll back the system using restore points. If they are not there, launch Command Prompt here, then check and restore the integrity of system files (a link to a separate article on this operation is provided in the section above).
- Also, through the Recovery Environment, you can start the procedure for returning your PC or laptop to its original state (“Troubleshooting” – “Return the computer to its original state”).
Note: After several unsuccessful attempts to start Windows 10, the Recovery Environment should appear without using a recovery disk/bootable USB flash drive.
Downloading drivers
If the code contains the name of a specific module that causes an error, you need to enter these numbers on the Internet to find out the reasons for the OS malfunction. If, for example, the failure occurs due to network card drivers, you need to find the latest version and download it to your computer.
The problem can still be solved not by downloading updates for the utility, but by rolling it back to the previous version.
Programmers do not recommend completely trusting drivers that the computer automatically updates. They usually work reliably, but sometimes non-standard Microsoft components are loaded onto the PC. This will reduce the performance of the installed systems and also cause a number of problems, including the Windows 10 blue screen.
It is advisable to open the website of the PC or laptop developer yourself to find the released updates for Windows there.
Reason 8: Incorrect overclocking of components
Overclocking of components is carried out by those users who want to increase the power of their computer by changing the frequencies and voltage of devices. However, not everyone understands with what care such manipulations must be carried out and what the consequences of performing this operation incorrectly are. In most situations, improper overclocking affects the temperature of the components. If it exceeds critical levels, the computer automatically shuts down. An incorrectly set voltage can cause other failures, as well as a blue screen of death with various errors. In the case where the problem appeared precisely after overclocking, we recommend checking the correct implementation of the task, and if this does not help, return the equipment to its default state in order to completely get rid of the problem in question.
Resetting Windows or reinstalling the system from external media
Restoring Windows to factory settings - step-by-step instructions:
- Hold Shift and select the “Reboot” option. This can be done through the Start menu or from the Welcome screen.
- The computer will begin to restart.
- Click on the action selection menu and find the “Diagnostics” tab.
- Select the option to return the computer to its original state.
- Next you will need to follow the computer prompts.
Suitable for cases when the computer does not boot into safe mode.
If you have important personal data on your device, you will need to select “Save my files” from the menu. By clicking on “Delete everything”, the information will be erased from the hard drive.
Instructions for reinstalling the system from a flash drive
If Windows recovery does not help, then there is only one option left - reinstalling the system. In this case, all files that are present on the local disk with the system will be deleted.
- First you need to make backup copies of the boot and system partition. They will be needed if the reinstallation does not go according to plan and you have to restore the original version.
- Make an installation flash drive: go to the Microsoft website and download the tool, open and accept the terms of the agreement, follow the prompts that appear on the screen.
- Insert the USB flash drive and restart the PC. If the flash drive is not visible and booting occurs from the HDD, then you should set the boot priority in the BIOS.
- The software installation will begin. When the computer asks you to enter the key, click “Skip”.
- It is advisable to format only the system partition (Usually this is drive C).
- Specify the cleaned partition as the location for installing Windows and click the “Next” button.
- The operating system will begin installation.
Before reinstalling the system, make sure that the problem is NOT with the hard drive. Otherwise, after reinstalling, you will again face the blue screen problem.
Read:
- instructions for creating a bootable flash drive;
- installation instructions for WIndows 10;
Cause of failure
An error with the code “CRITICAL_PROCESS _DIED” is most often caused by device drivers that do not work correctly or were downloaded and installed through the Update Center, while the installation of original drivers is required (for example, from the manufacturer’s website or a disk/flash drive that was in included in the delivery package).
Less commonly, the source of the problem may be:
- cleaning the computer using special programs, as a result of which the necessary system files were deleted;
- damage to system files and/or registry (for example, if they are located on a damaged area of the hard drive with the OS);
- malware that interferes with the normal functioning of a PC or laptop;
- Incorrect completion of the update download and installation process.
Troubleshooting Hardware
If the above steps do not help resolve the error, you need to inspect the components. You will have to check everything: the voltage coming from the power supply, the contacts on the installed motherboard, and even the integrity of the PC’s SATA cables.
The procedure for inspecting the PC hardware to eliminate the system error - blue screen of Windows 10:
- Check your RAM by downloading the Memtest86+ program. The utility also allows you to diagnose incompatibility of RAM modules.
- If Windows is loaded onto your computer's hard drive, you need to download the HDAT2 program, it will help you find bad sectors. After the “treatment”, the necessary data will be saved, and only after that you can think about changing the drive.
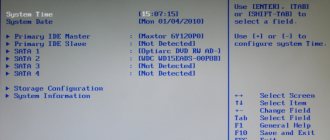
- We'll have to remember whether the system was overclocked in the coming days. If such an operation has been performed, you must return all initial settings to factory settings. To avoid this operation, you can go into the BIOS settings and return them to the original value. But the operation must be carried out extremely carefully, because if an error occurs, the computer cannot be restarted.
- You also need to remember whether the hard drive was switched between IDE, AHCI and RAID. If you switch and do not replace the drivers, a blue screen of Windows 10 (x64 or 32) will certainly appear on your PC. If the parameters have indeed been changed, they need to be returned to their initial position.
- Overheating of the device is another common reason for turning on the Blue Screen. It is necessary to check that the temperature of the chipset, processor and video card does not exceed the maximum values. There are special utilities for this, for example, HWINFO or AIDA
- A burnt-out network card also leads to the problem in question. Typically, the problem in question occurs after severe thunderstorms. This may not be detected immediately, because the activity indicator may continue to blink. This item will be useful to people if their computer connects to the network without using a router. First you need to disconnect the connector and restart the PC. If the problem disappears, you need to remove the network card and replace it with a new one.
Fighting viruses
Among Windows 10 software problems that activate a blue screen, viruses occupy the first place in terms of mass distribution. What to do in this case is clear - remove malware using current antivirus applications, for example, Malwarebytes Anti-Malware and AdwCleaner .
Quite often, a blue screen appears when loading Windows, and therefore does not allow you to install an antivirus and run a virus scan. In this case, try running the OS in Safe Mode with Networking. If the cause of the malfunction is due to viruses, then in this mode you can turn on Windows and scan the system for malware.
Windows 10 blue screen occurs when the system boots
If the Windows 10 blue screen of death occurs when loading the OS or activating an account (literally after a few seconds), the problem is quite difficult to solve, since the user simply will not be able to load the antivirus or use safe mode.
You need to download any antivirus that can be loaded onto a personal computer from an external media. After this, you need to make a bootable USB flash drive with Windows files, plug it into the PC port and select “System Restore”. Pop-up windows will help you install the OS correctly.
The user has several options to choose from on how to fix the Windows 10 blue screen:
- Roll back the system to a specific point.
- Reset Windows 10 to factory settings.
Reason 3: Missing important updates
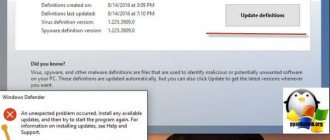
System updates in Windows 10 do not always contain only some innovations related to general functionality. From time to time, developers correct detected errors and conflicts with components, which allows you to get rid of blue screens of death. If you successfully launch Windows, we recommend that you independently scan for updates and install them to check whether the existing problem will go away.
- To do this, open Start and go to the Settings menu.
- There, select the “Update and Security” section.
- Click on the “Check for updates” button and wait for this operation to complete.
If any updates are found, install them and immediately restart your PC for all changes to take effect. If you encounter errors or difficulties while performing this operation, we recommend that you refer to the individual manuals on our website using the links provided below.
Read more: Installing Windows 10 updates Installing updates for Windows 10 manually Troubleshooting problems installing updates in Windows 10
The method is not for beginners in working with PCs
If the user is not new to working with Windows, then you can try a method suitable for people who are well versed in computer technology. To do this, you need to download the BlueScreenView program and study all the dumps. This helps to determine the cause of the breakdown, and then you can quickly find a solution to the problem.
If it turns out that a specific driver is causing everything (perhaps a Windows 10 blue screen error code will appear on the monitor), then it must be replaced immediately. When the screen opens from behind the hard drive, you need to unplug it or replace the cable.
As you can see, there is no universal way to get rid of the blue screen on Windows 10. In each specific case, you need to look for a suitable way to solve the problem. If none of the above methods helped, then there is only one thing left to do - go to the nearest workshop and take your PC for diagnostics.
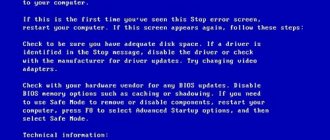
Identifying reasons for activating the screen of death by error code
In the latest versions of Windows, developers have significantly simplified the procedure for recognizing system errors that lead to a blue screen. In the first Windows, BSoD was a set of incomprehensible characters; in subsequent OSes, it displayed the error code and the name of the file in which it occurred. And starting from the eight, it began to contain less technical information, but acquired a blue background, a sad emoticon and a shorter format for recording the error that occurred, which is what interests us.
Very often it is not possible to write off the error code, since the computer restarts immediately after the screen of death appears. The automatic reboot function can be disabled, but only if the BSoD does not appear immediately, but allows you to turn on the OS and work in it for a while. So, to remove auto-reboot at the death screen, do the following:
- Activate the System Settings window using the Win + Pause/Break key combination.
- Open the " Advanced system settings " link.
- In the “ Boot and Recovery ” section, open the “ Advanced ” tab and click on the Options button.
- Perform automatic reboot checkbox .
Now, when the Windows 10 blue screen of death appears, you can safely copy the code; the computer will no longer reboot on its own.
You can find out what the code notation means on special Internet resources.
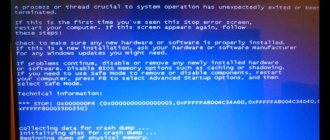
For example, the figure below shows an error code with the nvlddmkm.sys module, the video card driver.
Unfortunately, the operating system does not always allow you to disable automatic reboot, or the error code does not help identify the problem, so you need to know other ways to find the causes of the problem.