Wanted to transfer the system
from Windows 10 to a new and faster SSD or want to do bit-by-bit backups?
Macrium Reflect
application and our step-by-step instructions will help you with this.
Macrium Reflect 2019
is a reliable backup solution.
It is very useful for users and also includes a disk cloning feature similar to Clonezilla. In case you didn’t know, disk cloning
is the process of copying all the bits of the source disk to another one of equal or larger volume.
Although Macrium Reflect 2019
is a paid software, but there is also a free version that you can use when replacing the hard drive (HDD) on your computer with a new solid state drive (SSD). If you need to migrate the OS with all your settings, applications and files without having to reinstall and reconfigure, then this is the best option.
This tutorial will show you how to use the Macrium Reflect program
to clone a hard drive with Windows 10 installed to another drive.
How to clone HDD to SSD using Macrium Reflect
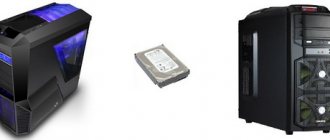
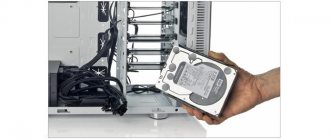
First of all, you need to connect the clone drive
. To do this, connect the new drive to your computer's motherboard. The process for connecting traditional hard drives, SSD drives, and M.2 drives will vary depending on your computer manufacturer and even model, so be sure to visit your computer manufacturer's support website for more detailed information.
You can also connect the drive using a USB adapter
, but you should not use an external drive as you cannot use it as a boot drive.
However, you can use an external USB drive if you intend to create a backup
that you will restore to the same or a different drive.
Transferring Windows 10 from hdd to ssd
Transferring Windows 10 to an SSD is possible using the built-in OS utilities or another program downloaded from the Internet.
Important! After successfully replacing the HDD with an SSD, run the built-in system performance assessment. Based on it, Windows 10 “recognizes” that it is on an SSD and configures the system appropriately.
Using Windows 10 tools
To use the built-in Windows 10 utilities that allow you to transfer from hdd to sdd, you need to do the following:
- prepare media;
- perform the intermediate stage of cloning: press “Win + R” and enter in the control field; select the “backup” section; in the column on the left, click “Create an image; The Wizard will open, click on the intermediate volume Backup on the first screen; enable archiving, wait for the procedure to complete and discard the “disaster recovery” disk;
- move windows to ssd drive.
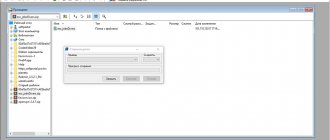
SDD media placed inside the computer cannot be formatted. They go through the verification process, but are not visible in the system. To fix this you need:
- Install the drive in the PC. After booting, only system partition C will be available.
- Press Win (Windows logo key) + X. A menu will open.
- Click “Disk Management.”
- Select partition matrix. If the system is 32-bit, it is MBR, if it is 64-bit, it is GPT.
- Right-click to open the context menu in a blank area (where there are no buttons). You need to select the button to create a simple volume.
- The creation wizard will open, you need to follow the prompts.
- The volume label should contain the word "Backup".
- Click next.
- The last step - the program will show the parameters of the created volume.
Do the same with the solid, giving it a different name.
Data transfer:
- Select language.
- Click on the “Recovery” footnote.
- Select troubleshooting item.
- Indicate that the image needs to be restored.
- Confirm and wait for data recovery to complete.
After restarting, it will boot from the SSD. The system is automatically activated.
Installing Macrium Reflect 2020
Use these steps
to download and install Macrium Reflect on your device:
1)
Open the Macrium Reflect download page - official site
https://www.macrium.com/reflectfree
.
2)
Click the Home Use button.
3)
Click Continue.
4)
Double-click the Macrium Reflect 2020 download agent.
5)
Click the Download button.
6)
Click Next.
7)
Click Next again.
Accept the license to continue.
9)
Click Next again.
10)
Select the Home option (for home use) and click Next.
11)
Uncheck Register this installation of Macrium Reflect.
12)
Once again, click Next and Install.
Once the installation is complete, you can proceed to use the application to perform the Windows cloning process.
Creating a backup in Macrium Reflect
The instructions will cover creating a simple backup of Windows 10 with all the partitions that are necessary for the system to boot and operate. If desired, you can include data partitions in the backup.
After launching Macrium Reflect, the program will automatically open on the Backup tab, on the right side of which the connected physical drives and partitions on them will be displayed, on the left side - the main available actions.
The steps to create a Windows 10 backup will be as follows:
- On the left side, in the “Backup tasks” section, click on the item “Create an image of the partitions required to backup and restore Windows.”
- In the next window, you will see the partitions marked for backup, as well as the ability to configure where to save the backup copy (use a separate partition, or better yet, a separate drive. The backup copy can also be written to CDs or DVDs (it will be split into several disks ) The Advanced Options item allows you to configure some additional settings, such as setting a password for the backup, changing compression options, etc. Click “Next”.
- When you create a backup, you'll be prompted to set up an automatic backup schedule and settings, with the option to perform full, incremental, or differential backups. This instruction does not touch on the topic (but I can suggest it in the comments if necessary). Click “Next” (the graph will not be created without changing the parameters).
- In the next window you will see information about the backup being created. Click "Finish" to begin the backup.
- Specify the name of the backup and confirm the creation of the backup copy. Wait for the process to complete (may take a long time if there is a large amount of data and when working on a HDD).
- Once complete, you will receive a Windows 10 backup with all the necessary partitions in one compressed file with a .mrimg extension (in my case, the original data was 18 GB, the backup was 8 GB). Also, with the default settings, paging and hibernation files are not saved to the backup copy (does not affect performance).
Disk cloning with Macrium Reflect 2020
Use these steps to clone two drives using Macrium Reflect in Windows 10.
Disk cloning can be done while Windows 10 is fully loaded and running
, but it is recommended to close all running applications before continuing.
1)
Open Macrium Reflect.
2)
Click on the Backup tab in the left pane.
3)
Click on the “Backup” tab on the right side.
4)
Click the "Clone this drive" button.
5)
Under Destination, click the Select Disk to Clone option.
6)
Select the target (new) drive.
7)
Click Next twice to skip the schedule option.
Click Finish.
9)
Click OK.
10)
Click Continue and Close.
Once you complete these steps, Macrium Reflect will continue cloning your data
(bitwise) from source to destination disk.
After completing the OS migration process, you must either replace the old disk with a new one (copied), or disconnect the cloned disk and place it in a safe place if it is a backup copy
.
Macrium Reflect Free Wimdows cloning
Macrium Reflect Free is one of the most advanced free tools. The user interface is intuitive, quite fast and responsive, unlike some tools that can be a little clunky in some places. However, it lacks some important features available in premium tools (presumably because it is a free tool). There is also a paid version of Macrium Reflect with all the typical advanced disk imaging features, although it is a little more expensive than other popular backup tools.
One of the strengths of Macrium Reflect is that it automatically configures the Windows PE environment during installation to make creating recovery media as easy as possible. Additionally, unlike many other free tools (and some paid ones), it has advanced backup plan management, allowing you to specify how often differential or full backups are performed, when to discard old backups, and the disk space threshold for deleting old ones backup copies.
Basic settings.
The main window is simple and clear language. Various tasks are accessed on the left side, and the main area on the right has tabs for setting up backups, managing various backup configurations, and scheduling jobs.
Similar to other tools, to take a backup, you select the source partition or drive you want to back up and then select the destination.
As usual, the destination can be a local drive (usually a bad choice), removable media, or a network-attached storage device. Backup speeds are very competitive, although it does have the limitation that you can't exclude personal files and folders that you've backed up elsewhere.
There are a few advanced options when setting up a backup job, although they are a bit sparse due to the fact that this is the free version of the tool. You can change the compression level in the advanced options, but it's best to leave it at the default value.
You can also split your backup files to a specific size if necessary. Features available in the paid Home version also appear in the free version, but when you select them, you are notified that the feature is not available in the free version.
This has the advantage of giving you a clear idea of what features are available on the home version if you decide to upgrade, but it's a bit annoying if you're trying to use a feature that isn't available.
One example of this is the backup encryption option.
In the advanced settings there is an option to choose a password and encryption level, but this will not work in the free version, instead a pop-up notification is displayed.
This also happens when setting up email notifications, although this may be less interesting for most people.
Backup plan.
Advanced backup plan configuration is one of Macrium Reflect's strengths compared to similar imaging software. Macrium Reflect Free gives you more flexibility in how often full and differential backups are automatically run. Typical usage would include periodic full backups and more frequent differential backups in between to save disk space. There are predefined backup plan templates to define when each type of backup occurs, and you are also free to create your own plan.
It's important to note that you can also specify retention rules for each backup type so if you had monthly full backups and weekly differential backups, you could store 6 full backups and 8 differential backups to have 6 months worth of backups , with the last 2 months available weekly. You can also automatically clean up your oldest backups by setting a limit on the remaining disk space on your backup device. These advanced backup and storage capabilities are especially useful if you want to keep backups of your drives running regularly, where you can set it and forget it. One caveat is that although incremental backups appear as an option on the form, they are not available in the free version. Incremental backups can save a significant amount of backup space, so it's something to be aware of. Once a backup is configured, the configuration is saved in an XML backup definition file. Interestingly, you can create a desktop shortcut to this XML file, which will allow you to run the backup job manually from your desktop.
Work planning.
As mentioned above, you can use a predefined backup plan template that defines the frequency of each backup and the type of backup. Typically you want to run random full backups and more frequent differential backups. The schedule for each backup can be edited individually and can be scheduled monthly, weekly, daily, or per login or startup.
File recovery.
Restoring individual files from a system image backup is very simple. The required drivers are installed during initial installation, so there is no need to download and install additional files when using this feature.
Mounting system image files from the recovery tab is quick and seamless, and Macrium Reflect even opens the mounted drive in Windows Explorer, which, while simply done, is an attention to detail missing from some other tools. Once you've finished copying the files you wanted to recover from the mounted drive, you can simply unmount the backup image from the recovery tab.
System Restore
Macrium Reflect is a little different from some other imaging programs when it comes to setting up system recovery. By default, it downloads and installs the Windows Preinstallation Environment (PE) and Automated Installation Kit (AIK) when installing Macrium Reflect. Some other tools offer to do this as a separate step afterwards, but Macrium Reflect does it out of the box, which is easier. There is no option to create a Linux-based recovery disk, which is often the simplest option. However, they seem to have integrated the Windows AIK easily enough with the tool, which doesn't seem to matter and you get automated driver handling without having to worry about it. When you use AIK, it checks and lists all the drivers for your hardware and inserts them into the recovery media. This gives you confidence that the recovery media is configured correctly, although, as always, you should check this yourself by manually running the recovery media after you create it.
Disk cloning
Disk cloning is available to clone the system to a new hard drive when the old one fails, or upgrade to an SSD for improved performance. As with other tools, the second hard drive must be connected and enabled in Windows Computer Management before it becomes available. In the main backup window, there is a "Clone this disk" option to select the partitions to clone and select the target disk to clone. There is an option to clone only the sectors in use (which is the recommended approach) or perform a forensic copy to clone everything.
There is also a feature called "SSD Trim" which apparently marks unused blocks to improve SSD performance. Once the cloning operation is complete, you must update the BIOS to select the cloned drive as the first boot drive, after which the system should boot from the cloned drive and start Windows normally.
As with free disk imaging tools, Macrium Reflect Free lacks some of the advanced features you'd expect in a premium tool. Probably the most important missing features are the inability to exclude files and folders from a backup and the lack of an incremental backup option. Both features can significantly impact the speed and size of backups during normal operation. If you can't exclude personal files that were backed up elsewhere, you're backing up additional data unnecessarily. Likewise, using differential backups instead of incremental backups means that most backups will contain redundant data. Both features are available in the paid home version, although it is more expensive than similar tools. Other notable features missing from Macrium Reflect Free are encryption and email notification.
There's also no cloud backup option, although if you can map your cloud storage to a drive or folder, this should work as an alternative.