Background
Acronis Backup solution version 11.5/11.7 was released more than 5 years ago and, although this product still successfully protects data around the world, it has already become obsolete and objectively necessary changes are overdue, requiring fundamentally new approaches. Despite the fact that the Acronis Backup 12 platform, which meets new trends, was released about a year ago, its “Advanced” edition remained at version 11.7 all this time, which introduced compatibility problems and the difficulty of simultaneously supporting very different architectural solutions. The moment has finally come when the entire Acronis Backup product line will be available on a single platform. This article is dedicated to the release of Acronis Backup 12.5
and, in fact, what new was added in this version. Let us recall that the Acronis Backup 12.5 solution comes in two versions: Standard and Advanced, and has proven its effectiveness as a full-scale backup system for hybrid environments. A simple and convenient web interface provides reliable backup and recovery of physical, virtual and cloud servers from anywhere in the world.
ASD components
To accomplish its tasks, ASD uses several components: Deploy Server, management console, PXE server, management agent and license server, which can be installed on PCs running Windows XP and higher. Another component - Wake-on-LAN Proxy - allows you to turn on computers located on a different subnet where the Wake-on-LAN signal does not pass. Components can be installed on one or different machines. Considering that Deploy Server usually stores all images, a large capacity hard drive may be needed. For the management console, a regular PC running a desktop version of Windows is suitable. Also, using the console, you can install other ASD components on remote systems, for which you need to go to “Tools -> Install components remotely”, then select the one you need in %ProgramFiles%\Common Files\Acronis\SnapDeploy\RemoteInstall and specify the IP or PC name. This will require administrator rights. If the remote PC is running Win7, be sure to disable UAC.
Bootable media can be of two types, both have a similar graphical interface, but differ in the set of components. Thus, Acronis bootable media is based on Linux and is recommended in most cases. If the hardware is not recognized correctly, you should use PXE bootable media built in WinPE (WAIK required). Once the boot components are assembled, they should be transferred to the selected PXE server.
Acronis Console Acronis Backup & Recovery Server
For management, a graphical console and command line tools are used. The process of installing ASD components and subsequent work in the console are carried out using clear wizards that minimize the risk of incorrect parameter settings. The menu item names are clear and specific, and the product is well documented and localized, so there are usually no problems with its use. Once launched, the console connects to the local server; if you need to manage a component (server, license server, PXE server and management agent) located on another machine, select the “Connect” menu item and specify the IP address. The image is created and configured from the “Welcome Screen” menu.
All connections between the agent and the server are secure, which avoids information interception. There is one danger when using PXE to install an OS: if network boot is left in the BIOS by mistake, the user may initiate the installation. Therefore, it is better to protect the installation program with a password by entering it in the appropriate wizard window. For PXE to work, a DHCP server must be active on the network.
ASD licenses are required for each machine deployed: for any number of installations on a specific machine or one successful installation on any machine (tracked by MAC address). The license can be of two types - server or PC; during installation they are usually distributed automatically. But if the Deployment Wizard does not know which license type to apply to the current installation, it will prompt you.
Why a new version? And everything is just as good! (No)
About the sore point: Version 11.7, for all its advantages, has a number of disadvantages that do not allow it to be used in an increasingly expanding world of data.
Literally 5 years ago, data volumes did not exceed several terabytes for the entire organization, while today the count is already in the tens and hundreds. The first necessary change to adapt to modern realities is the transfer of the application from the x32-bit plane to x64, including all components.
This allows you to both support large amounts of system resources when expanding the infrastructure, and support third-party libraries that are no longer available in x32 format. Example of libraries
As an example of such third-party components, I can cite the transition of VMware VDDK, starting from version 6.0, to an exclusively x64 format, which made it very difficult to support new versions of VMware vSphere (6.5 in particular) for our previous version of Acronis Backup 11.7 Advanced. The second obvious prerequisite for a new platform is the general movement towards cloud computing in the IT sector (at least for today).
What's new?
We will not list all the improvements in Acronis Backup 12.5 (you can always see this on the official website), but will focus only on the most key ones, which we believe will be most in demand when using the product or represent know-how worthy of attention.
The difference between Acronis Backup 12.5 Standard and Advanced in terms of functionality provided can be seen here.
Independent data plans
You can now create separate, independent plans to perform backup-related operations, including backup replication, validation, conversion to virtual machines, and cleanup:
If in the previous version 11.7 these operations were part of the overall backup plan and were performed one after another, now it is possible to fine-tune them.
For example, you can perform primary backups on weekdays and perform replication on weekends. Moreover, this replication can be performed by a separate independent agent (for example, located in the DMZ), which is not involved in the processes of directly creating backups.
Part of these changes was the expansion of backup validation capabilities. Prior to version 12.5, validation was only performed in the following way:
- When creating a backup, checksums of a certain number of sectors are written to the archive
- When performing validation, these checksums are recalculated by subtracting sectors from the archive and compared with those recorded in the archive
- If the checksums match, then everything is fine, if not, then the archive is considered broken
The expansion consists of a new validation option by launching a virtual machine from an archive
.
This will work provided you have a VMware vSphere or Microsoft Hyper-V hypervisor, including for backup copies of physical machines
, and not just virtual ones. In other words, we can run a virtual machine on the selected hypervisor, regardless of which platform the image was taken from - all thanks to Acronis Universal Restore technology, applied on the fly.
In the first version, the validity of a running virtual machine is checked by checking the “heartbeat” response from VMware Tools or Hyper-V Integration Services after its start, i.e. At a minimum, we make sure that the guest OS will boot during recovery. In the coming updates, the available checks will be expanded to execute scripts inside a running VM, in addition to “heartbeat”.
Example of settings for validation through starting a virtual machine
Hierarchical management model
Added the ability to create “Departments” (so-called “Units”) within an organization with delegation of control to dedicated administrators.
It works as follows: the chief administrator installs Acronis Backup 12.5 and in the web console interface creates “Departments” for his organization, for example, for offices in Moscow and St. Petersburg.
Then administrators are assigned to the created “Departments” by selecting accounts from the domain.
Adding a Department Administrator(s)
As a result, when logging into the web console as “Department” administrators, only resources that belong to this “Department” will be available.
The resource includes both protected entities, such as virtual or physical machines, application databases, Office 365 mailboxes, etc., and backup storage locations. Resource binding occurs at the level of backup agents, i.e. if you register Agent for VMware (or Agent for Hyper-V) in a certain group, then all virtual machines that are “visible” to this agent will be automatically included in this “Department” (it is not yet possible to divide virtual machines into separate subgroups, and we plan to implement this in the near future).
Registration of agents in “Departments” is carried out at the stage of their installation, including if the installation is performed remotely via the web console, then the agent is automatically registered in the corresponding “Department”, in the context of which management is carried out. Switching between “Departments” is available for the “main” administrator of the organization and is not available for department administrators:
Switching between Departments
Otherwise, managing backup and data management tasks is no different for any of the “Department” administrators.
An audit of all operations performed by administrators of “Departments” is also carried out, i.e. The “chief” administrator, in addition to being able to manage all resources, can also monitor the actions of his subordinates.
Audit log example
Dashboards, alerts and reports
Listening to feedback on the Dashboard in version 11.7, we saw that it was not very informative and sometimes spammed excessively with alerts (aka “alerts”), so in version 12.5 this dashboard was significantly redesigned.
In particular, the following was done for the alert system:
- The scheme for processing “alerts” has been changed: if the condition that led to the occurrence of the “alert” is no longer met, the warning is automatically deactivated. For example, the warning and low free space in the backup storage are automatically cleared if the space has been freed.
- New types of warnings have been added that can resolve situations not previously detected, such as “an expected backup was not created due to the agent being turned off,” “the backup process was stuck,” “the backup was skipped due to a scheduling conflict with another job,” and other.
The dashboard has also undergone significant changes and can now be customized to suit every taste and color by adding “widgets”, which, in turn, contain additional settings and are interactive, providing maximum ease of management.
The same Acronis Monitoring “engine” also powers the creation of reports, which are also interactive, customizable for each “Department” with the ability to regularly send reports by e-mail or save as .pdf.
Report Summary
Automating boot disk management using scripts
First of all, this innovation will be useful to administrators at medium and large enterprises, where automation of IT processes is the key to survival.
How it works: When creating a bootable disk using Acronis Media Builder, there is an option to specify scripts to automatically perform backup and restore operations immediately after booting.
In addition, the option to register a machine booted using a boot disk on Acronis Management Server is now available. This way you can manage your boot disk directly from the web console.
Settings for connecting to Management Server in Media Builder
When loading from such a disk, a corresponding item will appear in the boot menu for running scripts with the ability to switch to the standard GUI interface.
Script menu
The scripts themselves can be edited as described in the documentation.
For example, you can add other menu items, create new scripts, or change the type of operations performed. You can also configure the automatic execution of any of the menu items immediately after loading according to a certain timeout. If you boot into the GUI interface, the machine will automatically register with Acronis Management Server and become available for management:
Managing a machine booted from disk
View from the connected machine:
Acronis Active Protection
This functionality was first released in Acronis True Image 2017 at the beginning of this year, and why it is needed is best described in our previous article, so we will not dwell on it in detail.
In short, Acronis Active Protection is now available in the corporate product line, and not just for home users.
We apply the Acronis Active Protection plan to a machine with Agent for Windows installed inside:
Acronis Active Protection settings
As a result, the corresponding Acronis Active Protection Service service is launched on the machine and begins to monitor unauthorized modifications of files using a special driver over the file system.
Acronis Notary and Acronis ASign
In the context of Acronis Backup 12.5, it is also worth mentioning the support for blockchain technology and the Acronis Notary and Acronis ASign tools based on it, which are intended to ensure the guarantee of data immutability and digital signature of documents, respectively.
These tools were already available in Acronis True Image 2017 New Generation, and have now found their place in corporate solutions.
Acronis Notary, how it works: when creating a backup copy of individual files/folders, a hash tree is created - one entry in the tree for each protected file and this tree is written to the archive. Then the hash of this tree is calculated and added to the Ethereum blockchain database through the notary.acronis.com web service. When checking a file, the required hash is requested from Ethereum and compared with the one calculated relative to the hash of the tree in the archive.
Enabling notarization in a plan
In addition to checking the file from the web console interface, you can download a certificate that is generated based on data in the archive and data from the notary.acronis.com service (which in turn generates requests to Ethereum), which allows you to check a copy of the file not only in the archive , but also in any other place.
Checking a file in the web console interface
Find the required file in the archive:
Test results:
Let me immediately note the features:
- “Notarization” only works for file archives. Those. an archive that includes disks or partitions is not subject to “notarization.”
- When performing a backup job with “notarization” enabled and during verification, Internet access to notary.acronis.com is required (which essentially generates requests to the Ethereum database)
Acronis ASign, in turn, allows you to send electronic documents for signature to several persons at once by e-mail, creating for this a special page on the public service Asign.acronis.com, where the authenticity of the fact of signature by these users is recorded and verified using notarization, i.e. e. all the same Acronis Notary technology. This operation is performed only with archives located in the Acronis cloud, and can be initiated using the web restaurant console, where the “Send for signature” option is available for each document from the backup copy.
Conclusion
In conclusion, I would like to add that we have seriously redesigned the product architecture and improved, among other things, logging and the error generation system.
Monolithic services that were responsible for everything (which was why they could only be maintained with great effort) were “cut up” into separate mini-services that made it possible to accurately identify and locally fix emerging problems without breaking everything else. Thus, the product as a whole has become more stable and faster. PS Testing backup performance is a separate big topic, and we will try to cover it in the following articles.
Links
- Product download page
- Comparison of Standard and Advanced
- Ethereum is a platform for creating decentralized online services based on blockchain
- FAQ on licensing policy and updating from previous versions: English and Russian versions
Images, images
It is very convenient that the image created by the Acronis True Image or Acronis Backup & Recovery backup program can be used as a reference image. Due to this, when organizing periodic backups, all questions about the relevance of the software and the availability of all patches for each host are removed. ASD version 4 also supports Virtual Hard Disk (VHD) created by Win7, Virtual PC or Acronis backup software. Therefore, this scheme is convenient not only for deploying an OS on bare metal, but also for quickly restoring or returning the system to its original state. The latter may be needed during training or in cases where several people use the computer (for example, in an Internet cafe). There is also so-called custom deployment, when it is initiated by the user himself by selecting the appropriate item in the OS boot menu.
Configuring PXE agent settings in the Acronis Snap Deploy console window
The image can be saved to the server's hard drive (recommended), network share, CD/DVD/Blu-ray or USB device. If the image does not fit on one CD/DVD, the next one will be requested. Several compression levels are supported, but this will require more time and resources.
Using ASD, it supports installing Windows operating systems starting from NT/98, and Linux, capturing images from FAT, NTFS, ext2/3/4, ReiserFS, Reiser4, XFS, JFS and Linux Swap file systems. Provides sector-by-sector image removal and OS deployment from officially unsupported file systems.
Restoring a backup
If your computer starts to slow down, malfunctions, is infected with a virus, or stops booting altogether, all you need to do is restore the system from a backup copy.
Please note that all files located on the “C” drive, on the “Desktop” and in user folders such as “My Documents”, etc. will be deleted. Therefore, place all your files on another partition (D drive) and back them up regularly.
10.1. Recovery from Windows
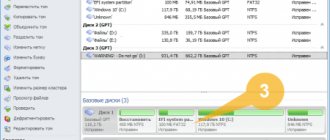
If the computer boots, then system recovery can be launched from Windows. To do this, select the backup copy and click the “Restore Disks” button.
Select all partitions from the backup by checking the boxes and click “Restore now”.
To successfully restore the system, you must restart your computer.
The process of restoring an operating system with installed office programs on a modern computer takes 5-10 minutes.
10.2. Recovery from bootable media
If Windows does not boot, then system recovery can be performed using a bootable CD/DVD, flash drive, or Startup Repair.
If you have activated Startup Repair, then when the following message appears, quickly press F11.
To start Acronis from media, insert a boot disk or flash drive, turn on the computer and hold down the “Boot Menu” key.
To call the boot menu, the “F8”, “F10”, “F11”, “F12” or “Esc” keys can be used. They can often be seen in prompts on the initial boot screen of your computer. You can also find out this information from the instructions, on the website of the motherboard or laptop manufacturer, by searching on the Internet, or at random.
Immediately after turning on the computer, press and hold the “Boot Menu” key until the boot device selection menu appears.
Use the down and up arrows to navigate to the DVD drive or flash drive and press Enter.
Wait for the menu to appear on the blue screen and use the mouse to launch “Acronis True Image”.
If the mouse does not work, then all actions in the program can be performed using the keyboard. The transition between items is carried out using arrows or the “Tab” key, checking boxes with the “Space” key, and confirming actions and pressing buttons with the “Enter” key. The transition between buttons is carried out using the “Tab” key.
In the main program window, click on the “Disks” link in the “Recovery” section.
Click the Browse button.
Find your backup, select it and click OK.
In this and the following windows, the drive letters may differ from those assigned in Windows. Be guided by the size of the partitions and the folders on them.
In the next window, click "Next".
Make sure "Recover disks or partitions" is selected.
Select all sections and click “Next”.
Next, depending on the number of partitions being restored, several identical windows will appear to allow you to manually compare the partitions from the backup with the partitions on the disk where the restoration is taking place.
Here, the drive letters usually don't match those assigned in Windows, but the partitions are mapped correctly and you just need to click "Next" a few times.
If you have several hard drives, then to restore the master boot record (MBR), select the drive on which Windows is installed.
The last window will display a summary of all operations performed.
Carefully check that the partitions are restored to their original location, otherwise you may wipe the partition with your files (drive “D”). For comparison, it is easy to navigate by the sizes of the sections. The partitions to be deleted must be identical in size to those being restored.
If everything is normal in the summary, then click the “Proceed” button and partition recovery will begin. If a partition does not match in size, select it in the left column and indicate where it needs to be restored manually.
The process of restoring an operating system with installed office programs on a modern computer takes 5-10 minutes and should end with a message indicating a successful restoration.
Remove the bootable media, close the program window using the red cross and the computer will reboot.
Peculiarities
Any backup sources
Backup individual files, folders, disk partitions, entire disks and the entire PC.
Any backup locations
Backup to local and external drives, NAS and cloud.
Exclusion from backup according to rules and masks
Excludes files from backup by mask, extension and path.
Security and encryption
Backups are encrypted using AES-256 and are protected at the file level.
Backup planning
Backup after a specified event occurs or at a scheduled time.
Disk cloning
Exact clones of disks at the sector level for transfer to a similar or larger disk.