Acronis Disk Director 12 utility interface
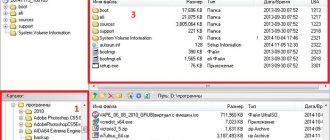
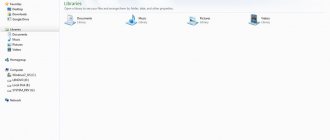
Launch the program shortcut. After the logo, a window will appear with a set of various functions. The window is divided into three parts. On the left are actions and tools (1), on the right are disk partitions with their parameters (2), below are the basic disks in graphical form (3).
At the top there is a control panel that contains the following items:
picture 1
To launch the wizard that creates bootable flash drives, you need to go to the Menu and select Tools, then Wizard, which is responsible for creating drives for downloads.
figure 2
In True Image, this is located in several sections - 1st - in the tab responsible for Backup and Restore, 2nd - in Tools and Utilities. As for further actions, they are almost the same and it does not matter what program was launched using this tool. As an exception, the following exists:
figure 3
figure 4
If more than one Acronis program is installed, here you can select the number of desired components that are worth recording, that is, there is an excellent opportunity to place several programs in the memory of one drive, as well as True Image backup programs, tools for good hard drive operation. disk and recovery of some partitions Disk Direct.
figure 5
Next, you need to decide on the choice of drive where the recording will be made, and also create an ISO if you need to burn a boot disk.
Advice: if it is a flash drive, then it must be formatted prematurely in the required format, usually FAT32.
When this window appears, you need to confirm and wait until the recording ends.
Upon completion, you will receive a ready-made new version of the bootable flash drive, where all Acronis products will be selected. Then it is possible to start the PC, carry out work related to the systems of any partition of the hard drive, restore the PC state from backup copies, as well as preparatory work for the second OS.
Reading SMART readings from the hard drive
If files are not copied on your computer, or programs freeze after opening, then a possible reason for this may be a faulty HDD. Typically, this behavior of the operating system is associated with bad sectors on the hard drive. To be sure that the problem is related to bad sectors of the HDD and not to malware, the first step is to confirm this guess. If the situation described above is observed on your computer, we will install the CrystalDiskInfo utility on it. This utility describes the status of all hard drives installed on your computer. You can download CrystalDiskInfo from its official website https://crystalmark.info. The utility supports Windows OS, from XP to Windows 10.
To check information about the hard drive, the utility uses SMART self-diagnosis technology. SMART technology is used on all manufactured HDDs. Below is an example of checking SMART readings using the CrystalDiskInfo utility on a WD1200JS hard drive. From this window you can see that the program detected its status as “Good” - this means that this hard drive is in perfect order and should not be worried about.
In the following image in the SMART readings, the CrystalDiskInfo utility detected the status of the screw with the message “Alarm”. This message means that the hard drive already has bad sectors or is overheating.
If you see the “Bad” message, this will mean that all bad sectors on the hard drive have been reassigned and will soon be completely damaged.
In both cases, when the program detects “Alarm” and “Bad” messages, you should make a backup copy of all data on the computer, since the screw will soon become unusable.
One solution that can temporarily fix your screw is the Victoria utility. This utility can REMAP BAD sectors, that is, it will reassign bad sectors to spare ones. In the next section we will describe in detail the process of REMAP BAD sectors using the Victoria utility.
Recovering a hard drive using the Victoria program
The Victoria utility was created by a Belarusian programmer and is distributed free of charge. You can download the utility on its official website hdd-911.com. The Victoria utility is distributed in two versions for Windows and DOS. In our case, we will download the Windows version. After launching the Victoria utility on Windows, we will be taken to such a window.
To fix the hard drive, we need to go to the “Tests” tab. On this tab we are interested in the area with the radio buttons Ignore, Erase, Remap and Restore, as well as the Start button. To fix it, we need to select the Remap radio button and click Start.
After these steps, the Victoria program will begin the process of repairing sectors, which can take quite a long time.
After reassigning the sectors, Victoria may be able to restore the bad sectors, and the CrystalDiskInfo utility will display the value “Good”. But a magical fix may not happen, since the reserve sectors may simply be absent and Victoria will not be able to help. In this case, there is only one way out - to completely replace the HDD. In addition to screw treatment, Victoria also allows you to check SMART readings on the “SMART” tab.
I would like to note that all operations that you perform using Victoria are done at your own peril and risk. Using the utility, an inexperienced user can damage the hard drive and also deprive it of warranty service.
Volume Splitting
An equally popular option is the ability to split one volume into two, using the available free space. When splitting, you can also move some files and folders from one volume to another.
The boundary between volumes can be set in two ways: by defining it in the input fields or by dragging the round separator with the mouse. Files are selected in a separate window after clicking the 'Select' button. This operation takes some time to calculate the size of the selected files to correctly display the possible volume boundary.
Fixing file system problems on your hard drive
Many users on Windows computers often experience problems associated with NTFS file system errors. File system problems occur due to malicious utilities and various software. Also, most often problems in the file system occur due to the inexperience of the PC user himself. For example, incorrect handling of the Acronis Disk Director utility. To solve this problem, Windows itself will help us. Windows provides a file system repair tool. To fix the file system on a specific partition, you need to go to its properties. In our case, this is the system partition of the Windows 10 operating system. To run the fix, we need to go to the “Service” tab.
On this tab there is a Check button that we will click.
After this action, a window will appear in which you need to confirm our actions.
After confirming the action, Windows will scan this partition.
After scanning, the system will display a message with the results of scanning the partition for errors.
Using this method, many users restored the operating system to normal operation without having to reinstall it. If the problems lie in the HDD itself, then no amount of checking the disk or reinstalling the OS will help in this case. The only option in this case is that you can resort to the Victoria utility or completely replace the screw with a new one, while reinstalling Windows.
Composition of programs included in Acronis BootCD 2020
- Acronis True Image 2020 for PC 19.0.5634 Rus
- Acronis Disk Director Home 12.0.3223 Rus
- Acronis Universal Restore 11.5.39006 Rus
Download Acronis BootCD (Rus) 2016
(Acronis True Image 2020 + Acronis Disk Director 12 and Acronis Universal Restore)
Tags: computer programs | cleaning, speeding up and optimizing Windows |
Hot news from the network:
Recovering disks using Acronis True Image 2020
Acronis True Image 2020 software is the ideal tool for creating a complete backup of all local partitions, including the system one. This feature is used by many administrators around the world. The created backup of local disks can be restored in a very short time. For example, if the system is infected with a virus or the HDD is broken, in this case you will restore all OS disks in a short period of time. You can find Acronis True Image 2020 on its official website www.acronis.com. By launching the program in question, we will be taken to such a window.
First of all, we will show our readers how you can create a backup copy of local partitions of Acronis True Image 2020. On the first tab “Backup” you can see that the entire computer is selected for backup. That is, a complete backup of all local partitions, including the system one, will be carried out. In the next block you need to select a backup location. In our case, this is local drive E. After selecting the type of backup data and where to save it, click the Create a copy button located in the lower right corner.
Depending on the amount of data being saved, the time it takes to create a backup will depend.
Having completed the backup, we will describe the process of restoring the computer. To do this, we need to create a bootable disk or flash drive for Acronis True Image 2020. This can be done by going to the “TOOLS/BOOTABLE DRIVE WIZARD CREATION” tabs. Below is the wizard that should open.
In this wizard, we will select the first option and continue. In the window that appears, select where we will save the boot drive: to an image or to a flash drive.
After saving the boot drive, the wizard will display a final window.
Having created a bootable USB flash drive or optical disk with Acronis True Image 2020, you can begin data recovery. To do this, we will boot from the bootable USB flash drive when the computer starts. After booting from the boot drive, we find ourselves in the Acronis True Image 2016 menu. Select the first item in this menu, after which we find ourselves in the main Acronis True Image window.
In the program window, go to the “Recovery” tab and find the backup copy of the entire system we previously created.
Now, to restore the Windows system disk and local disks, click the Disk recovery button.
In the wizard that appears, select “Recover disks and partitions” and continue.
In the next window, select all local disks and continue the wizard.
In the “Destination” items, select the original HDD for the first and second disks. If there are many hard drives installed in the system, be careful not to mix up the screws. In the final window, click the Proceed button.
The backup recovery time depends on the size and speed of the HDD. In our case it took 10 minutes.
The example shows how easy it is to make a backup copy of your entire computer, so if you master the Acronis True Image 2020 software package, you can easily restore its functionality in cases where the system is infected or the hard drive is broken. Also, after mastering the program, you will not have questions about how to recover data from a hard drive.
The list of programs included in the Acronis BootCD_USB (x86_x64 UEFI) [Ru] 2020 boot disk:
- Acronis True Image 2020 20.8029 Rus
- Acronis Disk Director Home 12.0.3270 Rus
- Acronis Universal Restore 11.5.40028 Rus
- ** full EFI x64 support
main window of Acronis BootCD 2016
Of course, by downloading and installing Acronis True Image Rus and separately Acronis Disk Director Home 12 (official Russian versions with serial numbers) on your computer, anyone can create their own boot disk images directly in these programs, but these will be completely separate images, not united by a common boot menu, so many users simply do not see the need for this (installing programs on a computer and creating images), since you can always download ready-made images on the Internet.
Acronis Disk Director 12 review
Acronis Disk Director is a professional disk management application that allows users to easily perform volume operations. Most of them are in the waiting queue and all tasks will be automatically executed after confirmation. Before this, tasks can be canceled and returned. Usually tasks are completed quickly.
Program features:
- Create, delete, resize, merge, split, mirror and convert volumes
- Changing the partition type
- Editing and defragmenting disks
- Checking for disk integrity errors
- Waiting in line with cancel and return buttons
- Acronis Recovery Expert recovers deleted volumes
- Creating bootable media
- View log details
- Quick tasks
Acronis Disk Director overview
Partition managers are very useful applications for advanced PC users who frequently reconfigure their hard drives, whether internal or external. Some noteworthy titles in this area are AOMEI Partition Assistant and Paragon Partition Manager.
Another well-known application is Acronis Disk Director. Equipped with a range of different types of disk operations, the program helps users easily restructure their hard drives, in particular by creating, resizing, moving, copying, merging and splitting volumes. At your service is a waiting queue for selected tasks, which will all be completed with the user’s consent. In addition, a built-in module called Acronis Recovery Expert attempts to recover deleted volumes that are preventing the operating system from booting. Version 12 supports Windows 8/8.1, UEFI machines and Win PE 4.0/5.0.
The demo version has no time limit. However, several functions are limited, such as converting MBR disks to GPT disks and vice versa, converting basic disk to dynamic disks and vice versa, and cloning basic disks. Users can unlock them by purchasing the full version for $49.99 or €39.95 (for one PC) or $79.99 or €69.95 (for three PCs).
Note: Acronis Disk Director 12 was tested on an Intel Core i5-3470 CPU @ 3.20GHz with 12 GB RAM, running Windows 8.1 Pro.
Installing the application is very quick and requires minimal attention. The interface is neatly organized and looks a bit like one of the versions of EaseUS Partition Master.
All hard drives displayed
A list showing all hard drives populates immediately upon startup, also displaying their total capacity, free space, type, file system, and status. The bottom of the screen displays a disk map with basic and logical volumes along with unallocated space.
Creating new volumes and setting parameters
New volumes can be easily created using a simple wizard. In addition to creating a primary partition, Acronis gives users the option of creating a simple, spanned, striped or mirror partition, depending on their preferred type of disk space allocation. It is possible to specify the file system, volume size and cluster size, unallocated space before and after the created volume along with the volume type, letter and label.
Modifying existing volumes and configuring settings
Volumes can be resized by specifying the dimension, initial or resulting unallocated space. All unallocated disk space can be added to the volume, while additional free space can be retrieved from other disks as needed. Moreover, the volume can be converted to another type (eg, simple, composite).
Copying volumes and setting parameters
To move or copy a volume, you must select the volume type (basic, simple, spanned, striped, mirrored), destination (unallocated space), and partition size, label, and type (active or inactive primary or logical disk).
Merging and Splitting Volumes
Merging two or more sections requires two steps: selecting the items to join, and selecting the section to which the others will be added. Meanwhile, volume partitioning is done by selecting the original or new volume size. To simplify the entire process, users can instruct Acronis to move selected files to a new volume using a basic tree display.
Changing the partition type and editing the disk
Other disk management tools focus on creating a mirror copy of a volume, editing drive labels and letters, creating active, inactive and logical partitions, changing their type (e.g. DOS 12-bit FAT, XENIX root), deleting volumes to reallocate free disk space, and changing cluster size.
In addition, it is possible to format and defragment volumes, hide them, check disks for errors with the ability to try to fix them and any bad sectors, and edit volumes by examining hexadecimal data, partition table, FAT16 boot sector, FAT32 boot sector or FS Info, NTFS boot sector or FAT Folder mode. You can also use tree display.
Perform pending operations and view log details
Most operations are not performed immediately. Instead, they are placed in a waiting queue, after which all selected tasks will require confirmation from the user to complete. This queue displays a summary of each task, such as hard drive number, drive letter, file system, volume label, and size when deleting the volume. Unfortunately, Acronis does not implement a mechanism for rearranging already marked operations. However, users can restore each step by undoing and redoing actions.
All program activity is recorded in a log, which contains the date and time of each event along with job details. Either all events or just selected ones can be exported to XML format for closer inspection.
Recovering deleted volumes and creating bootable media
Acronis Recovery Expert is a special component designed to completely recover deleted volumes, especially if the OS stops booting. It has an automatic mode that identifies all hard drives connected to the PC. In cases where it stops working, you can use manual mode to select free space to see the lost partition, along with the search method (quick or advanced).
Last but not least, Acronis includes a tool for creating a boot disk based on the Linux kernel or Windows PE. Here, users will have to download third-party components.
Functions and capabilities of the program
Acronis Disk Director contains many functions and there is simply not enough time to talk about them all. Therefore, in this article we will focus on the most important and most frequently used aspects. So, how to use the program:
Dividing a hard drive into volumes
First, you need to select which disk you want to split into additional partitions.
Then click the split volume button.
Next, a dialog box with settings will appear. You can choose which size will remain on the previous volume and which will be on the new one.
If you also want to transfer files during this operation, check the “transfer selected files to the created volume” checkbox and click the select button, then select the necessary files on your hdd.
After the manipulations have been completed, click the “OK” button, the program will split the previous volume into two new ones, and the first available letter will be assigned to the new volume.
Attention! If you are sharing a disk on which Windows is installed, do not move important system folders under any circumstances. For example, the “WINDOWS” or “Program files” folder. This will cause the system to crash. Also, if you transfer games or programs, some of them may not be available.
Recovering a hard drive with Acronis disk director
If you suddenly need a program to recover your hard drive, the disk director has a built-in utility called Acronis Recovery Expert. With its help, you can not only restore a deleted volume, but also try to repair after software or physical damage to the hdd. To launch recovery expert, in the lower left corner of the program, in the tools section, click on the button of the same name.
The program launch window will open, click “Next”, after which you will see a window like in the picture. Select manual or automatic recovery mode.
Automatic mode - the program will repair almost everything itself; if it fails to find deleted volumes, you will be prompted to perform a full search to more thoroughly examine the disk space.
Important : in automatic mode, selecting a volume for recovery is not available; the procedure will be performed without user intervention.
Manual mode is more flexible, but you will have to choose the space for recovery yourself. After selecting a space, you will need to select a quick or full search. The difference between them is the accuracy and speed of the operation.
If the search is successful, the volumes available for recovery and the “restore” button will appear on the program screen, clicking on which will complete the hard drive repair operation. Otherwise, a warning window will be displayed indicating that the search was unsuccessful.
Increasing and decreasing disk size
In order to change the disk size, you need to select the disk itself, and then click the “resize volume” button in the operations menu.
A window will open with a certain set of settings. In order to change the volume size, you can either move the sliders at the beginning and end of the yellow stripe, or change the digital value in the places highlighted in the picture.
The above will only reduce the disk size, but what if you need to increase the size? Check the boxes as shown in the figure.
And in the place where the arrow points, we reduce the value, the lower the %, the more space will be available to increase the main partition. Naturally, this space is not taken from nowhere, but will be taken from the unallocated space of other disks. Next, drag the sliders or change the numbers in the fields in the opposite direction, as we did for reduction.
Checking the hdd for bad sectors and errors
The Acronis Disk Director program also has functions for checking the disk for errors and bad sectors. To do this, according to the old scheme, select the required section and click the “Check” button.
In the window that appears, check the boxes for “Fix detected errors” and “Repair bad sectors.” If you want to get more detailed instructions, click the “Details” button and help will open with a more complete description. Click “OK” and wait for the procedure to complete.
Important : if the disk is currently in use, it will only check for errors and bad sectors, and they will be corrected after the system is rebooted.
Convert from GMT to MBR
This conversion may be required if you need to install an OS or software that does not support the current data storage method. It must be remembered that all disk volumes will become logical, volumes for which more than 2 TB are allocated will be unavailable, and boot volumes will stop loading until they are converted to primary volumes. To start the conversion, select the disk, right-click on it and select “Convert to MBR”.
Next, a warning will appear stating that acronis disk director is about to convert the disk from GMT to MBR. Click the "OK" button, your task will be added to the waiting list. Confirmation will be required to complete it, otherwise it will be canceled after the program is turned off.
Convert from MBR to GMT
If you need to install more than 4 volumes on a disk, install a volume larger than 2 TB, or add additional security measures against data corruption, you must convert from MBR to GMT. The conversion operation itself is described in the paragraph above, with the only exception that the conversion occurs in the opposite direction.
Note : if the MBR disk contains a boot volume running the operating system, then it cannot be converted.
Disk cloning
One of the most useful operations if you want to “move” to another hard drive. With its help, you can completely copy the contents of one disk to another. This will transfer all volumes and their contents. That is, you do not have to install the operating system with all your settings and programs again. Unfortunately, this utility is only available for media with MBR data storage method. To make a copy, select the disk that you want to duplicate and click on the “Clone base disk” button.
In the window that appears, if your hard drive is divided into several partitions or you have connected another hdd, you will see them in the list. Simply select the desired goal and click “Next”. In my case there were no such devices, so the list is empty.
After that, select the cloning method. Available to choose from:
- One to one: information is copied as is, that is, without any changes. If there is more space on the target disk, it will remain unallocated.
- Use proportional resizing of volumes: this method is recommended for use if the target disk is different in size. The program will make a proportional change in disk space.
Note : for disks with a smaller size than the original one, the program will try to move all data without loss. If possible, the procedure will continue, otherwise it will be interrupted.
Click Finish to add the clone operation to the queue. Next, you need to confirm; if this is not done, when you exit the program, all changes will not be saved.
Formatting your hard drive
The program's toolkit includes disk formatting. In what cases may this be needed:
- You need to clear the disk of any information contained there.
- The disk file system needs to be changed.
- When creating a new volume.
To start the formatting process, select the disk, then either right-click on it or select “Format” from the operation menu.
On the next screen, you can select the file system type, cluster size, and set the volume label.
File system type
You can select the file system type from the drop-down list. Let's look at each:
- NTFS is a standard file system; if you are working under Windows 7, Windows 8, Windows 10, we recommend choosing it.
- FAT32 - there are a number of restrictions, such as a maximum file size of 4GB, a volume size of no more than 32GB. Not recommended for use.
- EXT3 - used in Linux-based operating systems. The main advantage over EXT2 is that it provides for recording additional data that will allow you to restore the system in case of failures.
- EXT2, also a Linux kernel system, is an example of performance and surprisingly outperforms EXT3 in file reading and writing speed. More suitable for flash drives and SSD drives, since the absence of recording data to facilitate recovery from failures will help preserve the life of devices with a limited number of write cycles longer.
- ReiserFS is only supported on Linux and was specifically designed for it. It also has failure recovery algorithms. There is a function for placing files in one block, this will prevent disk fragmentation, but will greatly reduce performance. However, this function can and is recommended to be disabled on machines with weak hardware.
- Linux swap - used to unload RAM. Part of the RAM data is placed in this section, which is very convenient when executing programs that use a large amount of data at startup and rarely access it later.
- FAT16 is one of the oldest systems, there is a volume size limit of 2GB. The selection is only available on versions of Acronis Disk Director 2020 and earlier.
Cluster size
Experts recommend choosing “Auto” or “Default”. This choice is suitable for those who find it difficult to choose the cluster size, and will also help avoid conflicts when choosing the file system type. If you plan to store a large number of small files on your system, reducing the size can improve performance.
Important : Do not set a large cluster size for systems that do not support it. For example: NTFS may incorrectly show the remaining disk space when selecting more than 8KB.
After selecting the cluster size and file system type, you can specify the volume label (optional), click “OK”. The operation will be added to the queue and will need to be confirmed before it can be completed.