Greetings to all readers of my blog! Fedor Lykov is in touch. In this article we will discuss with you the question of how to make a stroke in Photoshop.
Adobe Photoshop is a professional raster graphics editor. The name of this application has long become a household name, and a person who knows how to use its tools in the eyes of other people immediately becomes two heads taller. Photoshop clearly doesn’t need any further introduction, and that’s what we’ll be working with today.
When designing drawings, pictures and documents, outlining is often used to highlight and decorate an object or text against a general background. This is done quickly and not difficult, so, gentlemen, don’t worry. Everything will be at the same level and clearly explained.
If you still haven’t read the article about graphic editors, be sure to follow the link and read it. There is a lot of interesting information that can help you understand some of the details and nuances of the work.
Well, let's not linger any longer on the introduction, but let's quickly get down to business! Happy reading!
How to make text in Photoshop
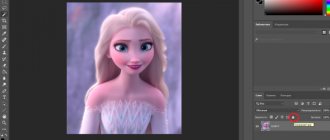
First, let's open the picture in Adobe Photoshop (Photoshop) on which we want to write a congratulation.
Go to the main menu, select File and in the menu that opens, select the Open command. A dialog box will open in which you need to find the folder with our image and open it in Photoshop.
To write text in Photoshop, you need to select the T tool (Text or TypeTool) in the toolbar (in the picture, the T tool is marked with a red square).
Stroke along the contour
How to make a stroke in Photoshop? The second way is to create an outline and draw it.
In Photoshop, a path is a vector line that specifies the direction of brush movement. That is, stroke in this case is drawing with the selected brush along a given path.
Using the Selection Tool, Lasso Tool, or Magic Wand Tool, select the portion of the image you want to trace. Through the “Window” menu item, call up “Outlines”. In this window, find the “Make a work path from the selected area” button. In the Tools panel, select the Brush tool and set its parameters (shape, color, etc.). Then in the Paths window, click the Stroke Path with Brush button. The area you previously selected will be outlined. After this, delete the outline.
Thus, to stroke along the contour, you do not need to create a new layer; it is enough to define a stimulating line along which the program will draw with the brush of your choice.
Please note that the stroke in this case will be placed on the layer you specify, including the new one.
How to add text in Photoshop
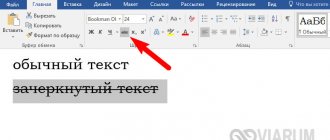
Press the T key simultaneously with the Shift key and select “Horizontal Text” from the drop-down menu.
Next, click on the postcard field in the place where we want to write the text, after which a dot with a blinking cursor in the form of a vertical stick will appear on the postcard field.
Simultaneously with the appearance of the vertical cursor in the Layers palette (Layers, press F7 to open), a new text layer is automatically created, which is highlighted in blue, which means the layer is activated.
All further actions with the text (choosing a font, font size, font color and other settings) will be performed only with the text layer activated.
To select a font in the text tool settings panel, open a window with a list of fonts and in the drop-down window we will see a list of fonts. From the list of fonts, select the font we need.
Simple processing of rectangular images
I have already told you how to make a beautiful frame and blur the edges in Photoshop. Today I will teach you how to outline them with patterns in two clicks, complement the outline with gradients and one color. This is done as simply as possible.
I have already created a ready-made base where I will insert a rectangular photo. If you need to outline inside a photo, this is not necessary. But since I want to show you all the capabilities of the tool, I had no choice. Now you will understand everything.
In the article on how to stretch an image, I told you why it is better not to copy the image using Ctrl + C and paste (Ctrl + V), but to drag it from the folder to the program window. I won't repeat myself. It was in this way that I added a photo of a set of micro SD and USB adapter from Aliexpress to a previously prepared window.
I don't do anything else. I simply click on this layer in the menu on the right to make it active. Next, in the panel just below, I go to the “Add Layer Style” tool and find the stroke among the tools.
I often process pictures in batches, like screenshots. I just open all the photos at once and work with the size and stroke. In this case, the Add Layer Style tool is closed. To open it, you just need to click on the lock next to the image layer and you will be able to trace the edge.
But, since I want to show you all the functions of the tool, I will work with the image inserted into the base. After you click on the stroke, an additional window will open. You can see the changes in real time. Check the box next to the preview option.
First of all, I choose where the stroke will be located: along the inner edge of the picture, outer or from the center. The last possibility, I think, is the most unclear. Suppose you set a stroke of 6 pixels, then 3 of them will be inside the picture and 3 outside.
If I had not inserted the picture into the prepared background, I would not have been able to show you the stroke of the outer edge.
Now I select the stroke type. You can do it in one color.
Click on the box next to the color and select the appropriate shade from the menu that opens.
You can do the same if you select a gradient in the stroke type menu.
Pattern processing of a picture with sharp corners will be no different.
Only at the last stage of working with the drawing do I decide on the thickness of the line.
By the way, you can add two different types at the same time. For example, several internal ones of different thicknesses or external ones. To do this, click on the plus sign next to the tool in the menu on the left. There are also many additional tools, such as shadow.
This is what my image will look like in the end.
How to choose text color and size in Photoshop
Next to the font selection window there is a font size selection window in which you need to select the font size.
Next, select the text color. On the Tool Settings Panel there is a colored square that is responsible for choosing a color. You need to hover the cursor over the square, and the inscription “Set text color” will appear. When you click on this square, the Primary Color Palette will open, where you can select a color.
If you want to take a color for the text not from the color palette, but directly from the image, then you need to move the cursor to the picture and a cursor in the form of an eyedropper will appear, with which you need to click on the image in the place where the color you need is located.
Now you can start writing the text. In our case, we will write the word “Congratulations!” and take the color for the text from the green ribbon in the picture. The result is this inscription:
To make our inscription brighter and more highlighted, we will use layer styles.
To do this, open the Layer Style palette, which is located on the bottom panel of the Layers palette and is indicated by the fx icon.
Stroke layer style settings and options
This layer style is the easiest effect to use, the purpose of the settings is intuitive, but still there are a couple of nuances.
Dialog window
Style dialog box in Russian and English Photoshop:
Size
Using this slider you can change the thickness of the stroke, the values are indicated in pixels
How to outline text in Photoshop
In the window that opens, select “Blending Options” and then select the “Stroke” layer style, and the style settings window will appear.
The “Size” setting, which is shown as a slider, allows you to set the desired stroke width. Select the 3px stroke option and apply the selected style to our text.
The next parameter “Position” is responsible for the location of the stroke - select the “outside” parameter. Set the Blend Mode to Normal and Opacity to 100%.
In the “Stroke Type” parameter, select a color from the color palette. In our case, we choose black.
Method #2: Outlining text
See also: “How to make 3D letters in Photoshop”
There is another way to highlight the inscription - make a stroke. This method is suitable when you have a very contrasting and multi-colored image. We took as an example a black version of our logo and a photo of a forest:
As you can see, the logo is almost invisible. Let's start selecting text.
- This time we won't need to create an additional layer, as in the first case. Everything is much simpler. Right click on the layer with the logo/text and select “Blending Options”.
- Afterwards, check the “Stroke” box. The stroke settings will appear. In our case, we just need to set the stroke size to 3 px. and choose white color, because... Our logo is black.
- After adjusting the stroke, without closing the window, go to the “Shadow” item. Here all the parameters are also individual, but in our case they are as follows:
- After we have entered all the necessary parameters in the “Stroke” and “Shadow” items, click OK and get the result:
Effects with text in Photoshop
After applying a layer style in the Layers Palette, an “fx” icon will appear on the text layer, and below two words “effects” and “stroke”.
Before each inscription there is an image of an “eye”, by clicking on which you can disable or enable the layer style.
In addition to the “Stroke” parameter, you can also apply any layer blending parameters to the text layer, for example, shadow, emboss, inner shadow, inner glow, gloss and other parameters.
Now our text, with the “Stroke” blending option applied to it, looks more vibrant.
To move the text, you need to activate the “Move” tool and use this tool to position the inscription in the place we need.
Another Stroke Dialog Box
The second way to stroke a layer is to select the “Layer” menu item, and then “Layer Style”. A window will open where all the parameters that can be set for the layer style will be visible. Among them you need to select “Stroke”.
The same window with styles is called up by clicking the “Add Layer Style” button in the “Layers” window.
Calling this general window with styles through the menu, of course, is not very convenient, and if you use stroke often, then for dynamic work you should set a key combination for this window.
To do this, go to the “Editing” menu, then “Keyboard Shortcuts”, find one of the above paths through the menu items and set a combination that is convenient for you.
How to change text in Photoshop
If there is a need to change the text, you first need to click on the “text” tool to activate the text layer and click in the place of the text where you need to continue the phrase or correct the error.
If you need to compress the text a little or stretch it, then use the “Free Transform” command.
To do this, go to the Control Panel and open the “Editing” tab. In the window that appears, select “free transform”, and a frame will appear around the text, with which you can stretch or shrink the text, or rotate the text.
After performing the transformation, you need to apply the results of the text transformation by double-clicking the left mouse button on the text.
Changing the text color and font is done as described above.
Free stroke - shapes
I put a screenshot of space candies from Ali on the blank and I want to circle the image itself in an oval. How to do it.
First I'll rasterize the layer. This is necessary if you simply dragged a picture from a folder into the program’s working field. Right-click on the selected layer to make an additional window appear, and then select Rasterize.
Next, select a selection and draw a shape. If you need an even circle or square, just hold Shift while moving the cursor.
Right-click in the center of the selected shape and select “Stroke.”
Unfortunately, now you will have to act on a whim. There is no pre-screening provided.
As a result, I got this option.
In my opinion this is not the best way. It is much easier to draw a circle or square using the appropriate shape. Remove the fill and leave only the outline. Apply the style you want to it and you're done.
How to insert text in Photoshop
If you need to paste ready-made text written in another editor into the picture field, then you first need to select the text and then place it on the clipboard using the Ctrl+C (Copy) command.
Then go to Photoshop and click on the T tool, click the cursor on the postcard field and paste the text using the Ctrl + V command.
You can apply all the previously described actions to the inserted text, namely: changing the font, color, applying a layer style to the text and other effects available in Photoshop.
How to quickly select a picture in Photoshop
If simple geometric objects are clear, we will move on to more complex objects. Let's see how you can quickly select an object in a picture.
How to create a selection with the Magic Wand tool
The Magic Wand tool should be used when working with a single color. In this case, by clicking on one color, the tool analyzes the entire picture. Having found an adjacent area similar in color, it highlights it.
Look at the example of Winnie the Pooh to see how this effect works in action.
- Choose a picture with Winnie the Pooh.
- Activate the “Magic Wand” tool.
- Click on any color of the image and get a full selection.
The color chosen was brown. All adjacent brown color (which has no outline) is highlighted in one motion. The tool helps you trace an object in a picture or photo very quickly.
In addition, if you hold down the “+” key and click on other colors, the selection will be combined.
Smart selection with the Quick Selection tool
Let's move on to a more complex object that needs to be highlighted in the photograph. I really liked the photo of the plane taking off. My goal: select an object (airplane) and cut it out from the background, copying it to another background.
In this case, the previously discussed tools will not work, but “Quick Selection” will work exclusively.
- Select the plane layer.
- Activate the Quick Selection tool.
The tool works as follows: by clicking on a color, the colors located next to the click are analyzed and combined. Continue clicking on the object until the entire object is selected.
You can also simply click on an object and, without releasing the left mouse button, move the cursor over the entire object.
- Outline the plane so that the selection area covers it completely.
In this way, you can quickly select an object in Photoshop that has a less even outline.
It is quite possible that along with the desired object, something else will stand out. In this case, press the Alt key (deselect) and drag over the erroneously selected objects. Inaccuracies will be removed, but the main selection will remain untouched.
Free stroke of an object
To outline a free-form object, the first thing you will need to do is select a brush.
Set it up right away. Decide on a color, in my case white is best, size, hardness, transparency, and so on.
Now, you need to select the shape. Make "ants" crawl along the edge. This can be done using a pen, a magic wand and many other tools. If you don't know how to do this, read my article about five ways to cut out an image.
I'll use a simple method. I'll hold Ctrl and click on the layer thumbnail. By the way, I again took the picture from Ali as an example. This time it's a "World Map" wall sticker .
Now I go to the contours tab and create a new worker.
All that remains is to right-click on the new path and select a stroke.
OK it's all over Now. If you liked this article, subscribe to the newsletter and I will make your life easier. There are many methods to complete a task. I find the simplest solutions.
Learning Photoshop
If you want to seriously study Photoshop, not scour the Internet for answers to certain questions, but systematically and consistently comprehend the basics of this amazing program, even if you are a complete zero, then I highly recommend Zinaida Lukyanova’s course - “ Photoshop from scratch in VIP 3.0 video format "
Even if you are a beginner, I will show you how you can quickly master Photoshop, create a website, promote a group, and not spend a lot of time and money. Creating is easy and enjoyable if you don’t bother with complicated settings. Find out secrets and learn from the experiences of others.