Backups are required
Imagine turning on your computer, but it... doesn't turn on. Simply because all your photos, music and programs, all your experiences accumulated in the computer's memory, have disappeared. They are no longer there. And you can’t go back to the past, you can’t bring back a disappeared memory. Don't want to think about that? But this situation sooner or later happens to every owner of a computer, laptop and phone. Equipment breaks down sooner or later. We need to prepare for this.
Hard drives break. Flash drives too. DVDs disintegrate over time. The memory of the past fades away if you do not take care of backup. Fortunately, we live in an era of storing information digitally, so copying data is an almost free process.
In order not to bother too much with regularly creating backup copies of important documents, you can use one of the appropriate software. For example, Todo Backup Free. She will take care of copying the selected documents. And not just copying, but regularly on a schedule. And not just all files, but only new and changed ones. This saves a lot of space and time.
Todo Backup Free - where to download, versions
You can download and install the basic version of the program for free from the download page. There is a big “Free Download” button, don’t miss it.
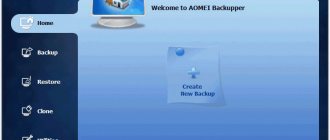
EaseUS Todo Backup Free really simplifies the task of storing copies of your data. The program has all the functions for creating file backups and even more:
- can make backup copies of entire folders and disks;
- knows how to backup the system disk (Windows with all programs);
- creates a boot disk for copying and restoring without starting the system;
- performs a copy operation before loading the operating system;
- can clone the system to another disk;
- Supports all versions of Windows: from XP to 10.
For particularly sophisticated requirements, extended versions are available on the developer’s website: Home and Business. If you need alerts by email, triggering based on system events (login, reboot, disk connection, etc.) and from the command line, these paid versions are useful for this. However, this is not necessary - the free one is enough for most scenarios for creating backups at home.
| Possibilities | Free | Home | Business |
| Backing up files, folders, disk partitions | + | + | + |
| Starting a scheduled backup | + | + | + |
| Copy modes: full, incremental, only changed data | + | + | + |
| Function to transfer data to another PC | — | + | + |
| Notification of successful copying by email | — | + | + |
| Run Windows programs and commands before and after completing a task | — | + | + |
| Launching copy tasks based on events | — | + | + |
| Excluding files and folders by name mask | — | + | + |
| Commercial use | — | — | + |
| Starting a backup from the command line | — | — | + |
| Centralized backup management | — | — | + |
Buying Home with a holiday discount
At the time of writing this article, a half-price discount is available for purchasing the Home version: purchase with a 50% discount. The cost will be a little more than a thousand rubles.
How does this program work?
Todo Backup is easy to use. You need to choose where to save copies of data and what exactly to save. The program will not engage in primitive copying; instead, it creates archives (backups) with compressed documents in order to save space.
Perhaps the only drawback that may confuse you is the lack of a Russian-language interface. Fortunately, you can always use the “F1” button to call up online help, which can be translated from English into a language you understand. In general, the program is simple, and you don’t really need to tinker with it - you set it up once and it works.
Choosing a storage location
This is the main thing to think about and is not directly related to the program. The essence of backup is storage on different media. Preferably in geographically different places, then no fires or disasters are scary. That is, there is no point in choosing a folder on “C:” or, say, “D:” as a storage location if these are partitions of the same disk. A cat will run by, knock the laptop onto the floor - and that’s it, there’s neither the original nor the backup.
Fortunately, Todo Backup can connect to NAS file storage and network folders on other computers. Personally, I have neither one nor the other; I store backups in cloud storage devices connected as disks via the WebDAV protocol. But you can do it easier: buy an external hard drive and store Todo Backup archives there.
During installation, you will see that the installer will prompt you to select the default location for storing backups: a folder on your local or network computer, a disk or NAS. The selection can always be changed in the program in the Settings window:
Selecting a storage location for your backup data
In the backup tasks themselves, the path can also be changed.
What to reserve and how
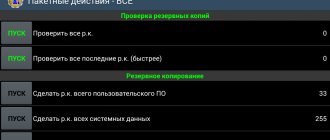
In the main window, you can add backup tasks using the left panel.
- Disk backup - archiving entire disks. Quite a long procedure, not very useful for home users. It will be useful, for example, before reinstalling the operating system in case you need to return everything “as it was.”
- System disk backup. The entire contents of the “C:” drive are archived, that is, Windows, programs and folders with documents, including those on the Desktop.
- File Backup is what you need in 99% of cases. Simply back up selected directories and files.
- Archiving mail from Outlook. Works only in Home and Business versions.
- Smart Backup is essentially a backup of files and folders, but all settings are as universal as possible so as not to fill the backup media with extra bytes, but at the same time ensure reliable data storage.
Perhaps the most optimal archiving method is File Backup. Click and you will be taken to an absolutely clear and simple window:
Creating a reservation task
I would especially like to mention the frequency setting (the “Schedule: …” button). You can make a copy once at a specified time and then run the task manually (convenient if you store backups on an external hard drive that you connect from time to time). You can configure the task to run regularly, then the program will work on its own.
Frequency setting
The frequency, as well as file selection and other options, can be changed at any time. By the way, pay attention to the “Backup method” item - there are three ways to create backups:
- Full - when an archive of all selected data is created each time. This is a long process, because you need to process the entire data array. And it requires a lot of space.
- Incremental is the default method selected in the program. The idea is simple: first, a Full copy of the data is created, then each time you start an archiving operation, archives with new and changed files are created instead of a full copy. Space is saved and the backup operation is greatly accelerated. In this case, full copies will also be created so that the previous such archive can be deleted with all incremental “successors”.
- Differential is almost the same as incremental, only each archive with changed data will store all changes since the creation of the full archive. Thus, intermediate backups can be deleted at any time; to restore the last backup, only one full and one differential are needed. In incremental mode, the entire chain from full to the latest incremental is needed to restore the most recent copy of the data.
By default, incremental is selected - it is most advantageous to use in terms of both speed and space.
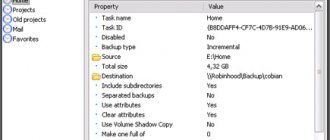
The “Image-reserve strategy” button is responsible for the actual storage of backup data and the ability to return data not only in the most recent state, but also as it was some time ago. This is worth adjusting to limit the number of archives. After all, most likely, you don’t need the ability to restore a set of files created a year ago, and it won’t hurt to save space.
There are two options here: either set “i will preserve no more than” and specify a short period of time to which the copy can be rolled back, or using “i will preserve the last” you limit the number of backup copies without reference to time.
In the first case, if, say, you select a period of one week, then when you run the backup task on the 8th day, a full copy of the data will be created, and the data from eight days ago will be deleted. In the second case, the number of archives is limited, that is, if you set it to 1, then only the current full archive will always be stored. If the allowed number is 10 copies, then 1 full copy will be created, then 9 incremental ones, then full again, and so on in a circle. It sounds complicated, but this is a useful feature because it allows you to go back in time even when creating a fresh archive. You don’t have to bother and put it as in the screenshot above.
Clicking the “Backup options” button opens backup compression and encryption options (you can protect archives with problems). Keep in mind that these settings cannot be changed after the task has been created. The rest can be done at any time by clicking Advanced - Edit plan.
How to start a reservation
The first copy is created after setting up the task. It will, of course, be the most complete. All subsequent times, a full copy can be generated manually by clicking the Backup in the main EaseUS Todo Backup window:
Making a full copy
If the default method is specified in the task properties (that is, incremental), then during the scheduled launch, incremental copies will be created. You can create an archive of this type yourself using the right-click context menu:
Creating an incremental copy manually
There is no need to make any additional movements. Well, perhaps connect the flash drive or disk on which the backup is being made in advance. After successful creation of the archive, a window will appear in the corner of the screen:
How to restore data from a backup
Easily! Click the Recovery :
Starting a restore from a backup
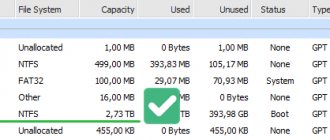
A window will appear where you can choose what and where to restore:
There you can go back in time and choose which copy to take data from:
The availability of previous versions depends on the settings that I described above. The ability to go back in time is one of the most useful features of EaseUS Todo Backup.
By the way, here is the error 0x961A3E1 after the recovery is completed, as a rule, not an error at all, but a message that the folders already contained original files and the program did not overwrite them:
In fact, everything was successfully restored
This is perhaps the only strange thing I found in this backup program. It works and is good.
Installing EaseUS Todo Backup
Even if you have only recently used a computer, installation will not be difficult - just double-click the file, after which you need to select the installation and program language (unfortunately, there is no Russian, but the interface is intuitive, so this can hardly be called a disadvantage). In the window that opens, you must click Accept , thus accepting the user agreement. Next, you need to select the folder in which the program will be installed (if this point is not entirely clear to you, then leave the option selected by default). Then you can check two boxes: the top one allows you to install a shortcut to the application on your desktop, and the bottom one allows you to join the Customer Experience Improvement Program. At the final pre-installation step, you need to select the folder where the “backups” will subsequently be saved.
Other options
Rescue disk
In Todo Backup Free, I came across a feature that is rarely found in free data backup solutions - an emergency recovery disk. These are special versions of Windows or Linux (two options to choose from), launched from a boot disk or flash drive. The creation of an emergency disk is started from the menu, the Create Emergency Disk item.
The version with WinPE weighs 525 MB and contains a simplified (in a good way) version of the utility. By booting from such a disk, you can create a backup copy of the disk or files, restore from an existing one, repair the MBR of the disk, and run the utilities built into Windows.
Windows version
The Linux image weighs 56 MB. There is a greatly simplified version of the software, in which there are minimal functions - recovery of files and disk partitions, their backup, as well as cloning partitions from one media to another.
Linux based version
I believe that this is the most adequate and safest way to create a copy of the system disk. Booted up, pressed a button - and you're done, you can return the entire hard drive to its previous state at any time. Starting such a copy from under Windows is fraught with difficulties, because the files used by the system and programs may simply not be readable. The authors of the program did everything possible, including implementing the PreOS function - launching Todo Backup before the system starts (essentially the same versions as for the boot disk), but, in my opinion, booting from a separate disk is safer.
Smart Backup
This is essentially an option for the lazy. Click the appropriate button in the panel, select directories, storage location and... done! Backups will be created periodically. You can add directories and files to the “Smart Backup” list directly from Windows Explorer through the context menu.
EASEUS Partition Master 13.0 Unlimited Edition (2019) PC | RePack & Portable by elchupacabra
Program version
: 13.0
Official website
: link
Interface language
: English and others
Treatment
: not required (the installer has already been disinfected)
System requirements
: Server 2012 R2/2008/2003/10/8/7/Vista/XP
Description
:
EaseUS Partition Master
is a convenient program for partitioning your hard drive into partitions, which will not only simplify routine tasks, but also help you edit and manage disk partitions. Namely, quickly and easily create, delete and format partitions, changing their size and location without losing data, using free disk space. With this program, you can create, delete, format partitions on your hard drive quickly and easily. The most attractive feature is the ability to resize/move your partitions using free space without deleting data.
Main features of the program:
Resize and move partitions without losing data HDD Copy and Partition Copy Wizards for easy disk upgrade or copying partitions to protected data Resize (reduce or enlarge) partitions and disks during the copy process RAID support Partition recovery solution Create, delete and format partitions using simple steps View detailed information about disks, partitions and file systems Hide and show hidden partitions Set one active partition as bootable Create bootable CD/DVD drives for easy, faster partition management Powerful security features that protect your system from crashes and partitioning Preview changes to a partition before applying them Change cluster sizes automatically and manually Function to undo actions taken while managing partitions Supports up to 2 TB partition on MBR and up to 4 TB partition on GPT Friendly user interface
Version comparison table:
Link
What's new in version:
New Features Revamped user interface: more streamlined and intuitive.
New feature: fast rollback protects data when move/resize processes are interrupted.
Now create WinPE bootable disk in any supported language.
Features of RePack:
1. Does not require registration (patch) 2. Multilingual interface (no Russian)
3. Picks up the external settings file settings.reg (if located next to the installer)
“Silent” installation with the /SILENT or /VERYSILENT switches (or the “Silent installation.cmd” file)
Note!!!
During installation, you will be prompted to visit the website of the author of the repack. Uncheck the box if desired.