FileZilla
You can download the FileZilla FTP client at https://filezilla-project.org/. To use the FileZilla program, you need to set it up by following the following steps, illustrated with pictures.
1. Launch the FileZilla program, then in the top menu click File
, in the menu that opens, select
Site Manager
.
2. In the window that opens, click the New site
.
3. In accordance with the FTP instructions - uploading files to the server, receive and specify the connection parameters:
Host
— FTP server address.
Server type
- FTP - File Transfer Protocol.
The input type
is normal.
User
- username.
Password
- password.
Encryption
- Use plain FTP.
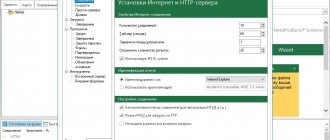
4. Go to the Transfer Settings
, select passive transfer mode, check the
Limit simultaneous connections
and set
the Maximum number of connections
to two.
Click the Connect
.
5. A connection to the server will occur, after which you can work in the usual mode of a two-panel file manager.
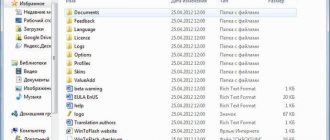
Important:
The content of your site should be placed in the
/home/login/Your_domain/docs/
.
Preparing to install your own FTP server
As promised, first, let’s briefly talk about what FTP is for those who don’t know:
FTP (File Transport Protocol) is a data transfer protocol that allows you to access files on a remote server. This technology distinguishes between two sides, server (FTP server) and client (FTP client). In case you want to share your music collection or artistic research, you will need an FTP server, that is, a place where everyone can connect and download everything that you have authorized. Just how to set this up will be discussed in this article.
I would like to immediately note that the article will consider the option of home use, without the tricky and subtle settings that are used in the case of full-fledged corporate servers.
To install, you need to download one of the multiple distributions that will help you deploy an FTP server. Personally, I recommend that you use FileZilla Server, because it, like the client I once mentioned (see the article at the link above), is extremely easy to install and configure, and is also free.
You can download it, for example, from this link.
FAR
To use the FAR program, you need to configure it by following the following steps, illustrated with images.
1. Launch the FAR program. Determine in which panel you want to make an FTP connection. Let's say on the right. Then press Alt F2 and select the FTP line in the window that appears.
2. Press Shift+F4, a window for entering connection parameters will appear.
3. Fill in the required fields. In the Descripton , you can give any name to the custom ftp connection; check the Passive mode .
4. After that, click the Save .
5. On the panel of the FAR program you have selected, for us it is the right one, a line will appear with the newly created name of the ftp connection. While on this line, press Enter.
6. A connection to the server will occur and you can work in the usual mode of a two-panel file manager.
Total Commander
You can download Total Commander at https://www.ghisler.com.
1. Launch the Total Commander program, then in the top menu click Network , in the menu that opens select Connect to FTP server
.
2. In the window that opens, click the Add
.
3. In accordance with the FTP instructions - uploading files to the server, receive and specify the connection parameters:
Connection name
- come up with a name, for example, “Hosting login”.
Server
—FTP server address.
Account
- username.
Password
—user password.
Set the Passive sharing mode flag (like a Web browser)
.
After that click OK
.
4. Select the created connection and click the Connect
.
5. A connection to the server will occur, after which you can work in the usual mode of a two-panel file manager.
Important
: The content of your site should be placed in the
/home/login/Your_domain/docs/ .
In-Depth Filezilla Server Configuration
To avoid a critical error, as well as other failures when working with the program, it is recommended to do in-depth configuration of the software. As a rule, the following is provided here:
- first of all, you set up a name that will be active when third-party users connect;
- you will also need to register the current IP address that will be used during synchronization;
- subsequently you can set IP addresses that will not be able to interface with the server space;
- the next step is to set the parameters for passive response and select the range of ports;
- among other things, you will also need to set some restrictions for connecting other users.
It is worth noting that through the auxiliary settings, you can also save the most important information regarding the input into memory. A number of options for the correct operation of the client will remain unchanged.
Total Commander (version 6.53)
Russified version
1. Launch the TotalCommander program, then, in the top menu, click Configuration and select the line Settings: FTP
2. In the next window, you need to check for a checkmark in the line Use passive mode by default and if it is not there, check it.
After which, click OK and the window will disappear.
3. In the top menu, click FTP and select the line Connect to FTP server .
4. In the window that appears, click the Add .
5. A new window will appear in which you need to set the necessary parameters and check the box Passive exchange mode .
After that, press the OK .
6. In the remaining window, click the Connect .
7. A connection to the server will occur and you can work in the usual mode of a two-panel file manager.
iWeb
After creating the site, the iWeb program window will appear on the screen with the contents of your site.
On the left side of the window, click on the name of the site you want to publish. In this example, the site is called My Site .
On the page that opens, enter the parameters required for publication. In the Publishing : Publish to: FTP Site name: Name of your site Contact email: your email
In the FTP server settings : Server address: ftp.your_login.nichost.ru User: user_name (usually your_ftp_login) Password: your_password Directory/path: your_site/docs Protocol: FTP Port: 21
For the URL, enter your website address.
Next, click the Test connection . If the connection is successful, a message will appear: “Testing completed successfully.” You can now publish your site to the selected FTP server.
If unsuccessful, check again that the entered parameters are correct. After testing is successfully completed, click the Publish site .
If the publication is successful, a message will appear: “Your site has been published.”
Important: By default, iWeb uses UTF-8 text encoding. Our hosting uses Windows-1251 encoding by default. To display your site correctly, you need to go to your hosting control panel, section Web server → Sites → your_site and select UTF-8 encoding Site encoding .
Installing and configuring the server using FileZilla
First, you need to download the FileZilla server program to your computer. It is better to do this from the official website, since the application is distributed free of charge and third-party resources may contain viruses. Next, you need to install the FileZilla server program on your computer using a standard installer. Installation of the application proceeds in a standard manner, with the exception of one point where it is necessary to configure the server control panel and select a port number.
FileZilla server works on a loopback interface, that is, without password authorization, since the program is often used directly on the computer without the need for remote control. If you want to connect to the server remotely via the network, you can later reconfigure the interface and add a password for authorization.
The initial setup will complete after you are prompted to log in to the FTP server. You will need to enter the IP address, port number, and password that you specified initially. After entering the correct data, the FileZilla server control panel will open. Overall, this panel is easy to understand. At the top you can see buttons for controlling the panel itself, at the bottom there is an information field, and even lower, statistics are displayed.
Now let’s briefly look at what each button in FileZilla server means - this will make setting up the program easier and it will be easier for you to create a server:
- File – section that contains functions for controlling the panel:
- Connect to Server – connect to the server;
- Disconnect – end the connection session to the server;
- Quit – exit the control panel.
- Server – section for managing the FTP server:
- Active – start or stop the server;
- Lock – this setting prohibits or allows the creation of new sessions connecting to the server.
- Edit – section for editing server configurations:
- Settings – setting up the basic capabilities of the server;
- Users – settings related to users;
- Groups – setting up user groups.
CuteFTP (version 7.0)
1. Launch the CuteFTP program, then in the top menu click Tools
2. Select the Site Manager .
3. In the window that appears, select the line Display Site Manager .
4. In the new window, click on the New .
5. Two submenu lines will appear at the bottom. Select the FTP Site .
6. A window will appear:
7. Fill in the fields in this window.
8. Then, without leaving this window, click the Type .
9. In the new window, in the Data Connection Type select the line Use PASV - this is a passive data transfer mode.
10. Then, in the lower row of buttons, click on the Connect .
11. A connection to the server will occur and you can work in the usual mode of a two-panel file manager.
Common errors when setting up Filezilla Server
Do not forget that some users periodically make real mistakes when working with the client, among which the following problems are most common:
- The utility does not connect to the hosting - check the connection.
- An error appears when enabled - look at the plugin settings.
- The connection is broken - the port or domain is entered incorrectly.
- File downloading stops - the address of the object's location on the device is entered incorrectly.
Among other things, the occurrence of problems can be associated with a fairly low network connection speed, which also has a very negative effect on the correct operation of the entire application.
Important! In order not to encounter problems, it is recommended that before activating the switch, you should go through a short familiarization with the most common operating problems.
Today, all users can independently create remote servers with regular access to the network. There are no significant difficulties in this if you first read and become familiar with the parameters that need to be adjusted after including everything necessary. Subsequently, all this will allow you to store personal data as safely as possible, and also a way to protect your device from hacker attacks, viruses and malware.
FlashFXP
You can download the trial version here: https://www.inicom.net/pages/en.ffxp-download.php After installation, there are several ways to connect to the server: By registering through Site Manager and Quick Connection.
Fast connection.
1. To quickly connect, you need to click on the lightning icon and select Quick Connect or press the F8 button.
2. After which, in the form that opens:
3. Fill in the Server or Url , User Name , Password .
4. After this, your FTP account will open.
5. After which you will need to go to the folder with the name of your site and in it to the Docs Folder. After that, on the left side, go to the folder with the files necessary for the site,
Site Manager.
1. In order to enter the Site Manager, you need to go to the Sites → Site Manager or press the F4 button
2. Next in the window that opens
3. Click on the New Site . Next in the window
4. Enter the name of the site and click on the OK . Next, fill in the fields IP Address , User name , Password
5. Replace test111 with your hosting ID. Then click the Apply . Then, by clicking on the lightning button in the drop-down menu, select the name of your connection.
6. Clicking on it will take you to your ftp account.
Remaining FTP server settings
If you don’t want to frequently encounter an error like “Can’t connect,” you also need to make some remaining settings that will help you avoid a number of failures and problems during operation, namely:
- first of all, you set the speed limit to turn on;
- you should also activate the file compression mode;
- to activate a secure connection, you will need to enable the SSL and TLS protocols, and also specify the path to the private key;
- Additionally, here you can enable blocking for users who make the nth attempt to turn on, but cannot connect to the resource due to some circumstances.
In practice, enabling all these additional options is not mandatory, however, it will allow you to significantly supplement the work of the project, and also limit visitor traffic and unwanted guests.