A computer mouse with an additional two or four buttons on the sides is a great way to add convenience to computer control. Mice with additional buttons are initially intended for gamers: in the settings of many games, you can assign certain game actions to these buttons. But additional mouse buttons can be used not only in games, but when performing any other tasks in the Windows environment and third-party programs.
Windows itself does not provide functionality for programming these buttons, but special third-party programs can do this. X-Mouse Button Control is one of them. With its help, you can program additional mouse buttons and, if necessary, reassign the main buttons. Let's look at the key features of the program.
About the program
X-Mouse Button Control is a program, alas, with an unfriendly interface, but it is a smart program, and it is free. It is Russified and provides the widest possibilities for customizing mouse operations in the Windows environment. Using X-Mouse Button Control we can program buttons and mouse actions for the entire Windows environment and for individual programs. We can create several configurations with different settings, export all our settings to profile save files and then import them on other computers or after reinstalling the operating system.
X-Mouse Button Control exists in a regular version for installation in the Windows environment and in a portable version.
Official program download site:
https://www.highrez.co.uk/downloads/XMouseButtonControl.htm
Mouse settings
To configure mouse parameters, you can use two tools - third-party software or the options section built into the system. In the first case, we get many functions, but increased complexity in operation, and in the second we can quickly adjust the parameters to suit ourselves.
Third party programs
This software can be divided into two parts – universal and proprietary. The first products work with any manipulator, and the second only with devices from specific manufacturers.
Read more: Programs for setting up a mouse
We will use the first option and look at the process using the X-Mouse Button Control as an example. This software is indispensable for setting up mice with additional buttons from those vendors that do not have their own software.
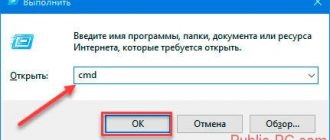
After installation and launch, the first thing we will do is enable the Russian language.
- Go to the “Settings” menu.
- On the “Language” tab, select “Russian” and click OK.
- In the main window, click “Apply” and close it.
- Call the program again by double-clicking on its icon in the notification area.
Now you can proceed to setting the parameters. Let's dwell on the principle of operation of the program. It allows you to assign actions to any mouse buttons, including additional ones, if any. In addition, it is possible to create two scenarios, as well as add multiple profiles for different applications. For example, when working in Photoshop, we select a pre-prepared profile and in it, switching between layers, we “force” the mouse to perform different operations.
- Create a profile by clicking “Add”.
- Next, select a program from the list of already running ones or click the browse button.
- Find the corresponding executable file on the disk and open it.
- Give the profile a name in the “Description” field and OK.
- Click on the created profile and start setting up.
- On the right side of the interface, select the key for which we want to configure the action and open the list. Let's take a simulation as an example.
- After reading the instructions, enter the required keys. Let it be the combination CTRL+SHIFT+ALT+E.
Give the action a name and click OK.
- Click “Apply”.
- The profile is configured, now when working in Photoshop you can merge layers by clicking the selected button. If you need to disable this function, simply switch to “Layer 2” in the X-Mouse Button Control menu in the notification area (right-click on the icon – “Layers”).
Russification
The program provides Russian-language localization, but is not automatically installed with it in Russian-language Windows. Therefore, the first thing after installing X-Mouse Button Control is to call up the context menu on its icon in the system tray, where the program will henceforth hide and provide its functions in the background. And select “Setup” .
Next, click “Settings” .
We go to the “Language” and here we set the Russian language. Click "Ok" .
Close all program windows.
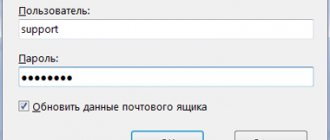
I once already wrote about how to configure the A4Tech WOP-35 mouse on Windows, but in the comments to this article it turned out that there is an even simpler solution. Dear leomaks leomaks said that the X-Mouse Button Control , which allows you to configure any buttons on any mouse the way we want! ~I’ll just warn you in advance, those who are hoping to see a setting for horizontal scrolling with the second wheel here will have to disappoint you. I don't have such a recipe yet. Perhaps this one will help, but I haven’t tried it myself, so I can’t promise it.~ In the comments to the above article, they suggested that in order for both scroll wheels and five buttons to work properly, you need to install the driver from the off-site, which I used earlier, By the way, I didn’t find it. Here is a direct link to it - https://www.a4tech.com/driver/iWheelZoomA780_RP2W5KB.zip
As stated on the program page, X-Mouse Button Control supports both 32-bit (x86) and 64-bit (x64) releases of Windows XP and later versions of Windows - 2000/XP/2003/Vista/2008/7. The requirements stated on the manufacturer's website include the mouse itself and a driver that supports 5 buttons. Although, having installed X-Mouse Button Control on a clean, freshly installed Windows 7 (x86) system, I did not need to install any drivers to configure additional buttons on my A4Tech WOP-35 mouse. Everything worked right away! This is probably due to the fact that the standard mouse driver for Windows already supports 5 buttons.
The program is free, and its installer weighs only 3.9MB, so for those who still do not have unlimited Internet it will not be too expensive. It is also worth noting that in this article we will consider the utility version 2.3.
First you need to install it. The installation is completely standard.
Invitation to install, license agreement, selection of installation directory...
Only the fourth dialog box is not quite standard. Here you can select the directory in which the program will save its settings and logs. And this is great, because usually, after reinstalling the operating system, the settings of all programs are lost, but in this case you will only need to install the program and point it to the directory with configs, and it will pick up the profiles that have already been configured. A trifle, but nice. You just need to understand that the settings should be stored on a partition (disk) that you do not format when reinstalling the system.
Then everything is the same as usual - the process of unpacking and installation, and at the end a proposal to launch the newly installed software. Also, after clicking the “Finish” button, the program page will open in your standard browser.
After installing X-Mouse Button Control , it is not necessary to restart the computer, although it is still better to do so. After doing one thing, do you usually need to collect your thoughts in order to move on to another activity? What's worse about your pet?
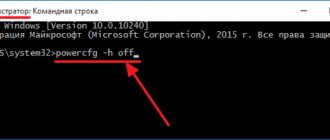
In the system tray, the icon of our utility looks like in the picture above and if we click on it, we will see the following window.
And this is how exactly the event that happened on the mouse will be highlighted. That is, if you left-click the mouse, the selector that indicates the action for this button will be highlighted. Thus, we can easily configure all the buttons without difficulty and “scientific poking”.
This is what my configured program for two additional buttons looks like. As you can see, the left side button performs the “Copy” action (Ctrl+C), and the right one “Paste” (Ctrl+V). The problem arose with setting the second wheel. X-Mouse Button Control treats it exactly the same as the main one.
It is also possible to set up different profiles for different programs. That is, in each program, the mouse buttons can react differently, as you would like. To do this, click the “Add” button and select the application for which you will configure a new profile.
To apply all the settings, you need to click on the “Apply” button, which is what this means in English
If I didn’t take something into account or described something incorrectly, write about it in the comments, I’ll correct/add it. Let me take my leave with this! Thank you for your attention. Goodbye.
Programming buttons and mouse actions
“Settings” in it .
Let's get to the mouse operations settings window. Here, in fact, programming of its buttons and actions is carried out. The left, right and middle mouse buttons, side buttons, moving the wheel up and down, tilting the wheel to the right and left can be programmed using the X-Mouse Button Control. In our case, we have a mouse with two side buttons, and we will assign them to decrease and increase the system volume. Assign and apply using the “Apply” .
Giving the side keys specifically for these two operations will be the optimal solution for many users who use their home computer primarily for leisure activities. Sudden changes in volume in films and online videos have probably infuriated people with acute hearing or those who sat down to “sit quietly at the computer” more than once while the child was sleeping. The side buttons of the mouse, programmed to control the volume, will provide the ability to quickly respond in such cases.
Those who need other options for additional buttons can choose from a fairly large list of operations offered by the X-Mouse Button Control. This list is the same for all buttons and mouse actions. We can not only program additional buttons, but also reassign the operation of the main buttons or wheel if they are out of order or simply for your individual use. So, for any button or mouse action we can configure scrolling with the wheel, tilting the wheel, clicking the right and left keys, and performing a double click. Among other operations, we can select sticking buttons, blocking cursor movement along axes, individual system operations such as: adjusting screen brightness, copying and pasting, switching windows, launching a screen saver, locking the computer, etc. In addition to direct mouse operations and system actions, we also Simulation of the operation of individual keyboard keys and key combinations will be available for customization.
Another possibility for programming additional buttons and reassigning the main ones is: magnifying glass action, multimedia operations block, browser operations block, operations with system windows, etc.
All these operations are available both for the main mouse settings profile and for individual program profiles.
Important: do not reassign left mouse button clicks without a conscious need, for experimental purposes.
Additional buttons
The Windows operating system does not allow you to customize the multifunctional manipulator to suit your tastes. If your device contains five or six buttons, then, of course, you can use them, but only those functions that are assigned by default will be assigned to them. In the case of the Microsoft OS, this is a right and left click, scrolling with the wheel and zooming.
There are many ways to reconfigure your mouse, one of which is installing drivers. However, this option is applicable only for popular manufacturers, whose installations for various equipment can be easily found on the Internet. Among them are “Genius”, “Razer”, but what to do if the controller you bought does not bear the brand logo and finding drivers for it is not an easy task? And even if it is branded, not everyone wants to occupy computer memory with its settings.
In this case, the X-Mouse Button Control program comes to the rescue, weighing only 4 MB. Quick installation and ease of use will allow you to reconfigure the gadget for yourself in a matter of minutes using the program. All you have to do is open the options menu and select for each button the action you want it to perform.
Individual program profiles
At the first stage, we programmed buttons and mouse actions for the entire operating system - the Windows environment and its third-party programs. These settings relate to the main programming profile - the profile called "default" . But for each of the programs we need, we can create our own separate profiles and in these profiles we can configure buttons and mouse actions differently. These individual program profiles will be exceptions to the general rule: the default profile settings will be applied to the system as a whole and other programs, and their individual settings will take effect when working with these individual programs.
To set up a profile for a separate program, launch it. In the X-Mouse Button Control window, on the left panel, click the “Add” . And in the list of application selection that appears, we indicate the running program we need. In our case, this is Microsoft Word . In the left panel in the X-Mouse Button Control settings window, we will see that Microsoft Word has its own separate profile.
Well, we can configure other mouse operations in it. When working with Microsoft Word, the side buttons of the mouse should perform the same task as in the system as a whole - volume control. Therefore, in the settings we set the value for them according to the default profile. But we will reassign the operation for the middle button. By default, the middle button scrolls at an adjustable speed. This function is not used in our case; only regular scrolling with the wheel is used. We will assign the search operation for the selected text on the Internet to the middle button. This will bring real convenience to working with a text editor: having selected a word or fragment of text, clicking the middle mouse button will instantly send it to the search engine in the default browser.
And using this principle, we can create profiles with individual customized operations for buttons and mouse actions in all the programs we frequently use.
gMote
gMote is a simple application that can be used to control mouse settings for working in the Windows operating system. Using this application, you can adjust not only the operation of the mouse, but also the “sensitivity”.
In order to start working with the application, you need to launch it. Then activate the “Active” function, and then select “Create gesture”.
Next, indicate the “Recording” gesture, and then make the desired movement.
Then you need to save the created gesture by clicking the “Save set” button.
Profiles of individual system areas
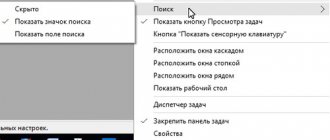
We can set up profiles not only for individual programs, but also for individual system areas - desktop, taskbar, tray. The mouse operations programmed in such a profile will take effect only if we are in these areas - working with the desktop or moving the cursor to a particular area on the taskbar. To configure such an area in the profiles panel, you need to add a new profile and click “Select window” .
Next, click on the window search engine while holding down the left mouse button.
And drag it to the desired area. In our case, this will be the area where the volume icon is placed in the system tray.
The area has been defined, now check the box to activate the profile only if the cursor is in the selected area. We can also enter a profile description and click “Ok” .
And now let's program. This is a profile that will work in one narrow area of Windows - only when hovering over the volume icon, so we can safely abandon some of the standard mouse control values. Let's make this narrow area multimedia: we'll set the volume control to rotate the wheel, we can turn off the sound completely with the middle button, and we'll use the side buttons to scroll through the tracks.
Perhaps the small icon area in the system tray will be too small for some. In this case, you can expand the area: double-click the profile in the left panel and specify larger values for the cursor area.
Layers
And finally, let's look at another of the key features of the X-Mouse Button Control - working with layers. Everything is simple here: each layer is a separate configuration of assignments for buttons and mouse actions. Separate configuration for all profiles - for the general system profile (default), for profiles of individual programs and system areas. In layer 2 we can set alternative mouse control settings to layer 1. And apply the configuration of this layer 2 when necessary.
In our example, we will sharpen layer 2 for creating screenshots. In the default profile, we traditionally leave the side buttons as volume controls; for this purpose, we set their values to the same as in layer 1. And we assign the operations of capturing the entire screen and a separate window to rotating the mouse wheel. These operations will work if there is an active screenshot on the system.
We will not adjust the values for other profiles in layer 2 separately; we will set their values identical to the default layer.
You can switch between layers using the hotkeys specified in the X-Mouse Button Control settings or in the system tray.
In total, a maximum of 10 such layers with alternative configurations can be created. By default, only two layers are active; in the program settings, you can activate other layers from these 10 possible ones.