Recently, there are more and more users who prefer devices from Apple. To work with them you need to have a special program – iTunes. With its help, you can transfer files from one device to another, listen to music, etc. However, many people have problems installing iTunes on their computer. After reading the article, you will understand what to do if iTunes does not install on Windows 7 and 10. It is worth noting that this process is not particularly different in other operating systems.
Troubleshooting iTunes installation problems.
ADVICE. To avoid unpleasant situations, download the program only from the official iTunes website. You should make sure that you are on the right resource, after which you can safely download the latest version of the application.
Insufficient account permissions
In order for the program to work correctly and “without jambs”, it needs to be granted full administrator rights. First, check if you are using an account with administrator rights. If not, then go to another account that has these rights. You can also try clicking on the iTunes shortcut and selecting “Run as administrator” from the menu that opens.
How to install iTunes on your computer?
Before you start installing the downloaded utility, the developers recommend installing “QuickTime”.
To install iTunes, follow the following sequential steps:
- Open, for example, through Windows Explorer or using any other file manager, the location where the downloaded installation exe file is saved and double-click to launch it;
- At the next stage of action, a window will most likely appear notifying the user about the danger for Windows XP; you just need to click “Yes”;
- Wait for the installer to complete its work; if the PC does not have modern capabilities, you will need to wait up to several minutes;
- In the menu that appears, click “Next”;
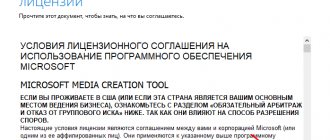
- Then take into account and agree to the license agreement by checking the “I accept...” line;
- Click “Next”;
- After this, a menu will appear in which it is possible to set checkboxes at the user’s personal discretion; it is recommended to check the boxes on the proposed items and click “Install”;
- Wait for the installation process to complete and in the last window that appears, click on the “Finish” button;
- Restart PC;
- Ready! Now you can check the functionality, connect your iPhone or iPad to your computer and load, for example, music into them.
Note: if you do not have an iTunes account, then before the above procedure you need to create one on the program support website.
Remaining files from the previous version
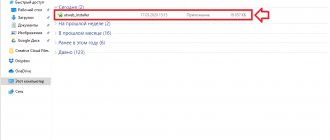
If you downloaded iTunes before, the remaining files may prevent you from installing it again. In order for the program to begin installing, you must delete all residual files and folders. To do this, it is recommended to use the Revo Uninstaller utility, which can be downloaded from the link.
After you have successfully downloaded this application, you should find and delete the following files:
- iTunes;
- QuickTime;
- Bonjour;
- Apple Software Update;
- Apple Mobile Device Support;
- Apple Application Support.
Next, restart your computer and try installing iTunes again.
iTunes won't install: possible causes and solutions
There are several types of errors that may appear when trying to install iTunes on “ten”:
- An error occurred during the installation of Microsoft assembly… HRESULT: 0x80073715. An error occurred during installation.
- Apple application support was not found (Windows error 2). This error indicates that Apple apps are not supported.
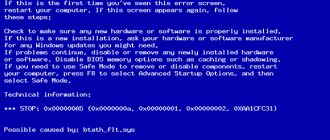
- Failure to start the Apple Mobile Device Service and others.
Windows Installer error when installing iTunes
When a Windows Installer error occurs, a window appears on the screen with a message stating that the service that is responsible for installing all applications on the system could not be started on the PC. This means that for one reason or another the service was disabled.
Solving the problem is quite simple - you need to start the service manually in a special window:
- On the keyboard, simultaneously press two buttons Win and R. This action will call the universal “Run” utility to launch programs and services on the PC. Enter the code services.msc and click on the OK button or press “Enter” on the keyboard.
In the “Open” line, write the request services.msc and click on OK
- After a few seconds, the “Services” window will appear on the display. In the right panel with a long list, look for a service called “Windows Installer”. Since the items are in alphabetical order, this will be toward the end of the list.
In the Services window, look for the Windows Installer service.
- If the “Advanced” tab at the bottom of the window is active, you can start the service immediately by clicking on the link located to the left of the list. There is another way: double-click on the line with the name of the service to open an additional window with its parameters. If the click does not work, right-click and select “Properties” from the context menu.
In the context menu of the service, click on “Properties”
- In the window that opens, click on “Run”. Let's try installing iTunes again.
Click on the “Run” button to enable the service
- When the installation is complete, you can turn off the service so that it does not consume PC resources. To do this, click on “Stop”. After this, you can close all windows.
After installing the program, you can click on the “Stop” button
Insufficient account permissions
In order for the installer to be able to install all the necessary iTunes components on the computer, the system must run under the “Administrator” account, that is, the computer user must have advanced rights . Thus, you need to make sure that you are currently in the administrator account and, if you do not have such an “account,” create one.
First, you can try running the iTunes installer file with administrator rights. To do this, right-click on the file and select “Run as administrator” from the options menu.
Try running the installer as administrator
If this trick didn't work, go to your account settings:
- Click on the “Start” button in the lower left corner of the screen. In the menu we find the current profile icon in the form of a portrait of a person. Right-click on it and select “Change account settings” from the list.
Click on the “Change account settings” item in the context menu
- The Options window will open. In the “Your data” section we study information about the current account in which we are currently working. If there is an o, then there is no need to do anything additional - the problem of installation failure has other reasons.
In the “Your data” tab, see if your account is an administrator account
- If it is “Standard user”, then go to the administrator account if there is one, or create it right there yourself. To do this, go to the penultimate tab “Family and other people”. Click on the “Add a user for this computer” link.
Click on the link “Add a user for this computer”
- In the new additional window, click on the link “I don’t have login information for this person” if you don’t have a Microsoft account. If there is one, log in using your login details.
Click on “I don’t have this person’s login information”
- On the next page, click on another link - “Add a user without a Microsoft account.”
If you don't have a Microsoft account, click on the "Add a user without a Microsoft account" link
- In the first line, enter the name (a required parameter) and, if desired, the password twice (it is optional). Click on the blue “Next” button.
Write the account name and, if desired, password
- A new profile will immediately appear in the window. Expand it and click on the “Change account type” link.
Click on “Change account type”
- In the new window, select “Administrator” from the drop-down menu and click OK.
Select “Administrator” as the account type
- After this, restart the PC and select the administrator account when logging in. If necessary, enter the password and try to install iTunes again.
Video: how to create an administrator account in Windows 10
System failure
Sometimes during the operation of the system various errors and failures may occur. They can interfere with the installation of programs, including iTunes. To correct the error, just reboot the operating system correctly (turn off and turn on the PC):
- Left-click on the “Start” button in the lower left corner of the display or click on the Win button on the keyboard (it will have the same window icon).
- On the system tray, click on the power button called “Shutdown”.
Click on the virtual button “Turn off” in the “Start” menu
- From the small menu, select either Restart or Shut Down. In the first case, the device will turn off and start again on its own. In the second, you will need to turn on the PC yourself by pressing the power button on the case.
Turn off the PC completely or reboot so that the system then turns on automatically
Interference in the form of antivirus software
The standard antivirus "dozens" called "Windows Defender" or third-party antivirus software installed on your PC may mistakenly block the launch of the iTunes installer or its operation. To check if this is the reason, temporarily deactivate the antivirus that is currently running on your computer and try running the installer. Let's first consider temporarily disabling the built-in antivirus protection:
- You can deactivate the standard defender temporarily. After restarting the system or after 15 minutes, the protection will turn on again. To deactivate, go to the Windows Defender window through the tray (icon in the form of a white shield).
In the tray, look for an icon in the form of a white shield
- Switch directly to the “Settings” section (icon in the lower left corner). Click on the link “Virus and threat protection settings”.
In the “Settings” section, click on the line “Virus and threat protection settings”
- Set the “Real-time protection” slider to the “Off” position.
Click the slider once to move it to the Off position.
- Click on “Yes” to allow the defender to make changes on the computer.
Click "Yes" to allow Defender to make changes to your PC
- In the window we see that the protection was temporarily disabled and the device is now vulnerable. Let's try to install iTunes.
A message will appear in the window stating that the system is currently vulnerable due to the defender being disabled
Disabling third-party antivirus is much easier. Let's consider the process using the example of the well-known Avast program:
- Open the Windows tray (the arrow sign on the “Taskbar” on the right next to the clock). It should have an icon of the installed antivirus, since it usually works in the background.
- Right-click on the icon and a menu will appear in which we select “Manage Avast Screens.”
Disable Avast antivirus for 10 minutes and try installing iTunes
- In the following list, select the time for which Avast is deactivated. It is best to set the period to 10 minutes or 1 hour. You can disable the antivirus forever, but after installing iTunes you will have to activate it again.
Video: how to deactivate Defender in Windows 10
Viral activity
The cause of the error that occurred during the installation of iTunes could be not only the antivirus, but also the malware itself, which penetrated the PC despite the work of the defender. In this situation, you need to conduct a deep scan of the operating system for viruses. As an example, let's look at running a scan in the standard Windows Defender antivirus:
- In the tray, find the white shield icon and left-click on it to open the built-in utility window.
- On the Start screen, select the “Virus and Threat Protection” section.
- You can enable a quick scan using the "Run scan now" button, but we recommend doing a full scan. To do this, click on the link under the “Run a new advanced scan” button.
Click on the link “Run a new advanced scan”
- On the new page, select the scan type - “Full Scan” or “Defender Offline Scan”. In the latter case, your computer will restart and you will not be able to work on it. However, the advantage of this type of scanning is that it allows you to remove viruses that are most difficult to detect. Click on “Run Scan Now”.
Select the advanced scan type and run it
- If you select “Full Scan”, the scan will take quite a long time – up to several hours – but will be effective. At the same time, you will be able to work on the computer. When the procedure is completed, the antivirus will provide a report on the number of scanned files, threats found and removed.
Wait until the scan is completed - the system will show whether the PC has been infected with viruses
- After this, restart your computer and try installing iTunes again.
To make sure that there are no viruses on your PC, use another antivirus if you have one on your PC, or download Dr.Web CureIt! is a free security utility that does not require installation and has a clear interface. You can download it on the developer’s official website.
The need to update the system
If the operating system on your PC is not updated, applications may not install due to non-compliance. You need to make an update through the standard “Update Center” service:
- Press the two buttons Win and I on your keyboard. If nothing appears on the screen, launch the Start panel and click on the gear located above the power button.
- In Settings, click the Update & Security tile.
In the Settings window, select the Update & Security section
- You will be taken directly to the desired tab - “Windows Update”. Click here on the “Check for updates” button.
Click on the “Check for updates” button to start the search
- The system will begin searching for current updates that can be installed at the moment. Wait for it to finish.
Wait until the search for updates finishes
- If an update is available, Windows will automatically start downloading it. You don't need to do anything here either. When the download is complete, restart your computer.
Wait for the updates to download and restart your PC
Extra files in the system
If you previously used iTunes on your computer, but then deleted it using the standard Windows tool, most likely, files from this previous version remain on your system, in particular, entries in the registry. They may interfere with the re-installation of the program.
There may also be iTunes-related applications on your computer that also prevent the service from installing:
- QuickTime.
- Bonjour.
- iTunes.
- Apple Software Update.
- Apple Mobile Device Support.
- Apple Application Support.
In this case, it is recommended to completely remove these programs and clean the registry of unnecessary entries using third-party software. For the first step, the Revo Uninstaller utility is suitable. It efficiently cleans the system of residual files that utilities leave in the system during their operation. We will tell you how to use the utility in detailed instructions:
- Follow the link that leads to the official resource of the program developer. To download the free version of the utility, click on the Free Download button.
Click on the Free Download button for the browser to download the free version of the program
- On the page that opens, click on Download Now again - the program installer will download. Open it and install the software, following the simple instructions in the installation wizard.
Click on the Download Now button - the installer file will be downloaded to your PC
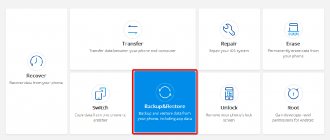
- After successful installation, launch Revo Uninstaller. Let's immediately begin removing all iTunes-related programs. Select the line with the name of the program in the list with the left mouse button and click on the “Delete” tool on the top panel.
In the list, we find the program that is associated with iTunes, and click on the “Delete” button in the top panel or in the context menu of the item
- The program will begin to create a restore point in case the deletion causes any malfunctions in the PC. We are waiting for the process to complete.
The program will first create a restore point so you can quickly rollback if a failure occurs
- Select the advanced scanning level and click on the “Scan” button. Revo Uninstaller will perform a standard uninstallation utility, and then scan the system for remaining files.
Select the scan mode and click on “Scan”
- Click on the “Select all” button in the window with a list of detected registry entries associated with the remote utility, and click “Delete”.
Delete all files in the registry that are associated with the iTunes program - We confirm that we want to get rid of all selected data.
Click "Yes" to delete the selected objects
- In the next window, the program will show the files and folders that remained on the system after the removed application. Again click on “Select all” and “Delete” and then confirm the action.
To clean the registry from unnecessary and erroneous entries, let's take another program - CCleaner. This application cleans not only the registry, but the entire system as a whole. It has a convenient and intuitive interface. Let us describe the procedure in detail:
- Download the free version of the utility from the official resource of the developer company Piriform. Using the installation wizard and its prompts, we install the program on the PC - the procedure is simple and does not take much time.
Click on the green “Download Free Version” button to download the CCleaner installer and use it for free
- We launch it through a shortcut that appears on the “Desktop” or in the “Start” system menu. In the left panel, click on the “Registry” section. The utility will immediately highlight all types of errors that it can detect in the registry. Click on the “Search for problems” button.
In the “Registry” tab, select all types of errors and click the “Search for problems” button
- We are waiting for the database scan to complete.
The program takes some time to check the registry for errors
- When the program performance indicator reaches 100%, look at the list of erroneous entries and click on “Correct selected”.
Click on the “Correct Selected” button in the lower right corner of the window
- In the window asking you to save a backup copy of your changes, click “Yes.”
Click on the “Yes” button to create a backup copy of the changes
- Enter the file name and select the folder to save it, and then click on the appropriate button.
Select the file name and its location, and then click on the “Save” button
- Click “Correct marked”. This way the application can fix all errors at once.
Click on “Fix marked” so that the program starts the process of correcting all errors
- The duration of the procedure will depend on the number of errors. At the end of the process, click on “Close”.
Click on the “Close” button and restart the PC
- We check again to make sure that there are no errors left in the registry. After that, close the program and restart the PC, and then try again to install iTunes.
Windows Installer problem
In this case, a corresponding message appears on the screen. If this is exactly the reason why iTunes is not installed on your computer, then follow the further instructions. To get started, press the Win+R key combination. In the window that opens, enter the command services.msc.
Next, find the “Windows Installer” item. Right-click on it and select the “Properties” option.
In the new window, find the “Startup Type” item, where you should set the “Manual” item. Don't forget to save your changes.
Download iTunes from the official website
To avoid all kinds of problems, you should use programs only from developers. You can download such programs on the official website.
Here is the link to download the iTunes program https://www.apple.com/itunes/download/
Make sure you are on the official iTunes website and download the latest version of the program from there, try installing it. Perhaps iTunes is not installed on your computer or laptop due to an old or “wrong” version of the program.
Incorrect date and time set
A very stupid and common mistake is to incorrectly indicate the date and time on your device. Go to settings and configure them properly.
If none of these tips help you, we recommend that you contact Apple Support.
After reading the article, you learned what to do if iTunes “doesn’t want” to be installed on your computer. We hope that after reading you do not have any questions. But if you have them, then feel free to ask them in the comments. Answers to them will be given as soon as possible. We will also be grateful if you like and share this article with your friends.
Possible reasons
- Note: While installing the program, disable your antivirus. It may be blocking installation.
- Also check the time to ensure it is set correctly.
A temporary solution when there is a problem with installing iTunes is the iTools program. It has the same functions as those developed by Apple. To take a closer look at the program, watch the video below:
Often, owners of smartphones and tablets experience serious difficulties when iTunes is not installed on a computer with Windows XP or another operating system from Microsoft. Unfortunately, unlike gadgets on the Android operating system, where Windows perceives and sees the device simply as a native flash drive and no additional programs are required, in the case of an iPhone or iPad this problem does not allow users to work on their computer with their devices, because i.e. exchange files, download audio and video, install applications and much more.
There are a large number of different reasons for errors appearing during the installation of iTunes, which will not cause significant difficulties to be eliminated if you have a detailed step-by-step guide. Below are instructions with a step-by-step description of how to install iTunes on Windows and stop the most common reasons that lead to failures during the installation procedure of this exclusive application from Apple.