Inexperienced designers often get rid of unnecessary parts of the image using an eraser - this is not worth doing, because it permanently removes erased pixels.
Professionals use Masks - they allow you not to delete, but to hide any parts of the image, so you can restore the image at any time.
In the photo from which you need to remove excess, an additional layer is created - that same Mask. A black brush helps to hide parts of the image, and a white brush helps to restore them.
How to use Masks in Photoshop
Often, when beginners make a selection and then create a layer with a Mask, it is not the background that is hidden, but the object that was cut out. If this happens, you just need to undo the action by pressing Ctrl + Z and invert the selection. To do this, select the selection with the active tool, right-click and invert the selected area.
How to Invert a Selection in Photoshop
Now you can proceed to removing the background from the image.
Magic wand
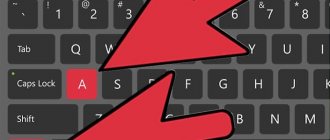
Magic Wand is the easiest and fastest way to remove unnecessary parts of an image. To remove the background from a picture using the Magic Wand, you need to set a tolerance value - the higher it is, the larger the selection area will be. Next, click on the area you want to hide and fill it with black.
Removing the background using the Magic Wand
If you expand the additional tools of the Magic Wand, you will see the Quick Selection Tool - this is a slightly more advanced version of the discussed method.
How the Quick Selection Tool works
Like all simple tools, the Magic Wand is quite crude. Traces of a hidden background may remain on the object, which will have to be removed using the Brush. With its help, you can understand whether the object is suitable for your purposes, and only then think about better clipping.
Replacing the background in Photoshop
How to remove a background in Photoshop : in simpler terms, it is dividing an image into large parts, each of which is placed on a separate layer. After this, the main part of the photograph remains unchanged, and the secondary details and background are retouched or replaced. To replace the old plan in the program, you need to separate the desired object from the background, which is removed or hidden, and a new one is inserted in its place.
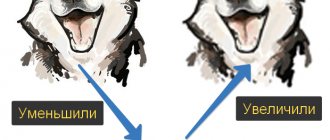
How to remove the background in Photoshop: you need to select the object correctly. But identifying it is not always easy. There are many methods and tools for this. For example, identifying human hair or dog hair is very difficult.
If a person has time and inspiration, then the photo must be enlarged and the hair carefully separated from the plan. But this process is very long and labor-intensive. And if there is absolutely no time, then you need to use a faster and simpler method of cutting hair from the plan.
Methods for replacing a plan with a photograph
First way . How to remove a white background in Photoshop: deleting an image with an easy outline—you can use an eraser for this purpose. For example, if the background is uniform and light, and the selected girl’s hair is dark and contrasts well with the background, then you can use the polygonal lasso tool. They need to highlight the background near the hands of the girl shown in the photo. The background must be removed from the selected areas. Then you need to move on to a more difficult task - cutting out the girl's hair. To select strands, you need to use a simpler method first:
- You need to use the “background eraser” tool, which is specifically designed to quickly remove the background from the image.
- The eraser cursor is shaped like a crosshair.
- Near the selected object you need to click the mouse so that the cross appears above the pixels of the plan.
- The selected color will become the sample for removal.
- Without releasing the mouse button, you need to move the cursor to remove hair.
- The eraser will only erase the color of the sample and shades close to it, without affecting pixels of other colors.
- The spread of colors depends on the “tolerance” parameter. To take a different color for a sample, you need to click the mouse so that the color is within the cross and repeat the above operation.
Photoshop can not only remove the background, but also make translucent pixels of transition colors that are close to the removed hue.
This is done in the following way:
- The “sample taking” button in the form of a pipette is used.
- In this case, it is better to select the one-time option, that is, the sample is taken only once at the moment when the person clicks the mouse.
- This works as long as the wizard moves the mouse over the drawing without releasing the button.
- This action is convenient if the background in the image is uniform.
You can use another option:
- The button is called “continued”.
- In this case, the program itself takes a new sample when it decides: the background under the cursor has changed so much that it is necessary to take a new sample and start erasing a different color.
- The cursor must be moved very carefully. With this method, you can erase not only the background, but also part of the hair.
Using one color protection:
- In this case, the checkbox is placed opposite the protect foreground color item.
- Then you need to Alt-click on the hair color that you want to protect.
As a rule, the hair in the photo comes out with a lot of highlights and the range of shades is in a wide range, so it is not possible to adjust the option more precisely. If the photo has a uniform background, the result will be good. And if the background image is glare, then this option is not recommended.
Pros and cons of replacing the background
Disadvantage of protect foreground color: the background must be erased very carefully, you cannot rush. It's better to do it slowly but well.
Advantages of the option:
- You don't have to learn Photoshop to use this option.
- The option is a simple tool available to the average craftsman.
If, after working with the function, the result satisfies the person, then under the layer with the girl you need to place a beautiful background, and carefully look at the enlarged outline to see if there are any halos there. If there are errors, they need to be removed using a regular eraser and choosing a brush with soft edges.
There is another cleaning method in Photoshop - highlighting using tone correction. This method of removing the background from an image is very quick, but requires more advanced knowledge of Photoshop.
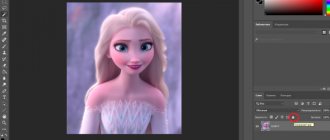
Second way . Replacing a plan using tone correction of one of the image channels. Next, we will look at the same photograph of a girl with dark hair and a light background. To replace, you need to go to the channels palette and consider each channel separately. For example, you can use colors:
- Blue.
- Green.
- Red.
It is necessary to select the channel in which the contrast between the girl and the background is most pronounced. For example, the color blue stands out. With the mouse, he drags it onto the Create New Channel icon, as a result a new Blue copy channel will be created.
In this case, the light background should become completely white, and the dark part of the image should turn into even darker. For this task you need to select levels. You need to select the newly created channel and press “Ctrl + L” - this will bring up the Levels window. After this, the master must increase the contrast between shadow and light. This method allows you to achieve a good contrast between the background and the main highlighted figure. To make it stand out more accurately in the photo, you need to experiment with the program and choose the most suitable option.
What happened after changing the background:
- There are no more light spots on the girl's face.
- The dress also became light.
- Now you can take a brush and paint the neck and face areas with black. To avoid mistakes in the area of the dress and hands, you can paint them black. Then you need to use the CTRL button and click on the Blue copy channel in the Chanels palette.
- The selected fragment will load, and the wizard will see that all the light parts of the image are selected. After this, in Photoshop you need to go to the general RGB channel and return to the Layers palette.
- The selected area perfectly covers the background around the girl's hair. Next you need to use the Delete key and clear the background. The remaining areas must be removed with the polygonal lasso tool.
In the final editing process, the photo should look realistic. Because the above method allows you to cut even small hairs. This method can be used to cut faster if one has good Photoshop skills.
How to insert a new background
Next, in the “layers” palette under the photo with the girl, you need to replace the new background . First you need to choose a beautiful replacement from another photo. If the size of the fragment does not match the source in size, then you need to use the keys one by one:
- "editing";
- "transformation";
- "scale";
- "movement".
After completing the action, you need to check the light areas at the border of the girl’s hair. To do this, the picture is greatly enlarged and the contours are visible. All errors will become clearly visible if the function has been used correctly. Errors can be removed using the Burn Tool option or using a soft brush.
How to replace a complex background
How to remove the background from a picture in Photoshop : a complex plan is considered to be variegated, multi-colored and containing light and dark areas. For example, you can make out a photograph that shows a girl with dark hair against a complex background. The hair is dark at the roots and light at the ends. This makes working in Photoshop more difficult because hair appears dark on a light background and light on a dark background. And in some places they almost merge with the background image. There is also color noise in the photo - this makes working with the background eraser much more difficult.
This will remove the main selected shades and leave noise pixels as a halo. This background is removed using channel technology, dividing the photo into parts. The selected shares must be placed in different layers. To easily and quickly divide an image into parts placed in different layers, using the “square selection” tool, you need to mark the desired part of the photo and apply the command “layer”, then “new”, then “layer through cutting”. This creates a new layer with the selected element.
Certain parts will have dark hair on a light background, and light hair will appear on a dark background. Using levels, you can increase the contrast of the photo and remove the background , as in the previous case. In parts of the image where the hair is lighter than the background, the light portion of the hair is highlighted rather than the background. Then the “select” command is executed, then “invert”, after which you can remove the background.
A person should try to perform the above steps on his own. But before that, you need to ask yourself a question: are fine hairs on your head really necessary? It is usually easier to quickly cut out an object, and then paint in strands and individual hairs using special brushes in Photoshop.
Lasso
The Lasso Tool, as well as additional selection tools, the Polygonal Lasso Tool and the Magnetic Lasso Tool, allow you to quickly select the desired area. This is convenient if you do not need the entire object, but only a part of it. You select this very part with Lasso, and then work directly with it.
Clipping an object using the Lasso Tool
You become a Photoshop pro when you start combining tools and finding creative ways to solve a problem. This is how life hacks appear. For example, if you need to cut out a bush from a non-uniform green background, you don’t always need to resort to complex clipping methods. You can cut out an object using a simple Lasso, and process the edges of the bush with a brush to create grass that is as similar in outline as possible to the object being cut out.
Channels
To remove the background from a picture using Channels, you need to go to the corresponding tab next to Layers, select the most contrasting one, duplicate it and call the Curves tool (Ctrl + M). Using a curve, you can make the object even more contrasting, create a selection by clicking on a channel while holding Ctrl, turn all channels back on and create a mask, inverting the selection if necessary.
How to cut an object using Channels
Just like the Selection and Mask tools, the Burn and Dodge tools are used as a means of enhancing an existing selection. For example, if you select a complex object using Channels, it may appear partially transparent due to the fact that the shades of the image itself are transferred to the mask in shades of gray.
The fix is simple: you need to go into mask editing mode - click on the mask icon next to the layer while holding Alt, and then lighten or darken the desired areas using the Dodge and Burn tools.
How to improve a finished mask
How to remove background?
Let's look at detailed instructions for removing backgrounds in Photoshop using different tools.
Using the eraser
The procedure is as follows.
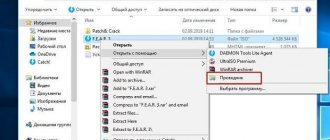
- Eraser tab on the toolbar , clicking on the item called “ Magic Eraser ”.
- Double-click on the white background of the open pattern, which will allow the function to determine the boundaries. Pressing key to delete the area that has been selected.
- Opening the panel with parameters , checking the item called “ Adjacent pixels ”, there should be a checkmark next to it. This approach allows the tool to destroy only groups of pixels that are in contact with each other, without affecting other elements.
- Adjusting the “ Tolerance ” parameter in the settings item. The higher the value, the higher the likelihood of removing a large number of detected background shades. If the method does not work, you need to select the “Layer” window in the main panel area and click “ Edge Processing ”, and then “ Remove Border ”. The result will be an image like this.
The checkered chess background, as in the picture above, does not need to be removed.
It means that there is no background under the picture. If you need to set a white background, just create any white object and use it as a background image. Removing red eye from photos in Photoshop
Magic Wand Tool
You can also cut out the background in Photoshop as follows:
- Open the image as a new project . Waiting for the loading process of the panel on which the tools are located. Select the instant selection option and click on the “ Magic Wand ” option.
- Point to the background of the photo and click. After this, the background part will be selected. All you have to do is click on “ Back Space» to remove unnecessary fragments.
Important! You will first need to unlock the background layer. This is necessary in order to detach it from the base picture. Otherwise, the stick will not be able to ensure its release. To solve this problem you need:
- go to the layers panel “ Layers ”;
- press the lock ;
- put it in the “open” position .
Removing the background inside a picture
Often, users need to remove background content that intersects with borders located in the main part of the image, and is also partially located within it. The result of its removal in this case is a transparent image with a clear outline. The procedure is as follows:
- Creating a copy by pressing CTRL + L and getting into the levels window, where you need to move the sliders to black.
- Clicking on the miniature version of the channel copy created initially. This requires holding down the CTRL button.
- Press Shift together with CTRL + I. And then click on “ Back Space ” directly on the keyboard to delete the extra layer. The finished result will look like this.
Blending Options
You can find this tool by right-clicking on the layer. A window with many functions will open, select the Blending Options tab. At the bottom of the window you will see the Blend If function. By adjusting the sliders on the palette, you can reduce the amount of white or black shades, and also change the channel to red, blue or green. Please note that if you click on the slider while holding down the Alt key, it will split into two halves. By moving them, you can make the selection softer.
Removing Background Using Blending Options
Other tools
Along with this, auxiliary means are also used.
Brush and mask
The user can create a mask and erase unnecessary elements by using the “ Brush Tool ” brush in black. This method is not quick, but the result is worth it.
Lasso
The name of the tool is “ Lasso Tool ”. There is also a tool called Straight Line Lasso and Magnetic Lasso. With their help, it will not be difficult to select areas, especially if the object needs to be selected not completely, but partially.
Creating a beautiful frame in Photoshop
Selection and Mask
To do this you need to use the rectangular selection . It is located at the top in the settings, where the tab is also located. By clicking on it, you can see a separate window containing a set of parameters . There you will also be offered to adjust the radius, select a brush for selection, adjust anti-aliasing, feathering, and contrast.
Using channels
You need to click on the tab next to “ Layers ”, and then select the most contrasting solution. It is duplicated, and subsequently a tool called “ Curves ” is called. It allows you to make an object contrast and highlight it.
Pen Tool
This method is considered the highest quality. To use it, you need to select a tool from the panel located on the left, and then build a diagram for the upcoming selection.
Blend Mode
This method is suitable when you need to add or remove elements from a white or black background . The specific option you choose depends on your situation. Preferred are Screen, Multiply and Soft Light.
Blending Options
Finding this tool is quite easy. To do this, right-click on the layer and go to the window with functions. In it you need to select “ Blending Options ”. An overlay option will appear at the bottom of the window. The user has access to optimal adjustment of the sliders to obtain the desired shade.
Color range
The option is on the Selection tab. After selecting it, you need to wait for the settings window to open. Using eyedroppers and adjustments, you need to select the images to be deleted. And then all that remains is to create a mask and invert the selection.
Color range
This is one of the oldest and most proven ways to remove the background from a picture. The tool is located in the Selection tab. When you select Color Range, a window with its settings opens. Your task is to use the eyedroppers and Scatter/Fuziness controls to select those shades that need to be erased from the image. Then create a mask, invert the selection if necessary.
Color Range will also help get rid of the background
There is no perfect way to remove the background from a picture. Each of the ones discussed can be useful in different situations, so it is important to know, if not all of them, then most.