Using Photoshop, you can easily reduce or increase the size of an image. Moreover, this can be done in different ways depending on what result you are striving for.
Before we start looking at the methods, first a little theory.
Firstly, what is reducing or increasing the size of an image? First of all, this concept should be understood as reducing/increasing the resolution of a picture, that is, its length and width and, accordingly, the number of pixels that make up any raster image. Learn more about resolution.
Secondly, what happens to the quality of the picture after resizing it?
- During the reduction process, pixels are lost, but the overall quality does not suffer, it remains quite clear.
- During the enlargement process, Photoshop stretches the pixels and draws them in accordance with its algorithm. Therefore, when enlarging, the picture quality always suffers. The higher the magnification, the more clearly the irreversible loss of quality is visible.
A similar issue was discussed in the lesson related to changing the layer size, I recommend you read it
A clear example of how image quality changes:
In this article, we’ll look at 4 ways to change the size of a picture in Photoshop and look at when and which method is best to use.
Method 1 - Image Size Dialog Box
This is the classic and most universal way. It is suitable in most cases, especially when you already know to what size you should reduce and enlarge the image size.
Open the image in Photoshop.
Open the Image - Image Size dialog box (or the key combination - Alt+Ctrl+I). The following window will appear:
Pay attention immediately to the Width and Height fields. The values that will be indicated there are the current dimensions of the image. By default they are measured in pixels.
If you initially know to what size you need to resize the image, then enter these values in the above fields.
Proportions
If the Save proportions checkbox is not checked in the window settings, you can enter any values in the length and width fields. But you risk that the picture will be stretched vertically or horizontally. It is very easy to make a mistake and choose the wrong proportions.
Example without maintaining proportions
It is recommended to check the box anyway. In this case, when you enter, for example, Width, Photoshop will automatically calculate what the height should be so that the proportions of the image do not change.
Example with maintaining proportions
Resize images using the Canvas Size tool
The Canvas Size tool is available by selecting the commands Image - > Canvas Size (Image -> Image Size). Unlike the “Image Size” command, this command does not resize the photo, but cuts out a part of a certain size from it. If you set the canvas size to be larger than the current values (for example, 110% height and 120% width), then the image will remain with its original dimensions, only the size of the document will increase due to the addition of a background (transparent if the image is in PNG format or color. In other words, changing canvas size, you can add or remove pixels to increase or decrease the overall size of the canvas .
We set smaller values - the image is cropped, and larger values - a colored frame is added around the original photo.
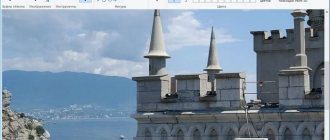
Let's look at an example. Here is the original image:
By reducing the canvas size, the image is cropped:
By increasing the width of the canvas, white stripes are added to the image on the right and left.
Bottom line: the image remains the same size, but adds extra pixels to work with. You can place other graphics on them, create a frame, make a background, manipulate the image dimensions (when you need an image with certain pixels in width and length).
There are two main areas in the tool window:
Current Size - Here you see information about the size of the image before changes. In the New Size , you set the desired width and height parameters. Here you can also select the units of measurement in which you are going to convert.
The Anchor parameter helps determine the direction in which new pixels will appear. Click on the grid square; it will schematically indicate the location of the original image on the new canvas.
At the bottom of the window there is an option to select the canvas color - Canvas extension color. Thanks to it, you can choose the Foregraund , or the main color (foreground), the Background color , or the background (background), white, black, gray or another (choose a color in the palette).
Method 2 - Resizing using Transformation
Transforming an image is a cool method that definitely needs to be added to your Photoshop knowledge base. This method is good in two cases:
- reduce or increase the size of the entire image;
- Reduce or enlarge the inserted image in Photoshop.
Size details for each case.
How to reduce or increase the size of an entire image
Step 1
Open the picture. Select Edit - Free Transform or press Ctrl + T.
Note
If this command is not active (grayed out), then your background layer is locked to change. This is indicated by a padlock icon directly on the layer.
To unlock the background layer, double-click on it. The New Layer window will appear, click OK.
Learn more about locking the background layer.
Step 2
A frame will appear around the image. There are markers in the corners and on each side that you need to pull to make the image smaller or larger.
After resizing, click on the checkmark at the top of the options bar. There is a bug in Photoshop CS6 and this checkbox is not visible. If you also don’t see it, then press the Enter button to accept the changes or Esc to cancel.
Step 3.1 Magnification case
If you enlarged the picture in this way, then, as you can see, part of it became hidden, it seemed to not fit into the size in which it was opened. On the one hand, this is also not bad and can also be used in some cases.
But if you insist on showing the entire image, select Image - Show All.
Step 3.2 Case when decreasing
When you zoom out, you'll see a checkerboard background. This is emptiness, transparency. It will disappear when you save the image. But it would be correct to cut off the void in order to ultimately see what the final size of the picture is.
To trim the void, select the Image - Trimming command.
Advice
In order not to disturb the proportions of the image in this method, when you drag the frame markers, simultaneously hold down the Shift .
How to reduce or enlarge an inserted image in Photoshop
In any case, take the case described above into account. Namely, the ability to use the Free Transform command (Ctrl+T). This technique will be needed to carry out such a common operation as reducing or enlarging an inserted picture, item, object (call it what you want).
So, a familiar situation: you inserted another picture into your main image in Photoshop, but it did not fit in size.
Scale in Photoshop
Author: NON. Date of publication: April 28, 2012. Category: Practical advice.
This practical Photoshop tip will show you a very convenient way to resize an image. You can visually set the required document viewing scale with one movement of the mouse cursor. This tip applies to Photoshop CS5. So how to change the scale in Photoshop
?
Similar publications:
- Changing the image scale
In earlier versions of Photoshop, you could change the image scale, for example, by entering numbers in the “Navigator” palette or in the lower left corner of the photo window. Or simply by moving the slider in the Navigator palette.
You can select the Zoom Tool (Z) and click to zoom in, or use the keyboard shortcuts Ctrl+Space or Ctrl++.
But in the version of Photoshop CS5, zooming in has become very convenient. Select the “Zoom” tool (Z), click and hold the left mouse button on the photo object that we want to enlarge. This element of the photo increases smoothly and beautifully; when the required degree of magnification is reached, release the mouse button.
And now the most convenient way to zoom in and out in Photoshop
. With the “Zoom” tool (Z) active, click and hold the left mouse button anywhere in the picture and move the cursor to the left, the scale decreases.
We move to the right - the scale increases. Agree, a very convenient and practical way that allows you to very accurately select the required scale in Photoshop
.
If you liked the lesson, share the link to it with your friends on your favorite social networks, the buttons for which you see before the comments. Don't miss the opportunity to do a good deed: click on the button from Facebook, Vkontakte or Twitter so that other people can also benefit from this material. THANK YOU!
You can download the lesson (307 Kb) in PDF format here.
If you don’t want to miss interesting lessons on working with images in Photoshop and other useful materials, subscribe to the newsletter. The subscription form is below.
Seal
- Back
- Forward
Comments
+1 Irigna 04/29/2012 21:35 Thank you! Very comfortably!
Reply | Reply with quote | Quote
+2 Andrey 04/29/2012 10:47 Everything is great, but why the hell is there so much writing! When you can just hold down the Alt key and roll the mouse wheel! By holding down the Shift key and rotating the mouse wheel, you can move up and down. And by holding down the Ctrl key and rotating the mouse wheel, you can move the image left and right.
Reply | Reply with quote | Quote
Update list of comments
Liked? Share:
Add a comment
Enter your name, or register on the site, so that your name is inserted automatically in the answers: it will take 2 minutes! After registering, you will be able to edit your messages and will not have to enter confirmation
.
To display an Avatar
(your picture), you must have an account on Gravatar at the same email address, it’s free.
JComments
Method 3 - Canvas Size
Not the most popular method, but nevertheless we will also consider it - the Canvas Size command.
The peculiarity of this method is that we change the size of the image resolution, while the picture itself does not change in any way. Photoshop simply cuts off part of the image (if we are talking about reduction), or adds a background color (if we are talking about enlargement).
That is, let’s say your picture is 700x700 pixels. Through Image - Canvas Size you set the size to 500x500. As a result, Photoshop cuts off the extra 200 pixels in height and width. In the settings, you can specify where it cuts from: it is either evenly on all sides, or you can select a specific side.
Adjusting image size in Adobe Photoshop
Delivery of goods from China.
Aviastar will also carry out storage of goods and work with declarations.
www.aviastar-spb.ru
Posted by admin. Published in the Graphics section
One of the basics of working in a graphics editor is the ability to change the size of the edited image. It is this technique that I want to describe in today’s article, because knowledge of basic skills is necessary when further studying such a serious program as Adobe
Photoshop
.
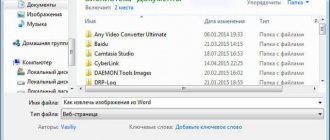
So, first of all, open our drawing. After this we will need the Image
.
There we select the item Image size
.
A window will appear in front of us in which we will change the size of the picture.
Please note that in the size settings there are two fields - these are Dimension
and
Print Size
.
What is the difference between them? The print size reflects the width and height of the printed document, that is, when sent to the printer, we will receive, in this case, an image on paper measuring 20.11 x 14.66 cm with a resolution of 72 pixels/inch. But what happens if we change the resolution to 300 pixels/inch? In this case, the size of the printed print will not change, but the Dimension
. Now it is 2375 x 1708 pixels.
I'll explain what happened. Photoshop, using its algorithms, expanded the image to a resolution of 300 pixels/inch, adding several hundred pixels there.
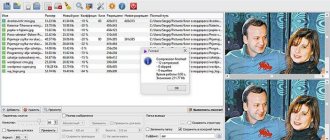
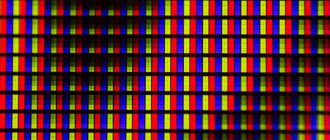
It is clear that this will not improve the quality of the drawing, that is, the image will become cloudy. But compared to, say, Paint, Photoshop does a much better job of smoothing out the pixels. In the picture on the left is an icon enlarged 10 times using Paint, on the right – using Photoshop.
Just in case, let me remind you that when you reduce the image, the quality of the picture also noticeably decreases, as when you enlarge it. Therefore, you should not get too carried away with this tool. The exception is working with vector graphics. In this case, you can change the Dimension
whatever you want, the image quality will not suffer.
Another interesting tool in Photoshop is Canvas Size.
. This tool also allows you to influence the size of the image. With its help, you can either cut off part of the picture from any side, or, conversely, add a few pixels.
For example, we have this image, 120 x 80 pixels in size.
From it we want to get an icon measuring 64 x 64 pixels. Canvas Size tool
.
To do this, select
Canvas Size
from Image .
In the window that appears, you need to indicate what size image in pixels (mm, percentage, inches) we want to receive. Use arrows to indicate which side you want to remove or add pixels from.
As a result, we get an icon of the size we need.
That's all. I think that this article will be useful to everyone who is starting to get acquainted with Adobe Photoshop.
Subscribe to the MyFirstComp YouTube channel!
Also read on this topic:
Rate this article (No ratings yet)
Tags: Photoshop, image size
First way
Go to the menu on the top panel called “Editing” and find the item “Transform” . When you hover your cursor over this item, a context menu will open with options for transforming the object. We are interested in "Scaling" .
Click on it and see a frame with markers appear on the object, by pulling which you can change its size. Holding down the SHIFT will allow you to maintain the proportions.
If you need to reduce an object not “by eye”, but by a certain number of percent, then the corresponding values (width and height) can be entered in the fields on the top panel of the tool settings. If the button with a chain is activated, then when you enter data in one of the fields, a value in accordance with the proportions of the object will automatically appear in the adjacent one.
Resizing a selected image
When you need to resize only part of an image, the “ selection ” tool is suitable, it can be found in the side toolbar. You can select an object using an ellipse, a rectangle, a vertical and horizontal line, a lasso and a magic wand. right-click on the selected area of the picture , after which a context menu will appear in which you need to select “ free transformation ” or “ transform selected area ”.
Photos is a new OS X service that turns your system into a darkroom.