Search system
By default, Google Chrome is set to search using the Google service. It is quite good and popular, but many users prefer its competitors: Yandex, Bing, Mail.ru. In order to select a search system, you need to go to your browser settings:
- Launch your browser.
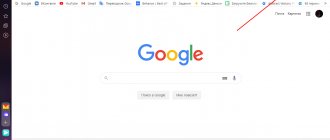
- On the right, at the very end of the address bar, immediately after the asterisk symbol, there is a “settings and management” button for the web browser. Click on it.
- In the drop-down menu that opens, find the “Settings” item and go to it.
- Scroll down the list of settings to the Search category.
- You can select the required search engine (for example, Yandex) from the drop-down list or click on the “Configure systems” button and select a service in the window that opens.
The changes will be automatically applied and saved to your profile. Now you can use the Yandex search service directly in the Google Chrome address bar.
Removing a browser
It is known that you cannot uninstall most programs by throwing shortcuts or folders with files that can be found on drive C to the Recycle Bin.
There are several ways to remove various types of programs. The Google Chrome browser can be removed from the Windows system in at least three ways: standard OS tools in the Programs and Features window, third-party and official utilities. The last of them is the merit of Google itself.
Method No. 1
Involves the use of standard OS tools. Even novice users who have experience removing programs from a PC are familiar with them.
1.Go to the Control Panel via Start or another method.
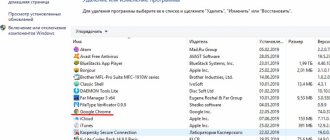
2.In the “View” section, select “Small icons”. This makes it more convenient to search for the necessary blocks. Go to “Programs and Features”. This will be the third column.
3.Find Google Chrome browser. Right-click to launch the context menu. Click on the only item “Delete”.
4.The system will then remove the program and all its components.
Method number 2
To uninstall, you can use third-party software, for example, the Revo Uninstaller utility. This method is often resorted to, since users know that standard tools do not remove programs from the system completely in most cases, leaving behind “traces” that interfere with further correct reinstallation.
This method is also effective if the system refuses to uninstall you. Most often, this problem is associated with the presence of viruses, so first scan your computer with your antivirus.
Revo Ununstaller allows you not only to remove the program, but also to clean up the mentioned “tails”: all files and registry entries. The software can be forcibly removed using this program. There will be no refusal to remove. 1.Download the program from the official resource: https://www.revouninstaller.com/revo_uninstaller_free_download.html. It's free.
2.Launch the utility. A window will appear with a list of programs installed on your PC. Find Google Chrome and right-click. The context menu is larger here. The first item “Delete” is required.
3.The analysis will start. Next, a backup copy will be created, with which the user can roll back the system in case of an error.
4. Decide on the scanning mode. As a rule, they choose the second or third. Click on “Scan”.
5.Then the utility will launch the removal and scan the PC memory for files and registry keys associated with the browser.
Method number 3
Google has introduced its program for completely cleaning the browser. You can download it for free using the official link: https://www.google.ru/chrome/cleanup-tool/index.html.
Anyone can handle it: it’s even easier than the previous third-party uninstaller.
After all the manipulations, you need to restart the PC.
Downloaded files
By default, the web browser saves files to the system drive in the user's personal folder. If you are using multiple HDDs, it is recommended to download content from the network onto a media other than the one on which Windows is installed. Setting up the download folder is easy:
- Similar to the previous point, go to the Google Chrome settings menu.
- Scroll to the very bottom of the page and click on “Show extras.” Settings".
- Find the "Downloaded Files" category.
- Here you need to click on the “Change” button and specify the path to the folder where you want to download files from the network. Now everything you download from the Internet will be stored in this folder.
Installation with data recovery
After uninstallation is complete, you will need to restart your computer. Now you can start installing the new browser version. Now you can install a new browser. To do this, you need to download the latest version of the distribution (or the one suitable for your configuration).
If you have any questions or complaints, please let us know
Ask a Question
Run the installation file and follow the system prompts for installation.
The main thing you need to do now is log in to your Google account. To do this, simply enter your username and password in the authorization fields. The system may ask you to answer several questions regarding your personal data. This is required to prevent unauthorized people from accessing your account.
Next, the Google service will ask if you want to restore a backup copy of all the services that we previously used. Don't skip this step if you want to access your old emails, contact list or files on cloud storage.
Can't reinstall Chrome browser
The most common errors when trying to install a program occur due to problems with the Internet connection. For correct operation and synchronization with your account, the service requires a constant connection to the network. Troubleshoot connection issues and resume the installation process.
Your device may not meet the new requirements of the latest browser version. All system requirements for devices from different manufacturers can be found on the official Chrome website. If you find a discrepancy, install one of the previous versions.
How to set up a microphone in Google Chrome?
If you are trying to install the browser on a computer connected to a secure corporate network, you may need administrator access to complete the installation.
Homepage
The home site is the resource to which you will be redirected when you launch your browser. This could be a news site, VKontakte or other social networks, a page with a list of your most visited sites, or just a tab with a search bar.
Open settings as before. The required category is “Open at startup.” There are three options to choose from.
- New tab – will open a blank page with a search engine and a panel of your favorite resources.
- Previously opened tabs – will open all pages that were open before the last time the browser was shut down.
- Specified pages – allows you to select a specific home page, for example, Vkontakte.
Plugins
Plugins, or extensions, are mini-programs that connect to Google Chrome and add additional functionality. This could be recognition of any formats, for example, FB2 or DJVU, a built-in text editor, ad blocking control, child protection, additional tabs from Yandex and much more. Let's look at connecting the extension using the example of a plugin for additional VKontakte settings:
- As before, go to your web browser settings.
- In the menu on the left you need to select the “Extensions” item - it is located immediately above the settings item.
- Here is a list where you can see already installed plugins. At the end of the list there is a “More” button. Click it.
- This is a directory from which you can download a variety of paid and free browser programs. On the left there is a search - enter “VKontakte” into it.
- Select the required plugin, for example, “Advanced VKontakte settings” and click on the “Install” button.
- Confirm your desire to download the application and wait until the process completes.
Now that the application is installed, it will appear in the list of installed ones, and you can use it at any time. Unneeded plugins can be easily removed by clicking on the trash can icon to the right of the name. Almost all applications that can be installed on the Yandex browser will also work on Chrome, which makes the transition between these two programs very easy.
Hidden settings
Touching additional hidden settings of Google Chrome is recommended only for experienced users who understand what they are doing. Regular people here may only need to enable NNAPI. Using his example, we will consider this topic:
- Open your browser, enter “chrome://flags/” in the search bar and press Enter.
- Scroll down to Enable NNAPI.
- Click on “Enable” and save the changes using the “Restart” button at the bottom of the window.
If you accidentally turned on something that is making it difficult to work, the best solution is to reset the settings.
Additional
To see hidden Google Chrome settings, click “Advanced” at the bottom of the settings tab.
We hasten to warn you! Before you go into these settings, soberly assess your strength regarding understanding computer literacy and web technologies in particular. You need to have a clear idea of what you are turning on and off. If you doubt whether you need to touch the advanced options, it is better to leave everything as is.
In the additional panel, options are also structured using blocks.
Privacy and Security
A very important group of settings. They are able to increase the level of protection of personal data, ensure proper privacy on the Internet, and create certain conveniences for collecting information in forms. In the preinstalled configuration, all add-ons on the top of the block are enabled with the exception of three. They can be left as is. It is not recommended to disable options such as “Protect your device from dangerous sites”, “Use hints...”.
Three initially disabled options can be activated according to individual needs: “Automatically send...” - a kind of collaboration with Google. By turning on the slider in this line, you are allowing the company to obtain data about your system and the content you are viewing.
“Send a denial of tracking…” - the browser will automatically deny tracking to “curious” sites along with outgoing traffic.
“... to check spelling” - automatically checks text for spelling errors. A very useful integrated tool for those who actively conduct business correspondence and work with documents on the Internet.
At the bottom of the block there are three more options with their own submenus:
“Configure certificates.” This option is for users who work for a company or are its client, and it (the company) provides certificates for setting up an encrypted network connection for the purpose of exchanging data (hiding information from outsiders). After clicking on the option, a panel opens for managing network certificates (import, export, delete).
“Content settings” - control the display of various elements on the page. Namely: pictures, animated banners, video frames, etc. The value in it can be set both for all sites and for the site opened in the current tab.
The settings menu panel contains general parameters (for all web resources). Open the setting you are interested in and change the slider value in its panel. It is recommended to enable notification when a site requests a user's location. Because it allows you to maintain privacy when visiting dubious sites.
In the latest versions of Chrome, the option regulating the launch of Flash applets (videos, games, animations, etc.) has been slightly changed. In general, for all sites, it provides only two actions:
- run on request - the flash element is launched if the user confirms the request;
- block - all flash elements on the page are blocked.
If you regularly watch videos, listen to music, or play games in the browser, you need to enable the “Always ask...” option in the Flash submenu.
View the Pop-Ups panel. For security reasons, it makes sense to deactivate the loading and display of this element. According to statistics, many viruses and spyware enter the PC through pop-up windows in the browser.
To customize the launch and display of items in the current tab, click the “lock” or “i” icon located on the left side of the address bar.
For example, when you can’t start a flash player, you need to do the following in the menu: 1. Open the item menu.
2. In the “Flash” line, click to open the list and select “Always allow on this site.”
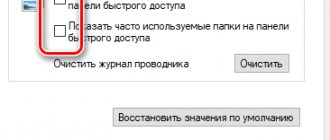
The last item in the “Privacy and Security” block is “Clear history”. Its submenu contains settings for cleaning the browser from traces of being on the Internet. This window also appears when you run the delete history command (Ctrl+Shift+Del).
To set the removal of all saved files in the Chrome directory, you need to mark all the items in the list and specify the time period “all time”.
Passwords and forms
This is an account and data manager for autofilling forms on websites.
The “Autofill Settings” submenu stores addresses, bank card numbers, etc.
In the “Setup” submenu there is a list of passwords and settings for saving them.
These functions are activated using the slider in the submenu panel. It must be switched to the “ON” state by clicking.
The manager performs automatic authorization on sites after saving the data, this significantly speeds up logging into your profile. Autocomplete automatically provides a hint when typing a saved word or number. There is no need to enter the entire character combination manually. But with all these conveniences, the risk of identity theft increases.
Languages
Adjusting language localization, adding additional preferred languages. Enabling the option to automatically check spelling separately: for the main language and for each additionally added language.
If you frequently visit websites of a particular country, it is appropriate to add its language in this panel and enable error checking.
Downloaded files
In order not to waste time searching for files downloaded from the Internet, click “Change” in this block and specify the folder (it is advisable to create a new directory). The browser will place all downloaded content into it.
The penultimate blocks - “Print”, “Accessibility”, “System” - respectively, are intended for preparing pages for printing, changing the control system, displaying content (for people with disabilities), adjusting hardware parameters (graphics, network, background mode) .
Attention! Through the “System” submenu, you configure a connection to the Network through a proxy server.
Reset settings
If you made a mistake somewhere and managing the program has become inconvenient, you can reset the settings and do everything again. To do this, you need to open the list of settings and select “Reset” at the very end of the list of additional options. This command will remove all connected plugins, saved tabs and return Google Chrome to factory configurations.
Was the article helpful? Support the project - share on social networks:
Grade: 4,87
Google Chrome Update
Chrome updates automatically, but you can also do this manually by opening the browser's main menu and selecting About Google Chrome browser
A new tab opens and automatically starts checking and installing updates if available.
After installation, for the updates to be applied correctly, you will most likely be asked to restart the browser. This can be postponed. If you want to use the updated Chrome now, it is advisable to close all tabs and then click Restart.
The presence of updates is indicated by the main menu icon. It can be orange (as in the previous picture, green and red). In this case, the orange icon signals the addition of a new extension. Open the main menu and select the appropriate item
In the pop-up window that opens, you can find out more detailed information about the extension and Enable it or Remove it
I don't need it so I'm deleting it.
That is, if the main menu icon has a color other than gray, it means Chrome wants to update or update one of its components.
Errors may occur while updating your browser. (In my practice this was not the case). In this case, it is advisable to restart the browser first. If it doesn't help, restart your computer. If this does not help, then reinstall Google Chrome. Reinstall means removing the browser and installing it as in the first point.