When you work with an operating system for quite a long time, a large amount of information, files and settings accumulate. I would not like to lose this due to its reinstallation. And sometimes this had to be done - due to the occurrence of all sorts of problems - virus infection, corruption of system files, incorrect configuration, etc.
To solve this problem, special Windows boot disks are created - they help restore the system in case of failure, without reinstallation. Agree - this is a great alternative .
Let's see how you can create a boot disk for Windows 8 yourself.
What is a boot disk
This is a special set of system files and utilities that are recorded on removable media. You can use CD/DVD drives, personal USB Flash cards and removable hard drives. You need to write files in bootable media creation mode.
If problems arise with the operating system, you should boot from such media. You must first configure your computer accordingly. In the BIOS you need to set the appropriate media as the main one for startup.
You may find it useful: The main reasons why a computer refuses to turn on
After turning on the computer, use all necessary means to restore the operating system to working condition. Or try to diagnose the causes of problems.
You may find it useful: Windows Blue Screen of Death - detailed guide
If it is not possible to restore the operating system using standard means, you should try to use a previously created backup copy and try to restore Windows.
You may find it useful: How data archiving works in the Windows operating system
Creating a bootable DVD in UltraISO
This method is suitable for those who already have an operating system image. The UltraISO program itself unpacks it and writes it to a CD, turning it into a bootable one. So what does it take? In addition to the system image, we will need a blank DVD and a drive that will actually burn it. It is worth noting that, unlike the first method, this program allows you to create bootable disks not only with operating systems, but also with games and various utilities for checking the system and much more. In addition, you can use pirated images. However, it is worth warning that they have some limitations in functionality, and sometimes can cause irreparable harm to your computer.
Creating a bootable DVD in UltraISO on Windows 8: Video
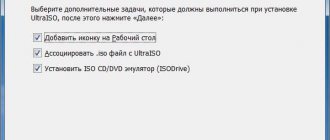
Insert a blank DVD into the drive. Launch the UltraISO program. The program menu is divided into four windows. In the lower left window called “Directory” we need to select the folder in which the image we need is located. After this, the entire contents of this folder will appear in the lower right window. Select the required file. Open it by double-clicking with the left mouse button. Now the unpacked image, with all the boot files, is displayed in the upper right window.
Now let's go to the toolbar. This is the top row, which has various tabs. We are interested in the “Tools” tab. Click on it. In the menu that appears, select “Burn CD image.” The same service can be opened by simply pressing the F7 key.
There is no need to configure anything here. At the very bottom there is a “Record” button. Click on it. All. After that, all you have to do is wait for the recording to complete, after which you will have a bootable CD/DVD.
Now you know how to make a bootable Windows 8 disk using UltraISO. In fact, this is not the only program. There are a lot of them, but this application is easy to use and multifunctional. With its help you can create bootable flash drives. In addition, it performs the functions of a virtual drive. As you can see, everything is extremely simple. It is also worth noting that you can write additional programs to the disk image if there is free space on it. For example, you can add drivers for your system to the image. Thanks to this, you can install Windows and drivers from one drive.
Checking whether the recovery partition has been created
In the Windows 8 operating system, for the recovery procedure, the so-called “Recovery Partition” can additionally be used. It can store a prepared system image that we can work with.
Let's check if the recovery partition is created in your operating system.
Launch Command Prompt and type “recimg /showcurrent” then press Enter. If you see this message: “There is no active custom recovery image,” then your operating system does not have a recovery partition and there is no prepared system image:
Please note: to create a bootable disk, you will need a previously created system image!
How to install Windows 8 - step-by-step instructions
This instruction will discuss how to install Windows 8 from a boot disk or flash drive onto a computer or laptop. The instructions are a visual and step-by-step guide designed primarily for users who have not yet encountered reinstalling and installing Windows 8 on their own.
There are 4 versions of Windows 8:
“Simply” Windows 8 or Windows 8 Core - version for home computer users; Windows 8 Pro - with advanced features; Windows 8 Enterprise - version for sale to companies; Windows RT is a version for tablets with ARM processors.
To work with G8, your computer must meet the minimum system requirements:
- Processor: 1 GHz, 32-bit or 64-bit;
- RAM: 1 GB (32-bit) / 2 GB (64-bit);
- Free hard disk space: 16 GB (32-bit) / 20 GB (64-bit);
- Video card: DirectX 9 support, 128 MB memory (to enable Aero theme);
- DVD Reader/Writer/USB Flash.
We will divide the Windows 8 installation process into the following points:
1. Preparing a boot disk (if you already have a disk with Windows 8, then move on to the next point); 2. Setting up BIOS/UEFI to boot the computer from a boot disk; 3. Start of installation; 4. Recommendations for partitioning a hard drive; 5. Microsoft account.
Preparing a boot (installation) disk
As mentioned above, if you already have a boot disk with Windows 8, then skip this point. But if not, then you need to download the Windows 8 iso image and burn it to disk. Link to article on how to burn Windows 8 iso image to DVD
Setting up BIOS/UEFI to boot your computer from a boot disk
In order to set the computer to boot from disk, you will need to enter the BIOS/UEFI settings and change just one parameter there. You can find out how to do this by following the link: setting up BIOS/UEFI to install Windows from a boot disk
Start of installation (we should have an installation disk with Windows in the drive 
After exiting the BIOS/UEFI and saving the settings made, the computer will restart and the following message will appear: Press any key to boot from CD or DVD , which is what you should do.
So we are in the Windows 8 operating system installation program, click Next.
Install.
Enter the license key and accept the license terms.
Custom: Windows installation only (for advanced users).
Recommendations for partitioning a hard drive
At this stage, we have to select a partition on the hard drive to install Windows 8.
Do not allocate all of your hard drive space to one single partition. This could cause you a lot of trouble in the future.
Modern hard drives have quite large capacities for storing data and therefore it is advisable to divide them into several thematic sections. It is recommended to set aside a separate section for installing the operating system and necessary software and not fill it with your personal data. You should choose the size of the system partition with a margin, taking into account that for Windows to work correctly, 15% of the space of this partition must remain free. Don't create too many sections. This will make navigation difficult and reduce the efficiency of distributing large files and folders.
Now let's get back to the installation. From this point on, the installation of Windows 8 can proceed in two ways:
Option 1: You have a new, unallocated hard drive. In this case, the following window will appear:
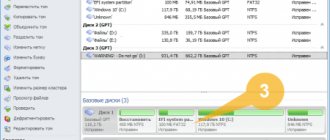
To partition the hard drive into partitions (we will create two partitions C: and D:), you need to select the item: Disk setup. In the next window, select Create.
In this window, we need to select the size of the future disk (C:), the Windows 8 operating system will be installed on it. Select the size for the disk (C:), a size of 110 GB will be enough. Apply.
"To ensure that all of its features work correctly, Windows may create additional partitions for system files." We agree and click OK.
As you can see, we have a small hidden and reserved Partition 1 of 350 megabytes and a second Partition 2, which will be the system drive (C:), its size is 107.5 GB.
Now let's create the drive (D:). Select Unallocated space on disk 0 and click Create.
We leave the size as it is 127999MB, this will be the disk size (D:), 125 GB. Click Apply.
In this window, select the future drive (C:), the volume is 107.5 GB and click Next, the installation of Windows 8 begins.
Option 2 - If your computer already has an operating system installed. Then your hard drive is already divided into logical areas, and you will see a window listing all found partitions on it. If the current partition of the hard drive does not suit you, you can delete unnecessary partitions by selecting the appropriate part of the disk, and then click Delete. You have the right to partition the unallocated space on the disk that appears after this at your discretion using the above method, discussed in option 1.
So, after selecting a partition, the Windows 8 installation process will begin.
First reboot.
There is no need to click anything in this window, otherwise the Windows 8 installation process will begin again.
Microsoft account
Preparing devices.
Let's configure the basic settings of Windows 8.
We select the color we need and give the computer a name.
You can use the standard parameters.
If you have your own Microsoft account, then enter in this window the E-mail you specified during registration. A Microsoft account is a combination of email address and password that you use to sign in to services such as Microsoft Community, Hotmail, SkyDrive, Windows Phone, Xbox LIVE, and so on. Creating a Microsoft account is very easy and can be done here. But even if you don’t have an account, you can still continue installing Windows 8 and an account will be created automatically. Let's say we don't have a Microsoft account, enter your email in this window and click Next.
Setting up a Microsoft account. We create an account, fill out all the fields, indicate the real mailbox, and enter the password to log into your Microsoft account not out of the blue, but to remember it.
After successful installation of Windows 8, we will receive an email from Microsoft Account Technical Support, asking you to confirm the creation of a Microsoft account, click Check and log in to your account by entering your email and password.
I want to say that the account will be useful to you, because if you have questions while using the operating system, you can ask them in the Microsoft community.
Adding information to protect your account. You don't have to specify a backup email address.
Enter the captcha.
Create an account.
Now after installing Windows 8, you need to install all the required drivers for connected devices.
REMEMBER! After installing Windows, you need to enter the BIOS/UEFI again and return booting from the hard drive.
What you need to create a boot disk
First of all, you need to decide what type of removable media you will use.
It is best to choose USB Flash - they are compact, inexpensive, and all personal computers have a USB connector. This is one of the main reasons why you should choose a flash drive, because not every computer will have a CD/DVD-ROM for reading discs.
Accordingly, prepare the media for use.
Now you need to create a recovery partition (if you don't have one).
Go to the search box and type "CMD". When the command prompt shortcut is found, right-click on it and select “Run as administrator.”
Now you need to do two things:
- Creating a folder to store the system image - type the command “mldir c:\restoreimage”
- Create an image of Windows 8 in the created folder - type the command “recimage -createimage C:\restoreimage”
These operations are shown in the figure below:
Creating a bootable Windows 8 disk
Now that we have prepared a system image, we can proceed to writing it to removable media.
We launch the “Charms” menu, and in the search bar we type “Recovery”. Select “Settings”, then “Create a boot disk”.
Next, you need to connect the removable drive, select it as the location for recording data, and create a boot disk using the wizard.
Download Windows 8 ISO image
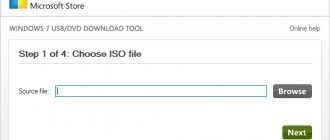
There are a huge number of bootable images of the Windows 8 operating system published on the Internet. You can download any of them. Most often they are distributed in ISO format. After you download it, you should burn it to disk using the built-in Windows disc image burning tool.
It can also be used for system recovery.
It will be useful for you: Setting up the BIOS for installing Windows.
Video for the article:
Create a bootable USB flash drive with Windows 8
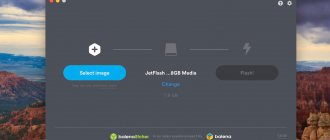
Rufus is completely free. You can download it from the official website https://rufus.akeo.ie
There is no need to install the program. Just download and run the .exe file.
Connect the flash drive on which we will write the image (the flash drive must be more than 4 GB). In the program window, in the first item “Device”, select our USB drive.
Below, in the section “Partition layout and system interface type”, you can choose one of three options. I recommend leaving “MBR for computers with BIOS, or UEFI” at this point (it’s unlikely that you know what format your hard drive is in).
“File system” - leave NTFS.
“Cluster size” is also left at default.
Below, we set all the checkboxes as in my screenshot (by default). And click on the button in the form of a disk to select the .iso image of the operating system.
We check all the settings again and press the Start button to start recording.
A warning will appear that all data on your flash drive will be deleted. If the necessary files are not on the drive, then click Ok, thereby confirming the formatting of the drive.
The process of writing the image to the USB drive will begin. We are waiting for it to end.
When the recording ends and the status is “Ready,” the Rufus program can be closed. That's it, the flash drive has been created, you can start installing the operating system.
Our recommendations
If for some reason you cannot read information from a CD, look for advice in the article - the drive has stopped reading discs
If you need a printer repair manual, use the material Windows 7 printer offline mode
If you want to set your computer to turn off automatically, use the Windows 7 computer shutdown timer