Build from source
One of the most correct ways is to use the source code published by the Google or Cyanogenmod development teams. But at the same time, this method is the most difficult, because in order to assemble Android firmware from source code, optimize it and make it work on a specific device, you need to have fairly deep programming skills and understand all the intricacies of the mobile operating system and device hardware. This knowledge is not acquired in a day, so in this article we will not describe this method in detail.
Android Kitchen - preparing the firmware yourself
Has it ever happened to you that you installed fresh new custom firmware. And it seems to be just perfect from all sides. Fast, with the latest version of the system, terribly beautiful. But suddenly a friend boasts that he also upgraded yesterday, and you realize that someone else’s product is more beautiful, faster, tastier, more desirable. What to do?
The answer is simple - you can take and redesign your firmware as needed. Replace various elements in it, add some of your own animations or other things. For example, do you want a waiting animation, a charge indicator or a progress bar, like in the screenshot, with the ability to change colors and shapes to suit your needs? Then under the cut I will tell you how this can be done.
To change your firmware, the first thing you need to do is go to the kitchen website https://uot.dakra.lt/kitchen/. This is where the whole process will take place. In fact, it is impossible to build the firmware from scratch. You’ll have to take someone else’s creation as a basis, but it’s easy to season it with your own spices.
Follow the link, and then everything is simple. We choose what we want to change: battery indicator, system icons and emoticons, status bar, appearance of pop-ups, waiting animation, glow effect when scrolling lists, volume change dialog, separators in lists, progress bar, lockscreen, transition animation windows, fonts, butanimation, etc.
Moreover, when choosing some options in the kitchen, it is possible to create a real-time preview of the changes to see what the output will be.
After selecting the changes you need, you need to go to the file upload tab. There is no need to change anything from the settings unless absolutely necessary. Only in the “Select your rom from kitchen's list, or upload your own files” section, select the “Kitchen's list” option. A drop-down list will appear in which you will need to specify the firmware used. If you specify something other than yours, then there is a high probability that the generated patch will not be applied or, even worse, you will have to reflash it because the system will not be able to boot.
After all these manipulations, go to the “Summary” tab, check the list of changes that have been planned and press the “Submit Work to kitchen” button.
Next, we go to the page https://uot.dakra.lt/pickup/, where we wait for our turn. As soon as it arrives, the site will give you a .zip archive with a freshly prepared firmware patch, which must be flashed through recovery.
Attention, before flashing the firmware, do not forget to backup your system!
Happy customization!
If you are as interested in news from the IT world as we are, subscribe to our Telegram channel
.
All materials appear there as quickly as possible. Or maybe VKontakte
or
Twitter
?
We are also on Yandex.Zen
and even Facebook.
Read us wherever it is convenient for you
There was more on this topic
Changing an existing file
If you are not too versed in all the intricacies of the OS, but want to change something in your firmware, the best solution would be to tweak a ready-made solution. You can change both the native, built-in firmware, and already changed by someone else. There are a lot of customized firmware on the Internet, and you are unlikely to lack their quantity. So, we present step-by-step instructions for assembling your own firmware based on an existing product.
CCACHE
This is a useful utility that is used to cache binary files and can reduce compilation time (by about 50%).
To initialize it, run the following command:
ccache -M 50G
Of course, instead of the given value, you must indicate the number of free gigabytes on your hard drive.
To view caching statistics, use the following command:
ccache -s
To delete cache files use the following command:
ccache -C
Setting up the working environment is almost finished - all that remains is to open the bash.rc file:
sudo nano ~/.bashrc
Now you should go to the last line of this file and insert the following lines into it:
export USE_CCACHE=1 export PATH=~/bin:$PATH
Finally, you should close your text editor and run the following command to apply the changes:
source ~/.bashrc
It's time to reboot the system.
That's all for today!
And these are the next two articles in the series, describing the process of assembling the firmware!
- Building your own Android firmware, part 2/3
- Building your own Android firmware, part 3/3
Editing using a computer
Required Software
We will need a computer, a device, a firmware file and a special program called Android Kitchen (also known as kitchen). The firmware file can be found on specialized forums, the most famous are the English-language XDA Developers and the Russian-language w3bsit3-dns.com. In the section for your device model, you can find links to the most popular and proven firmware, both official stock and unofficial custom ones.
Next you need to install the kitchen on your computer. It is best to work under Linux, but the necessary libraries can also be installed on Windows. In this case, you can get out of the situation by installing Cygwin. Download the archive and follow the step-by-step instructions included in the archive. Before this, you will also need to install the Java Platform (JDK) from the official website (https://www.oracle.com/java/technologies/javase-downloads.html for Windows) or in the Ubuntu Application Center find and download OpenJDK Java 6 Runtime or similar (for Linux). The second use case is to install Linux on a virtual machine and manage the process through it.
Firmware modification
Firmware is most often distributed as a file with the .img extension, less often as a ZIP archive. In both cases, you will need to move the firmware file to the installed kitchen folder so that it can import it and start working with it. Kitchen should be installed to the path c:/cygwin/home/user/ (when installing via Cygwin) or Filesystem/home/user/ (when installing via Linux).
- Start the kitchen via Cygwin or Linux terminal using the command cd kitchen, then ./menu.
- Unpack the archive into the kitchen, as described above.
- After the program menu appears, go to section 0. Advanced Options.
- After this, a list of commands for modifying the firmware will be presented. Choose exactly the one you need. You can add Busy Box, Root, Apps2SD, replace stock applications, various animations, free up device memory and much more.
- After completing the manipulations, run command 99. Build ROM from working folder in the main menu and take the ZIP archive from OUTPUT_ZIP.
Device firmware
You can flash the device either through a computer or without it. In the first case, you need to download the firmware program, usually Flash Tool or Odin, drivers for your device model and prepare an already corrected archive.
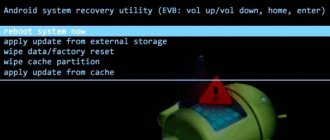
When flashing firmware via Recovery, you will need to copy the file to the root of the memory card, boot the device in Recovery mode, format the device and cache, and then install the firmware from the archive. After the reboot, you will have the firmware that you personally modified.
Changing the loading animation
The animation is stored as PNG images, packed into the archive /system/media/bootanimation.zip without compression. Inside the archive there are:
- desc.txt - file describing the animation;
- part0 - folder with animation files that are played first;
- part1 - folder with animation files that are played second;
- .
- part? — the outermost folder, the images from which are played back at the end.
The desc.txt file might contain something like
The purpose of these lines is intuitive: 1920 × 1080 is the image resolution, 60 is the number of frames per second. Part0 and part1 indicate the folders from which the animation will be played and the playback sequence. In general, there can be either one part or several (three or more).
Images located in the part folders are numbered with five numbers in playback order: 00000.png, 00001.png, 00002.png. These images can be replaced with your own, thereby creating an original animation. Or you can simply delete the bootanimation.zip file. Then the device will show animation from standard Android. Or use a ready-made collection of animations on w3bsit3-dns.com.
Four parts in bootanimation.zip for LineageOS
Editing on device
The simplest way of all. No additional devices or manipulations are needed. All you need is a rooted device, an application for creating backup copies (Nandroid backup is best) and a file manager with the function of changing the system partition.
Changing your own firmware
- If your device is not yet rooted, get it. You can read how to do this on specialized forums in the section dedicated specifically to your device. The fact is that universal methods are supported by a small number of devices and most of them have an individual procedure.
- Install Nandroid backup) and use it to make a system backup of your device. Save it in a safe place, such as cloud storage. Why create a copy? If something goes wrong or you accidentally delete something you need, you will be able to return everything as it was.
- Install a file manager that works with the system partition to remove unnecessary software and add your own applications. The gold standard is Titanium Backup.
- Select the apps you want to remove and remove them through the file manager.
- Install the applications you want to replace the deleted ones with, and use Titanium Backup to make them system applications.
- Reboot your device and enjoy your progress.
Changing third-party firmware in a ZIP archive
- Download the firmware file you are interested in in .zip format.
- Install a file manager that can work with archives, for example, ES Explorer or Total Commander, and unpack the contents of the archive.
- Remove unnecessary or add missing applications, then pack the archive back and move it to the root of the flash card.
- Using Nandroid backup) create a backup copy of the system and copy it to a cloud drive.
- Flash the device from Recovery mode.
How to create your own firmware
One of the most popular, if not the most popular, operating system for mobile devices, be it smartphones, tablets or other devices, is undoubtedly Android. There are a great many mobile gadgets running on the basis of this software, and even more - firmware versions, both official from the manufacturer and unofficial, collected by amateurs or fans of a particular device. But it happens, it happens that one or another firmware does not suit you. The reasons can be very different, from performance to interface, and many other small nuances. What to do in this case? Create the firmware yourself!
You can customize the firmware of your own device as desired, change many elements, animations, icons, performance and energy saving settings, and so on. The scope for imagination is undeniably great, and it is impossible to predict what will seem like the ideal choice for a particular person. After all, everyone strives to customize everything exactly for themselves.
Create Android firmware
We will look at a way to create your own firmware, which is great for not the most experienced users, but who are fully charged with enthusiasm. It is not always necessary to go into low-level programming to achieve the desired changes; very often the desired functions or appearance can be changed much more easily. Just visit the specialized Android Kitchen website. The process of “cooking” the new version of the software will take place in this “kitchen”. The only caveat is that the new firmware will be based on an existing version created by someone else, but seasoning it with all sorts of improvements, changes and other “spice” will not be difficult.
After visiting Android Kitchen, you can choose what you need to change - the battery indicator, system icons, status bar, various animations, volume dialog box, separators and progress bar, lock screen, fonts. When choosing certain functions in the “kitchen”, you can immediately, in real time, preview the changes made in order to evaluate them. After all the necessary changes have been made, go to the File Upload tab. There are some settings available here, but they are optimal by default - don't change them unless you're sure what you're doing. In the “Select your ROM from Kitchen`s list or upload your own files” section, select the “Kitchen`s list” option. From the drop-down list, select the firmware used. Be careful - if you specify the wrong software version, there is a high probability of an error, after which, at best, the patch will not be applied at all, and at worst, the system will stop booting and you will have to completely reflash the device.
After the completed manipulations, go to the “Summary” tab, check the list of changes made again and click the “Submit Work to Kitchen” button. Now all you have to do is wait your turn - the resource is quite popular, and many people use its services to make changes to the operating system. As soon as your turn comes, the site will provide you with a link to a ready-made .zip archive with a patch for your firmware prepared in your “kitchen”. Now this patch should be flashed via Recovery.
We remind you that before making any changes to the software of your smartphone, tablet or other Android device, it is strongly recommended to make backup copies. This way, if something goes wrong, you will always have the opportunity to quickly and painlessly roll back the changes made.
Rate this article: Share with friends!