What is it for?
Read also: TOP 12 Programs for computer diagnostics: description of proven software tools
Over time, users need to reinstall the operating system. This may be due to many reasons: someone wants to switch to a different version of the OS, for someone the current system does not start at all or starts with system failures.
In addition, there are a huge number of reasons why the operating system does not start. The problem may also be due to visiting virus sites that your antivirus cannot handle.
Then the system is completely infected. Then you can't do anything other than reinstall.
In this case, the user asks for help with reinstallation, and the procedure costs a lot of money and also takes time.
But you can reinstall your system yourself.
Perhaps each of you has DVDs with operating systems, as well as other recovery programs.
But this method of reinstallation has long been relegated to the background, since disks are very large and not entirely reliable storage media.
Advantages of a bootable USB flash drive
Therefore, you need a flash drive - it is compact, a very reliable and safe medium .
On it you can download installation files of the operating system and various programs to test it.
Next, we will tell you what basic programs must be on the media to successfully reinstall the system and all its components, and what you will need to create it yourself.
back to menu ↑ back to menu ↑
Recording with UltraIso
UltraIso is a paid program, but a 30-day demo version is available. This period is quite enough to successfully create a working installation of Windows XP. You can download the data recording program from the official website. To run the free version, you need to right-click on the shortcut and run as administrator. Next is the trial period.
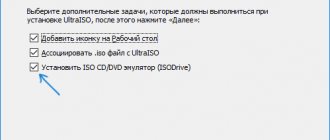
In addition to UltraIso, the computer may have Nero. Then, to avoid a conflict between these two programs, you should change the settings and, therefore, create bootable media for Windows XP. We carry out the sequence of actions: Options - Settings - Recording.
There should be no check mark in the box marked in the picture. If there is, we remove it. Otherwise, the resulting boot disk can be thrown away. Next, click OK and click File – Open – ISO file. We specify the path to the data so that the creation of a working installation takes place successfully.
After selecting the file, click Open. A window appears:
Pay attention to the inscription in the left corner. If it says Bootstrap, then the creation of a bootable disk will take place, and if it is specified, for example, without bootloader, then the downloaded image cannot be used for installation.
A settings dialog box will open in which you need to select the drive, recording method (Disc-at-once), speed and check the box to check the resulting boot disk. It is necessary to set the minimum allowed speed for the matrix. The burning depth, processor load, and time reserve depend on this. After distributing the settings, click Write.
After the recording is completed, a table with the results will pop up: whether everything was done without errors or not. The media tray will pop out automatically. The message that the check was completed successfully is very important.
Thus, creating a boot disk yourself is easy, as is installing Windows XP. The main thing is to strictly follow the instructions and believe in your own strength.
Creating a boot disk
There are several ways to create a bootable CD. Keep in mind that creating a bootable Windows CD is difficult, but you can create a CD that runs MS-DOS.
Let's look at the easiest way to create a bootable CD. To use it, you must have administrator rights. First, let's create a boot floppy using Windows XP.
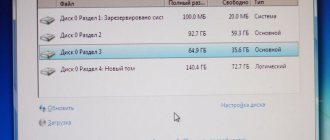
Insert a blank floppy disk into the drive. Run the command Start -> My Computer. Right-click on the drive icon and select Format from the context menu. The Format Disk 3.5(A:) window will open (Fig. 7.14).
Rice. 7.14. Window for formatting a floppy disk.
Note.
Most often the floppy disk is named 3.5 (A:), although it may be called differently on your computer.
In the Format Disk 3.5(A:) window, check the Create a bootable MS-DOS disk box and click the Start button. A dialog box will appear warning you that all data on the floppy disk will be destroyed. Click OK to start the boot diskette creation process. Once the process is complete, you will see a dialog box indicating that the formatting was successful. Click the OK button. The boot diskette has been created. Leave it in the drive.
Open Nero Burning ROM. On the left side of the New Project window, select the CD-ROM icon (use the scroll bar to do this). The New Project window will take the form shown in Fig. 7.15.
Click the New button. The ISO1 window will open, described in detail in Section. "ISO1 and View Areas" files" of this chapter. In the View window files, click on the + icon located next to the drive name, or directly on its name - Disk 3.5 (A:). The additional directory will display the files written to the floppy disk. Right-click on a blank field or on a file name in an additional directory and select Select All from the context menu. After selecting the files, press Ctrl+1. The selected files will be added to the project.
Note.
A bootable CD is essentially a data CD, so if you want, you can create a folder on it and put some information in it.
Click the Record the current project button located on the toolbar of the program window, or execute the Recorder -> Record project command. The Burn Project window opens. Most of the tabs in this window are already familiar to you; Let's look at the new tab - Downloads.
Set the switch to the Boot log position. disk (must fit on a CD!) and select item A: \ 1.44 MB from the corresponding drop-down list. If the floppy disk is still in the drive, this will be the default position. When you select the Advanced Settings for Advanced Users check box, all options in this area will become active. From the Emulation Type drop-down list, select the required type if your computer has a floppy drive of a different diameter. Leave the remaining parameters unchanged.
Note.
In the Boot Image Data Source area, you can select Image File from the drop-down list. However, to use the image file, you must first create it, and for this you will need to study special programs, for example the Norton package or something similar.
If Hard Disk Emulation is selected in the Emulation Type list, you should create a partition of no more than 700 MB on the disk and install an operating system on it that will not use the hard disk during boot. After this, you can begin creating a bootable CD.
On the Miscellaneous tab, the Cache files from disk and network checkbox must be selected. This type of cache is specifically designed for situations when a CD is written not from a hard drive, but from not very powerful devices (the floppy drive is first on this list).
After adjusting settings on other tabs as necessary, go to the Recording tab. Configure the settings in this window and click OK. After finishing recording, be sure to check if there are any malfunctions in the operating system.
Remove the floppy disk from the drive, leave the created bootable CD in the drive, and restart the computer. Ideally, an MS-DOS prompt will appear on the screen. However, if it does not appear, you should not be upset.
The fact is that when you turn on the computer, the clock generator begins to generate pulses. All internal cells of the central processor are immediately cleaned, after which testing of computer components begins. If you have connected a new device, the program will detect it and, if necessary, offer to install a driver.
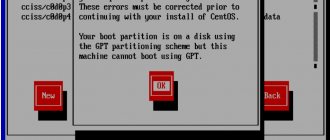
The video card is checked first and starts working so that you can observe the testing process on the screen and, in the event of a malfunction, identify the cause in a timely manner. When scanning your computer, the BIOS queries the CD drive, hard drive, and floppy drive in the order you specify. If the hard drive is tested before the CD drive, then the system will boot from the drive only if the computer has broken down seriously enough that the BIOS cannot start booting from the hard drive.
Note.
If, when creating a boot disk, you selected Floppy Emulation from the Emulation Type drop-down list, then when the computer boots from such a CD, the drive will swap places with the floppy drive. In any case, the user does not require any additional settings, since these actions occur automatically. However, you must understand that the BIOS must first detect the CD drive and then the hard drive. It does not matter when the drive is detected.
To avoid wasting time, enter BIOS Setup and configure the necessary settings yourself. However, before doing this, restart your computer by first removing the created CD and inserting the boot floppy disk into the drive, since it is quite possible that you have messed up something with the settings.
If your computer does not respond to your boot floppy during reboot, remove it, enter BIOS Setup and reconfigure the program. How to enter BIOS Setup and configure the necessary parameters is described in detail in Chapter. 1, sec. "CD/DVD drive."
Note.
In Windows XP, there are easier ways to restore the operating system. For example, after installing Windows, save the CD from which you installed the system, and in case of serious problems, insert the CD into the drive and restart the computer. In the Windows XP Installation window that appears, select Repair. However, keep in mind that the BIOS must first detect the CD drive and then the hard drive. You should create bootable disks if you do not have an installation CD.
| |
Installing Windows is an inevitable occurrence for every personal computer. The most popular operating system from Microsoft is Windows 7. This version has a simple interface and support for almost all devices and programs.
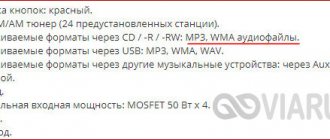
As a rule, Windows is installed either from a DVD or from a flash drive. The Flash drive allows installation on computers that do not have a DVD drive. But if the user formats the flash drive sooner or later, the DVD will most likely always be stored, allowing you to reinstall the operating system at any time.
Creating a bootable USB flash drive
Read also: TOP 12 Best USB flash drives for all occasions: for music, movies and backup data storage
Creating a bootable USB flash drive?
By selecting all the programs that will be on the flash drive, you can check and fix malfunctions in the performance of your operating system and hardware.
In addition, you can reinstall the operating system and automatically scan your computer for viruses: various Trojan blocker programs that can block your OS requiring money for further unlocking, as well as other dangerous programs.
All you need to create a bootable USB flash drive is to launch two programs and transfer to it the set of utilities that we provide below.
And, of course, the flash drive itself, the volume of which must be at least 16 GB. All utilities are suitable for installing 7 and 8/8.1 versions of Windows.
back to menu ↑ back to menu ↑
Making a multiboot flash drive
After you have added the operating system distributions, it’s time to upload boot files and utilities to the flash drive.
We return to MultiBoot USB and go to the fifth point: Copying files and utilities.
The multiboot flash drive window opens, click the browse button.
Select our portable USB device and click OK.
Then click the Extract button to begin the file copying process.
A small window appears confirming the replacement of files, replace the existing usbdrive.tag file, click Yes for all.
We perform the same action for all subsequent files that we are asked to replace.
If you want to see what came out of this, then go to the fourth item WinSetup From USB, click the button, check the box next to it and click.
This is what your boot menu should look like.
There are points here that need to be edited a little, and some that need to be removed altogether.
Required utilities
back to menu ↑
Active Boot Disk Suite
Read also: [Instructions] Testing computer performance: using popular programs + Reviews
Active Boot Disk Suite
This is a real OS on a USB drive.
It includes a large number of tools for further work with disks:
- system recovery options
- creating backups
- password reset
- secure data deletion, etc.
Thanks to this utility, you can create images in the operating system based on the system itself and DOS shells. In addition, you can add additional elements to this image using the Bootable Disk Builder.
After all operations, the utility will write the created image to your flash drive.
back to menu ↑
Acronis Media
Read also: TOP 10 disk cloning programs: their advantages and disadvantages
Acronis Media
This is a boot disk that contains a package of all the necessary programs for backing up data. It can create identical images of the hard disk and its individual fragments, and also manage partitions: merge them, split them, move them and create them.
It contains a classic boot menu, and is also a complete collection of all popular programs from Acronis.
back to menu ↑
Win7 Live by Xemom1
Read also: TOP 15 Programs for Windows disk defragmentation: choosing the best utility
Win7 Live by Xemom1
This thing is an edition of Win7Live - a lightweight version of tools for reinstalling Windows OS, which will allow you to boot from a USB drive.
It has a traditional interface and supports networks and SCSI/SATA devices. But it does not have multimedia support .
Its core has a built-in ERD-Commander for restoring the operating system and a standard recovery function.
back to menu ↑
ERD Commander
Read also: 5 Tips for setting up the Windows page file (7/8/10)
ERD Commander
Microsoft Diagnostics and Recovery tools , with which you can secure the process of using your device, increase its performance, and reduce the cost of managing it.
Thanks to these tools, administrators will be able to restore failed devices, identify the cause of failures, and fix them. If the need arises, you can also restore lost information.
This set is the core component of the Desktop Optimization Pack for Software Assurance , which includes new technologies to help secure and improve device management.
back to menu ↑
AntiSMS XP for weak computers
Read also: TOP 15 programs for checking hard disk sectors
Setting up AntiSMS on XP
This version of the program will be able to automatically eliminate all problems with the device associated with various viruses: Trojans, blockers, ransomware, etc.
With its help, even a beginner can unlock and restore the operating system if the problem concerns viruses.
When the device is started from a bootable USB flash drive, the utility will automatically take all necessary actions to disinfect the operating system.
back to menu ↑
AntiSMS Win8 for new computers
Read also: Errors when loading Windows: We deal with the most common ones
Setting AntiSMS to 7
This is the same program as the previous one, but this version is designed for newer operating systems and powerful devices.
back to menu ↑
AntiWinLocker LiveCD
Read also: TOP 15 Best free antiviruses for Windows | Rating 2020
AntiWinLocker LiveCD
This application will help in treating and unlocking an already blocked system if the system is infected with a specific virus - TrojanWinlock.
It is a ransomware that blocks the operation of the entire system, and unblocking will occur only after you send a message to a paid number.
back to menu ↑
Reset Windows Password
Read also: Safe Mode in Windows? How to log in?
Reset Windows Password
The utility is the best of its kind. It can reset, change and recover passwords for any type of system account.
It supports all OS versions, works with both local and domain records, and restores all lost elements in a short period of time. In addition, the utility has a Russified interface.
The utility will help you if you forgot your Administrator password when logging in or if you cannot activate your account.
It launches with a Setup Wizard , so even a beginner can cope with the interface and operation of this program.
back to menu ↑
Passware Kit
Read also: How to remove the password when logging into Windows? Methods for all versions
Passware Kit
The application contains tools for guessing passwords for files that were created using Word, Excel, Outlook, Access, Exchange, Acrobat, PGP, WinZip, as well as many other basic system elements.
In addition, it can pick up keys in most versions of Windows OS, as well as their files and media that were encrypted using BitLocker technology.
It supports almost all methods and mechanisms for guessing passwords:
- searches through the dictionary;
- according to a given alphabet;
- uses a known part of the password;
- uses information about previously recovered data;
- combines different methods.
The process is accelerated by the processing power of graphics cards and multi-core processors.
back to menu ↑
AIDA 64
AIDA
It is a utility for diagnosing the device and checking the overall system configuration.
It checks the hardware and shows detailed data about the computer’s hardware: its video card, processor, monitor, motherboard, the operation of hard drives in general, etc.
It also displays information about the operation of the operating system, drivers, running processes and other installed and loaded programs.
back to menu ↑
Victoria HDD
Victoria
The utility is designed for diagnosing and analyzing hard drives with SATA or IDE interfaces. It is free and is often used by many specialized service centers.
But it is suitable for home use, so it is in demand among most users, since with its help you can find all the necessary errors at home.
It can determine all failures in the system, the surfaces of hard drives, identify noise levels, average access times, delete necessary data from media without further recovery, and set passwords.
back to menu ↑
Memtest86+
Memtest86+
Performs a safe test of the device's RAM. The latest version of the program has the ability to support a large number of threads, accelerated speed when errors are detected, and displays data on the current processor temperature.
back to menu ↑
GoldMemory
GoldMemory
The utility conducts testing and checks RAM for the identification and presence of various types of failures. Capable of supporting almost all types of modules, as well as compatible platforms for working with different configurations.
With its help, you can analyze the available modules, check them for failures and errors, which often cause system malfunctions.
It runs on DOS-compatible operating systems, has a list of parameters for operation and has a function for generating a report on the results of the analysis.
back to menu ↑
MHDD
MHDD
The application allows you to accurately diagnose HDD drives and make minor repairs. Can work even at low level, communicates directly through IDE controller ports.
The utility performs a very accurate and fast check of all surfaces of hard drives, despite the information it receives when diagnosing the drive.
In addition, with its help you can easily and quickly eliminate soft-bad sectors.
back to menu ↑
Volkov Commander (NTFS+)
Volkov Commander (NTFS+)
This is a very popular shell for DOS.
It allows you to mark, move, copy/delete sections with all their subsections and performs the same operations as with simple files. And during copying, files can be either merged or split.
In general, it has very powerful functionality.
back to menu ↑
FixNTLDR
Dealing with the NTLDR is missing error
“NTLDR is missing” appears when booting your device , then this utility can easily fix it.
back to menu ↑
Kon-Boot Commercial
Kon-Boot Commercial
The application allows you to change the contents of the operating system kernel directly during its boot. At the same time, it bypasses the authorization stage in the system, that is, it can log into your account without entering a password.
But, at the same time, your password is not deleted or overwritten, which means that after a further reboot of the system, all the original contents of its kernel—the authorization process—is restored and occurs in the format already familiar to you.
This set of utilities will be more than enough to create a bootable USB flash drive.
back to menu ↑ back to menu ↑
Early Easy2Boot method for creating a drive (still works)
The following files were checked by VirusTotal, everything is clean, with the exception of a couple of threats (which are not) in Easy2Boot, which are associated with the implementation of working with Windows installation ISO images.
We will need RMPrepUSB, take here https://www.rmprepusb.com/documents/rmprepusb-beta-versions (the site is sometimes poorly accessible), download links are towards the end of the page, I took the RMPrepUSB_Portable file, that is, not the installation file. Everything is working.
You will also need an archive with Easy2Boot files. You can download here: https://www.easy2boot.com/download/
The process of preparing an Easy2Boot multiboot flash drive
Unzip (if portable) or install RMPrepUSB and run it. Easy2Boot does not need to be unpacked. The flash drive is hopefully already connected.
- In RMPrepUSB about (No User Prompts)
- Partition Size - MAX, volume label - any
- Boot sector (Bootloader Options) - Win PE v2
- File system and options (Filesystem and Overrides) - FAT32 + Boot as HDD or NTFS + Boot as HDD. FAT32 is supported by a large number of operating systems, but does not work with files larger than 4 GB.
- О (Copy OS files from here), specify the path to the unpacked archive with Easy2Boot, answer “No” to the request that appears.
- Click the “Prepare disk” button (all data from the flash drive will be deleted) and wait.
- Click the "Install grub4dos" button, answer "No" when asked about PBR or MBR.
Do not exit RMPrepUSB, you will still need the program (if you exit, it’s okay). Open the contents of the flash drive in Explorer (or another file manager) and go to the _ISO folder, there you will see the following folder structure:
Note: in the
docs folder you will find documentation in English on editing menus, design and other features.
The next step to create a multiboot flash drive is to transfer all the necessary ISO images to the desired folders (you can use several images for one OS), for example:
- Windows 10 - in _ISO\WINDOWS\WIN10
- Windows 8 and 8.1 - in _ISO\WINDOWS\WIN8
- Antivirus ISOs - in _ISO\Antivirus
And so on, according to the context and folder names. The images can also be placed in the root of the _ISO folder; in this case, they will subsequently be displayed in the main menu when booting from a flash drive.
After all the necessary images have been transferred to the flash drive, in RMPrepUSB press Ctrl+F2 or in the menu select Drive - Make All Files on Drive Contiguous. Once the operation is complete, the flash drive is ready and you can either boot from it or press F11 to test it in QEMU.
Fixing media driver error when booting from USB HDD or USB flash drive Easy2Boot
This addition to the instructions was prepared by a reader under the nickname Tiger333 (his other tips can be found in the comments below), for which many thanks to him.
When installing Windows images using Easy2Boot, the installer often displays an error stating that the media driver is missing. Below is how to fix this.
You will need:
- Flash drive of any size (you just need a flash drive).
- RMPrepUSB_Portable.
- Your USB-HDD or flash drive with installed (working) Easy2Boot.
To create the Easy2Boot virtual drive driver, we prepare a flash drive in almost the same way as when installing Easy2Boot.
- In the RMPrepUSB program about (No User Prompts)
- Partition Size - MAX, volume label - HELPER
- Boot sector (Bootloader Options) - Win PE v2
- Filesystem and Overrides - FAT32 + Boot as HDD
- Click the “Prepare disk” button (all data from the flash drive will be deleted) and wait.
- Click the "Install grub4dos" button, answer "No" when asked about PBR or MBR.
- Go to your USB-HDD or flash drive with Easy2Boot, go to \_ISO\ docs\ USB FLASH DRIVE HELPER FILES. Copy everything from this folder to the prepared flash drive.
Your virtual drive is ready. Now you need to “introduce” the virtual drive and Easy2Boot.
Remove the flash drive with the drive from the computer (insert a USB-HDD or a flash drive with Easy2Boot, if removed). Run RMPrepUSB (if closed) and click “run from QEMU (F11)”. While loading Easy2Boot, insert your USB flash drive into your computer and wait for the menu to load.
Close the QEMU window, go to your USB-HDD or flash drive with Easy2Boot and look at the AutoUnattend.xml and Unattend.xml files. They should be 100KB each, if this is not the case, repeat the dating procedure (I only succeeded the third time). Now they are ready to work together and problems with the missing driver will disappear.
How to properly use a flash drive with a drive? Let me make a reservation right away: this flash drive will only work with a USB-HDD or an Easy2Boot flash drive. Using a flash drive with a drive is quite simple:
- While loading Easy2Boot, insert your USB flash drive into your computer and wait for the menu to load.
- Select the Windows image, and when asked by Easy2Boot “how to install”, select .ISO, then follow the instructions for installing the OS.
Problems that may arise:
- Windows again gives the error that the media driver is missing. Reason: You may have inserted a USB-HDD or flash drive into USB 3.0. How to fix: change them to USB 2.0
- The counter 1 2 3 starts on the screen and constantly repeats, Easy2Boot does not load. Reason: You may have inserted a USB flash drive with a drive too early or immediately with a USB-HDD or Easy2Boot flash drive. How to fix: turn on the USB flash drive as soon as Easy2Boot starts loading (the first boot words appear).
Instructions for creating a bootable USB flash drive
How to make a bootable USB flash drive
1First, you need to insert a flash drive with a capacity of at least 16 GB into your device.
2Now you need to format it. To do this, you need to run the HP USB Disk Storage FormatTool program as Administrator.
3In the next window you must specify the following parameters:
- in the Device , select the path to your flash drive;
- in File system specify NTFS ;
- in the Format options column, select Quick format , which means complete formatting of the media;
- After specifying all parameters, click Start.
Setting media formatting
4Now you need to install the bootloader on the flash drive using the Bootice utility.
5Select the boot media, click Process MBR.
Selecting boot media
6In the next window, specify the second boot type, complete the installation by selecting Install/ Config.
Selecting the installation type
7At the last stage, mark two positions in the first column, click Save to disk.
Saving disk
8After completing all the applied actions, the bootable flash drive will be ready. Now you need to copy the entire set of tools that were given above to the root folder of the media.
Congratulations! Your regular flash drive has turned into a bootable one.
Now you can use it when the need arises to install, reinstall and restore the operating system.
back to menu ↑
VIDEO: Creating a bootable USB flash drive with a set of programs
Creating a bootable USB flash drive with a set of programs
We create our own bootable USB flash drive with utilities for Windows (7/8/10)
back to menu ↑
VIDEO: How to make a bootable USB flash drive for Windows 7-10?
How to create a boot disk using the DOS method?
- We create a folder on the hard drive in which we will enter all the necessary data. First of all, you should add a file manager adapted for DOS: Norton Commander, FAR or Volkov Commander.
- To make it convenient to launch a file manager (for example, Volkov Commander), we create a bat file. It’s very simple: open notepad and enter:
cd vc
vc.com
Let me explain a little. The first line is a command to replace the directory with Volkov Commander. The second line is a command to run the file called "vc.com".
Save the notepad file under the name “vc.bat”. The presence of a file under this name makes it possible to enable Volkov Commander using the letter combination on the command line: vс. And confirm everything with the Enter key.
- Later, when you use the boot disk, you will need to select the exact drive letter that corresponds to the CD drive. This is done as follows: in the command line, write first D:, then E:, and so on until the notification “The disk is not specified correctly” pops up. The most recent disk in existence will most likely be your CD drive.
However, this should be checked. To do this, enter the command “dir” in the command line. This command will display all files and folders contained on the disk. In this simple way, you can make sure that the disk is selected correctly and continue.
- Next we will use the Partition Magic program, namely its DOS version. This software product is designed to work with hard drives: formatting, dividing the hard drive into partitions, converting file system types and much more.
- In the folder where we collect everything necessary for the boot disk, we create an additional directory called “PQ” with program files. Similarly, with Volkov Commander we create a launching notepad file with the following content:
cd PQ
pqmagic.exe
Let's call it "pq.bat".
Next, install the disk with Windows XP into the drive and create a bat file that starts the installation:
cd i386
winnt.exe
We give it the name “xp.bat”.
Thus, everything necessary for the boot disk has been created.
- Launch Nero (or any other imaging program described above). In the menu that opens, select “Create a bootable data disk.”
- Click the “Add” button and enter into the window all the folders and files that should be written to the installation disk. Then click the “Next” button.
- At this stage, you may be prompted to insert a boot floppy disk, ignore this requirement and select “Next” again.
- Now directly select the “Record” button.
Advice: we do not recommend recording at a speed of more than 4, because it is impossible to accurately predict what type of CD-ROM this disc will subsequently be used on.
Kaspersky Rescue Disk 10
Everyone has heard that there is Kaspersky anti-virus, some of you have used it or are still using it. I like and am quite satisfied with this antivirus, so I have been using it for more than 5 years.
Kaspersky also has a Windows emergency recovery disk, just like Doctor Web. It is called Kaspersky Rescue Disk 10, its anti-virus databases are updated regularly, so Kaspersky can help you if viruses appear on your computer and logging into the system is not possible.
Here is the link to Kaspersky Rescue Disk 10
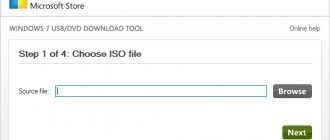
Download the image, rename it from to .
We go to the root of the flash drive, create a new folder in it and call it .
Then copy the renamed image to the created folder.
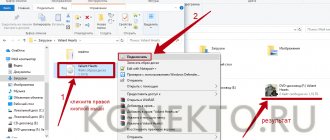
That's not all. We return to the root of our portable usb device and create a new text document in it.
Rename <New text document.txt> to .
Remove the <.txt> extension and press enter.
We are warned that after changing the extension the file may be inaccessible, click <Yes>.
Working with the graphical boot menu
Now we have finally added all the necessary programs and file images to our bootable USB flash drive. Now we need to edit the graphical boot menu that will appear when selecting our distributions, programs and utilities.
We go to the flash drive, to the root, find the file, open it using Notepad, WordPad or, whichever is more convenient for you.
Just in case, I’ll show you how to open the menu sheet using Notepad if you don’t have Notepad++. Right-click on the file and select Open.
The window The file could not be opened appears. Place a dot next to <Select a program from the list of installed programs> and press .
We are looking for Notepad in the list of recommended programs.
If it is not there, then you need to double-click on Other programs or on the right on the small downward pointer.
In the list that appears, find Notepad or WordPad, select it and click OK.
I’m used to working through a convenient one, so I’ll do all my editing work in it.
You can download notepad here Notepad++
A list of all items appears in front of us, which is displayed in the graphical menu of our bootable USB device.
First of all, I propose to remove (delete) the unnecessary and unnecessary items mentioned earlier, Symantec Ghost and Windows XPE - full version.
The unnecessary stuff has been removed, now I propose to edit our list in accordance with the contents of our flash drive. Depending on the names of the images on the usb device, you need to rename these names in the menu sheet, that is, make them the same for everything to work.
I will write the names of my images, you may have others, but remember one thing, if you make a mistake in even one letter, the required distribution or program will not start.
Previously, we added distributions of the Windows XP and Windows 7 operating systems through the WinSetup From USB utility. We find the corresponding items in our menu and change their names to new ones.