What is Aptio setup utility - copyright (C) 2012 from the developer American Megatrends, Inc
American is a recognized leader in the development of software and hardware components for various PCs. The organization was founded back in 1985, and is known to millions of users for “AMIBIOS,” which is installed on both branded motherboards and motherboards from other manufacturers.
With the advent of GPT and UEFI technologies, the company released the Aptio setup utility to the market - a modern UEFI firmware that replaced the usual BIOS. It supports many innovative hardware solutions, including modern GPT.
"Aptio" has a version for each year (2010, 2011, 2013, 2020, 2020, 2017, 2018), differing in the features of its implementation. Accordingly, the more modern your PC, the more advanced the firmware version is installed there.
Methods for solving the problem
In most cases, resetting the CMOS memory or replacing the battery powering the memory with a new one will solve the problem. We wrote about how to reset CMOS memory and how to change the battery in the relevant articles.
If you reset the CMOS memory and replaced the battery with a new one, but, nevertheless, the BIOS settings still reset, then you can try checking the power supply, the power button, and the contacts of the BIOS chip. It also makes sense to check whether the battery is securely in its socket. If you are sure that these factors are not the source of the problem, then most likely the problem is a malfunction of the CMOS memory, BIOS chip, or the motherboard itself. In this case, you will need to replace the faulty chip or replace the entire motherboard.
Functionality and configuration of innovative firmware
Getting into the “Aptio setup utility” we are greeted with a text interface similar to a standard BIOS. There are six main tabs, the interface language is English.
Aptio Main Tab
The “Main” tab contains basic information on the BIOS, including its vendor and kernel version, information about the amount of PC memory, the choice of the BIOS system language (“System Language”), the system date and time.
- Advanced Tab
Functionality of the “Advanced” tab
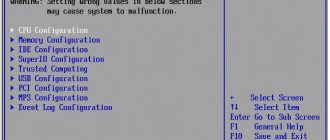
This tab contains information on settings for the PCI subsystem, power interface and configuration settings, settings for the central processor, SATA, USB and serial port console.
Pay attention to the "CPU Configuration" section. Here are the settings for configuring the operation of the central processor, including technologies from Intel “Hyper-threading”, “Intel Virtualization Technology” and others, which you can activate and deactivate as you wish.
In the “USB Configuration” section, activate the “Legacy USB Support” option, which allows you to support previous versions of USB technology.
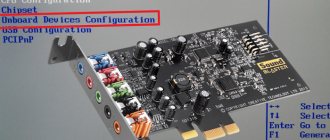
- Chipset tab
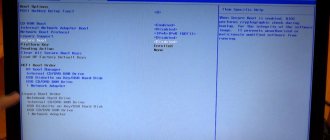
- Boot Tab
Boot tab settings
The “Boot” tab contains the boot settings for your system. Pay attention to the “Boot Option Priorities” parameter, which displays the priority of boot options, and set the ranking that you need.
- Security Tab
In the “Security” tab you can set your password to log into Aptio Setup Utility
This tab allows you to set the User Password and Administrator Password to enter the BIOS. Setting a password helps prevent unwanted users from interfering with your PC's BIOS settings.
How to enter BIOS on a computer or laptop - Find out here 48
April 11, 2016 Yuri Khripachev page » About hardware 5886
Welcome to my blog! Every computer or laptop user sometimes has to enter the BIOS of their system, and it often happens that the user does not know how to do this and asks a more experienced user for help in this matter. In this article you will find some tips on how to enter the BIOS of your computer or laptop and you can do it yourself without resorting to outside help.
:
If we recall history, starting with 286 processors, computers had a built-in BIOS Setup system setup program.
BIOS – Basic Input/Output System or Basic Input/Output System, here are the system settings on which the speed and reliability of the computer depends.
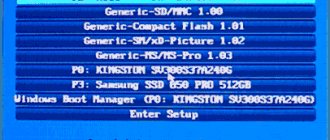
What to do if the system crashes in Aptio setup utility
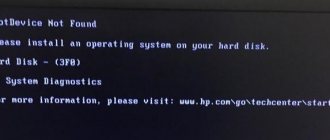
The popularity of search queries for the request “Aptio setup utility” is usually associated with a problem when the PC automatically kicks the user into this utility, and it is impossible to exit it. This is due to problems with the hard drive, when the drive itself is faulty. Or the hard drive is not connected to the PC properly.
You can solve the error in Aptio as follows:
- Make sure the HDD is properly connected to your PC. Check the tightness of the plugs to the connectors;
- Reset BIOS settings to factory settings;
- Enable the “CSM” option and disable “Secure Boot” in the BIOS settings;
- Perform a Windows recovery using a boot disk (flash drive). Select the "System Restore" option and then "Startup Repair".
Use the "System Restore" option to normalize your PC
InsydeH20 Setup Utility rev 5.0: How to boot from USB
Many users have firmware installed on their PC that is similar to the traditional BIOS. This firmware is usually used for software maintenance of UEFI systems. When trying to install any version of Windows OS on a computer with such firmware, the user may encounter problems installing the system from an external flash drive. In our article we will try to help such users and will look at how you can boot from a USB drive to InsydeH20 Setup Utility rev 5.0. And also what we need for this.
a) Setting up booting from a flash drive in AMI BIOS
- Using the arrow or tab, select “Boot” , then select “Hard Disk Drives” , then click Enter on “1st Drive” . In the window that opens, select the designation of our flash drive like “USB Flash Disk” . Press Enter , then Esc .
- Select the next item “Boot device priority” , click on “First boot device” - press “Enter” .
- And similarly, we select the designation of our bootable flash drive (by name and media size). Press Esc to close the current window.
- To exit the BIOS while saving changes, go to Exit and click “Save changes and exit” or “Exit saving changes” - then press “Y” , and then “Enter” .
- After which the computer will restart, followed by loading from your external storage device - a flash drive.
Phoenix TrustedCore Setup Utility
Popular BIOS version. It is, in particular, on many Acer laptops:
We need to get to the Boot section. Press the right arrow three times:
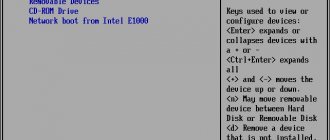
Here is a list of devices from which you can boot. The line names are different on each computer, but the first two words always tell you what kind of device it is:
- IDE CD – CD/DVD drive
- IDE HDD - hard drive
- USB HDD – portable hard drive
- USB KEY – flash drive.
To set the disk drive first (line starting with IDE CD), i.e. change the boot priority, use the up/down arrows to highlight this item, then press F5/F6 (on some versions of this BIOS you need to press – or ), put it first in the list. It will be something like this:
Loading order
To save your settings, press the right arrow to get to the Exit Exit Saving Changes menu item and press Enter twice in a row.
Note: The Exit Discarding Changes menu option allows you to exit the BIOS without saving the settings you have made.
The computer will restart and instead of loading Windows, it should start booting from the selected drive. That is, for example, the installation of Windows will begin. Mission Complete!
d) Setting up booting from a flash drive in Aptio Setup Utility American Megatrends
IV) How to configure boot from a flash drive in UEFI - BIOS?
New computers, as a rule, already have a UEFI BIOS, which differs from the classic one in its graphical window interface, mouse support, and quite often the menu items and names of windows and tabs are already in Russian (it is possible to select the interface in Russian).
On the most common motherboards Gigabyte and Asus, the sequence of polling media for booting changes in the first window when booting, at the bottom of the window the sources of possible booting are displayed and with the mouse we simply move our flash drive to the first place - to the beginning - to the first left place.
However, often this is not enough and in addition to installing the flash drive in the first place, you will need to go to the BIOS menu item “Boot Options” and go to the “Features” .
How to boot InsydeH20 from a USB drive
To enable loading InsydeH20 from a flash drive, you must perform the following set of operations:
- Enter your PC's BIOS. This is usually done by quickly pressing the Del (F2) key when starting the PC. At the same time, a number of computers have other combinations for entering the BIOS (for example, Fn+F2 on Lenovo);
- Using the cursor, go to the “Security” section;
- In this section, find the “Secure boot” option and set its value to “Disabled”;
For the “Security boot” parameter, select the value “Disabled”
- Now go to the "Boot" section;
- Here, find the “Boot mode” option. Instead of the “UEFI” that is there, set the value to “Legacy Support” (instead of the specified value there may also be “Launch CSM”, “CMS OS”, “CMS Boot”, “UEFI and Legacy OS” and others);
Select the "Legacy Support" option
- In the item below “Boot Priority” (if available), set the value to “Legacy First”. In this case, this item can be installed automatically by the system;
- Now save the changes by going to the “Exit” section and selecting the “Exit-Saving Changes” option there or simply pressing F10;
Save your changes
- Your PC will restart.
The necessary settings for MBR support have been made. All that remains is to put our flash drive first in the download list. This will make it possible to boot a PC from USB based on InsydeH20 Setup Utility rev 5.0.
- Insert the flash drive into the USB connector of the PC;
- Enter the BIOS again by pressing F2 (or Fn+F2) during boot;
- Using the cursor, select the “Boot” section;
- In the “USB HDD” item, select your flash drive;
Select your USB HDD flash drive Move your flash drive to the first place in the list of boot devices (for example, using the Fn+F6 combination);
Place your flash drive first in the list of devices
After completing these operations, you will be able to boot your laptop from USB into InsydeH20. Please remember that after completing the first stage of installing the new Windows OS and correspondingly rebooting the PC, you must disconnect the flash drive from the connector, otherwise the installation of the operating system may begin again.
November 2019 update fix:
We encourage you to try this new tool. It fixes a variety of computer errors and also protects against things like file loss, malware, hardware failures, and optimizes your computer for maximum performance. This fixed our computer faster than doing it manually:
- Step 1: Download PC Repair & Optimizer Tool (Windows 10, 8, 7, XP, Vista - Microsoft Gold Certified).
- Step 2: Click “ Start Scan ” to find Windows registry issues that may be causing problems with your PC.
- Step 3: Click " Fix All " to fix all problems.
(additional offer for Advanced System Repair Pro -> Website | License Agreement | Privacy Policy | Remove)
On the contrary, if you are 100% sure that your hard drive is working properly or that your replacement is supported and connected correctly, there are steps you can take to resolve the issue. To help you, we have provided some solutions below. Don't forget to take a look at this.
Try the following and see if it solves the problem.
1. In Aptio Setup Utility, select the "Boot" menu, then "Launch CSM" and change it to "enable".
2. Then select the "Security" menu, then "Secure Boot Control" and switch to "Disable".
3. Select "Save and Exit" and click "Yes".
4. Then press and hold the "Power" button until the laptop turns off completely.
5. Now you want to turn it back on and press and hold the “F9” key for about ten seconds or until you get to the “Windows Recovery Menu”.
6. Select "Advanced Start" and then "Advanced Options" once the recovery menu appears.
7. Select System Restore and select a date before the problem began.
The computer should now go through the recovery process and start normally for you.
Make sure your computer's hard drive/SSD is connected correctly.
The most obvious reason for this problem in your case could be that the connection between your computer and its hard drive/SSD is somehow weakened such that your computer is unable to recognize its hard drive/SSD. If this is indeed the cause of this problem for you, all you need to do is connect your computer to its HDD/SSD. To do this you should do this:
- Open your computer to access its hard drive/SSD. If your computer is a desktop computer, open the case. If your computer is a laptop, unscrew it and remove the bottom.
- Locate and disconnect the reader connector from your computer's motherboard.
- Clean the reader connector and motherboard connector on your computer.
- Connect the player's connector to the connector on the computer's motherboard and make sure it is connected correctly.
- Close your computer.
Start your computer and check if the problem persists.
CCNA, Web Developer, PC Troubleshooter
I am a computer enthusiast and practicing IT professional. I have many years of experience in computer programming, troubleshooting and hardware repair. I specialize in web development and database design. I also have a CCNA certification in network design and troubleshooting.
Getting advanced settings in Bios insydeH20 setup utility rev 5.0
How to adjust BOOT in Bios insydeH20 setup utility rev 5.0 Help. cry: I put USB-HDD and CD/DVD in the first 2 places in BOOT. 3rd under the railway. Attempt.
How to open the ADVANCED tab in Bios insydeH20 setup utility rev 5.0? At startup there is a standard BIOS window: how to make the ADVANCED tab appear in the BIOS.
Reinstalling the OS from a flash drive [insydeh20 setup utility rev. 3.5] Hello, the essence of the problem: I need to reinstall the Sony Vaio pcg 41414v laptop, but the BIOS does not see it.
BIOS settings insydeh20 setup utility rev are not saved. 3.7 Hello everyone, there is a problem with the BIOS; when turned off, the BIOS insydeh20 setup is reset.
I order tests, coursework, dissertations and any other student work here.
How to unlock a hard drive in insydeh20 setup utility rev 3.7 Please help me solve the following problem: Win 8 stopped loading. After turning it on.
Acer Predator Triton 700 and insydeh20 setup utility rev 5.0 hi guys and this is the problem. I need to reinstall Windows, but there is no boot mode option in the boot menu.
How to disable one of the hard drives via BIOS insydeH20 setup utility? How to disable one of the hard drives via BIOS insydeH20 setup utility?
Setup Utility Rev. 3.5 laptop Please help if anyone knows. I decided to install wine from a flash drive to my laptop, and it was most likely cut off.
source
Basic advanced menu settings
Let's look at the basic settings that can be found on the advanced tab.
Let's take for example the old AMI BIOS - version 3. Other BIOS versions should have similar functions and may have different names.
Quick Boot - Quick boot, which means to enable or disable (Enabled - enabled, Disabled - disabled) the quick loading of the operating system, without spending time checking devices and testing memory with the basic I/O system.
Boot Device Select - A favorite menu and a familiar menu for those who have at least once encountered reinstalling Windows; in this menu you need to change, if not the default, the device boot priority. In other words, here you should select the first device that will be checked for boot information (Windows bootloader or Live Cd), usually the default is a hard drive (HDD), you can change, for example, to CDDVD USB and other devices from the list. Generally speaking, you need to install First Boot Device - CDDVD, if the installation program is on the disk, then you can install the hard drive, and leave the third priority device empty. (two or more is enough for convenience). By analogy, you can install Fist Boot Device - FlashUSB... if the boot files are on a USB flash.
Full Screen Logo Show is a rare menu; it is not found on all motherboards and is also rarely used.
SMART for Hard Dist is a BIOS function that checks the hard drive for functionality; to put it another way, this function will tell you in advance when it is recommended to replace your hard drive. The information will be checked every time you turn on the computer. And when the life of the hard drive reaches the end, you will be advised to copy the data to a new hard drive right on the start screen.
BootUp Numlock is a BIOS feature that automatically turns on the right numeric keypad right when you turn on the computer.
Floppy ... are functions associated with outdated floppy drives and devices for reading them.
Password Check – here you can set a password to enter the BIOS. If you forget, you will have to remove the battery and reset the settings to factory settings. Necessary for protection from “prying eyes”.
Hyper Threading is a technology that is difficult to explain, the essence of which is that the operating system will count one computer core as two and because of this technology the processor is used more efficiently. This setting affects performance.
MPS – this option is needed if you have a multiprocessor motherboard.
APIC ACPI SCI IRQ - use advanced mode if you have a multi-core processor; if advanced mode is disabled, the computer will only see one core.
CPU L1 & L2 Cache – enable or disable fast processor memory. It’s better not to touch these settings, especially if you don’t know why.
System BIOS Cacheable - older operating systems used some of the ready-made BIOS functionality, so this option could speed up the work, but now operating system developers do not use it, and, therefore, it is better to keep it disabled.
ATTENTION : If you update the BIOS, this option must be disabled (DISABLED). Otherwise, flashing the BIOS may not be completed completely, which will lead to the BIOS not working.
C00 32k Shadow - this option could speed up the operation of the video card by copying the BIOS of the video card into RAM; it is not used on modern platforms.
Let's take a quick look at another type of advanced BIOS menu
JumperFree Configuration is a set of settings necessary to overclock your computer.
ATTENTION : IN THESE SETTINGS YOU NEED TO BE VERY CAREFUL AND KNOW WHAT YOU ARE CHANGING. SINCE ACCELERATION IS ASSOCIATED WITH AN INCREASE IN ELECTRICITY AND HEAT. FAILURE TO CHANGE THESE SETTINGS MAY RESULT IN CORRECT OPERATION OF THE COMPUTER EQUIPMENT.
CPU Configuration is information about the processor and its current settings.
CHIPSET is usually a set of settings for overclocking RAM. The recommendations are the same as for all overclocking parameters.
Onboard Device Configuration is a set of settings for enabling and disabling ports and network cards.
PCIPNP is a set of settings related to the maintenance and interrupt processing of components on PCI.
USB Configuration is a set of USB-related settings.
Conclusion
If you do not have the “Advanced” tab or it is hidden, then you need to find in the tips, either on the left side or at the bottom, which key to press to switch to Advanced mode. In practice, the BIOS has a similar structure, it’s just that some functions can be placed in other tabs. The information obtained here can be used for most motherboards.
Some motherboards will have different functionality available and may have a slightly different menu (For example, Asus UEFI, etc.)
Despite the fact that motherboards and laptops with this BIOS version have not been produced for a long time, there are a large number of devices equipped with it. The most common reason for entering BIOS settings is to change the boot priority for installing the operating system. Since almost no one uses disks anymore, and the DVD drive does not work on every computer, in this article we will tell you how to boot from a USB flash drive in Insydeh20 setup utility rev 3.5.
How to disable Secure Boot and UEFI on a Gigabyte motherboard
Press the DELETE key when booting the PC and enter the UEFI-BIOS. We go to the “BIOS Features” section and, having found the “Windows 8 Features” parameter, switch it to the “Other OS” position.
Then switch the “Boot Mode Selection” parameter to the “Legacy only” or “UEFI and Legacy” position. And finally, switch the “Other PCI Device ROM Priority” parameter to the “Legacy OpROM” position.
To save the changes, press the F10 key and confirm saving the changes by selecting “Yes”. Reboot. Now we can load any operating system onto our computer.