Overclocking on NVIDIA
If you are using a video card from NVIDIA, then overclocking your monitor will not be difficult for you. The fact is that the NVIDIA Control Panel, which is installed along with the NVIDIA drivers, has supported this function for a long time and will allow you to set any refresh rate in just a few clicks.
First, you need to right-click on the desktop and open the “NVIDIA Control Panel” or go to the path “Control Panel – Hardware and Sound – NVIDIA Control Panel”. For more information about this, see the article on how to open the NVIDIA Control Panel.
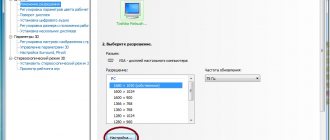
In the “NVIDIA Control Panel” window, you need to open the “Display - Change Resolution” section, select the monitor that you want to overclock to 75 Hz and click on the “Settings” button.
Next, the “Settings” window will appear. Here we simply click on the “Create Custom Permission” button and move on to the next step.
This should open the Create Custom Permission window. Here you can configure many parameters that relate to the operation of the monitor. In particular, here you can set your own resolution, color depth and refresh rate. In order to overclock the monitor to 75 Hz, set this value in the “Refresh rate (Hz)” field and click on the “Test” button.
After this, the NVIDIA driver will try to set the frequency to 75 Hz. If the monitor overclocks, a message will appear on the screen stating that the test was successful and you can save this resolution. Here you need to click on the “Yes” button to continue.
Then you will return to the main window of the NVIDIA Control Panel. Here, in the list of available permissions, the new custom permission should appear. Select it, set the monitor refresh rate to 75 Hz, click on the “Apply” button and confirm saving the changes.
After this, your monitor should start working with overclocking to 75 Hertz.
Overclocking the AMD Radeon HD 7770: solo and duet, with standard CO and under a chiller (page 3)
Test bench
The following components were used for testing:
- Motherboard: ASUS Crosshair IV Formula;
- Processor: AMD FX-8150, overclocked to 5300 MHz;
- Video card 1, XFX Radeon HD 7770 Black Edition Super Overclock;
- Video card 2, HIS Radeon HD 7770 IceQ X Turbo X;
- Video card 3, Radeon 7950;
- RAM: 2 modules of 4 GB, Patriot DDR3 1600 MHz (9–9–9–2–4);
- HDD WD5000AAKS;
- Power supply: Tagan 1100 W.
Tools
The following software was used during the work:
- Operating system: Windows 7 x64 Ultimate;
- Video card driver: AMD Catalyst 12.6 beta.
Helper utilities:
- HWMonitor;
- MSI Afterburner v. 2.2.0 Beta 14;
- GPU-z v;
- FurMark 1.9.1.
Game tests:
- 3DMark Vantage, Extreme profile;
- 3DMark 11, Extreme profile;
- Unigine Heaven 2, Maximum detail, DirectX 11, Extreme tessellation;
- Metro 2033 Benchmark;
- Alien vs Predator Benchmark Tool, maximum detail, DirectX 11;
- STALKER: “Call of Pripyat”, settings to maximum.
Testing methodology
The processor was overclocked by increasing the multiplier to 5.3 GHz. Turbo Boost/APM is disabled. To overclock the video card and monitor temperatures, the MSI Afterburner v utility was used. 2.2.0 Beta 14. Voltage was unlocked from the settings.
The stability of the video card during overclocking was checked using the FurMark utility.
The obtained frequencies were additionally checked by running the Heaven Benchmark v.2.5 test with an extreme level of tessellation and graphics tests from the 3DMark 11 and Vantage packages.
announcements and advertising
2080 Super Gigabyte Gaming OC for 60 rubles.
Compeo.ru - the right comp store without any tricks
RTX 2060 becomes cheaper before the arrival of 3xxx
Ryzen 4000
series included in computers already in Citylink
The price of MSI RTX 2070 has collapsed after the announcement of RTX 3xxx
Core i9 10 series is half the price of the same 9 series
The price of memory has been halved in Regard - it’s more expensive everywhere
Overclocking
Regular CO
For overclocking, a table stand with a built-in chiller was used. Description of the stand. I'll start with the HIS Radeon HD 7770 IceQ X Turbo X
.
I installed the card on the stand and waited until the coolant in the chiller cooled. Turned it on.
Launched Afterburner (hereinafter referred to as AB). The default GPU ran at 1170 MHz, memory 1250 MHz. The voltage on the GPU is 1.2 V. At these frequencies and voltages under FurMark load, the GPU was already getting quite warm. The temperature reached 75 degrees. I did not attach any importance to this and increased the Power Limit by 20 percent, and raised the voltage to maximum. The video card worked at a frequency of 1270 MHz. But not for long. The temperature quickly rose to 110 degrees and the computer froze. Wow, cool 28nm crystal!
Or maybe the cooler is priced “crookedly”? I checked - the print is normal.
And then I remembered the peculiarity of the cooling system of this video card - the recesses along the heat pipes. Maybe this is the reason? I lowered the voltage to 1.22 V and the card began to pass the tests. But the cooler speed had to be turned up to full.
Well, perhaps this is the only drawback of my copy. But the card, already overclocked by the manufacturer, overclocked by another 100 MHz, and this with a defective cooler. What will happen on the chiller?
Now memory. I always check it for overclocking at the standard GPU frequency. With the fan turned up to maximum speed, the memory accelerated to 1630 MHz. And at the “default” speed – only up to 1350 MHz! The reason for this difference is that the radiator base half covers the memory chips from the fan.
1630 MHz is a decent result, but with the GPU overclocked, the memory only worked stably at 1530 MHz. This is a known problem with video cards 7750–7770, called the “swing effect” (deterioration of memory overclocking after increasing the voltage on the GPU).
So, the HIS video card with standard CO at maximum cooler speed reached:
- GPU – 1270 MHz;
- Mem – 1530 MHz.
Now XFX Radeon HD 7770 Black Edition Super Overclock
.
I put the card in the stand.
By default, it worked at a voltage of 1.17 V. GPU frequency 1120 MHz, memory 1300 MHz.
When running FurMark, the GPU warmed up to 60 degrees. Let's see if this provides any benefits. To even the odds, I turned the cooler speed to maximum.
With the Power Limit increased by 20 percent and the GPU voltage up to 1.25 V, the core raced to 1230 MHz! 40 MHz less than HIS with a “crooked” cooler. The GPU temperature did not rise above 70 degrees. Voltages are higher, temperatures are lower. And the result is less. Well, overclocking is a lottery. The memory ran a little better, up to 1580 MHz. Result:
- GPU – 1230 MHz;
- Mem – 1580 MHz.
And now both cards are in CrossFireX
:
As expected, they started working at the minimum set of frequencies:
- GPU – 1230 MHz
- Mem – 1530 MHz
The picture above shows stability check and test.
I liked the system with two video cards. This tandem gives an almost twofold increase in productivity.
Now a little extreme?
Overclocking on AMD
In order to overclock a monitor to 75 Hertz with an AMD video card, you will need a new driver that includes a modern control panel. You can download such a driver on the official website.
To overclock your monitor, you need to launch a new control panel for your AMD video card, go to the “Display” section and click on the “Create” button.
This will take you to the monitor settings screen. Here you need to set the monitor refresh rate to 75 Hz and click on the “Save” button.
After applying the custom resolution, the monitor should work with overclocking to 75 Hertz.
Overclocking with CRU
If the methods described above for overclocking a monitor to 75 Hertz do not work for you, then you can use the CRU program or Custom Resolution Utility. You can download this program at www.monitortests.com/forum/.
After downloading, the CRU program must be unpacked into any folder and run with administrator rights. You should start setting up by choosing a monitor. To do this, open the drop-down menu at the top of the window and select the monitor that needs to be overclocked to 75 Hz.
After this, you need to click on the “ADD” button and add a new screen resolution, which will include a refresh rate of 75 Hertz.
Next, you need to move the created screen resolution to the first position and save the settings by clicking on the “OK” button.
After saving the settings, you need to restart the video card driver. To do this, use the “restart.exe” utility, which comes with the CRU program.
After reloading the drivers, the monitor can be overclocked to 75 Hz through the standard settings of the Windows operating system. In the case of Windows 10, open the “Settings” menu (Win-i) and go to the “System - Display - Advanced display settings” section. Here you need to select a monitor, click on the “Video Adapter Properties” button, go to the “Monitor” tab and specify the refresh rate at 75 Hz.
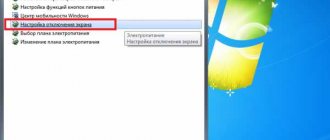
In Windows 7, you need to right-click on the desktop, select “Screen Resolution” and go to “Advanced options - Monitor tab”.
Overclocking a video card: how it happens and what you need to pay attention to
To understand how to properly overclock a video card, it is enough to understand its structure and characteristics, of which there are only two:
- Core frequency.
- Amount of RAM.
RAM stores data that needs to be used for a specific operation and have instant access to it. From this comes another characteristic called RAM speed, but it is directly related to the processor frequency, so it is never isolated separately. The restrictions described above are software; if the manufacturer allows you, you can easily bypass them by overclocking the frequencies. For this purpose, there is more than one program that “hacks” the code installed on the hardware and rewrites it to suit your needs. When overclocking any hardware, pay special attention to its temperature, because according to the basic laws of thermodynamics, an increase in work leads to an increase in the heat generated. Overclocking is far from the only way to overclock video cards, and in special cases, by simply flashing the BIOS, you can unlock auxiliary potential in the form of additional computing units. But this is only on a few series of motherboards and video cards, so specialists often engage in overclocking.