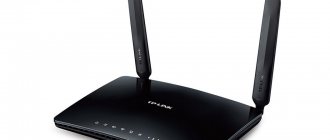
Good day everyone! Today, perhaps the most popular model from D-Link – D-Link DIR-300, or in common parlance “three hundred”, comes to us for review and configuration. Where and how they are used, and after their active use in Rostelecom, such a model has visited every third family in Russia. So let’s see what kind of beast this is, and let’s figure out its proper configuration step by step.
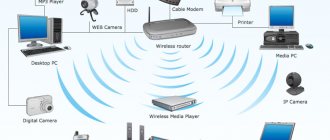
Approximate plan of action: we will connect, set up a network, the Internet, distribute Wi-Fi and change passwords everywhere for security. That's all, let's get started.
Connection
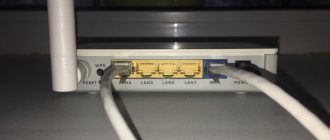
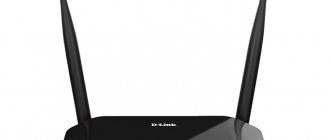
Before moving on to the settings, everything needs to be connected correctly. Pay attention to the back panel of the router:
What is important to do here in order to successfully connect our D-Link DIR-300 router:
- Install the router in a convenient place so that Wi-Fi reaches approximately all rooms, so that there is enough distance to the provider’s wire so that you can connect a computer or laptop via wire.
- Connect the power, make sure that at least one of the indicators is on - this means the router is turned on and you can continue to work.
- We connect the wire of your Internet provider from the entrance to the INTERNET - no other place will do, only this port is suitable for an external cable.
- Connect your computer or laptop via wire to any LAN port (there are 4 of them) from which you will perform the setup.
Note! There is also a button in the RESET recess here - don’t do anything with it, but perhaps it will be useful to us later. To reset the settings to factory settings, you need to press this button and hold for about 10 seconds.
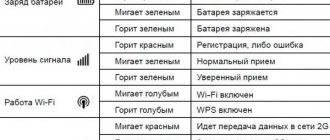
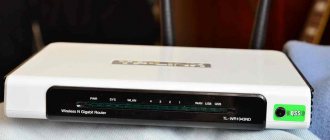
All! We're not doing anything else here for now. At the same time, you can look at the front panel - there the corresponding indicators will light up during connection:
From left to right:
- Power is connected – lights up when you turn on your router to the network. Indication that everything is fine with nutrition.
- INTERNET – when you connect the provider’s cable, changes will begin here. If it turns green in the end, everything is fine. Fast blinking on any indicator means data is being transferred, this is normal, don’t be alarmed.
- Wi-Fi – if turned on, it lights up.
- 1-2-3-4 – connected devices via wire. If you turn on your computer or laptop, the required indicator will light up here. Make sure it lights up. Poor connection is one of the possible problems when connecting to the control panel.
For reference. Over the years, many versions of the router have been released, differing in their hardware, firmware and slightly external changes. Although outwardly this DIR-300 router was basically the same old working “three hundred”. Released revisions - NRU B1, B2, B3 (the very first models), NRU B5, B6 (slightly newer), NRU B7 (small external changes), A/C1 (latest modifications). Perhaps something has already been released and newer. You can see your version on the sticker under the router. But all the settings below are suitable for any revision.
Addition . Models DIR-300 and D-Link D-300 are one and the same, no matter how they are confused. TP-Link does not have a model with this number.
Presets - Windows
If you are sure that everything is fine in your system, feel free to skip this section.
To eliminate all possible problems from the previous settings, I propose to delve a little into the system and make sure that the network settings are obtained automatically. At the setup stage, this is important, because there is a possibility that you either won’t connect to the router or won’t get internet. So it’s better to initially check that everything is set to automatic, and after the basic setup, do whatever you want with your network.
The following steps are suitable for all modern operating systems - Windows 7, Windows 8, Windows 10. The differences between them are minimal; any errors in the text can be corrected by eye. If suddenly something difficult arises, we either look for settings for our system on our website, or simply ask a question in the comments. The screenshots below are taken from the “seven”.
For reference. You can set up the router without a computer - via a phone or tablet, connecting via Wi- Fi. But computer setup is the simplest.
Step 1: Network and Sharing Center
We look for the network connection icon near the clock, right-click on it and select our Control Center:
Step 2: Change adapter settings
Step 3: Adapter Properties
On this page you may have several adapters - for example, wired and wireless. Select the one through which you are connected to the router, right-click on it and activate Properties.
Step 4. Settings – automatic
And then you just need to click to get to the settings we need:
- Internet Protocol Version 4 (TCP/IP)
- Properties
- In both columns, if you have something set, select automatic receipt of settings
- Don't forget to click OK to save everything.
Now your computer will receive settings from the router itself - and this will allow you to connect, and the Internet will flow correctly without unnecessary dancing with tambourines.
Connecting and entering settings D-Link DIR-300A
Connect the power adapter to the router, plug it into a power outlet, and turn on the power with the button on the router itself.
If you are setting up the router from a PC or laptop, then take the network cable that came with the kit and connect the computer to the router. We connect the cable to one of the 4 LAN ports.
In the “Internet” port (it’s yellow), connect the Internet. Cable from your Internet provider. By the way, it was in vain that they made a yellow WAN port and included a yellow network cable in the kit. Many will be confused.
If you want to configure by connecting via Wi-Fi networks, then connect your device to the wireless network that the router will distribute immediately after turning it on. The network will have the factory name. Most likely it will be “DIR-300A”.
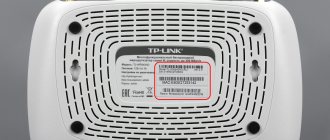
The connection password is indicated on the bottom of the router, on a sticker. Signed as "WPS PIN".
The computer must be connected to the router. The connection may be without access to the Internet, this is normal.
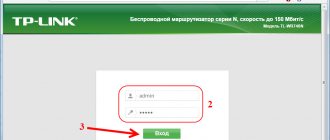
Next, open any Internet browser and go to the address 192.168.0.1.
If the router asks for a username and password, then enter admin and admin. The address for entering settings and factory settings are also indicated on the sticker on the bottom of the router. My router immediately asked me to change the factory password, which in the future will be used by the login share in the settings instead of admin. Create and write down a new password twice. Try not to forget him.
Immediately change the control panel language to Russian or Ukrainian.
We went to the settings page. If you are unable to access the settings at 192.168.0.1, then check your connection to the router and look at the tips from this article:
Before setting up, I advise you to update the router firmware. If there is a new version. I have prepared separate instructions for flashing D-Link DIR-300A firmware.
Login to settings
Let's get started with the actual setup. Before setting up the D-Link Dir-300 router, you need to go to its control panel:
- Try going to the following IP addresses – 192.168.0.1 (sometimes 192.168.1.1)
- Login – admin
- Password – admin
Usually, within the same device, the connection addresses are the same. But on this popular model both options are found. So try both, and where it opens, enter. Here is an example of connecting to the panel via one address:
But on another device there is a sticker on the bottom (here on any router you can see the connection data):
After successful entry, you will be taken to the settings. But if suddenly something doesn’t work out, write your situation in the comments. Common causes of this problem:
- No connection
- Router is turned off
- Network settings curves - you need an automatic, you can reboot just in case
- Someone used the router before you and changed the connection settings - you can reset them to factory settings (the instructions were in the section above)
Router functionality
DIR-300 supports all popular types of WAN connections - PPPoE, IPoE, L2TP, PPTP, so it can work with any provider, performing dynamic and static IP routing.
Connection types
List of supported connection types.
Speed and load
Thanks to the hardware packet processor, the router achieves maximum performance when processing the IPoE and PPPoE protocols. When working with PPTP and L2TP packages, the DIR-300 confidently produces 70 - 90 Mbit/s, however, with an increase in the streaming load in these modes, significant heating of the device and delays in the interface operation are observed.
Despite its relatively modest hardware characteristics and affordable price, the D-Link DIR-300 Wi-Fi router has a wide range of network capabilities, and also has built-in firewall protection that supports IPv4 and IPv6 packet filtering and flexible configuration of rules for applying security policies to addresses and ports of both source and destination.
Network functions
DHCP is a protocol responsible for assigning IP addresses to devices connected to the router. If the DHCP server function is enabled, the router automatically assigns addresses to devices, but if it is disabled, you will need to enter IP addresses manually. Relay mode is used to assign addresses by an external DHCP server: for example, a provider's server or another router on the local network.
New versions of DIR-300 can work with the IPv6 protocol with the ability to request a prefix from an upstream router (DHCP PD). In Stateless mode, clients generate IPv6 addresses based on the prefix themselves, and in Stateful mode, they receive them from the range specified in the settings.
The DNS system is responsible for resolving IP addresses into familiar alphabetic domain names.
Dynamic DNS (DDNS) provides home network client access to enable real-time translation of an ever-changing dynamic IP address into a permanent domain name. This function is needed to organize a game or FTP server. Also for these purposes, the DMZ function is used, which allows secure access to local network components from any computer on the Internet.
The IGMP protocol ensures the transmission of multicast traffic, which is necessary for watching IPTV on a computer or through a special set-top box.
Support for the UPnP protocol avoids manual port configuration, allowing applications to automatically access network resources.
Support for VLAN technology allows you to divide the local network into several virtual subnets, distributing access at the data link level.
The WAN ping respond function will be useful, for example, when calling the provider’s technical support, allowing specialists to remotely ping the router and determine its availability.
The ALG gateway provides protocols such as SIP and FTP, allowing you to use VoIP telephony and provide access to FTP folders, and the RTSP protocol can be useful for organizing video surveillance, allowing you to capture video streams from IP cameras and control playback.
The DIR-300S and DIR-300A models implement the Yandex.DNS service, which allows you to set a specified level of content filtering and a level of protection against malicious sites for each network device.
Yandex.DNS service in DIR-300S and DIR-300A
Internet connection
Now we are trying to connect to the Internet on our D-Link. My main advice is... There are a lot of Internet providers in our big world, and you can’t adapt to everyone:
If there is a problem with the setup at the stage of connecting to the Internet, feel free to call your Internet provider and clarify the necessary settings.
You will have to do this once and for many years, so there is nothing to worry about. Maybe your provider has some specific technologies, and this happens. But usually everything connects successfully even if you do it yourself.
Network - Connection - WAN
We follow this path and end up here:
On the last page, the main thing is to select your connection type - PPPoE or IPoE. Here, look at your agreement with the provider - it usually indicates the type of connection, login, and password. The figure shows a connection via IPoE - you don’t need to enter anything additional here, but if you need to enter a login and password, select PPPoE and the corresponding fields will appear.
Enter everything as here, save - the Internet works.
Setting up the Internet on a D-Link DIR-300 NRU router with firmware 1.3.3
Go to the Network - WAN tab.
If you access the Internet using the static IP address issued to you without additional connections, then you select the Static IP option in the Connection type line. If you connect to the Internet via a modem or via a leased line without using passwords, select the option Dynamic IP . If you access the Internet via a modem, you will additionally need to enter in the MAC field the MAC address of the computer that was connected to the Internet before purchasing the modem. If you are setting up a router by connecting it to the exact computer from which you accessed the Internet yesterday, then you can use automatic copying of the MAC address from your computer by selecting the appropriate option in the MAC field just to the right from the drop-down list. Then click the Clone MAC button.
Now don't forget to click the Save button at the bottom of the page.
When the router saves the settings, a corresponding text notification appears. If the connection was configured correctly, the router is working properly and there is a connection to the provider’s server, then in the Network - WAN section you will see the Connected status in the Status column. If something is configured incorrectly or the connection is interrupted, then the connection status will be marked as Broken. Also check that the connection type you just created is marked as the default gateway.
Wi-Fi setup
The most important thing in setting up Wi-Fi is that everything works and you have your own password. We do this:
Wi- Fi – General settings
Here, make sure that the “Enable wireless connection” checkbox is enabled. Or you can simply look at the front panel of the router and make sure that the wireless network indicator is on or blinking.
Wi- Fi – Basic Settings
Here look at the SSID - the name of your network. This is how you will see it when searching for networks, and this is how all your neighbors will see it. Also make sure that the mode is set to B/G/N mixed - this will ensure a complete combination of standards between all possible devices and your router, so that there are no problems.
Wi- Fi - Security Settings
Here you set the basic security settings for your home wireless network. Don't ignore this point! Be sure to set your password.
What is important:
- Network authentication - WPA-PSK/WPA2-PSK mixed - this is the only way, no unsecured networks, no WEP that breaks once or twice.
- The PSK encryption key is your password, which will be requested when any device connects to your Wi-Fi. It doesn't have to be simple, but write it down somewhere right away. You can watch it again here, but it’s easier to enter it from a piece of paper.
Setting up a wireless network on a D-Link DIR-300 router with new firmware
Wi-Fi power is enough for any apartment and even more. The signal from your router can be received on the floor below or above, but the signal level will be lower and the speed may also be lower than in your apartment. To prevent your neighbor from using your wireless Internet for free, you must set a password for access to Wi-Fi. If necessary, the position of the antenna on the router and the position of the router itself in the space of the apartment can be changed in order to achieve the best reception conditions and maximum signal. Setting up a wireless network on the D-Link DIR-300 router is done in the Wi-Fi section. In the General Settings tab, you can disable or enable the wireless network by checking or unchecking the box next to the Enable wireless connection option.
In the Basic Settings section, set the name of your wireless network in Latin letters and numbers in the SSID field. Click the Change button.
In the Security Settings tab, select the desired encryption type from the Network Authentication list, for example WPA-PSK/WPA2-PSK mixed. If your laptop sees the wireless network but cannot connect to it, try setting a different authentication option.
Set the encryption key, i.e. password to access your wireless network. Try to avoid simple passwords like 1234, 1111, etc., because... a curious neighbor in search of free Internet may be interested in guessing the password for your network. Click the Edit button in the corner on the right.
You can see who has connected to your wireless network in the Wi-Fi section in the Station list tab.
You can change some additional wireless network settings in the Advanced Settings tab. For example, here you can change the signal strength of the wireless network from 0 to 100%. This can be useful in reducing the effects of radio interference on other devices and on your body. It is not recommended to change other parameters if you do not know what they are intended for.
In the Advanced section in the Routing tab, you can register static routes on the router.
If necessary, you can change the password for logging into the router through the System section in the Administrator Password tab.
At the end of the setup, click “Save and Reboot” in the “System” menu (top right).
The optimal MTU size for the Triolan network is 1500 bytes , however, one of the simplest and most accurate ways to determine the optimal MTU size is the MTU ping test.
The command for this ping test is www. tp - link . com - f - l xxxx
- When testing, you can use the well-known ping domain www. google. com - f - l xxxx instead of www . tp - link . com
- Space between each command
- “-l” is a lowercase letter L, not the number one.
- last four digits – test packet size
Step 1
Open the DOS dialog box by clicking Start>Programs>MSDOS - PROMPT. You can also use the Run command by clicking Start>Run, then type “cmd” if you are using Windows 2000/XP/Vista, or “command” in Windows 95/98/ME.
Step 2
In the DOS dialog box, type ping www. google. com - f - l 1500 and press Enter. Keep in mind that the packet must be fragmented.
Step 3
Reduce the size of the test packet (10 or 12 bytes), send the request again. Be aware that the packet must be fragmented again
Step 4
Reduce the size of the test packet again, send the request, and so on until the size of the sent packet needs to be fragmented
Step 5
Once you send a packet that will not be fragmented, increase the packet size a little and resend the request, this way you can find the maximum packet size that will not be fragmented.
Step 6
Take the maximum packet size you calculated during testing and add 28 . You add 28 bytes because 20 bytes are reserved for the IP address header and 8 bytes are allocated for the ICMP Echo Request header. Remember : You must add 28 to your ping test result!
Example:
1472 – maximum packet size in the ping test
+ 28 – IP and ICMP headers
1500 is the optimal size for your MTU
Router password
We have the Internet, we have secured Wi-Fi from our neighbors, now is the time to protect any router - because now any device from the outside can connect to it, enter admin-admin and, for example, replace all your sites with their own with evil intentions. That's why:
System - Administrator Password
And change the password here to a new complex one. Nothing complicated)
Other interface
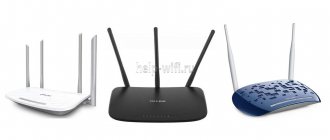
As I wrote above, the D 300 had many manufacturing options, and there were many different interfaces. The whole essence described above will fit any model - and even any other router, because the process is the same everywhere. Below I’ll just show you what other interface variations there are.
Home page and access to advanced settings:
Our WAN network (where you need to add a new setting with the connection type and provider login-password):
And here are the settings for PPPoE. As a reminder, you only need to enter the Connection Type itself, as well as your login and password:
The internals of Wi-Fi look approximately the same, so I’m only showing the entry point to all the necessary settings:
Interesting advanced settings
Attention! The above points are usually enough to connect to the Internet and distribute it via Wi-Fi. I do not recommend using the complex settings of the D-Link DIR-300 for “hobbyists”.
I’ll just briefly touch on what else this model can do. Professionals will simply understand what we are talking about and organize their task without any problems. So for a mention.
- Routing. Allows you to create any routes. That's why it is a Router (router), and not just a modem. The model, although old, allows you to solve problems at home.
- VLAN – allows us to divide our networks into virtual spaces. This content filter will help to apply and separate IP television from the general traffic flow.
- Firewall, NAT and port forwarding are all present. I am attaching a video on forwarding below:
- Repeater (repeater, amplifier, repeater). If you already have some kind of network, then this router can be connected to it and simply duplicate it to expand the coverage area. This is done in the “Wi-Fi – Client” settings. Here we check the box to switch to and broadcast mode, select the desired network and everything works.
- The device is perfectly stitched. If you have an old model, go to the official website, look at the firmware for your revision and simply update the software. But for me, if there are no problems, it’s easier to leave the official firmware the same, and it only makes sense to update for professionals directly to some third-party OpenWRT.