How to create and highlight a paragraph
In Microsoft Word, you can make single paragraph indents and apply paragraph settings to the entire text or selected fragment. The procedure is similar in different versions of the program.
In order to print text on a new line, thereby creating a paragraph, you must press the Enter . After this, the cursor will move to a new line.
You can select an entire paragraph in the following ways:
- Place the cursor at the beginning of the line before the first word. Press and hold the left mouse button while moving it to the end of the fragment. You will see the text highlighted in blue.
- Place the mouse cursor anywhere in the paragraph you want to highlight. Then quickly shout 3 times with the left mouse button. After this, the entire paragraph will be highlighted in blue.
To prevent the text from looking like a single canvas, it needs to be formatted - create indents (red lines) or protrusions at the beginning of paragraphs. Let's figure out how to do this.
Tab key
If there were no hotkeys in Word, then each typing would take a very long time due to the need to constantly press something with the mouse. Thanks to keyboard shortcuts, you can significantly speed up the creation of documents if you remember the ones you need most. While in the program, just press Alt to find out more about all such combinations, and also go to “Options”, where other, simpler hotkeys are described. Some of the most important and useful combinations are described in the article “Hotkeys for Windows, Google Chrome and Word,” which is recommended reading.
But for now we are only interested in one specific Tab key. It’s extremely easy to use – you just need to click and that’s it. It is located on the left edge of the keyboard. Don't forget to place the cursor at the beginning of the line before doing this. Then it will move slightly to the right, forming a paragraph - done. You can do this not only to create a paragraph, but also to write words in a column and anything else.
Using the TAB key to set paragraphs in a document
This method allows you to create not only a paragraph, but also simply indent at any time and anywhere. This is the simplest method of installing the red line, but it has one significant drawback - it cannot be customized. Tab always indents the same, and if you want to set the paragraph size manually, then the other methods described below will work for you.
How to create left indent
Indentation in text editors is the space between the written text and the margins of the page. This can be done in various ways, the simplest of which is using a space. However, this method does not allow text to be aligned throughout the document. If you make changes to the file or open it on another computer, the spaces may move and end up in places other than where they should be.
Therefore, let's look at other correct ways to create paragraph indents on the left.
Using tabs
The easiest way to make a single indent is to use the TAB key. Place the cursor in front of the text you want to move to the right and press TAB. You will see the text move a short distance from the left edge of the page.
Buttons on the main panel
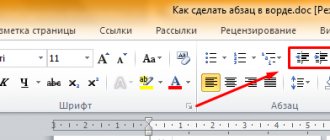
Another easy way to indent text is to use the menu at the top of the screen. On the Home tab, find the Increase Indent button.
To decrease the indentation, use the adjacent “Reduce indentation” button.
Via context menu
To specify the exact distance between the left edge and the text, do the following:
- Select an area of text to edit.
- Right-click and select “Paragraph” in the window that appears.
- In the “Indents and Spacing” section, find the “Indentation” item and set the value in the “Left” column. Confirm the action by clicking on the “OK” button.
Please note that if the specified value is less than zero, the text will move out of the page margins.
Using a ruler
This is one of the most convenient and universal ways to adjust the position of paragraphs, as it works in any version of Word. In the top panel of the editor window there is a ruler tool with three sliders. With their help, line length and indents are adjusted. The sliders located on the right and left bottom are responsible for the length of the line. The top left slider adjusts the indentation of the beginning of the paragraph.
To change the indentation using the ruler, follow these steps:
- On the “View” tab at the top of the screen, check the box next to “Ruler”.
- Move the bottom-left slider to the desired paragraph size.
- To highlight the red line, move the top left slider to the right. After this, the first line of the selected paragraph will move closer to src=»https://comp-doma.ru/wp-content/uploads/2020/07/regulirovanie-abzatsev-s-pomoschyu-polzunkov-lineyki.png» class=»aligncenter "width="575″ height="142″[/img]
Using hotkeys
Press Ctrl + M and set the desired indent. To cancel an action, use the keyboard shortcut Ctrl+Shift+M .
Indentation
You can start text with a red line using various methods. They differ in simplicity and time costs.
Ruler
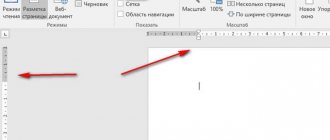
To indent the beginning of a paragraph in Word, you need to enable the display of the ruler. This can be done in the “View” tab and selecting the “Ruler” option.
You can also enable this option in Microsoft Word by clicking on the rectangle on the side of the screen, above the horizontal scroll bar of the document.
Before you start decorating the red stitching, you should familiarize yourself with the ruler. It has several sliders with different functions. Top - responsible for the indentation at the beginning of the paragraph.
To indent only one paragraph, you need to place the cursor on it and move the top slider. To make a red line in each paragraph, you need to select all the information and drag the marker to the required distance.
You can perform the actions in question in Word: 2003; 2007; 2010; 2013; 2020.
Note! In different versions of programs, the design of the icons may differ slightly, but the described function is available everywhere.
Tab key
You can indent the beginning of one paragraph by pressing the “Tab” key, after placing the cursor at the beginning of the required line. It's simple, but not many people know about it.
The red line is created according to the parameters specified in a specific program. If you need to apply custom settings, this method will not work.
Context menu
To indent a given fragment, select the required section of text, right-click on it and select “Paragraph” in the pop-up window.
After completing the described steps, a window will open in which you will need to enter the necessary settings. The same settings apply to the Tab key.
In the “Indents and Spacing” tab, you need to find the “First Line” parameter and set the necessary settings for it, as indicated below. The distance to which the indentation is made can be any. Traditionally, the line is moved back - 1.25 cm. Some guidelines have other instructions, for example, move the line - 1.5 cm.
After pressing the “OK” key, the indentation will appear automatically.
How to make a ledge on the left
In addition to indentations, Microsoft Word texts can use indentations - shifting the text to the left side relative to its original position without changing the first line of the paragraph. Tabs are commonly used in numbered and bulleted lists, as well as in artwork and magazine articles. There are several ways to create an overhang on the left.
Using the paragraph context menu
This is the simplest way to create a left overhang of a given width. The procedure is as follows:
- Right-click on the text.
- In the window that appears, click on “Paragraph”.
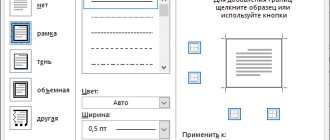
- On the “Indents and Spacing” tab, find the “Indentation” section, and in it the “Special” item. Set the value to "Protrusion".
- Set parameters manually or use the arrows.
Using the list context menu
- Highlight all the lines in a bulleted or numbered list.
- Right-click once.
- In the window that opens, select “Increase indent” or “Decrease indent.”
After this, the list will move to the right or left.
How to make a red line 2 cm in a Word 2010 document?
And this is the case when you need to set your own indentation option. Here we proceed similarly to what was described above. That is, we call up the paragraph formatting window and select “indent” in the “first line” field. But in the field next to where it says “on:” we enter the required interval. In our case it is 2 cm.
That's it, click "OK".
How to create an indent on the right
There are also several ways to adjust the right margin.
Using the context menu
To set the exact distance between the right edge of the sheet and the text, follow these steps:
- Select the area you want to edit.
- Click on the right mouse button and select “Paragraph” in the window that appears.
- In the “Indents and Spacing” section, find the “Indentation” item and set the value in the “Right” column.
The set value can be either positive or negative. If you select negative, the text will move out of the page margins.
Using a ruler
To use this method, follow these steps:
- Go to the "View" tab in the top menu of the screen.
- Check the box next to “Ruler” to enable display above the work area.
- Select the paragraph to edit and move the right slider to change the line length.
Paragraph menu
This method will allow you to choose the paragraph parameters that you personally need, rather than using the default indentations. You can use it like this:
- Place the cursor at the beginning of the line or simply select the desired piece of text.
- Right-click and select the “Paragraph” section in the menu that opens.
"Paragraph"
- Next, a window will appear where you can set all the parameters you are interested in. To build a paragraph, click “First Line” in the “Indentation” section and select the option of the same name.
"Indentation"
- On the right you can specify the size. You can leave the default value (1.27 cm - the same as that left by the Tab key) or set your own.
Specify size
- Click "OK" to save your changes.
How to set the default paragraph
To create a specific default paragraph style, do the following:
- text by pressing Ctrl + A.
- Right-click and select “Paragraph” in the window that appears.
- On the Indents and Spacing tab, click the Default button.
- Set the current position of paragraphs for the entire document by checking the box next to the appropriate item.
Paragraph using a ruler
As mentioned above, paragraphs in Word can be made in three ways. Now we will consider the first of them - using a ruler. This method is quite easy to use, but it is still not popular enough. Most likely, this is due to its inaccuracy - the length of the paragraph is determined by eye, but if this is not important to you, then you can safely use it.
So, first you need to figure out where that ruler is. The fact is that sometimes it is removed by default and needs to be enabled. To do this, follow three simple steps:
- Go to the “View” tab in the program.
- Find the area called "Show".
- Place a check next to the "Ruler" line.
If you use Word 2003, then you need to click “View” and select “Ruler” from the list.
How to Create a Paragraph Style
You can customize text and paragraph styles to your liking as follows:
- On the "Home" tab, click on the "Style Panel" icon.
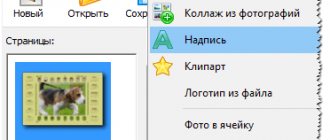
- From the side menu that appears, select Create Style.
- Specify the desired options and customize the text formatting.
How to indent the first line in word?
After you have typed all the necessary text in Word, or you have been given an already typed document, you can proceed to editing and formatting the finished text in Word. And one of the things you have to do is adjust the indents for the lines in the document.
In this article, we'll look at how to indent an entire paragraph, indent just the first line, and indent paragraph text.
Let's start with the first question. You can indent an entire paragraph in Word from the established margin boundaries on the right and left sides. You can set indents using special markers on the top ruler of the document. If it is not displayed for you, go to the “View” tab and in the “Show” group, check the “Ruler” box.
There is only one marker on the right side. To set the right indent for a paragraph, left-click on it and drag the marker to the desired distance on the ruler. The ruler division value is 0.25 cm.
If you did not select any text, then the indentation will be made for the paragraph in which the cursor is positioned. If you need to make the same indentation for all text, select it by pressing “Ctrl+A” and drag the marker. To indent different paragraphs in the text, select them and drag the marker.
There are three markers on the left side of the ruler. To indent the left side in Word for all text in a paragraph, left-click on the bottom marker, it looks like a rectangle, and drag it to the desired distance on the ruler.
At the same time, highlight the entire text or individual paragraphs.
If you need to indent the first line, also called the red line in Word, then on the ruler on the right side, drag the top marker to the desired distance. Considering that the division value is 0.25 cm, in the example we made an indent equal to 1.25 cm.
You can read a detailed article about paragraph indentation in Word by following the link.
Using the last marker, you can make a protrusion for text in a paragraph. Click on it with the left mouse button and set it to the desired distance on the ruler. In this case, all text in the paragraph, with the exception of the first line, will shift by the specified value.
All the considered indents in Word can be done in another way. To do this, on the “Home” tab, in the “Paragraph” group, click on the small black arrow in the lower right corner.
The Paragraph dialog box opens. In the corresponding fields in it, you can set exact values for indents. At the same time, below, in the “Sample” area, you can see how your text changes.
You can set the indentation for the entire paragraph by specifying values in the “Left”, “Right” fields; the paragraph indentation is set in the “first line” - “Indent” field, and the “Indentation” for the text in the paragraph is also set there. When you have selected the values you want, click OK.
If you are interested in how to add or remove spacing between paragraphs in Word, read the article by following the link.
I think that now you will definitely be able to make indents and protrusions in the text for the entire paragraph or just for the first line in Word.
Share this article with your friends:
I am specifically interested in how to reduce the space from the left, i.e. how to move the left markers from the zero point to the left. Why don’t the left markers move to the left (from zero) along the three (3cm) dark divisions of the ruler, but the right marker moves?
This article is the first in a series of publications devoted to technical issues in preparing book texts for publication.
According to our classification, these works belong to the preliminary formatting stage.
At the next stage, layout and conversion are carried out, which is carried out by the publishing house. At the same time, many issues of preliminary formatting are quite capable of being resolved by the author himself.
One of the most common mistakes when formatting book text is indenting the first line of a paragraph using spaces.
While this is normal for paper printing, certain problems arise when publishing an e-book. The fact is that when reading an electronic version of a book, the computer skips spaces and does not consider them as separate characters. As a result, the text can “float” and turn into an unreadable array of characters.
To prevent this from happening, you should set the indentation using the standard Word function.
Let's assume that the text has already been typed on the computer. And now, when we know that there should be no extra spaces, how can we see and check whether they are in the text or not?
To do this, you need to enable the service symbols display mode.
To do this, go to the main menu of Word, find the “Non-printable characters” icon and turn it on.
After this, paragraph marks and spaces appear in the text - see Fig. 1.
Figure 1 Displaying hidden non-printing characters
The example above shows that the first lines in the text in question are indented using spaces. On the screen they appear as dots in front of letters.
The picture is clickable - double-click with the cursor and it will open in an enlarged form. You can view other pictures in this article in the same way.
To correctly indent the first line, you must first remove spaces and then use the standard Word function.
Removing spaces is simple - select and delete. And then we place the cursor in the paragraph where we need to indent (and if there are many such paragraphs, then select them all) and go to the main menu of Word, where we select the “Format” - “Paragraph” section and the “Indents and Spacing” tab.
On this tab, find the “First line” option, click the arrow and select the “indent” value from the drop-down list.
All! Word will immediately automatically set the necessary indents.
How to align paragraphs throughout an entire document
When you create a new document, the text on the page is aligned to the left. To change this setting, do the following:
- Select all text by pressing Ctrl + A.
- Use the icons in the top menu bar to choose center, right, or justified alignment.
When designing official documents, width alignment is often used. This makes the text even on both sides by changing the spacing between words.
You can make a paragraph with a ruler
At the top of the program interface there are controls. One of the most convenient ways to adjust paragraphs is to use the ruler found in this panel. It has 3 sliders that allow you to set the line size and indents. The lower left and right sliders are responsible for the length of the line. Just move one of them to change this parameter. The top left slider sets the indent at the beginning of each paragraph. This method is suitable for any version of Word.
The ruler function is not enabled as standard. To fix this, go to the “View” tab on the top panel, and then in the “Show” category.
To set the red line this way, you must:
- Click on the paragraph you want to edit, or select several. If you want to indent all text, press Ctrl + A.
- Use the lower left slider to place the beginning of a new paragraph.
One division on the ruler equals 2.5 mm.
How to make a paragraph in a table
The procedure for changing the position of text in a table cell is as follows:
- Select the table and right-click.
- In the window that appears, click on the “Table Properties” line.
- In the Table section, click the Options button.
- Set default cell margins.
How to open a paragraph window in Word
To open the paragraph window in Word, select individual text in a paragraph of the document with the left mouse button (or using the hotkey “CTRL+A”). (Screen 4).
Next, in the drop-down menu, click on the “Paragraph” section (Screen 5).
This will open a paragraph window where you can customize it. For example, change the following values:
- General settings. Align paragraph width, center, right or left.
- Indent section. In this section, you can set paragraph indents on the right or left.
- Setting the interval. This setting allows you to decrease or increase paragraph indents at the top or bottom.
- Position on the page. Here you can set up paragraph exceptions. For example, break it into pages and exclude its formatting.
This window is not very convenient for formatting a paragraph in Word. Therefore, we use a simpler option.
Formatting a Paragraph in Word
Every version of Word has a top control bar that provides tools for formatting paragraphs. It’s called “Paragraph” (Screen 6).
To use it, select the paragraph in the text again and click at the top of this control panel, for example, on line spacing (Screen 7).
If you select a spacing of 1.5, you will see that the paragraph has noticeably changed and become larger. Since the sentences in it departed from each other.
The next formatting panel is paragraph alignment (Screen 8).
For example, we need to center a paragraph. Select the text with the left mouse button and click the “Center” button at the top. The paragraph will then be aligned in the center of the Word document. The rest of the paragraph alignment functions also work.
In these paragraph options you can set:
- numbered, bulleted and multi-level list;
- reduce and increase its indentation;
- sort paragraph;
- show all hidden paragraph characters, such as spaces;
- add or remove spacing between paragraphs.
After all changes with the text, click the “Save” button at the top left of the control panel.