If you begin to suspect that your neighbors are using your home Internet by hacking Wi-Fi, then this article will help you set a hyper-complex password that simply cannot be hacked. The wireless network key needs to be changed if you have a purely digital password or a standard (factory) one.
Many may argue that the factory one has a rather complex structure. But all such passwords are loaded by default into hacker databases with which hacking programs work. There are simply tons of them on the Internet and anyone can download them, since they are mostly free.
Today in the article I will tell you how to establish a connection with the router and configure it, set a new password for Wi-Fi. There is no need to be scared; it can be done easily and in a couple of minutes. I will go through simple instructions for the most popular routers.
HELP! If you encounter difficulties, problems, or errors during setup, then describe everything in detail in the comments below, and I, Bearded Man, will help you!
How to connect to the admin panel on Windows 10, XP, 8.1, 7, iOS, Android
You can log in in any way. Or from a computer, connecting directly from a wire. Or via Wi-Fi network from a laptop, phone, tablet. Just connect to your wireless local network and enter its password.
Now launch any Web browser. You must enter the address of the router in the address line. It is indicated under the device body on the label. This can be either a URL address in letters or an IP.
If that doesn’t work, try one of the standard addresses:
- 192.168.1.1
- 192.168.0.1
- 192.168.30.1 For Xiaomi routers.
- https://tplinklogin.net
Now you will be asked to enter your username and password. Take a closer look at the label and there is also this information. Type “admin” in both lines. Next, you should be taken to the router settings web interface page. Now, a little lower in the article, simply select the name of the company of your router.
ATTENTION! After you save the new settings with the new key, reboot the router. This can be done from the admin panel using the button. But if you can’t find it, just go to the device and use the “On/Off” button to turn the router off and on again. But you can simply unplug the cord from the outlet and plug it back in; this method also works.
I don’t know or don’t remember the Wi-Fi password
Look at the label under the router case. There should be a line containing the standard Wi-Fi password. If there is no data, then go to the Internet center and find the WPS button. It is usually located at the back. Press once.
We are trying to connect to the network again and you will be asked to enter a password or PIN. It's right there on the label. If you are too lazy to enter such a long password, press the same button on the device again. The connection should now be established.
Step-by-step instructions for changing your password
If you are afraid of doing something wrong and messing up important settings, then step-by-step instructions will help you quickly and easily change your Wi-Fi password.
Step #1. Connect the router to your computer/laptop
To change the password, you need to connect the router to the PC. Usually this item is enabled by default. But if not, then just insert the patch cord into one of the free connectors on the router. And the other one needs to be installed in a PC connector compatible with the connector.
Step #2. Determine the local IP address
Next, you will need to access the router settings. To do this, you will need to enter the IP address in the address bar of your browser. You can find out the IP address in three ways:
- Directly from the provider. To do this, you just need to provide the router model and identification data.
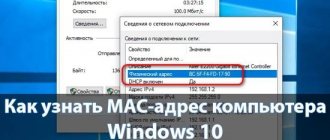
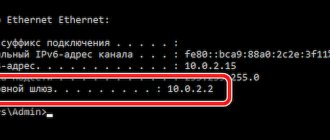
- Find out for yourself. Go to Wi-Fi settings. In the lower right corner of the monitor you can see an icon with 4 or 5 stripes. Click on it, after which a list of wireless networks will appear, but only one of them will be active. Right-click the network and select Status. From the list that appears, select “Information”. In the window, find the line “Default gateway Ipv4”, next to which 4 numbers will be written, separated by a dot. This is the IP address.
- Look on the router. Usually the IP address is indicated at the bottom, but sometimes it can be found on the rear of the case.
Step #3. Login page for router settings
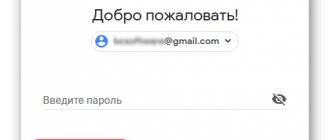
Launch any browser and enter the IP in the address bar. After this, a window will appear where you need to enter your username and password.
Step No. 4. Login and password
Almost always the default login is admin and the same password. Manufacturers indicate standard login information on the back of the router. Enter them. If the settings have changed and you do not know the new data, you can completely reset them using the button on the router. After this, you will need to configure it again using the data that is specified on the device.
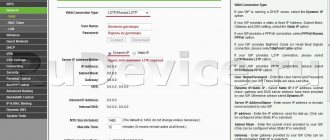
Step #5: Wireless Settings and Security
Next, you need to go to the “Wireless Mode” section, where you select the “Wireless Protection” item, click on it. On the page that opens, find “Wireless Network Password”.
Step No. 6. Change the Wi-Fi password
In the “Wireless Network Password” line, delete the old password and enter a new one. Next, click “Save.” The changes will take effect after rebooting the router.
Step No. 7. Security type
The correctly selected type of security and encryption method guarantee the security of personal data.
Important! Please note that the security type, authentication, protection, authentication method are the same thing. The name may vary depending on the device manufacturer.
There are three options for protecting your device:
- WEP is not a secure option. Attackers can easily gain access to a router that has WEP protection installed. Some manufacturers have completely removed this type of protection from the router setup mode.
- WPA is a fairly reliable and modern security that is compatible with all operating systems and devices.
- WPA-2 is like WPA, but better. This is an improved version. There are two types: Personal (it is recommended to use it at home) and Enterprise (suitable for protecting the network in offices or large institutions).
For home use, it is recommended to select the security type WPA-2 with AES encryption. Many devices have this protection installed by default.
Step #8: Wireless Network Name
In the settings, the network name is called SSID. If you look at the router, at the bottom there will be an SSID line with the factory name. It is recommended to change the default data when setting up the router for the first time.
IMPORTANT! Usually, attackers first of all pay attention to networks with a factory name, as this indicates less awareness of the owners of the router. And, most likely, they did not take proper care of the device's security.
To change the name, you need to find the section “Wireless network”, Wireless, etc. The name may differ depending on the device model. There you need to find the SSID window, “Wireless network name”, etc. The required line is quite easy to find out, since it will indicate the standard name. Then simply specify new data, save and reboot the device.
Step No. 9. Changing the router password
It is not recommended to leave a default password. This puts your network and personal data at risk. Attackers can easily penetrate your network. To change the router password, you need to go to the “System” section. The section may also be called “Management”, “Operation”, etc.
Enter your new login information in the field and save. The update will become relevant after a reboot.
TP-Link
Old interface
- Wireless mode.
- Wireless Security.
- Check the box next to “ WPA/WPA2 Personal(Recommended)”.
- Enter the new keys in the “Wireless Password” line.
- Click on the bottom “Save” .
New interface
- Basic setup ( Basic).
- Wireless mode(Wireles ).
- Enter the password.
- Save.
Wi-Fi network security
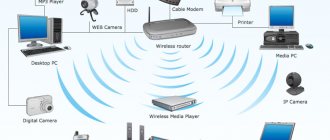
Modern wireless devices can have quite a long range. For example, the signal from a standard router can be caught at a distance of 50-100 meters, even indoors.
In an apartment building or office building, there will likely be many users in this area who will be able to connect to your wireless network if it is not secure. At the same time, they will not only be able to use your Internet, which is not so scary. Through a Wi-Fi connection you can access your computer and your files. And this is a much more serious threat.
A number of router models come with secure Wi-Fi already configured. In this case, the network name and key are printed on a label at the bottom of the device. But in some models the wireless network is not configured at all or security is not installed and anyone can connect without a password. Therefore, during the initial setup of the device, you must set the network key and set the encryption type .
D-Link
Old firmware on the DIR modem
- If everything is in English, select the language at the top by clicking on “ English”.
- "Wi-Fi".
- Security Settings.
- In the “PSK encryption key” you need to set a new value and click “Apply” .
New firmware
- Go to the “Wi-Fi (Wireless Network Setup Wizard)” section.
- Select “Access Point”.
- Enter the name of the network that will be displayed.
- In the “Security Key” , enter our access code. Click “Next” and “Apply”.
How to set a password on a WiFi router?
Technically, the principle of action for setting or changing the passphrase of a WiFi wireless network is the same for different WiFi devices. The point is to go to the wireless network settings - Wireless or Wi-Fi, and there, in a separate tab or Security section, select the appropriate parameters. I will give examples for the most common models of WiFi routers.
D-Link routers (valid for DIR-300, DIR-320, DIR-615, DIR-620, DIR-651, DIR-815 and DIR-825).
The default IP address for D-Link routers is 192.168.0.1 . Router web interface address: https://192.168.0.1, access login: admin. The default password is either admin or an empty string.
In the old DIR-300 and DIR-320 (not NRU), DVG-5402, DIR-615, as well as the first DIR-651, the web interface was in the old, orange style. To access the WiFi wireless network settings, go to the “Setup” -> “Wireless Settings” section:
At the very bottom of the page we look for the line “Pre-Shared Key”. In it we indicate a new passphrase and click the Save/Apply button. For DIR-300 NRU and DIR-320 NRU on firmware 1.2.xx series, you need to go to “Advanced settings”, select the “Wi-Fi” section, subsection “Security settings”:
We look for the line “PSK encryption key” and change the prescribed WiFi security code to your own. Click the Change button, then in the upper right corner of the interface click the System -> Save and Reboot button. The DIR-300 NRU, DIR-320 NRU and DIR-620 on firmware series 1.3.xx have an almost similar interface in appearance and logically everything is located identically: Manual settings -> Wi-Fi -> Security settings. On all D-Link DIR-300 NRU, DIR-320 NRU, DIR-620, DIR-651 routers, DAP-1155 B1 and DAP 1360 D1 access points, as well as dual-band DIR-815 and DIR-825 using the latest firmware versions , you need to select the section “Advanced settings” -> “Wi-Fi” -> “Security settings”:
In the “PSK encryption key” field, enter a new code, click the Change button, and then at the top of the interface click the “System” -> “Save and Reload” button.
Video instructions for changing the wireless network security key on D-Link routers:
UPDATE: Since March 2014, the new dual-band routers DIR-815 A/C1A and DIR-825 A/D1A have a new firmware version that uses a new web interface. Outwardly it looks a little different, but logically all the elements are grouped in exactly the same way. Therefore, to change the wireless network security passphrase, you need to go to the “Wi-Fi” => “Security Settings” section:
Please note that if the router is dual-band, then for each of the bands - 2.4 GHz and 5 GHz - there will be a separate tab with security settings. That is, the passphrase can be made different for each range. You need to enter it in the “PSK encryption key” line.
ASUS router password.
The IP address of the router in the local area is 192.168.1.1, the web interface address is https://192.168.1.1, the login is admin and the default password is admin. In order to set or change the Wi-Fi password for ASUS RT-G32, RT-N10, RT-N12, RT-N13U and RT-N15 routers, you need to go to the “Settings” -> “Wireless” -> section General tab:
We are interested in the line “WPA Pre-Shared Key” - this is the Wi-Fi code. Change it to yours and click the Apply button. In the Russified version: “Advanced settings” -> “Wireless network” -> “General” tab:
The new code must be specified in the “WPA Pre-Shared Key” line and click the Apply button. And here is what the window for setting up and entering the WiFi key looks like on the flagship line of ASUS firmware - ASUSWRT. Initially, only RT-N66 routers were equipped with it, but then updates appeared for most simpler ASUS routers:
Logically everything is the same - one to one. We also enter the WiFi passphrase in the “WPA Pre-Shared Key” field and click the Apply button.
Zyxel routers.
The IP address of the router on the network is 192.168.1.1, the web interface address is https://192.168.1.1, the login is admin and the default password is admin. On Zyxel Keenetic routers of the first revision, you can set a WiFi password by going to the “Wi-Fi Network” -> “Security” section:
Enter a new WiFi passphrase in the “Network Key” line and click the Apply button. Zyxel Keenetic II routers (Keenetic Start, Keenetic Omni, Keenetic Viva, Keenetic Extra) already have another firmware installed - NDMS v2. In order to change the key phrase, you need to select the “Wi-Fi” section in the lower menu, and then select the “Access Point” tab in the upper menu:
On newer firmware versions this item may look like this:
In the “Key” line, enter the WiFI network security key and click the Apply button.
Wireless network password on TP-Link.
The router IP address is 192.168.1.1, the web interface address is https://192.168.1.1, login: admin and default password is admin. Just like almost all the latest D-Link routers, TP-Link also has almost the same web interface. Therefore, in order to install the code for Wi-Fi on models TL-WR740N, TL-WR741ND, TL-WR743ND, TL-WR841N, TL-WR841ND, TL-WR842ND, TL-WR941ND and TL-WR1043ND, you need to go to the “ Wireless" -> "Wireless Security":
Scroll to the end of the page, find the line “PSK Password (PSK Key)” and enter a new WiFi key there. Click the Save button.
WiFi network key on TredNet routers.
The IP address of the router is 192.168.1.1, the web interface address is https://192.168.1.1, the login is admin and the default password is admin. To set a WiFi password on TrendNet routers, go to the Wireless -> Security section:
In the Passphrase field, you must enter a new passphrase and repeat it in the “Confirmed Passphrase” field. After this, you need to click the “Apply” button.
Tenda routers.
The IP address of the router in the local area is 192.168.0.1. The address of the router web interface is https://192.168.0.1, the login is admin and the default password is an empty string. On Chinese Tenda routers, to install the security key, you need to go to the “Wireless Settings” -> “Wireless Security” section. In the Russified version: “Installing a wireless network” -> “Wireless network security”.
Enter the WiFi password in the “Key” field. Click the “OK” button.
WiFi network key on NetGear routers
The usual IP address on the local network for NetGear routers is 192.168.1.1, the web interface URL is https://192.168.1.1, the login is admin and the default password is password. Installing and changing the Wi-Fi security key on a NetGear router is done in the “Basic mode” => “WiFi wireless network” tab or in the advanced mode: “Settings” => “WiFi network settings”:
The key phrase is located in the “Security Settings” subsection. Don't forget to click the Apply button.
Password for Rostelecom Sagemcom Router.
The router IP address is 192.168.1.1, the web interface address is https://192.168.1.1, the login is admin and the default password is admin. In order to change the Wi-Fi password on Rostelecom Universal routers - Sagemcom [email protected] 2804 and Sagemcom [email protected] 3804 - you need to go to the WLAN settings -> Security section:
In the “WPA/WAPI password” field, enter a new key and click the Apply/Save button.
Note: After changing your Wi-Fi password, remember to reconnect to your wireless network.
ASUS
On new models
- Set the language.
- "Wireless network".
- In the “Authentication Method” , set the mode to “ WPA2- Personal”.
- In the line called “WPA Pre-Shared Key” you already know what to write.
- Click “Apply”.
On older models
NOTE! On older firmware there may be problems with changing the language. That is, you set the language to Russian or Ukrainian, but it is reset when you go to any menu item. Therefore, I will describe the instructions with translation.
- On the left side of the menu, click on the item “Network Settings” ( Advanced Setting). Select “Wireless Network” .
- Authentication Method field , set the encryption type to “WPA2-Personal”.
- Just below in “ WPA Pre- Shared Key” we enter a new combination of code with symbols and numbers. Click “ Apply”.
Setting a password in Windows
To connect to a wireless network on a computer or laptop, you also need to enter a password that will match the one set on the router.
- Open “Network and Sharing Center” on your PC or laptop. You can do this through the Start menu and the control panel, or you can call it by clicking directly on the Internet connection icon.
- In the window that opens, select “Wireless network connection”.
- A window will open in front of you, in which you need to find the “Wireless Network Properties” button.
- In the next window, select the “Security” tab and enter the previously created password in the “Network Key” line.
- Set new settings by clicking on the “OK” button.
Zyxel
Firmware version 2.12 and higher
- Go to “Home Network”.
- Next, go to the “Wireless Wi-Fi network” section .
- Enter a new key.
For old firmware
- Click on the ladder icon at the very bottom.
- We are interested in two fields: network protection and key. In the first one, install WPA2PSK . In the second, enter the key. Click “Apply”.
How to create the perfect password?
It is not enough to simply set a password for Wi-Fi. For it to be of any use, the key must be reliable. The best option is a password consisting of 8 characters. Moreover, it must contain both letters and symbols, and keys.
But entering a key containing symbols can be quite problematic when using it at home. Therefore, you can limit yourself to only letters and numbers. Moreover, they should be located in random order. No amount of 123456789 or qwertyuiop will protect your network from intruders. Also not the best option would be the names of relatives, important dates, animal names, etc.
Methods for generating a key
Here are some effective ways to help create a strong key:
- Write a short sentence. Remove all spaces and some letters so that only 8 characters remain. Capitalize a few letters and replace a couple others with numbers.
- Use an online generator. You can specify the key length, select letters, numbers, after which the program offers secure password options.
- Take any book or article and select a small sentence from it. Leave only every 3rd letter of the word. Then write them in Latin. Replace some letters with capital letters. A strong password is ready.
This will help prevent many problems from occurring.
Netcomm
The problem with these products may be an inconvenient and, most importantly, different interface. Each new router has its own firmware, which means setting up Wi-Fi can lie either deep in the wilds or on the surface. It’s still not clear why they use a separate interface for each model. So when making adjustments we will rely on the 3rd eye and 6th sense.
- When we get into the settings. Our task is to find the word “ Wireless”. All firmware has an English translation, so most likely there will be no Russian one. Take your time, in some models this item is on the surface, and in some it is buried in the “ Networking” section. So just indulge in the main sections.
- And so my young seekers, as soon as you click on this section. A config with a password can be opened immediately, but cunning developers could put the key settings deeper. Therefore, next you may need to click on “Wireless settings” , “Security” or “Client configuration”.
- Find the “Network authentication” or “Security Mode” and set the encryption method to VPA2.
- Well, in the field with the word “Key” we put the key.
- “ Save” or “ Apply” to save the settings.
How to change the password on an Asus Wi-Fi router
Asus Wi-Fi routers are very reliable and popular among users, but Internet providers rarely use routers from this manufacturer. Therefore, if you did not change the router yourself, then the chance that you have Asus is extremely low. The procedure for changing your password is extremely simple.
- To get started, launch any browser and enter your IP address in the address bar.
- After this, a small window will appear in front of you asking you for a “Username” and “Password”, by default they should be “admin” and “admin”.
- Next, the router settings window will appear in front of you; on the left, find and select “Wireless network”.
- Then, in the “General” tab, find the line “WPA Pre-Shared Key”, to the right of it there will be a line for entering a password, to change it, just create and enter a new password into it, and then click “Apply”.
As you can see, this procedure is not at all complicated. If the password and username suggested in the instructions do not suit you, then try looking for up-to-date information about them on the router manufacturer’s website.
Linksys
New firmware
- Moving on to “Wireless”.
- Opposite “2.4 Ghz network” or “5GHz network” click “Edit”. Basically, according to the standard, people use 2.4 Hz, so if you don’t know, click on the first one.
- Enter new letters and numbers in the “Password” field. Click on the “ Apply” to save the settings.
Password rules
In order for a password to effectively perform its functions, you must follow some simple rules when composing it. The password must be at least 8 characters long. Do not use known number combinations, dates of birth, or simple series of numbers. To enhance the strength of the password, it is recommended to use lowercase and uppercase letters and special characters.
You can use the old method, when you need to come up with a phrase, randomly remove the characters so that 8 characters remain, then convert the letters into Latin and add numbers.
When creating a password, you can use a password generator. Finding them is not difficult - enter the query into the search bar of your browser and select any site from the ones offered. The generator will select for you a unique, reliable combination of numbers, letters and symbols. All generators have the ability to customize parameters - the number of characters in the password, the use of symbols and letters of different case. Write your password down on a paper or electronic notepad so you don't forget.
Routers released in the last few years have a password protection feature. To set it up, it is recommended to read the instructions for the device. This feature helps prevent password cracking and intruders from entering your local network.
Sagemcom
Changing the key on this device is a standard procedure:
1. In the address bar of an open browser, enter 192.168.1.1. 2. To identify, enter “admin” as Login and Password, click “Login”.
3. A new window will appear. In these settings, find “WLAN Settings”. 4. Select the “Main” item, and next to “SSID”, enter a new name for WiFi, if necessary. Save.
5. Immediately go to “Security”. 6. “Select SSID” should contain the name you entered a few seconds ago. 7. In “Authentication” select “Mixed WPA2/WPA-PSK”. 8. In “WPA/WPAI password”, enter new data and save.
Reboot your device, update the secret combination on your laptop and gadgets, and use a secure wifi network.