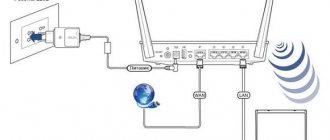
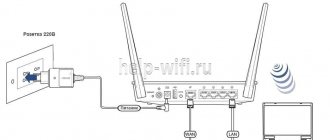
The TP-Link WR1043ND router is one of the most budget gigabit WiFi routers. The router is built on the Atheros AR9001AP-3NG chipset - an AR9132 chip with a 400 MHz processor and a built-in USB 2.0 interface. The wireless module on the AR9103 chip fully supports the 802.11n standard. The network module with 1 WAN and 4 LAN ports runs on a chipset - Realtek RTL8366, with a 128 KB cache for packets. The amount of RAM is 32 MB, the amount of flash memory is 8 MB. Among the obvious advantages of the router, in addition to gigabit ports and price, we can highlight the presence of 3 antennas of 5 dBi each, which should eliminate problems with WiFi in the average apartment, a USB connector, and a print server.
Cons: - the firmware is rather weak in terms of stability, which is why there are many complaints about the quality of the WiFi module. The problem seems to have been resolved with the latest firmware versions. But still, many people prefer DD-WRT and Open-WRT firmware. — there were complaints that the WAN port was burning out. It’s also not noticeable lately - apparently the developers have improved it. — limited list of supported printers by the built-in printer server. Let's take a closer look at the process of setting up the TP-Link TL-WR1043ND WiFi router for the main Russian providers.
Setting up PPPoE
- On the left menu select Network -> WAN
- WAN connection type: PPPoE/Russia PPPoE
- Enter the login and password from your provider
- Secondary connection: Dynamic IP
- Connection mode: connect automatically
- Click Save
The connection is ready to use.
Go to TP-Link settings
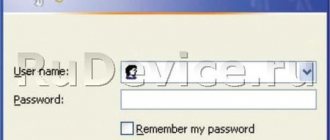
Open the window of any browser on your laptop (you can take Google Chrome, Opera, and even the classic Internet Explorer browser). At the top in the field where the address is usually indicated, set the following combination: 192.168.0.1. To quickly navigate, press “Enter”. In the menu to identify the user, type admin - admin. Click on the green Login button to get to the web panel.
Type admin twice and log in
Let's replace the passphrase with entering the web panel with TP-Link settings
Go to System Tools - click on Password. There is a form in the menu - you need to fill it out. We write the previous password and login (the word admin). Next, we enter new information and save using the Save key.
To enter a new password, you must enter the old one
Setting up PPtP
- On the left menu select Network -> WAN
- WAN connection type: PPtP/Russia PPtP
- Enter the login and password from your provider
- Dynamic IP (Dynamic IP) and fill in the server IP address (issued by the provider)
- Connection mode: connect automatically
- Click Save
The connection is ready to use.
Setting up the router
To set up Internet access, you should go to the TL-WR1043ND router menu through a browser - enter the device’s IP address 192.168.0.1 in the line and press Enter. After this, an authorization window will appear, where the default value should be admin.
Next, you will see a settings interface where you can configure the connection. Let's look at how to install the Internet for different types of protocols, but before that, let's mention such a parameter as the computer's MAC address.
Why do you need to know it? Some providers use a specific computer to connect to the network, so you will need to enter this address to establish a connection. Find out whether this parameter is required for the connection, and if so, do the following before setting it up:
- Select the Network menu, MAC Address Clone tab;
- In the window that appears, click on the “Clone MAC Address” button and save the changes.
If this connection is not needed to install the Internet, then you can immediately proceed to setting up the basic parameters.
The setup for a Dynamic or Static IP address is as follows:
- Open the Network menu and select the WAN section;
- In the Connection type line, select dynamic or static IP;
- In the option with automatic address detection, you don’t need to change anything else - the connection will be established without additional data. For a static IP, you must enter the address, subnet mask and gateway - these are provided to you by your provider.
Other protocols are configured in the same WR1043ND menu called Network and the WAN section, but they require additional data to be entered.
Therefore, to establish a PPPoE connection, do the following:
- In Connection type, select PPPoE from the drop-down list;
- Below, enter the login and password from the provider agreement in the appropriate lines;
- In the Secondary connection part of the form, select “Disable” or choose Static address if this data is provided by your Internet service provider;
- In WAN connection mode, you need to select Automatic connection.
Setting up the PPTP (VPN) protocol for dynamic IP occurs as follows:
- Select this type of connection from the list and enter your login and password information below;
- Check the Dynamic IP address option; in the next line you need to enter the server address that your provider will provide to you;
- Leave the MTU size as it is by default;
- Select the “Connect automatically” mode at the bottom of the window.
Connecting via the same protocol for a Static IP address is done as follows:
- As before, select this type of connection, enter your login and password;
- We put a tick in the Static IP address option, below we enter all the necessary data - server name, combinations for IP, subnet mask and gateway, DNS;
- Leave the MTU value as default and select automatic connection mode.
For L2TP, enter the following data:
- Select this type of connection;
- Enter the name and password from the contract;
- Select a connection via a dynamic IP address;
- In the IP address/Server name, enter a combination of numbers or a value from the contract;
- Set MTU to 1450 or less;
- Select the automatic connection method.
Wi-Fi setup
- On the left select Wireless mode
- Fill in the Wireless Network Name field. Latin! This will be the name of your Wi-Fi network
- Save. We ignore the reboot offer for now.
- On the left select Wireless Security
- Select WPA/WPA2 – Personal
- Set a password, at least 8 characters
- Save
- Reboot the router for the changes to take effect.
Home LAN and DHCP
Where do you change the internal network parameters of the TP-Link TL-WR1043ND router:
- The internal network is configured in the LAN block in the “Network” list. Enter a different IP address for your router. This is basically the only thing you can do with this tab. You can immediately activate the IGMP option.
Open LAN and change the router's local network address if necessary
- The DHCP server is configured in a separate block - you can tell which one by its name.
- In DHCP Settings, set the server status to Enable. This must be done. The number of addresses can be left unchanged - usually the default value is 100 addresses. These addresses will be received by gadgets that will use your Wi-Fi. If you change something, click on Save (save function).
The server for distributing IP addresses is configured in a separate DHCP section
Port forwarding
If you want to access a specific device from the Internet, the server on your local network needs to configure port forwarding (port forwarding). Ports are forwarded to a specific IP, i.e. First you need to set a static IP address for the device. And for this you need the MAC address of the device. So.
- Launch the command line
- Type the command ipconfig /all and press Enter
- We need a physical address. This is the MAC address of the network adapter.
- Go to the router settings, on the left, DHCP –> Address Reservation
- Click the Add new button
- Insert the MAC address and fill in the IP address
- Save
Now the router will always give the device with this MAC a static IP address.
Configuring port forwarding:
Important! If you want to set up port 80 forwarding, you must first change the router interface control port:
- On the left, select the Security section
- Subsection Remote Management
- Set another port
- Save
- Reboot the router
Actually, port forwarding:
- On the left, select the Forwarding section
- Click Add new
- We specify the ports and indicate the IP address of the computer
- Save
Main features of TP-Link TL-WR1043ND
First of all, this brand has a good reputation among other manufacturers due to the fact that it produces reliable and durable equipment. Many users note that TP-Link routers work stably and without failures, and this is one of the most important criteria when choosing and purchasing a router.
The first thing worth noting when looking at this model is the presence of three removable antennas, which are located externally. This configuration indicates that the device provides a large coverage area with a Wi-Fi signal; you can use the Internet in any part of the apartment without losing speed.
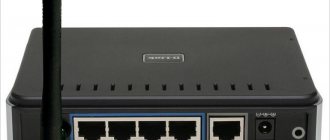
As with most equipment of this type, the TP-Link TL-WR1043ND has 5 ports, 4 of which are intended for local connection, and the fifth is connected to a wire from the provider. Please note that the LAN ports are gigabit, which means that you can fully enjoy high-speed Internet access.
The maximum data transfer speed is up to 300 Mbps - this is more than enough for home use, even if many wireless devices are connected to the router and all LAN connectors are used.
Additional advantages include the presence of a USB port and a relatively large amount of built-in memory - about 8 MB, which is important for maximum firmware performance.
Firmware update
No matter how loud the word “firmware” sounds, the process of flashing a router is very simple. You must first download the firmware file to your computer (we recommend downloading from official websites).
Important! There is a chance that the router will stop working (the chance is very small, but it exists)
- On the left select System Tools
- Sub-item Firmware Upgrade
- Click the Select file button
- Specify the path to the firmware file
- Click Update
Setting up digital TV on the router (IPTV function)
How to set up a connection to a TV set-top box on the TP-Link Tl-WR1043ND model:
- In the “Network” section, open the IPTV block. There will be only one menu - “STB Port”. We select port number 4 in it. Apply the settings.
- We connect the set-top box to this yellow socket.
- We turn it on and wait for it to load completely. The channels should appear on the TV.
IPTV is configured in the tab of the same name in the “Network” section
Setting up an Internet connection (Dynamic IP, PPPoE, L2TP)
These are the most important settings. You need to find out what type of internet connection your ISP uses. Know all the necessary data for connection, if necessary. Most likely you have Dynamic IP, PPPoE, PPTP, or L2TP. You need to set these parameters on the “Network” – “WAN” tab.
Depending on your connection, open the desired spoiler and see the setup instructions.
Dynamic IP This is the simplest type of connection in terms of configuration. Select it in the “WAN connection type” drop-down menu and click on the “Save” button.
The same type of connection must be selected if you connected the router to the modem.
Some providers still bind by MAC address. If you have such a provider, then see this article. There I showed how to clone a MAC address using TP-LINK as an example.
Immediately after saving the settings, the Internet through the router should already work.
Setting up PPPoE on TP-LINK TL-WR1045ND Select the PPPoE connection type, set the username and password (which are issued by the provider), then check if the connection is set to automatic, click on the “Connect” button, and if the connection with the provider is established, save the settings .
Setting up L2TP and PPTP connections Everything here is the same as in the case of PPPoE. Select your L2TP or PPTP connection from the drop-down menu. Specify the username, password, and IP address (server name). We set the connection to automatic and try to establish a connection with the provider. If there is a connection and the Internet is working, save the settings.
If the Internet is already working through the router, then you can continue setting up. But, most importantly, we have already done it. If you had a high-speed connection on your computer before installing the router, then it is no longer needed. It does not need to be launched and can be removed. The router itself will establish this connection, we have just configured it.
Setting up Wi-Fi and setting a password on TP-LINK TL-WR1045ND and TP-LINK TL-WR1043ND
Go to the “Wireless” tab. Here you need to change the name of the Wi-Fi network (SSID) and specify the region. To save the settings, click on the “Save” button.
Setting a password for a Wi-Fi network
Go to the Wireless Security tab. Select the item “WPA/WPA2 - Personal (recommended)” , set the version and encryption parameters as in the screenshot below, and in the “PSK Password” field, create and write down a password that will be used to protect your Wi-Fi network. The password must be at least 8 characters.
Don't forget to save your settings. And you need to reboot the router. This can be done from the control panel, on the “System Tools” tab – “Reboot”, by clicking on the “Reboot” button.
After rebooting, the router will broadcast the wireless network with the new name that you specified in the settings. To connect, you need to use the set password.
Change admin password. Protecting your router settings
When logging into the router's web interface, we specify the password and username. Factory admin and admin. So, it’s better to change this password so that no one can access the settings.
This can be done on the “System Tools” – “Password” tab.
We first specify the current username and password, and then come up with a new password. You can leave the username as admin.
Factory reset
Just open the Factory Defaults block in the System Tools list on the web panel. In the menu, click on the Restore button - it will be there alone. In the new window, we agree to resume the original settings of the router - the custom ones will then be deleted.
Resetting settings can be done via the web panel
If there is no access to the interface, press for a few seconds the Reset/WPS button, which is located on the back of the router. The old settings will be immediately deleted.
Coverage and access control
Stories about how it is impossible to catch a signal from a router in the next room are the talk of the town. Indeed, low-power devices have a very small coverage area - the area within which the signal has sufficient power. The signal is hindered by obstacles in the form of walls, partitions and furniture. Other devices operating at the same frequency as the router are interfering. Even the wallpaper on the walls gets in the way. Cheap routers are not capable of providing long-distance reception of a local network signal. Therefore, it is better not to purchase them. WR1043ND is free from this drawback - it guarantees normal reception throughout the apartment and even far beyond its borders. The device is equipped with three antennas, which increases the coverage area.
Access control is carried out using SSID Broadcast Control technology, which uses powerful and well-tested signal encryption techniques. The firewall built into the router prevents unauthorized entry into your local network and reliably closes it from outsiders.
But the user himself can configure the privileges of users on his network. For example, parents may limit the rights of their children. There is also a function for remote device control. It is especially useful for administrators of local office networks.