- 27shared
- 2Facebook
- 20Twitter
- 5VKontakte
- 0Odnoklassniki
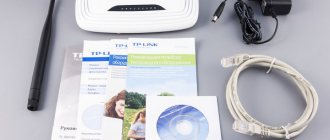
In this article we will provide detailed instructions for setting up the D-Link DIR-620 router. This router model has all the necessary functionality for distributing the Internet both “wired” and via a wireless Wi-Fi network. In addition to standard Ethernet connectors, the router is equipped with a USB port for connecting a USB modem, which provides connection to WiMAX and 3G GSM networks.
Brief characteristics of the D-Link DIR-620 router
| Characteristic | Meaning |
| Type | Wi-Fi router |
| Wireless Standard | IEEE 802.11n, IEEE 802.11g, IEEE 802.11b, IEEE 802.3, IEEE 802.3u |
| Frequency range | 2400-2462 MHz |
| Max. wireless connection speed | 300 Mbit/s |
| Antenna | 2 x 2 dBi |
| Wireless Signal Strength | 17 dBm |
| Wireless Security | WEP/WPA/WPA2, WPA-PSK/WPA2-PSK |
| Ports | 4xLAN 100 Mbit/s, 1xWAN 100 Mbit/s, 1 USB 2.0 Type A |
| Passing VPN traffic | PPTP, L2TP, IPSec |
| DHCP server | There is |
| Firewall | There is |
| NAT | There is |
| WDS Bridge | There is |
| Possibility of connecting a 3G/LTE modem | There is |
| Dimensions (WxDxH) | 147 x 114 x 33 mm |
Connecting a router
So, let's start installing and configuring the router. This will be done step by step:
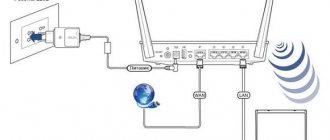
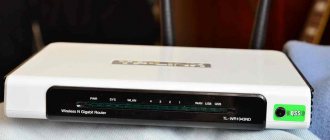
- First of all, we will connect your computer and router with the Ethernet cable included in the package. We plug one end of the wire into the connector of the PC’s network card, and the other into one of the four LAN ports on the rear panel (the ports are highlighted in blue).
- Next, connect a cable from an Internet provider or an ADSL modem to the connector marked “INTERNET”. The router also provides the ability to connect to the network via USB modems in WiMAX, 3G GSM or CDMA formats. If you plan to use this method of connecting to the Internet, insert the modem into the USB port on the front panel of the router.
- Now is the time to connect the router to the power supply, for which we plug the adapter plug into a special 5V/2.5A socket on the rear panel, and the plug into the socket.
Is it possible to restore a device after unsuccessful firmware?
In the event of an extremely unsuccessful flashing, this is the only method of restoring the router’s functionality. This is done as follows:
- The TFTP server is downloaded and then unpacked into a separate folder.
- Download the factory version of the software (can be downloaded from the above links)
- Set the IP address on your computer to 10.10.10.3 with a mask of 255.255.255.0
- Power off the router
- Connect your PC to any LAN connector
Further, the remaining actions depend on the firmware that is currently installed. If the firmware is from D- Link , then you need to do the following:
- Connect the console cable , relying on the “Serial” instructions, turn on the router and write 2 in the console. You need to do it in 5 seconds
- After clicking, the following text appears:
- Reboot the device after the completed operations.
What is PPTP - basic characteristics of the protocol and connection settings
But if the firmware is from Zyxel , then when restoring you need to do other steps:
- Power on the router by holding the Reset key for 5 seconds
- Release the button (the device will start downloading from the TFTP server)
- Reboot the transmitter
LAN configuration in Windows 7/10
In Windows, open Control Panel – Network and Sharing Center. Next, on the left, click on the “Change adapter settings” link. All your network connections will be displayed here. If you previously used the Internet on only one computer and the provider’s cable was connected directly to it, then a high-speed connection will definitely be on the list. Now there is no need for it, since the router will now connect to the Internet. All we have to do is configure “Local Area Network Connection”.
Right-click on the corresponding icon and select “Properties” from the menu that opens. Then go to the Internet Protocol Version 4 settings.
On the “General” tab, set the radio switches to the “Obtain an IP address automatically” and “Obtain DNS server address automatically” positions. Save the changes.
Now we can connect to the router via wire and make the necessary settings.
Firmware via Zyxel Keenetic: why is it needed
This flashing method is used to specifically remake the router itself. Using a similar method, people pursue the goal of improving the functionality of their device (the ability to simultaneously work on the Internet and local networks or support for IP television, for example) or performance.
How to flash a router via Zyxel Keenetic
First, you will need to disassemble the router itself. In this case, you need to find a wire to connect to the serial port.
Then you will need to disconnect the connector from the cable in order to connect it to the device board. After this, you will need to solder a piece of the connector to the cable (usually soldered from the flop cable). The pins from the connector must then be connected to the disconnected serial port.
After this, the TFTP32 (the software creates a free TFTP server for Windows, link https://www.tftp-server.com/tftp-download.html) along with firmware from Zyxel Keenetic. The archive needs to be unpacked. The unpacked file is renamed to a.bin. Then TFTP32 installed , after which the firmware file is transferred to the root folder of the created TFTP server.
After all installations, the IP address 10.10.10.3 and mask 255.255.255.0 . Then TFTP32 is launched along with the HyperTerminal (or with PuttY for Windows 7 owners). After this, the port to which the wire is connected is indicated. Next, specify the following parameters:
- Speed – 57600
- Parity – 8N1
- Port control is disabled.
Then the router is connected to the cable and power is supplied. If everything was done correctly, the following is displayed :
Traffic on the Internet - what is it and how to find out its volume
After the withdrawal, you must select item 2 ( Load system code then write to Flash via TFTP ). This must be done within 3 seconds, because if you do not meet the specified time, you will have to reboot the device.
If everything is done correctly, the new firmware will be loaded, erasing all data about the previous version. All actions will be shown on the terminal. Then the router will need to be rebooted. After this, your router will have a changed address ( 192.168.1.1 ), login ( admin ), and password ( 1234 ). Then the IP address selected from this range by the user is registered.
But there is an alternative way, without opening the router. In this method, the sequence of actions is as follows:
- Download two software with two versions (regular and Zyxel Keenetic)
- Flash the router with regular firmware (if the software version is not updated to the latest)
- Reflash via software interface from Zyxel Keenetic
- Disconnect and reconnect the network cable
* Note : This method only works with version A1.
How to update firmware
On new router models, the update occurs automatically, you just need to go to the device interface.
If this option is not available, then new firmware versions can be found on the Internet and installed by specifying the path to the updated version or using the “ Check for updates ” button.
How to log into the control panel of the D-Link DIR-620 router
To perform basic setup, let's go to the router's Web interface, or it can also be called the administration panel. To do this, in any browser, enter the address 192.168.0.1 , after which a window should appear asking you to enter your username and password. The default data is admin and admin .
If someone else used the router before you, then most likely the username and password have been changed. You need to find them out from the previous owner or you will have to reset the settings to factory values. We assume that you know the authentication information, so we move on.
September 02, 2014 Blog — Hardware and peripherals
Support for web cameras, 3G modems, NAS, all at the same time! But not out of the box. Out of the box, this router has very modest capabilities. For anyone who doesn’t like the standard firmware, just upload an alternative firmware. It just works. Everything works, even modern 4g modems. In addition, the firmware gives you full-fledged Linux.
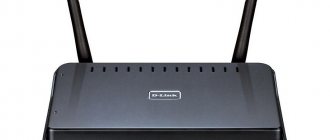
Description of the router
But be careful. New revisions of revision C1)) may not work with Vampik firmware. I have last year's C1.
This revision of routers does not support DD-WRT, Open WRT and Zyxel Kinetic firmware, since the device uses a Broadcomm chip. And assemblies for this chip are not yet expected in official communities.
Screenshot from the OpenWRT website
First you need to restore the factory firmware. The fact is that nothing will be installed on the latest firmware from Dlink.
I had 20131018_1247_DIR_620C1_2.0.9_sdk-master.bin . A completely working version, beta, but the Web interface and stability are simply terrible. Although the router performs the stated functions.
You won't be able to downgrade the firmware using a regular upload via the web interface. You'll have to boot into Recovery Mode. I'll describe it in more detail.
- download firmware 1.0.8 - the firmware itself at the time of writing is here - go to the network settings - network adapter on the computer and change the values from automatic parameters to your own
In detail it looks like this:
To update via emergency mode, use any browser. Set the computer address manually on the network card in the properties of the TCP/IP protocol, for example, IP 192.168.0.2 mask 255.255.255.0 gateway 192.168.0.1 preferred DNS server 192.168.0.1.
Then turn off the power to the router, hold down the “Reset” button, turn on the power and hold the button for another 10 seconds . Next, contact 192.168.0.1 and insert the firmware as requested.
We wait for it to flash, don’t touch anything, watch the behavior of the indicators, it will take about 3-5 minutes , when it loads, close the browser, reboot the router, and use it.
I got the firmware from Vampika
This is not an independent firmware, it is a modification of firmware 1.9.2.7-d/-rtn from enthusiasts. Our router is on the list of supported ones. Download the release version or nightly builds at https://vampik.ru/post/1/
At the time of writing, the version was DIR620C1-3.0.6.5218.trx
Then everything is simple - go to the web interface of our router, select the downloaded firmware and upload it. It is advisable to carry out all manipulations without turning off the router. If you have a power breaker, connect the power through it.
After a few minutes (filling takes quite a long time), refresh the browser page and you will see a different invitation to the admin panel from the standard one:
Login admin : password: admin
And you can use firmware with advanced capabilities. All that remains is to deal with the Entware repository .
In this version of the firmware, I was interested in the expanded support for USB devices, in particular web cameras, and fine-tuning of USB modems. And of course the capabilities of the built-in samba server.
In the next article on this device, I will tell you how to install and configure the TomatoUSB firmware.
After using the DIR-620 router in practice, I will say that the device justified the investment in it 100%. After testing the firmware, two more routers of this revision were purchased solely based on the low cost of the device.
3G or 4G Internet is used , then firmware from enthusiasts is preferable. You can easily configure a modem operating in Hilink mode (a mode in which the modem is controlled using a Web interface) by simply enabling Ethernet over USB .
Don’t forget to check the websites for new firmware versions, and also, if an alternative one is not installed through the standard D-link firmware update interface, then almost any compatible firmware up to 8 MB in size can be installed through emergency mode .
Tomato USB firmware is just right .
← Intel WiFi 5100 ABG firmware in ABN DD-WRT firmware in DIR-300/NRU (rev.B3) →
Tags:
- firmware
Setting up an Internet connection (WAN)
The sequence for setting up the D-Link DIR-620 router is given for the version with firmware 2.5.11. If your interface is slightly different, then there is nothing wrong with that, since the configuration principles remain the same.
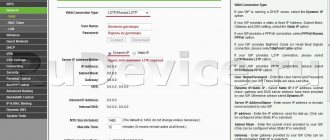
So, let’s immediately get down to the main thing – setting the Internet connection parameters. Go to the Network - WAN section. On the right, click the “Add” button and set the connection settings. All parameters necessary for connection must be provided to you by your telecom operator. If you don’t have the data, then try to find it out through your personal account or call the provider’s technical support.
We will look at setting the configuration using the example of a PPPoE (Rostelecom, Megafon, Dom.ru, Evo). Select it in the first drop-down list. Next, enter the name of the connection, and just below the username and password. If your Internet service provider uses MAC address binding, it must be specified in the “MAC” field of the Ethernet section. By clicking the “Clone” button, you can automatically write into the settings the MAC address of the computer from which you are connecting to the router. The MTU parameter located next to it determines the maximum size of a transmitted packet. Set it to 1500 as in the screenshot below.
At the very bottom of the settings page there is a group of “Miscellaneous” parameters. If you don’t know what they are used for, check only the boxes next to “NAT” and “Firewall”.
This completes the PPPoE connection setup. Save the configuration by clicking on the corresponding button. We make sure that a new WAN connection has appeared with the status “Connected”. A green indicator will indicate that the Internet network setup in the D-Link DIR-620 router interface has been completed correctly.
By analogy with PPPoE, other types of connections are configured, only the list of entered parameters differs. Below are possible WAN connection schemes:
- Static IP – you must fill in the fields IP address, Netmask, gateway IP address, Primary DNS server and Secondary DNS server;
- Dynamic IP – in some cases, requires setting DNS servers or an identifier;
- PPTP and L2TP – require entering a username, password and VPN server address.
Configuring WI-FI router D-Link DIR-620 on firmware version 1.4 SDK
This router model was configured with firmware 1.4 sdk, which can be saved from the D-Link ftp server.
To flash the router, save the firmware file to your computer, in the router menu select System - Software Update .
We indicate the path to the downloaded firmware and update the firmware on the router. Informsvyaz tested the performance of the D-Link Dir620 router in different modes, the table shows the maximum speed values (approximate data):
| pptp | 80 |
| l2tp | 65 |
| Local torrents | 100 |
| Wi-Fi (802-11n) | 60 |
1.
Connect the Ethernet cable included in your apartment to the
Internet of your router.
2.
Make the necessary settings on your computer's network card.
Start button , select Control Panel , then Network Connections . In the window that opens, right-click on the network card icon and select Properties .
Left-click TCP/IP Internet Protocol and click the Properties .
Make settings similar to those shown in the figure:
3.
Connect an Ethernet cable between the computer’s network card and one of the router’s ports, for example port No. 1, as shown in the figure.
4.
Open a browser window and type
https://192.168.0.1 and press Enter . In the authorization window that appears, in the Username select admin , in the Password type admin , and click Login .
5.
After clicking the
Login , the settings page will open.
If the system language is different from Russian, select Russian. Select Advanced settings.
6.
In the page that opens, select
Network , then WAN .
In the window that opens, click Add .
7. Select the connection type PPTP + static IP and fill in the appropriate fields as in the figure:
Click the Save button.
Attention! After any actions that require saving settings, press the next button (in the form of a light bulb)
8. Next, open the Advanced - Routing and click the button - Add.
In the window that opens, fill in the following lines one by one (see table below) and click Save
.
| Destination network | Destination mask | Gateway | Metrics | Interface |
| 10.0.0.0 | 255.0.0.0 | Your gateway address | 1 | automatically |
| 10.0.255.12 | 255.255.255.255 | Your gateway address | 1 | automatically |
| 195.98.64.65 | 255.255.255.255 | Your gateway address | 1 | automatically |
| 195.98.64.66 | 255.255.255.255 | Your gateway address | 1 | automatically |
| 195.98.90.80 | 255.255.255.255 | Your gateway address | 1 | automatically |
| 224.0.0.0 | 240.0.0.0 | Your IP address (10.xxx) | 1 | automatically |
If you have several computers and you want them all to have access to the network, then to do this, configure their network cards similarly to the settings given in paragraph 2 of this instruction and connect the network cards of the computers with the free ports of the router using Ethernet cables. Attention!
The instructions contain all the necessary settings to be able to watch TV programs via IPTV.
When setting up a router, it is advisable to allocate an Ethernet port for transmitting multicast traffic to the TV set-top box:
D-Link DIR-620 router
the setup should look like this: a) Go to settings by selecting
Quick setup and select the IP television menu item - IPTV setup wizard
;
b) Assign a port according to the figure below and click the Change button,
The port assigned to the set-top box will not distribute the Internet.
9.
To set up a connection using a wireless network, go to the
Wi-Fi
and select the Basic settings .
In the window that opens, set the name of your wireless network and Wi-Fi operating mode and click change
.
Note! In some cases, you need to specify the WiFi operating mode in a fixed manner - For example, 802.11 G. For the operating mode of your network equipment, see its specifications.
10. Next, you need to go to the Security Settings and configure the security of the Wi-Fi connection according to the figure and click the Change and Save button.
After completing these steps, in the upper right corner, click the button System - Save and Reboot .
This completes the router setup.
11.
Set up your Wi-Fi card on your computer to access the network.
To do this, left-click once on the network card icon in the lower right corner of the screen (next to the clock).
In the window that appears, click the Connect and enter the Wireless Network Access Key that you specified earlier.
3G setup
We will especially focus on setting up Internet distribution using a USB modem. We connect it to the port on the front panel of the router. Then, if the SIM card has a PIN code check, enter it on the 3G/LTE modem - PIN page.
Now go to the web panel to the already familiar Network - WAN tab. In the list of available connection types, select “3G”, after which we find the desired operator, for example, MTS, in the list of providers located at the top. All settings will be registered automatically. Save the changes.
Next, open the System – Configuration section and click the “Save” button to apply the settings made.
We return to the list of WAN connections and check the connection status. Everything should work.
Wi-Fi setup
You can configure the wireless network in the Wi-Fi – Basic settings section. Set the parameters: SSID (network name), location, channel, operating mode and maximum number of clients. If you need to “hide” the network, check the box next to “Hide access point”.
To protect your wireless local network from unauthorized users, go to Wi-Fi – Security Settings. In the “Network Authentication” list (set to “Open” by default), select a security technology. One of the preferred options is WPA-PSK/WPA2-PSK mixed with an access key.
Another way to secure your Wi-Fi network from unwanted guests is to set up a list of trusted MAC addresses. You do this in the Wi-Fi – MAC filter section. First, set the restriction mode on the “Filter Mode” page.
Then in the “MAC Addresses” window we add the addresses of those devices that are allowed to connect to your wireless network.
Changing the administrator password
Among the mandatory items for setting up the D-Link DIR-620 Wi-Fi router is the replacement of standard authorization data in the web interface of the network device. You can set a new password on the System – Administrator Password tab.
This completes the basic configuration of the D-Link DIR-620 router. We will devote separate articles to advanced router settings.
- 27shared
- 2Facebook
- 20Twitter
- 5VKontakte
- 0Odnoklassniki
Important! Dir-620 has several revisions
I would immediately like to note that this router is available in three hardware revisions known to me, i.e. installed software on this device, and today we will talk about Dir-620 with revision C1 (there are also A and D).
You can find out what revision your Dir-620 is on the back of the device, find the lines there
H/W Ver.:(revision) FW Ver.:(firmware version).
Note! This is important, because when updating the firmware version, you need to know exactly what revision is on your device, in other words, if you try to update, for example, a router with revision C1 to new firmware for a router with revision A1, then your device will simply fail , won't even turn on.
Immediately after purchase, look at the revision version, i.e. if you turned the router over and found the lines H/W Ver.: C1, then you can read further, if you have a device with a different revision, then you will have a different interface, and perhaps you will not understand something.
So, everything described below is for the Dir-620 router with revision C1, firmware version 1.0.0.