" Iron
Bogdan Vyazovsky 12/13/2017
Some routers differ in their design and this frighten users, but this is not scary, because, for example, for TP Link TL WR940N the setup is no more complicated than for other routers of this brand of older versions and generations.
It doesn’t take too much time, and its interface will be familiar to those who have already encountered routers released under this brand.
For those who will be familiar with this model for the first time, it is worth noting several technical features of the design.
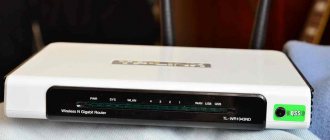
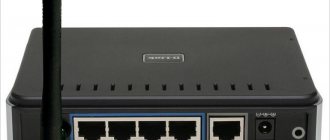
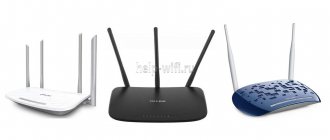
This router is relatively large and has non-removable antennas for distributing the Wi-Fi signal. There are only three of them and they complement the signal distribution through the standard four LAN ports.
Depending on the modification, the model’s case may differ slightly from the original version, but it does not affect the configuration of the router at all.
As for the device specifications, it is worth highlighting the connection speed via LAN ports, which is 100 Mbit/s, and the connection speed via a wireless channel, which is 450 Mbit/s.
Instructions for setting up the TP-Link TL-WR940ND router
- Authorization
- Changing the factory password
- Setting up an Internet connection Setting up a PPPoE connection (Rostelecom, Dom.ru)
- Setting up an L2TP connection (Beeline)
- Configuring PPtP (VPN) while automatically obtaining a local IP address (DHCP)
- Setting up PPtP (VPN) with a static local IP address
- NAT when automatically obtaining an IP address (DHCP)
Preparatory actions
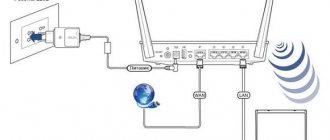
All work related to setting up the mentioned router is done through the web interface. You can log in only after preparing the device itself. This operation includes connecting it to the computer using a local network cable and connecting the network equipment to a wire from the provider. In this case, you will need to choose the optimal location in your house or apartment so that there are no problems with laying cables, and the Wi-Fi coverage area covers all the necessary areas. Another thematic article on our website at the link below will help you figure out the connection.
Read more: Connecting a TP-Link router to a computer
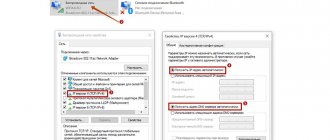
The preparatory actions are not yet completed. Often the WAN protocol from the provider is the type of connection that requires manually entering the IP address and DNS servers. Because of this, the settings set in the operating system may cause conflicts. To avoid such situations, we advise you to check your settings immediately. All you need to do is set the receiving IP address and DNS server to the “Obtain automatically” state. The parameters responsible for this rule are located in the properties of the network adapter. Find detailed instructions on this in our separate material.
Read more: Windows Network Settings
All that remains is to make sure that the router is running and connected to the computer. After that, feel free to move on to the next stage of our guide.
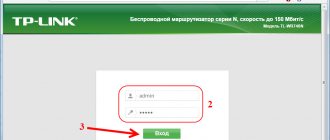
Authorization
In order to get to the router’s web interface, you need to open your Internet browser and type 192. 168.0.1 in the address bar, Username - admin , Password - admin (provided that the router has factory settings and its IP is not changed).
Resetting the router to factory settings
Resetting the Link device to factory settings is done using a special button on the case or in the “Control Panel”.
Using a button
Take the WR940N, turn it over, find the RESET or WPS/RESET button, usually recessed into the case, press it and hold it for 10 seconds. All indicators on the router (depending on the model) will blink, which will signal that the parameters have been reset.
In the "Control Panel"
Go to the “System Tools” - “Factory Resets” menu and click the “Restore” button. A warning will pop up, click Ok. Link will reboot, thereby “rolling back” the settings to the factory settings.
Changing the factory password
To ensure that no one but you can enter the router settings, you need to change the password to enter the settings.
To do this, select on the left in the menu System Tools - Password and enter the settings:
Old User Name : old user name, enter admin Old Password : old password, enter admin New User Name : enter a new user name, you can leave admin New Password : enter a new password Confirm New Password : confirm the new password
Regional defaults and other settings
To avoid problems with connecting to the network, you should immediately set up regional standards. This applies not only to the interface language, but also to parameters such as date and time.
They are also related to the time zone, which also needs to be set manually.
All these settings are set in the “System Tools” section. To do this, use the “Time Settings” subsection.
This procedure is simple and does not take much time, but after it is completed, it is important not to forget to save the settings by clicking the “Save” element, otherwise they will not be applied, and the functionality of such functionality as, for example, “Parental Control” will not work. will be broken.
In the same section, you can change the standard password and login for accessing the WEB interface in order to protect against hacking. There is a special subsection “Password” for this purpose.
To change it, you will need to indicate the current login and password in the “Old User Name” and “Old Password” fields, and in the cells indicated below - once the new login and twice the password for confirmation.
Tip: To prevent your new login information from being lost, you should rewrite it or save it on another device.
If you encounter connection problems, you can additionally use the special “Diagnostics” subsection.
It provides such auxiliary functions for accessing the ping and traceroute utilities that will be useful primarily to representatives of the provider.
Rice. 7 – Basic information about settings
Setting up a PPPoE connection
- On the left select the Network , then MAC Clone
- Click Clone MAC address , then Save
- In the WAN Connection Type field: PPPoE
- User Name : your contract login
- Password and Confirm Password : Your contracted password.
- WAN Connection Mode : Connect Automatically
- After entering the above settings, click Save . The Internet is configured.
Network card settings
To begin with, I always recommend checking the operating system settings for connecting to the router. I’ll tell you using the example of “tens”:
- Go to “Windows Settings” through “Start”, go to “Network and Internet”;
- In the list on the left, select “Ethernet”, then in the main field we look for “Configure adapter parameters”;
- The “Network Connections” page will open, where you need to right-click on the network and select “Properties”;
- In the window that opens, look for protocol version 4 in the list and click “Properties”;
- In the “General” tab, you need to check the boxes to automatically obtain IP addresses and DNS server;
- Confirm that the settings are correct with the “OK” button.
Admin panel and easy setup
If anyone is interested, check out the review of the WEB interface:
I’m sure that all our readers already know this section by heart, but I’ll repeat it. To configure the TP-Link TL-WR940N router, you need to go to the “admin panel”. I’ll tell you what to do (the manual is relevant for any model of TP-Link equipment):
- Launch your favorite web browser in the address browser too! enter tplinkwifi.net in the line (if you have an old version of the router – 192.168.0.1 or 192.168.1.1);
- A login window will appear where you need to enter your username and password (admin in both fields);
- Click “Login”.
The system will prompt you to proceed to quick setup, for which you need to click “Next”. As a rule, this option is suitable for an ordinary user, so I will describe the procedure:
- On the “Auto-configuring Internet connection” page, you need to specify the country, city, provider and connection type (you can find out from the contract), click “Next”;
- On the “Wireless Mode” page, you can change the network name (SSID) and specify your security key, click “Next”;
- Apply the settings with the “Finish” button.
Another option for dummies is the available configuration on TP-Link TL-WR940N routers through the utility. If you purchased new equipment, a CD will be included. Insert it into the drive. Specify the desired router model and click “Quick Setup Wizard”.
Select your language and click Start. The wizard will offer you to go through all the steps to install and configure the router. All instructions are more than clear. After everything, click “Finish”.
I assume that these instructions will be enough for someone. But if you want to manually configure your router to take advantage of all its features, read on!
Quick setup for the admin panel in blue here:
Setting up an L2TP connection
- WAN Connection Type : select L2TP/Russia L2TP
- User Name : your contract login
- Password and Confirm Password : your contracted password
- We put an end to Dinamic IP
- Server IP Address/Name - server address or name (specified in the contract)
- MTU size - change the value to 1450 or less
- WAN connection mode - Connect Automatically (connect automatically)
- After entering the above settings, click Save . The Internet is configured.
Additional router settings (password change)
Tools – Time Settings” section, you need to set the current time and date, as well as standard time.
If you want to change the factory login and password, select “System Tools – Password ” .
Where “Old User Name” and “Old Password” are indicated , enter admin and admin (i.e., the login and password that were in effect previously). Enter your new login and password in the lines marked “New ” . Be sure to confirm your new password, remember it, and save any changes.
Detailed instructions for protecting your router settings can be found here.
After all settings are saved, reboot the router. It is now completely ready for work and you can now connect any devices that need the Internet to work - both via cable and Wi-Fi.
Thank you for reading the material, with respect, the author of the OK-WiFi.COM portal.
Certified computer network security specialist. Routing skills, creating complex network coverage schemes, including seamless Wi-Fi.
Default wireless network name (SSID)
2.4 GHz band; TP-LINK_XXXXXX (where X is a sequence of characters)
5 GHz band; TP-LINK_XXXXXX_5G (where X is a sequence of characters)
Default wireless (Wi-Fi) password
Indicated on the bottom of the router
Access to the web interface
login admin password admin
Current firmware version
Step 1 of 1 Connect the cable that our installers installed in your apartment to the Internet port, and connect your computer to any of the Ethernet ports. You can also connect your PC to the router via a wireless network, but at the initial setup stage it is better to use a cable.
Step 1 of 7
Open the browser, type the router address in the address bar, and press Enter. The router authorization page will open. Enter your username and password to access the router and press Enter.
Step 2 of 7
The router settings will open. In the left menu, click on the “Network” item. Select the “WAN” sub-item. The corresponding window will open. In the “WAN Connection Type” item, select “Dynamic IP” from the drop-down list. Click the “Save” button and wait for the settings to be applied.
Step 3 of 7
In the left menu, select “Wireless Mode” or “Wireless Mode – 2.4 GHz”. The “Wireless settings” window will open. In the “Wireless Network Name” field, we come up with and write a new network name. In the “Region” field, select “Russia”. Make sure that the “Enable SSID Broadcast” option is checked. Click the “Save” button and wait for the settings to be applied.
Step 4 of 7
In the left menu, select “Wireless Security”. The corresponding window will open. In the “Version” field, select “Automatic”. In the “Encryption” field, select “Automatic”. In the “PSK Password” (“Wireless Password”) field, we come up with and write a new password for the Wi-Fi network (at least 8 characters, using only English letters or numbers).
Step 5 of 7
Let's scroll down the page. Click the “Save” button and wait for the settings to be applied.
Step 6 of 7
If in the left menu there is an item “Wireless – 5GHz”, click on it and configure the 5 GHz network by analogy. The “Wireless settings” window will open. In the “Wireless Network Name” field, we come up with and write a new network name. In the “Region” field, select “Russia”. Make sure that the “Enable SSID Broadcast” option is checked. Click the “Save” button and wait for the settings to be applied.
Step 7 of 7
In the left menu, select “Wireless Security”. The corresponding window will open. In the “Version” field, select “Automatic”. In the “Encryption” field, select “Automatic”. In the “PSK Password” (“Wireless Password”) field, we come up with and write a new password for the Wi-Fi network (at least 8 characters, using only English letters or numbers). Let's scroll down the page. Click the “Save” button and wait for the settings to be applied.
Step 1 of 1
In the left menu, select the “Network” item, then IPTV (If the IPTV item is missing, no additional settings are required for television). In the “Mode” field, select “Bridge”. In the “Port for IPTV” field – select the port to connect the TV set-top box. Click the “Save” button and wait for the settings to be applied.
Be careful when following the instructions in this section. In case of an error in the actions, a visit to the service center will be required to restore the device. It is recommended to flash the router by connecting the cable from the PC to any of the LAN ports. When flashing a router via Wi-Fi, there is a risk of getting an inoperative device that can only be restored in a service center, or cannot be restored at all.
Step 1 of 3
Step 2 of 3
Open the browser, type the router address in the address bar, and press Enter. The router authorization page will open. Enter your username and password to access the router and press Enter.
Step 3 of 3
The web interface of the router will open in front of you. In the left menu, click on “System Tools”. Select the “Firmware Upgrade” sub-item. Opposite the line “Path to firmware file” (“File”) – click the “Select file” button; in the window that opens you need to find the file with the firmware. After that, click the “Upgrade” button.
Wait while the router updates its firmware, it usually takes no more than 15 minutes, and do not unplug the router from the power outlet during the update. After the router updates its firmware and reboots, you can start using it.
Step 1 of 12
Open the browser, type the router address in the address bar, and press Enter.
Step 2 of 12
If the “Create new user and password” page opens, in the “New user” and “New Password” fields we come up with and write the user name and password that will be used for further authorization in the router settings. We recommend using the username admin and password admin. In the “Confirm new password” field, re-enter the created password. Click the “Confirm” button.
Step 3 of 12
If the router authorization page opens, enter the username and password to access the router and press Enter.
Step 4 of 12
The router settings will open. If the interface is in English, check the presence of a drop-down list with a choice of language at the top right. If there is a drop-down list, select “Russian”.
Step 5 of 12
Select the “Advanced” tab. The “Status” page opens.
Step 6 of 12
In the left menu, click on the “Network” item. Select the sub-item “Internet” (“WAN”). The corresponding window will open. In the “IPv4” block, in the “Internet Connection Type” item (“WAN Connection Type”), select “Dynamic IP” from the drop-down list. In the lower right part of the current block (“IPv4”), click the “Save” button and wait for the settings to be applied.
Step 7 of 12
In the left menu, click on the “Wireless” item, then select the “Wireless settings” sub-item. The corresponding window will open, make sure that the item “Enable SSID Broadcast” is selected (“Wireless Network Name”) and write a new network name (it is enough to change/add one letter or number). Click the “Save” button and wait for the settings to be applied.
Step 8 of 12
If in this window (“Wireless Settings”) there are items “Security”, “Version”, “Encryption”, “Password” (“Wireless Password / RADIUS Password ") – fill them out. In the “Security” field, select “WPA/WPA2-Personal”. In the “Version” field, o (“Auto”). In the “Encryption” field there is also “Auto”. In the “Password” field (“Wireless Password / RADIUS Password”) we come up with and write a new password for the Wi-Fi network (at least 8 characters, using only English letters or numbers). Click the “Save” button and wait for the settings to be applied.
Step 9 of 12
If in the “Wireless settings” window there were no items related to password/protection, in the left menu click on the “Wireless” item, then select the “Security” sub-item. ). A. In the “Version” field, select “Auto”. In the “Encryption” field, also select the “Auto” item. In the “Password” field (“Wireless Password / RADIUS Password”) we come up with and write a new password for the Wi-Fi network (at least 8 characters, using only English letters or numbers).
Step 10 of 12
Scroll down the page, click the “Save” button, wait for the settings to be applied.
Step 11 of 12
If in the window (“Wireless mode settings”) there are items “2.4 GHz / 5 GHz” at the top right, click on “5 GHz” and configure the 5 GHz network in the same way. We make sure that the item “Enable SSID Broadcast” (“Wireless Network Name”) is selected and we write a new network name (it is enough to change/add one letter or number). Click the “Save” button and wait for the settings to be applied.
Step 12 of 12
In this window (“5 GHz Wireless Settings”), in the “Security” field, select “WPA/WPA2-Personal”. In the “Version” field, o (“Auto”). In the “Encryption” field there is also “Auto”. In the “Password” field (“Wireless Password / RADIUS Password”) we come up with and write a new password for the Wi-Fi network (at least 8 characters, using only English letters or numbers). Click the “Save” button and wait for the settings to be applied.
Step 1 of 2
In the left menu, click on the “Network” item, then select the “IPTV” sub-item. Make sure that the “IGMP Proxy” item is checked. If there is an item “Mode” and items for selecting a dedicated port for home television, in the “Mode” field select “Bridge”. If the port selection for IPTV is presented in separate drop-down lists, only for ports to which set-top boxes are connected, instead of the “Internet” value, select the “IPTV” value. Click the “Save” button and wait for the settings to be applied.
Step 2 of 2
If the choice of port for IPTV is presented in a single drop-down list “Port for IPTV”, select the port numbers to which the set-top boxes are connected. Click the “Save” button and wait for the settings to be applied.
Be careful when following the instructions in this section. In case of an error in the actions, a visit to the service center will be required to restore the device. It is recommended to flash the router by connecting the cable from the PC to any of the LAN ports. When flashing a router via Wi-Fi, there is a risk of getting an inoperative device that can only be restored in a service center, or cannot be restored at all.
Step 1 of 4
Step 2 of 4
Open the browser, type the router address in the address bar, and press Enter. The router authorization page will open. Enter your username and password to access the router and press Enter.
Step 3 of 4
The web interface of the router will open in front of you. Go to the "System" menu. In the “Files” section (in earlier versions of the firmware this section was called “Configuration”), click on the file name “firmware”.
Step 4 of 4
The “File Management” window will appear, in which click the “Select File” button to specify the firmware file. In the window that opens, specify the location of the file with the firmware for your device (file with the extension bin). First you need to extract the files from the zip archive with the firmware. Click the “Replace” button to start the firmware update procedure.
Wait while the router updates its firmware, it usually takes no more than 15 minutes, and do not unplug the router from the power outlet during the update. After the router updates its firmware and reboots, you can start using it.
Use a hard reset if you need to configure the device again (delete all user settings), there is no access to the web page of the router settings interface, after setting up the router, the Internet connection was not established or the access password was lost.
Attention! When performing a hard reset, all user settings will be reset to factory settings!
There is a recessed RESET (RESTORE) button on the device body, which allows you to reset the settings to factory settings. You can find the RESET, RESTORE button on the same side of the router case where the other connectors and buttons are located. In rare cases, the button may be located on the bottom of the router.
To reset the router to factory settings, follow these steps: Turn on the power to the router and wait until the device boots up completely. Press the RESET, RESTORE button using a pointed thin object (such as a paper clip) for 30 seconds, then release the button. After this, the router will reboot with default settings (factory settings) and will need to be configured again.
Configuring PPtP (VPN) while automatically obtaining a local IP address (DHCP)
- On the left select the Network , then MAC Clone
- Click Clone MAC address , then Save
- In the WAN Connection Type field: PPTP
- User Name : your contract login
- Password and Confirm Password : your contracted password
- Select Dinamic IP address .
- In the Server IP Address/Name we put the address or name of the server (specified in the contract)
- WAN Connection Mode: Connect Automatically.
- After entering the above settings, click Save. The Internet is configured.
WAN setup
Without the correct WAN configuration, you will not be able to connect to the Internet, and therefore all devices connected through the router will not have access.
This means that this stage must be done very carefully and without errors.
Before you begin setting up, it's important to know the type of connection your router will use to connect to your ISP. There are several options available here, which will be discussed below. In addition, it is important to know whether you need to bind to a specific MAC address of the network card.
All these parameters can be clarified by calling your provider's technical support service. It is possible that all these parameters are already somewhere in the accompanying documentation that you received when concluding the contract.
To be on the safe side, you can immediately duplicate in the router the MAC address of the network card of the computer to which Internet access was originally assigned. If you are sure that according to the rules of your provider such a binding is not required, then you can immediately proceed to the next setup items
Clone the MAC address for the router
The instructions below present two options for the setup steps for English and Russian firmware.
Select the item in the control panel “Network - MAC Address Clone” ( Network - MAC Clone) , and there you already need to click the inscription “Clone MAC Address” ( Clone MAC Address) . It is important not to make a mistake here - the computer must be exactly the one to which the Internet was originally connected by the provider.
Next, select in the “Network - WAN” panel and next to the inscription “WAN Connection Type” - the type of connection. This can be one of four types, and we will consider each of them in more detail.
Dynamic IP TP-Link
For this technology, select “WAN connection type - Dynamic IP address” in the line and , as a rule, you will immediately gain access to the Internet. To avoid repeating these steps every time, click the “Save” button and reboot the router.
Static IP TP-Link
We indicate “Static IP address” in the connection type and enter the IP address (field number 3 in the figure), which you found out from the provider’s technical support. Then we also save with the “Save” button .
PPPoe mode in TP Link router
To configure PPPoE in TP-Link routers, the procedure is similar to the previous two, only perhaps in addition to the login and password, you will also need an IP address.
L2TP or PPTP
Everything is the same, with the necessary parameters. And, of course, don’t forget to save the changes.
After all these procedures, if all parameters are recorded correctly, Internet access should appear and the status of the network icon in the lower right corner of the desktop should also change (the yellow triangle with an exclamation mark should disappear).
If there is still no Internet, it means that the settings have been entered incorrectly somewhere - check everything again step by step.
Setting up PPtP (VPN) with a static local IP address
- In the WAN Connection Type field: PPTP
- User Name : your contract login
- Password and Confirm Password : your contracted password
- Select IP address .
- In the Server IP Address/Name , IP Address , Subnet Mask , Gateway enter the data from the contract. In the DNS you can enter the DNS address of your provider.
- WAN Connection Mode: Connect Automatically.
- After entering the above settings, click Save . The Internet is configured.
Organizing an Internet connection
This is the most crucial moment. Immediately prepare a contract agreement with the provider. I'll tell you how to configure TP-Link TL-WR940N for different protocols.
PPTP and L2TP
In the left panel, select “Network” and go to the “WAN” section. Next, fill out the following points step by step:
- Set the required connection type;
- Fill in the “Username” and “Password” fields;
- Check the box next to “Dynamic IP”;
- Enter the server address in the required line;
- “Connection mode” is recommended to be selected as automatic;
- Apply changes using the “Save” button.
If your home Internet provider works with Static IP connection technology, you also need to fill in the fields IP address, subnet mask, default gateway, DNS.
To connect via L2TP protocol, use the same instructions. If you need help, write in the comments or online chat!
PPPoE
Here I will describe 2 options for setting up the TP-Link TL-WR940N Wi-Fi router:
- Dynamic IP:
- Specify the connection type;
- Fill in the “Username” and “Password” fields;
- In the “Secondary connection” line, leave a checkmark next to “Disable”;
- “Connection mode” select auto.
- Static IP:
- Connection type – PPPoE;
- We register a login and password;
- “Secondary connection” – select a static IP;
- Mode – auto;
- Next, click “Advanced”;
- In the window that opens, check the box next to “Use the following DNS server addresses” and fill out the bottom two lines according to your agreement.
After all settings have been changed and saved, reboot the router. In the main menu on the left, go to the “System Tools” section and select “Restart”. On the main page you need to click “Restart” and wait until it turns on again.
NAT when automatically obtaining an IP address (DHCP)
- On the left select the Network , then MAC Clone
- Click Clone MAC address , then Save (for more details, see the section Cloning a MAC address;)
- In the WAN Connection Type field: select Dinamic IP
- Click Save . The Internet is configured.
Specifications
TP-Link TL WR940N is a router for creating Wi-Fi networks and combining connected devices. It looks like a small rectangular box to which 3 antennas are attached. The device is available in three versions. Version information is indicated next to the barcode on the device box.
The picture shows the back panel of the device:
The main differences between the versions of the TL WR940N router:
- Version 3 (V3). Devices of this type have reduced functionality and can only be used as a router. The maximum connection speed is 300 megabits per second.
- Versions 5 and 6 (V5 and V6 respectively). Devices of this type have advanced functionality and can be used both as a Wi-Fi router and as a signal amplifier. The maximum speed is 450 megabits per second (450M option).
Technical characteristics of the TP-Link TL WR940N router:
| Device type | A combined type router that can work with both wired and wireless networks. |
| Number of ports | 1 incoming WAN port and 4 outgoing LAN ports. The throughput of each is up to 100 megabits per second. |
| Number and type of antennas | 3 fixed antennas with 5 dBi power. |
| Maximum speed | 300 megabits per second (version V3) or 450 megabits per second (versions V5 and V6). |
| Radio frequency | 2.4 GHz |
| Standards support | 802.11b/g/n |
| Operating mode | For version V3 - only as a router; for versions V5 and V6 - as a router and amplifier. |
| Encryption | 64-, 128- and 152-bit encryption using WEP, WPA, WPA2, WPA-PSK and WPA2-PSK. |
| WAN connection type | Dynamic IP, static IP, PPPoE, PPTP, L2TP and others. |
| Total wireless signal strength | Up to 20 dBm |
| Supported IP protocol | IPv4 only |
| Working temperature | 0 to 40 degrees Celsius |
| Dimensions | Approximately 20 x 14 x 3 cm |
| Operating system compatibility | Windows XP/Vista/7/8/10, Mac OS, Linux, UNIX. |
| Additional properties | The device can monitor bandwidth, filter IP and MAC addresses, and has built-in protection against DDoS attacks; The device is also equipped with a WPS button for quickly setting up a connection via a Wi-Fi network (access is encrypted using the WPA algorithm). |
Also watch the review in video format:
Setting up Wi-Fi on the router
Setting up a Wi-Fi connection. From the side menu, go to Wireless . In the window that opens, enter the following settings:
We set the parameters as follows:
- field ; : Enter the name of the wireless network.
- Region : Russia
- Chanel : Auto
- Mode : 11bgn mixed
- Channel Width : Automatic
- Click the Save button below;
We configure Wi-Fi encryption for each network. The passwords may be the same. In the side menu go to Wireless Security :
- Select the encryption type WPA/WPA2 - Personal(Recommended) .
- Wireless Password : enter the password for the Wi-Fi network. The password must not be less than 8 characters
- Click the Save . After saving the settings, you will be prompted to reboot the router; ignore this requirement (red inscription below).
A short review
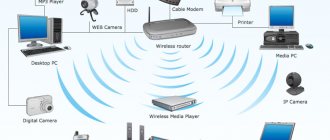
A wireless router with three antennas is suitable for home and small office space. The manufacturer claims a maximum data transfer speed of 450 Mbit/s, which is enough to watch high-definition videos, play online games and download large files.
The network device supports 3 operating modes: router, access point, signal amplifier. It is possible to configure using a Russified WEB interface or through the application for Android and iOS - Tether. Price – from 1600 rubles.
Main technical characteristics and capabilities:
- The operating frequency of the Wi-Fi module is 2.4 GHz;
- Protocol support – 802.11b/g/n;
- Transmitter power – 20 dBm;
- Antenna gain – 5 dBi (each);
- 5 ports (1 WAN, 4 LAN) – 100 Mbit;
- IPv4 and IPv6 support;
- Ability to create a guest network.
All specifications and prices are for the V6 model! On other versions the parameters may differ!
Watch a video review of the model here:
Saving/restoring router settings
After setting up, it is recommended to save them so that if problems arise, you can restore them. To do this, go to the System Tools Backup & Restore menu .
- To save the current router settings, you must click the Backup . The settings file will be saved to the specified location on your hard drive.
- To restore settings settings from a file, you must click the file selection button, specify the path to the settings file, then click the Restore .
Speed and signal strength test results
The penetration ability of the TP-Link RE450 turned out to be close to the declared one.
Testing was carried out in an office space of approximately 240 square meters. meters. The repeater was installed in the same office as the router (we determined the optimal location of the first by the indicator - it glowed blue). There we connected it to a stationary PC using the patch cord included in the kit. Another test computer was located in a remote room through 5 concrete walls and received a Wi-Fi signal. This is interesting: The best Wi-Fi amplifiers for the home: rating 2019
As expected, the wired connection showed the fastest connection speed. The speed of the LAN port in real conditions reached 330 Mbit/s, which is very, very good.
In second place is the 5-Hz Wi-Fi channel. The maximum reception/transmission speed through it was as much as 175 Mbit/sec. This is also not surprising, because the operating frequency of 5 GHz is used by a small number of devices today.
The lowest speed was shown in the 2.4 GHz range – 110 Mbit/s. However, this is also a completely acceptable level, considering how heavily loaded and noisy this channel is in office centers.
The signal level at both frequencies remained stable throughout the working day. No connection interruptions were observed.
This is what the TP-Link RE450 looks like in action
Port forwarding/forwarding
This function automatically redirects requests for certain services from the Internet to the appropriate host on your local network, located behind the router’s firewall. This function should be used if you want to create a server (for example, a Web server or mail server) on the local network behind the router’s firewall. Go to Forwarding, click Add New.
IP address - the network address of the device to which the request will be redirected Service Port - the number of the port that needs to be opened Protocol - Select the required protocol Status - Enable Click Save .
Conclusions and parting words
As you can see, for the TP Link TL WR940N model, the setup process is practically no different from the setup process for other routers.
This is available thanks to a simple unified interface, which is complemented by a full-fledged help system that provides hints for any operation performed.
At the same time, the advantage is that the firmware has a completely Russified certificate.
It is also worth noting the wide functionality that the device provides. Above, only the main part of the settings was discussed - exactly those that will be useful to all users.
But there are several more functions that are not provided by all providers, for example, IPTV.
Rice. 8 – Subsection “IPTV” with tips