- 27shared
- 2Facebook
- 20Twitter
- 5VKontakte
- 0Odnoklassniki
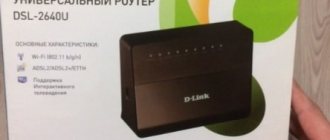
In this article we will provide detailed instructions for setting up the D-Link DIR-620 router. This router model has all the necessary functionality for distributing the Internet both “wired” and via a wireless Wi-Fi network. In addition to standard Ethernet connectors, the router is equipped with a USB port for connecting a USB modem, which provides connection to WiMAX and 3G GSM networks.
Brief characteristics of the D-Link DIR-620 router
| Characteristic | Meaning |
| Type | Wi-Fi router |
| Wireless Standard | IEEE 802.11n, IEEE 802.11g, IEEE 802.11b, IEEE 802.3, IEEE 802.3u |
| Frequency range | 2400-2462 MHz |
| Max. wireless connection speed | 300 Mbit/s |
| Antenna | 2 x 2 dBi |
| Wireless Signal Strength | 17 dBm |
| Wireless Security | WEP/WPA/WPA2, WPA-PSK/WPA2-PSK |
| Ports | 4xLAN 100 Mbit/s, 1xWAN 100 Mbit/s, 1 USB 2.0 Type A |
| Passing VPN traffic | PPTP, L2TP, IPSec |
| DHCP server | There is |
| Firewall | There is |
| NAT | There is |
| WDS Bridge | There is |
| Possibility of connecting a 3G/LTE modem | There is |
| Dimensions (WxDxH) | 147 x 114 x 33 mm |
Connecting a router
So, let's start installing and configuring the router. This will be done step by step:
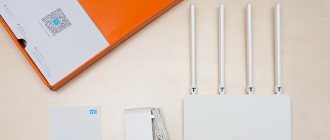
- First of all, we will connect your computer and router with the Ethernet cable included in the package. We plug one end of the wire into the connector of the PC’s network card, and the other into one of the four LAN ports on the rear panel (the ports are highlighted in blue).
- Next, connect a cable from an Internet provider or an ADSL modem to the connector marked “INTERNET”. The router also provides the ability to connect to the network via USB modems in WiMAX, 3G GSM or CDMA formats. If you plan to use this method of connecting to the Internet, insert the modem into the USB port on the front panel of the router.
- Now is the time to connect the router to the power supply, for which we plug the adapter plug into a special 5V/2.5A socket on the rear panel, and the plug into the socket.
LAN configuration in Windows 7/10
In Windows, open Control Panel – Network and Sharing Center. Next, on the left, click on the “Change adapter settings” link. All your network connections will be displayed here. If you previously used the Internet on only one computer and the provider’s cable was connected directly to it, then a high-speed connection will definitely be on the list. Now there is no need for it, since the router will now connect to the Internet. All we have to do is configure “Local Area Network Connection”.
Right-click on the corresponding icon and select “Properties” from the menu that opens. Then go to the Internet Protocol Version 4 settings.
On the “General” tab, set the radio switches to the “Obtain an IP address automatically” and “Obtain DNS server address automatically” positions. Save the changes.
Now we can connect to the router via wire and make the necessary settings.
Saving/restoring router settings
After making the settings, it is recommended to save them so that if problems arise, you can restore them. To do this, go to the System Configuration menu .
- Select saving the current configuration. To save the current settings of the router, the settings file will be saved to the specified location on the hard drive.
- To restore settings from a file, you need to click and select Load a previously saved configuration into the device , specify the path to the settings file, then click the button.
Today we will learn how to configure the DIR-620 router for such providers as Rostelecom, TTK, Dom.ru, Beeline and the like. Before starting the firmware, I recommend that you flash the router with the latest firmware using the instructions Firmware D-link Dir-620. This will save you from many problems and questions that arise during the process of setting up the DIR-620.
Connecting the DIR-620 router
Connecting the DIR-620 router is not difficult. Connect the cable from your provider to the “Internet” port, and connect the computer’s network card to the “LAN” port (preferably LAN1). Plug the router into a power outlet.
Also, if you have already tried to configure the router yourself, it is better to reset it to factory settings. To do this, you need to hold down the reset button for 10-15 seconds (until the router blinks all the indicators) and wait a couple of minutes until it boots up.
After this, I recommend setting up your network card to automatically obtain an IP address and DNS servers.
- In Windows 10, Windows 8, Windows 7, you need to go to the Network and Sharing Center (right-click on the local network icon in the taskbar). Then select “Change adapter settings”. Right-click on the network card and select “Properties”.
- In Windows XP, go to Control Panel and select Network Connections. Right-click on the network card and select “Properties”.
- You will see the connection properties window. Go to the settings of the item “Internet Protocol version 4 TCP/IPv4″
- The settings should be “Obtain an IP address automatically” and “Obtain a DNS server address automatically.” If not, make changes and click OK.
After this, you can proceed to the next step.
Setting up a PPPoe connection for Rostelecom, TTK, Dom.ru, etc.
Providers Rostelecom, TTK, Dom.ru use the PPPoe protocol to connect to the Internet, so the connection settings for them will not be different.
To set up an Internet connection on the DIR-620 you need to:
- go to “Advanced settings”
- On the “Network” tab, select “Wan”. You will see a list of connections. Click on “Dynamic IP”, then “Delete”.
- You will be back in the connection list. Click “Add”. On the page that appears, specify the following connection parameters (we do not touch the rest)
- Connection type - PPPoE
- Username - Your login from the Rostelecom agreement
- Password and password confirmation - Password from the Rostelecom agreement
- Click “Save”
How to log into the control panel of the D-Link DIR-620 router
To perform basic setup, let's go to the router's Web interface, or it can also be called the administration panel. To do this, in any browser, enter the address 192.168.0.1 , after which a window should appear asking you to enter your username and password. The default data is admin and admin .
If someone else used the router before you, then most likely the username and password have been changed. You need to find them out from the previous owner or you will have to reset the settings to factory values. We assume that you know the authentication information, so we move on.
Connecting DIR-620 to the Internet
Open the “Network -> WAN” tab and select the connection type to use. This information can be obtained from the provider that provides Internet access. User data (login and password) are indicated in the “PPP” section. The remaining parameters can be left unchanged if the provider does not provide recommended values.
Note! Some providers do not require you to specify additional settings for connection. It is recommended to check the connection immediately after turning on the router. If Internet access is successful, you can skip this step.
Setting up an Internet connection (WAN)
The sequence for setting up the D-Link DIR-620 router is given for the version with firmware 2.5.11. If your interface is slightly different, then there is nothing wrong with that, since the configuration principles remain the same.
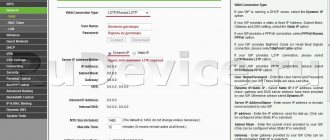
So, let’s immediately get down to the main thing – setting the Internet connection parameters. Go to the Network - WAN section. On the right, click the “Add” button and set the connection settings. All parameters necessary for connection must be provided to you by your telecom operator. If you don’t have the data, then try to find it out through your personal account or call the provider’s technical support.
We will look at setting the configuration using the example of a PPPoE (Rostelecom, Megafon, Dom.ru, Evo). Select it in the first drop-down list. Next, enter the name of the connection, and just below the username and password. If your Internet service provider uses MAC address binding, it must be specified in the “MAC” field of the Ethernet section. By clicking the “Clone” button, you can automatically write into the settings the MAC address of the computer from which you are connecting to the router. The MTU parameter located next to it determines the maximum size of a transmitted packet. Set it to 1500 as in the screenshot below.
At the very bottom of the settings page there is a group of “Miscellaneous” parameters. If you don’t know what they are used for, check only the boxes next to “NAT” and “Firewall”.
This completes the PPPoE connection setup. Save the configuration by clicking on the corresponding button. We make sure that a new WAN connection has appeared with the status “Connected”. A green indicator will indicate that the Internet network setup in the D-Link DIR-620 router interface has been completed correctly.
By analogy with PPPoE, other types of connections are configured, only the list of entered parameters differs. Below are possible WAN connection schemes:
- Static IP – you must fill in the fields IP address, Netmask, gateway IP address, Primary DNS server and Secondary DNS server;
- Dynamic IP – in some cases, requires setting DNS servers or an identifier;
- PPTP and L2TP – require entering a username, password and VPN server address.
3G setup
We will especially focus on setting up Internet distribution using a USB modem. We connect it to the port on the front panel of the router. Then, if the SIM card has a PIN code check, enter it on the 3G/LTE modem - PIN page.
Now go to the web panel to the already familiar Network - WAN tab. In the list of available connection types, select “3G”, after which we find the desired operator, for example, MTS, in the list of providers located at the top. All settings will be registered automatically. Save the changes.
Next, open the System – Configuration section and click the “Save” button to apply the settings made.
We return to the list of WAN connections and check the connection status. Everything should work.
Wi-Fi setup
You can configure the wireless network in the Wi-Fi – Basic settings section. Set the parameters: SSID (network name), location, channel, operating mode and maximum number of clients. If you need to “hide” the network, check the box next to “Hide access point”.
To protect your wireless local network from unauthorized users, go to Wi-Fi – Security Settings. In the “Network Authentication” list (set to “Open” by default), select a security technology. One of the preferred options is WPA-PSK/WPA2-PSK mixed with an access key.
Another way to secure your Wi-Fi network from unwanted guests is to set up a list of trusted MAC addresses. You do this in the Wi-Fi – MAC filter section. First, set the restriction mode on the “Filter Mode” page.
Then in the “MAC Addresses” window we add the addresses of those devices that are allowed to connect to your wireless network.
First of all, you need to configure the network on your computer/laptop to automatically obtain an IP address and DNS server.
After that, we go to the Web interface, I remind you that by default, ip 192.168.0.1 is used, which is what we enter in the address bar of any browser, for example Internet Explorer. Login admin, password admin (default). After getting to the Web interface, click the “Set up Wi-Fi” button.
You see the General settings , check the box Enable wireless connection , if you click on Advanced settings , you will be able to specify the MBSSID (allows one access point to serve up to four wireless networks with different settings at once) and BSSID (this is the physical address of the access point (MAC address) for corresponding network). These functions are used extremely rarely, which is why they are initially disabled. Let's leave them that way. Click “Next”.
We get to General settings , here you need to specify the SSID (wireless network name). We indicate the country; the regional signal settings and the channel number on which your Dlink will operate may depend on it. I recommend leaving the channel on auto. In the Wireless mode , I recommend choosing 802.11 B/G/N mixed, since this mode includes all possible Wi-fi standards. If you wish, you can specify the maximum number of devices that can connect to the Dlink dir-620, in this example I indicated 7, if the field is 0, then there are no restrictions. After you have specified all the parameters you need, click “Next”.
In the Security Settings Network Authentication field , I recommend selecting WPA-PSK/WPA2-PSK mixed. Many may argue that WPA2-PSK encryption is more reliable than WPA-PSK, but we must not forget that not all mobile devices and tablets support the WPA2-PSK encryption method. PSK.
In the PSK Encryption Key we enter a password that will need to be entered in order to connect to your Wi-Fi wireless network, I recommend specifying at least 8 characters with numbers, upper and lowercase letters and special characters, otherwise you never know, maybe your neighbor just out of curiosity or for other reasons wants to hack your network, with a high level of complexity, he will have to spend a lot of time to do this. In the encryption settings, I suggest leaving everything as it is. Click “Next”.
In the next window, we check the correctness of the specified parameters, if everything is correct, click “Save” . After this, all that remains is to check the operation of the router; to do this, on the device that we want to connect to the wireless network, turn on Wi-fi and after a few seconds we see the home network, click “ Connect” , enter the password that was specified in the settings.
If you connect to the router again via the Web interface and go to the path “Manually configure - Wi-Fi - Stationary list” , you will see the Mac addresses of devices connected to the Dlink dir-620 router.
After configuring the router, you can begin setting up a local network on Windows XP or Windows 7 , making a network folder or setting up a network printer .
I really hope my article helped you! Please share the link with your friends:
Changing the administrator password
Among the mandatory items for setting up the D-Link DIR-620 Wi-Fi router is the replacement of standard authorization data in the web interface of the network device. You can set a new password on the System – Administrator Password tab.
This completes the basic configuration of the D-Link DIR-620 router. We will devote separate articles to advanced router settings.
- 27shared
- 2Facebook
- 20Twitter
- 5VKontakte
- 0Odnoklassniki
Setting the Wi-Fi network name and password
After we have set up the Rostelecom Internet, let's set up a Wi-Fi connection. To do this, we need to return to the advanced settings tab. In the “WiFi” column, select “General Settings”. Here we will indicate the network name in the “SSID” field, the name that will subsequently be displayed in the list of wireless connections.
After entering the name, click the “Change” button.
Then go back and select “Security Settings” in the “WiFi” block. Here we need to make two points. 1) “Network authentication:” indicate “WPA-PSK2” - the most secure encryption method. 2) “PSK encryption key”, here we indicate the password for connecting to your network. You can specify any, but not less than 8 characters.
Don’t forget to save the settings by clicking on the “Change” button.
That's it, dear friends, this completes the setup of the d link dir 620 router for Rostelecom.