Dr.Web LiveDisk is an emergency disk for treating and restoring the Windows operating system in cases where the computer starts with failures or is not possible at all. The emergency “live” disk Dr.Web LiveDisk was previously called Dr.Web Live CD (Dr.Web Live DVD) or Dr.Web Live USB.
After loading the Dr.Web Live boot disk from a CD/DVD disk or from a bootable USB flash drive, you can take the necessary steps to treat and restore the system. Booting from external media, the so-called Live CD, will help solve problems and cure the system, even if Windows fails to boot.
The Dr.Web LiveDisk boot disk, in addition to treating and restoring damaged system components, can be used to delete undeletable files, to copy important information to another drive (external hard drive, flash drive), if there are doubts about the possibility of restoring Windows, to delete unnecessary files and so on.
The Dr.Web Live Disk disaster recovery system is based on the Linux operating system.
You can download the Dr.Web LiveDisk emergency boot disk from the official website of the famous Russian anti-virus company Dr.Web.
Download Dr Web Live
On the download page, in the “Sysadmin First Aid Kit” section, select the type of bootable media, depending on the configuration of your computer (no or not a CD/DVD drive):
- “Download to burn to CD/DVD.”
- “Download to record to USB.”
After clicking on the appropriate item, accept the terms of the license agreement. Immediately after this, the download of a disk image in ISO format for a CD/DVD disk, or a special Dr.Web application in EXE format for creating a bootable USB drive, will begin.
After burning Dr.Web LiveDisk to a flash drive or CD/DVD disk, you will have an emergency recovery disk for treatment and system recovery, or for saving user data if it is impossible to restore normal operation of Windows.
Burning a Dr.Web LiveDisk boot disk to a CD/DVD disk
To burn a Dr.Web LiveDisk disk image to a CD or DVD, you must use the system's disk burning tool, which is available in the operating systems Windows 7, Windows 8, Windows 8.1, or any disk burning program, for example, Ashampoo Burning Studio, ImgBurn, CDBurnerXP, etc.
In the appropriate application, select the Dr.Web LiveDisk CD image, and then burn it to an optical DVD or CD by selecting the “Burn image” option.
After recording, you will have a bootable Dr.Web LiveCD.
General description of the toolkit
We must give Dr.Web its due - the developers are tirelessly working to improve their antivirus and develop new options for combating any Internet infection. This happened this time too, namely they released a certain LiveCD which will actually be discussed in this article.
Although, if someone is too lazy to read, then we have a visual video format:
If it is inconvenient for you, then you can continue studying the article with pictures and everything else.
What kind of LiveCD is this? It is a shell (i.e., something like a stripped-down version of the operating system) based on Linux, into which a number of programs are built in (Mozilla FireFox and other varieties) and, in fact, the antivirus itself.
This miracle, being written to a disk and launched from this disk using the BIOS, boots as a separate operating system (without any installations) and allows, as I already said, to restore the functionality of a system affected by viruses on workstations and servers running Windows \Unix, and also, importantly, copy important information to removable media or another computer if the actions of malicious programs made it impossible to boot the computer.
Creating a bootable Dr.Web LiveDisk on a USB flash drive
Connect the flash drive to your computer by inserting the flash drive into the USB port. Run the Dr.Web LiveDisk USB file on your computer.
In the “Dr.Web LiveDisk” window, select the USB drive. It is recommended to check the box “Format the drive before creating Dr.Web LiveDisk” in order to delete all data from the flash drive before recording.
Next, files will begin to be copied to the bootable Dr.Web LiveUSB flash drive.
After the process is completed, you will see a message in the application window stating that the emergency recovery disk has been created on the USB drive. Click on the "Exit" button.
Complete instructions for Dr.Web LiveUSB: create, download, scan
There are cases when malware blocks the system, extorting money from the user, or damages system files so much that it is no longer possible to boot. This is where a powerful tool from Dr.Web comes to the rescue - Live USB, which can be written to a flash drive, booted and disinfected Windows. Here are complete instructions for using the Doctor Web bootable flash drive.
How to use Dr.Web LiveUSB?
The Doctor Web healing flash drive allows you to restore operation of an infected system from which it is impossible to boot. If viruses or other malware have damaged system files, then using Dr.Web LiveUSB (LiveCD - written to disk) you can boot from a flash drive and cure the OS, remove malware and try to restore important files.
How to download Dr. Web Live USB?
I'm sure you've come across websites where you can download Dr.Web Live USB from a torrent or some file hosting service - you don't need to do this! Download only from the official Dr.Web website, all further instructions will be based on the example of the official website.
And so, go to the Dr.Web website, and more specifically to the Doctor Web library of free utilities, here - https://free.drweb.ru/
On the top panel you need to click on Dr.Web LiveDisk
The Dr.Web LiveDisk page will open with a choice for downloading - LiveCD or LiveUSB. Select the second item - to record to a USB drive (LiveUSB).
In principle, there is no difference here, it’s just that a LiveCD is an ISO image that can also be written to a flash drive. But the second option (LiveUSB) is an EXE file, by running which it will be easier to install it on a flash drive automatically, without using third-party programs (such as UltraISO), as, for example, for LiveCD.
From the previous paragraph it became clear how these two files differ, and I think everyone chose LiveUSB, unless, of course, they firmly intend to write the antivirus to a flash drive and not to a disk. Next, you need to accept the license agreement to download the utility, scroll down the page and click on the button.
Next, wait for the Dr.Web LiveUSB utility to download.
Installing Dr.Web LiveUSB on a flash drive
Now, finally, the file for installing Dr.Web LiveUSB on a USB flash drive has been downloaded. Some points need to be taken into account before you start recording the antivirus utility onto a USB drive:
Your BIOS should support booting from USB-HDD (most likely there will be no problem with this)
In new computers, UEFI is replacing the BIOS, and the problem is that you can’t just boot into UEFI from a flash drive. If you have UEFI, then a little further you will find a detailed solution to this issue, for now follow the instructions.
Now let's move on.
We connect the flash drive to the computer, if there are important files on it, they need to be transferred to another location, the flash drive will be formatted..
Launch our downloaded Dr.Web LiveUSB utility. The utility installer window will open. In the drop-down menu, you must select the flash drive on which Doctor Web Live will be recorded.
Below, check the box “Format the drive before creating Dr.Web LiveUSB”.
Click the “Create Dr.Web LiveUSB” button. We agree with the warning about formatting the drive.
We are waiting for the process of downloading the utility to the flash drive. This will take some time. Further after the end, you will be notified about this.
Download from Dr.Web LiveUSB
Now, finally, we have reached the point of loading the computer with Doctor Web Live in our instructions. Now you need to make sure that the computer boots from a USB drive, and not from the HDD where the system is installed.
Insert the flash drive into the USB port of the computer/laptop and turn off the computer.
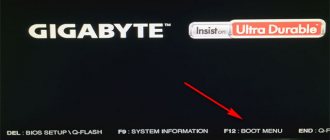
Now we need to enter the BIOS, how to do this is written in detail in this article. Usually this is the Del, F1, F10 key on the keyboard. There may also be combinations with the Fn key (often found on Lenovo laptops). Immediately after turning on, press this key or combination (it is better to press it many times and quickly before the system has time to boot).
Next, once you have entered the Bios, you need to find the item responsible for booting the computer from a USB device. Also, there is a detailed article on how to boot a computer from a flash drive. In short, we find the desired tab, usually “Boot”, and put USB in first place. That's it, press F10 and wait for it to load. If this happens, then it is better to put the HDD back in place, in the same way as above, naturally after finishing working with LiveUSB.
In most cases, when you start your computer, you can simply press the boot selection key (usually F12) and select from the list the device from which you want to boot (USB drive). In this case, you will not have to return anything, subsequent downloads will be the same as before (from the hard drive).
For those with UEFI
Booting from a flash drive is not as easy to do on new UEFIs as it can be done in old BIOSes. Therefore, you will have to disable the Secure Boot feature.
How to find out if a laptop has UEFI? And is Secure Boot enabled?
It's simple. Press the Windows key combination - Ctrl + R, type msinfo32 and press Enter.
Now look at the line “BIOS mode”, if there is UEFI, then you have a new BIOS. Now look at the line “Secure Boot Status”; if “disabled”, then the Secure Boot function is disabled in the BIOS of your laptop.
What to do if Secure Boot is enabled? We won’t go into depth here, this is a separate topic, here are detailed instructions for disabling Secure Boot in UEFI.
Now, we have completely figured out how to boot from Dr.Web LiveUSB on a computer or laptop, be it the old Bios or the new UEFI. Now let's move on to the instructions for using the Doctor Web boot utility.
Downloading Dr.Web LiveDisk on your computer
Set the BIOS to prioritize booting from USB or from a CD/DVD drive, depending on what type of boot disk from Dr.Web you are using. To be able to load Dr.Web LiveDisk on computers with UEFI, you must enable Legasy mode.
After loading the rescue disk, a window will open with a choice of boot options:
- Web LiveDisk - downloading the emergency disk Doctor Web Life Disk.
- Test memory - test memory using the Memtest86+ utility.
- Boot from first hard disk—exit Dr.Web LiveDisk, boot the operating system from the hard drive.
Switching between modes is done using the keyboard arrow keys.
By default, the DrWeb live disk window has an English interface language. To switch to Russian, press the “F2” key, then press the “↓” arrow key, and then press the “Enter” key.
Next, the configuration will begin in accordance with the hardware of this computer. Wait for the Dr.Web LiveDisk working environment to load.
DR.Web_LiveUsbTo install, download
the iso
image from the site ftp://ftp.drweb.com, write it to a disc, and start the computer from the disk.
1. When loading Dr.Web LiveCD
from the disk in the mode selection dialog box, specify the item:
DrWeb-LiveCD (Safe Mode)
or
DrWeb-LiveCD (Safe Mode no ACPI)
.
2. Dr.Web LiveCD
will boot in command line mode.
From the main menu, select Start Shell
.
3. To check the disks connected to the computer, run the mount command: /bin/mount
or just
mount
4. Connect the flash drive and check the connected drives again. A new disk will appear in the list, let's say it will be designated /dev/sda1
.
5. Run the create_usb command: create_usb sda1
For this operation we use another flash drive formatted in fat3
I’ll explain why this is so: if you stupidly copy it directly from a CD, it won’t work because it requires a disk when loading and that’s it…. Apparently something is written in the kernel
let's continue... Then copy the boot
and rename it to
Dr.Web
, then you need to create a menu, create the file
/boot/menu/drweb.lst
and enter the following into it:
foreground ffffff background 03bc19
title Dr.Web LiveUSB kernel /DrWeb/vmlinuz root=/dev/ram0 init=/linuxrc init_opts=4 quiet dokeymap looptype=squashfs loop=/DrWeb/module/white.mo usbroot slowusb vga=791 splash=silent,theme:drweb CONSOLE=/dev/tty1 initrd=/DrWeb/initrd
title Dr.Web LiveUSB (Safe Mode) kernel /DrWeb/vmlinuz root=/dev/ram0 init=/linuxrc init_opts=3 quiet dokeymap looptype=squashfs loop=/DrWeb/module/white.mo usbroot slowusb initrd=/DrWeb/initrd
title Return Back <== configfile (hd0,0)/menu.lst
title Reboot reboot
title ShutDown halt
and add a link to this menu to the main menu
title Dr.Web ==> configfile (hd0,0)/BOOT/menus/drweb.lst
All !!!
A few words about use: In order to be able to update the database, you need to do the following: after startup, by default the network is not running, and when it starts, it tries to get an address via dhcp
and often it is necessary to use statics; for those who are familiar with Unix, it will not be difficult to configure, but for beginners it will be very difficult; I will describe what needs to be done; go to the terminal
1) assign ifconfig address 192.168.1.*
2) add the default gateway
route add default gw
3) add the
DNS
/etc/resolv.conf
file , i.e. add the following lines
namesrver
<your dns server> 4) start the network
Dr.Web LiveDisk working environment
After loading the rescue disk, a desktop with utilities will open, which has a windowed graphical interface.
Dr.Web LiveDisk contains the necessary utilities to solve the necessary problems: the Dr.Web CureIt! anti-virus scanner, tools for editing the registry, file managers for copying or deleting files, etc.
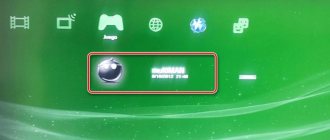
Some utilities are located on the desktop, other utilities can be launched from the system menu (green button located in the lower left corner of the boot disk window).
You may also be interested in:
- Dr Web online - virus scan
- Kaspersky Rescue Disk 18 - antivirus boot disk
Virus scanning in Dr.Web LiveDisk
Immediately after downloading, the healing utility Dr.Web CureIt will automatically launch! From the “License and Update” window, you can start scanning your computer for viruses by clicking on the “Continue” button, or click on the “Exit” button in order to complete other tasks first.
In the Dr.Web CureIt! anti-virus scanner window. click on the “Start scanning” button, or click on the “Select objects to scan” link to select additional objects.
Learn more about working with the Dr.Web CureIt! anti-virus scanner. can be read here.
Utilities in Dr.Web LiveDisk
The Dr.Web LiveDisk emergency recovery disk includes the following utilities as its main components:
- Web CureIt is an anti-virus scanner for checking and treating viruses.
- Web Updater - to obtain the latest databases and modules of the Doctor Web antivirus.
- Web Registry Editor - registry editor.
Doctor Web Live Disk includes auxiliary utilities:
- Midnight Commander is a console text file manager.
- File Manager PCManFM is a graphical file manager.
- Firefox is a Mozilla Firefox browser for accessing the Internet.
- MATE Environment Terminal is a terminal emulator for working with the command console.
The boot disk has tools for changing the date and time, network connection settings. The disk includes a text editor, you can take a screenshot, configure the monitor and keyboard.
Free programs for Windows download for free
The innovative software product Dr.Web LiveDisk is a replacement for the outdated DrWeb LiveCD-LiveUSB and makes it possible to create a bootable disk in CD/DVD format or use a USB flash drive as storage media. Regardless of the media, the free automatic anti-virus boot scanner Doctor Web Live SD or USB will thoroughly check the hard drive, RAM, BIOS, cache memory and other chips where viruses and other malware may be hiding in the computer’s safe operating mode, and carry out treatment. To begin with, without waiting for an emergency situation of force majeure, you need to download Dr. for free. Web LiveDisk for Windows 7, 8.1, 10 (32-bit and 64-bit), create a computer emergency disk, check and cure your computer or laptop.
Additional utilities will help clean your computer from system problems, incorrect changes and registry errors. It is important that Doctor Web LiveDisk allows you to get full access to all information on a damaged computer, save a backup copy of important data to a secure remote storage device or a “cloud service” on the Internet.
Dr. Web LiveDisk - antivirus boot disk
In cases where Windows OS does not boot or is inoperative due to infection by viruses, bootkits, rootkits, ransomware or other malicious activity, you will need one simple tool to restore your computer - an emergency boot disk. When to use Dr. Web Curelt! no and you need a boot disk, then you should take advantage of the latest version of Dr. Web Live CD free download for Windows or Dr. Web Live USB download for free via a direct link from the site https://programswindows.ru without registration and SMS. This software for restoring the operation of Windows affected by viruses is based on the Linux operating system and the powerful DrWeb Curelt! antivirus scanner, and is also equipped with additional utilities.
Advantages, interface and interesting functionality
The latest version of DrWeb LiveDisk is equipped with a sophisticated software engine, a nice graphical interface, a clear menu, advanced features for advanced users and up-to-date virus databases. A fairly new replacement for the Dr. program. Download Web LiveCD/USB for free for your computer to carry out work to restore the functionality of your computer or laptop even in the most difficult cases.
Work with Dr. Web Life Disk can be used either in a standard graphical interface, in advanced mode, or in the most secure command line mode for advanced users of Unix systems. For the average user, using a graphical interface is preferable. If desired, you can customize the appearance according to your preferences.
For those who have definitely decided to download Dr. Web LiveCD-LiveUSB for free in Russian under the new name Life Disk, you should pay attention to such interesting functionality as:
- The disk image with the latest anti-virus databases is updated several times a day,
- the ability to download new anti-virus databases from the official website via the Internet,
- support for the maximum number of devices without conflict at the hardware level,
- operation does not require loading the main operating system,
- viruses remain unused and do not enter RAM,
- Possibility of downloading over the network,
- fast, maximum or selective check at the user's choice,
- scanning using the DrWeb Cloud service,
- use of modern algorithms for searching for root kits, boot kits and other viruses,
- backing up information to a secure remote disk or cloud service.
How to create and use DrWeb LiveDisk
Any ordinary computer user can easily create an anti-virus bootable disk on their own. To do this, on a computer with OS Windows 10, 8.1, 7 (32-bit and 64-bit), you need to download Dr. for free. Web LiveCD for Windows in Russian and burn a CD or DVD blank or, using a regular flash drive, create a Boot Rescue Disk, for which you will need to first download Dr. for free. Web LiveUSB for Windows 10, 8.1, 7 (FAT32, 16 and NTFS file systems) without leaving the site https://programswindows.ru without SMS. Both of these tools, on CD/DVD or USB media, are equally well suited for fighting viruses and resurrecting the system.
After DrWeb LiveDisk has been created, you can proceed to virus treatment. On the infected computer, click “Restart computer” with a USB flash drive or CD/DVD in the drive inserted into the corresponding slot. While the computer is booting, go to Bios, go to the Boot Menu and select the disk with Live Disk as the boot disk. During the download process, do not forget to select the graphic mode in Russian and get to work. After starting the Control Center, you can simply click on “Scanner”, select a scanning option and click on the “Start scan” button. Automatic adjustment of the system registry when it is damaged by malware is done in the “Registry Treatment” menu. In addition, the boot disk from Doctor Web contains several more useful utilities.
LiveDisk Software Suite
Dr. Control Center Web LiveDisk brings together programs that can help tidy up your computer or laptop. Powerful antivirus program DrWeb Curelt! will scan, treat and generate comprehensive reports. Quarantine Manager works with neutralized threats, including allowing you to restore files from quarantine that ended up there when the scanner was triggered incorrectly. DrWeb Updater will help you update the anti-virus databases of the DrWeb Curelt scanner! Those who know how to do this will need a terminal to work with the command line. The built-in Mozilla Firefox web browser will allow you to find a solution to a non-standard problem on the Internet, for example, by visiting the official Doctor Web website. And to set up a local network and access to the Internet, if this does not happen automatically, there is a network setup utility on the disk.
The file manager will allow you to save valuable files in a secure location on other drives or even in “cloud storage” on the Internet. When working with the system registry, the file manager allows you to edit registry entries as text files, and the DrWeb RegEdit utility can restore the registry automatically or using user settings. The Sylpheed email utility does not have as much functionality as Mozilla Thunderbird or FoxMail, but it will allow you to send a few email messages while the process of restoring your computer to normal operation is not completed. The value of a simple text editor when Microsoft Word is not available is beyond doubt, and it is included on the Doctor Web disk. Changing the appearance of the graphical interface is done by a special utility for changing the graphical interface, which is accessible from the system menu.
The importance of using a permanent antivirus
If you do not delay, download Doctor Web Live Sidi USB for free in Russian for your computer without registration and SMS, then you will have a boot disk at your disposal for emergency treatment of the system with an antivirus and various utilities “on board”. Despite such a serious toolkit that provides the ability to fully treat a system from viruses, in order to protect against infection today it is imperative to use a permanent antivirus that runs on the computer in real time and uses effective technologies for searching, heuristic analysis, neutralization and creating screens appropriate to probable threats, including the use of proactive protection. We recommend downloading Avast Free Antivirus, Kaspersky Free Anti-Virus, AVG AntiVirus Free, Avira Free Antivirus, Panda Free Anti Virus, 360 Total Security, Microsoft Security Essentials or any similar antivirus for free.
Download Dr. Web LiveDisk CD-USB free
| Update from: | 02.10.2020 |
| Latest version: | 9 |
| Synonyms: | drweb livedisc, dweb liwedisk, drweb livedisk, drveb liwecd-liweusb, dweb live yuesbi, dweb live sidi |
| Operating system: | Windows 10, 8.1, 7 (32-bit and 64-bit) |
| File size: | 798 / 792 MB |
| Download for free: | Dr.Web LiveDisk for burning to CD/DVD |
| Download for free: | to burn Dr.Web LiveDisk to a USB flash drive |
Free programs download for free
You are now on the page “Dr. Web LiveDisk - Dr. Update Web Live CD - Live USB with Linux and Dr. Web Curelt! for Windows" website of the program for Windows. Thank you for visiting the Antivirus section.