A fairly common situation is when a flash drive is displayed in devices, but when you try to open it, a characteristic error message appears:
It is not clear what to do in this case. A quick search on the Internet made me understand that the user faced with this problem is offered all sorts of nonsense: format, reflash, throw away, etc. Don’t believe me? Google it and see, they keep repeating the same article, saying there is no section, viruses or something else... Occasionally you come across materials on low-level formatting. The general message is that although you can try to bring the flash drive back to life, the data there is already lost.
How to flash a USB flash drive
About the reasons
Every time people ask about the reasons. Explaining that “they didn’t throw anything, didn’t hit anything, it was on its own.” I usually say that her time has come. Well, in fact, it’s impossible to say specifically here. The problem is clearly not in the file system because the flash drive was “suddenly pulled out”, the problem is somewhere deeper. At the controller level.
And so they came to me with just such a malfunction and a request to restore the data. The fate of the flash drive itself was no longer of interest; what was important was a few files from it.
Is this really a flash drive?
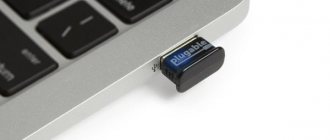
Before repairing the device, you must first determine whether it is really a removable disk at all. You will laugh, but there were several cases when users brought me USB card readers for MicroSD cards, such as in the photo or similar to them:
They quite seriously believed that it was a flash drive. When connected to a computer, it is identified as a removable disk, and since there is no memory card inside, when you try to open it, Windows writes “Flash drive says insert the disk into the device” and the drive letter D, E, F, G and the like. And you should have noticed the round eyes of these users when I told and showed that this is a card reader.
Solution
I’ll say right away that the solution is not suitable for everyone due to special conditions. But if you, like me, have friends with the necessary arsenal, you can try. I wrote about the arsenal in one of the previous articles.
How to recover data from a flash drive if the controller is faulty
Today there will be practice. Yes, this tool is PC3000 Flash. Open the link above in a new window, take a look at this equipment, it deserves attention.
Software failure in the flash drive
When the option described above does not help solve the problem with the “Insert disk into device” error, you can resort to specialized programs aimed at restoring external drives. There are a huge number of similar applications, and their operating principle is approximately the same. Applications allow you to format the drive at a low level, which is more effective than regular formatting using standard Windows tools. The following programs are suitable for this: USB Disk Storage Format Tool, HDD Low Level Format Tool and a number of others.
It is worth noting that some flash drive manufacturers, for example Transcend, produce their own utilities for formatting the drive at a low level. First of all, before downloading a third-party application, go to the flash drive manufacturer’s website and look for an official program for low-level formatting.
( 418 votes, average: 4.56 out of 5)
System Restore has been disabled by the administrator
Black screen when loading Windows
Related Posts
Stages of data recovery
The idea to write an article about this arose after I completed the task, so there may be some incompleteness and inconsistency, but I will try to describe chronologically and as completely as possible everything I did.
We disassemble the flash drive
It was easier for me - the owner of the flash drive did not mind deteriorating its appearance, so I simply broke the case with a nail puller. Most often you have to carefully separate the halves of the case and press the latches. It should look something like this:
Although there were some that were shrink-wrapped, or maybe even filled with compound. It depends on your luck. Most often they are naked. And the number of memory chips can be more than 1. On both sides. Here it is better to sign the order on the surface of the chip with a bright felt-tip pen. The first is on the same side as the controller, the second is on the opposite side.
The controller is a small square chip surrounded on all sides by legs. Will be in other photos.
Soldering the memory chip
As I do, I clamp the flash drive into the “third hand” - a special clamp. I lightly heat the memory chip with a hairdryer until it’s “very, very warm,” then I drip some flux under one row of contacts, for example, the one closest to me. And I start using a hairdryer to focus the hot air on this row.
When the flux begins to boil and steam, I use a blade to pry up the whole side and begin to wedge it apart. As a rule, the entire side of the terminals immediately comes unstuck. It is important here to continue warming up so as not to tear off any contact along with the track. I repeat the same on the other side.
Flux is absolutely necessary here - the heat is distributed more evenly, the contacts are clean and non-stick. And now we have the chip. Cool and wipe off any remaining flux. If you plan to install the chip back, you can prepare the contact pads on the flash drive - remove excess solder while it’s hot.
Just in case, let's rewrite the name of the controller - I was lucky, I came across Alcor AU6990 , this is a fairly common chip with a (usually) simple translator.
And this is me training. All flash drives were read successfully
Reading a memory dump from the chip
We install the memory chip in the PC3000 Flash reader.
Then it works in a special utility. It must be said that the chip is installed with some play. And until it can finally be read normally, you have to pull it out, clean it, move it, clamp it again, etc., it may take some time. To install the chip, there is a special mark in the direction of which you need to orient the key on the chip. If you mix it up, the utility detects it and curses, so it’s unlikely that you’ll be able to burn the chip.
So, we launch the utility, set the number of memory chips (in our case 1) and see the following:
The chip is unknown. We read the chip identifier. As I already wrote, this may not work the first time. But when it finally works out (I believe in you!), we will get something like this:
Now all that remains is to read the memory dump from this chip and then work with it, the chip itself can be installed back (in fact, I would not rush yet, if the data is not considered very well - I may have to re-read it again at a reduced speed, but for me this have not happened before).
The reading speed is not so great... But it can be even less.
So, the memory dump has been read. The problem is that the memory structure in NAND chips is fundamentally different from the data storage structure on a hard drive. If you can simply mount a disk image to the system and work with it as with a virtual disk, then this will not work.
How to mount images captured by dd in Windows
We perform ECC correction
ECC - Error Correction Code - in general terms, these are special codes for eliminating small errors in information encoding, such as checksums or recovery information. Memory chips are a very unreliable structure and every now and then the bits start to lie. Thanks to these (ECC) codes, we don't even notice the failures.
After reading the dump, we can create a special structure called “Transformation Graph”, where, in the form of a constructor, we can carry out various operations with the read data, combining functions in different ways with each other. And at any stage we can see what our data looks like until we get an acceptable result.
The fact is that in order to reduce the uneven wear of memory cells, recording in them is carried out using special algorithms, so we will have to “untangle” this tangle without a controller (which knows this algorithm) ourselves.
Select the “Auto detect ECC type” option.
If we are lucky, we will see something like this:
And after an affirmative answer:
And a long progress bar at the bottom... You can go have some tea, since the process is quite lengthy. But it’s nice when most of the lines are green (there are also a lot of red ones). At this stage, memory pages are adjusted taking into account ECC.
Defining the Encoding Algorithm
There are several possible solutions here.
- We have a controller model (AU6990), we can immediately select it as a translator, all that remains is to experimentally select the transformations;
- We have a model of the controller and memory chip, you can go to the “solution system” from the PC3000Flash developers and get ready-made transformation algorithms, if someone has already calculated for this combination of chip and controller, the easiest option. There are thousands of solutions in the system, as far as I have noticed;
- Automatic algorithm detection. If we get lucky.
Automation looks like this:
Then the program automatically tests various transformation options and looks for characteristic structures (I suspect the correct MBR); if the information is correct, then the selected algorithms are accepted for all other memory pages (but this does not always work correctly). For example, after a series of transformations we were able to read the beginning of the volume normally:
Here I wrote about the structure of the FAT file system, it helps a lot to understand.
Research of file systems. FAT. Chapter 1.
So, let's continue with the automatic selection of the translator. You can see it in the screenshot below. In the blue column we have the probability (in%) of using a particular translator, and below is the log.
The log shows that signs of using the AU6980 translator were detected (warm, but not), but the information was not confirmed. And then - everything worked out! The AU6990 translator was identified successfully and the information was confirmed. Probability 100%.
But that is not all. Now we need to add some transformations to the graph. Now I will show what preliminary transformations there are in general - there are many of them:
As you can see - a huge number. Most of them have additional parameters, in particular page sizes, number of blocks, offsets, etc. Not getting confused in them is already a feat.
And this is what the search system for ready-made solutions looks like:
On the right side of the window there is a search form. Then various options proposed by users will be given (probably they were able to complete the task using these transformations and they uploaded them to the common bank). Here I have highlighted the solution for my specific chip with a frame and an arrow.
For preliminary preparation, you need to change the page format. Let's add the corresponding function to the transformation graph and set the recommended parameters. You can open the parameters by clicking on the red leaf. Let's see this:
Data can be copied.
In the transformation column we indicate the change in page format:
Ready. Now let’s apply the translator algorithm with the following parameters (different from the default):
File system search
After generating the translator (assuming that we selected all the correct parameters the first time, which does not happen so often), we need to scan the resulting volume for the presence of file systems:
A small flash drive of 99% was formatted in FAT16/FAT32, so we will limit ourselves to the following filter.
Let's analyze the section data. Traces of the presence of two file systems were detected, from offset 8192 and 12496.
One of them turned out to be the one I was looking for - the files went with a bang:
There are situations when there are red indicators next to the files, this most often means that the conversions were performed incorrectly or the task was not completed. There are usually no problems for small files; they fit entirely on the page. Large files are “torn” into pieces, and these parts are joined incorrectly. Therefore we have to work further.
Well, my task is completed, I copied all the files to the optical disk, soldered the memory chip back (very roughly, the flash drive was scrapped), and to be safe, I unsoldered the power contact from the connector so that they wouldn’t accidentally plug it into the port and burn something something, because Several tracks stuck together during soldering, and I was too lazy to separate them. They will take it apart if they see it.
If you liked it - Like it! Send us flash drives, we’ll look at them in detail! There is an idea to edit a video, write if you are interested!
From scratch
If all the previously mentioned methods did not help, then only one remains. The most global. The media must be completely formatted. To achieve this goal, you must do the following:
- Launch My Computer.
- Among the lists of disks and drives, find your media, right-click on it on your computer mouse, thus calling up the context menu. The formatting window will launch.
- Here you need to either make a number of settings at your own discretion, or leave everything as default.
- Next, press the quick format key and just wait until the procedure is completed.
If none of the proposed options turned out to be useful, and important information remains on the media, you can only resort to the help of special service centers that will help you solve this problem without losing valuable data.
Nuances of power supply schemes
But let's assume that all ports are working normally, and the media itself is also fine (at least when connected to another PC or laptop, it is detected without problems). Another reason for the message that there is no connected storage device (the removable device is not recognized under any pretext) may be the most common lack of power for the correct operation of both the drive itself and the port to which it is connected. In this situation, first look at the displayed power supply diagram.
If it says economy mode, change it to balanced or high performance mode.
It also wouldn’t hurt to check the properties of all USB controllers and hubs, and on the power management tab, uncheck the boxes that allow you to turn off these components to save energy. If you are using USB hubs to connect, it is strongly recommended to disconnect all additional peripheral devices.
If you use the DISKPART toolkit to display a list of connected devices to work with an external HDD, the problem may also appear. True, the list will show something like “Disk 1 - no media.” In this case, the removable device may not be recognized only because the external drive requires an independent power source, and the power supplied through the port is clearly not enough. In this situation, if there is such an opportunity, you just need to power the disk from any other external source, for example, by connecting it directly through a special transformer adapter to the mains.
Other ways to fix the error
If the above methods do not help solve the problem, you can try to return the flash drive to a working state using the following methods:
- Software treatment using special utilities found using VID/PID data, or the universal JetFlash Online Recovery application.
- Low-level formatting, which will result in the complete removal of all information from the drive and clearing of memory sectors, including file system tables.
The saddest situation is hardware damage to the flash drive. In this case, you can extract information from the disk at a service center, and the media itself will have to be replaced with other, working equipment.
Restoring the firmware
In principle, if the main reason is damage to the firmware (controllers), special utilities from the hardware developer can be used to resuscitate the drive.
Today, for almost all brands (with rare exceptions), you can download similar tools directly from official resources. However, you can also use some universal programs like D-Soft Flash Doctor.
What should I do if, when connecting a flash drive, a message appears: “Insert the disk into the device”?
This situation is one of the most common when working with USB drives. The flash drive is connected, but the Windows operating system refuses to see it point blank. Or another common option, the system offers to format the device, and then reports that it is impossible to complete the formatting.
In this article we will try to analyze in detail why this happens and how best to correct such an error.
How to identify a problem with a flash drive?
Correct detection of a flash drive by the operating system depends on many factors that must be checked to identify and resolve the problem. That is why you should use a comprehensive approach to diagnosing the drive.
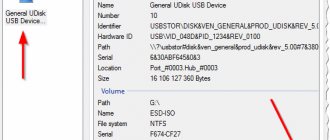
First, you should check the flash drive in the Disk Management . To do this, right-click on the “Start” and select “Disk Management” .
Another method, suitable for users of older versions of Windows , is to call the Disk Management . To do this, right-click on the “Start” , select “Run” and enter diskmgmt.msc .
In the utility window that opens, you can find all connected drives. Among them there should be a disk that matches the size of the flash drive. This disk can be displayed even if autorun does not occur, and it is also not displayed in the “My Computer” .
The lack of display of the flash drive in Disk Management is evidence that the following problems may have occurred with the drive:
- USB port is broken . To detect this, you need to use a different port or insert a USB flash drive into another computer.
- The media is not receiving power . Sometimes flash drives can have internal damage that limits power supply. In addition, there are media that require an external power source . In this case, you should check the cable .
- Problems with your drive, accessories, or computer . To eliminate all problems, you should try connecting the flash drive directly to the motherboard in different ports . A clear sign of an imminent failure of the motherboard are failing bridges that are connected to the USB inputs . To make sure that the flash drive is broken, you can check it on another computer.
"Insert disk into device" error when opening a flash drive
Dear friends, today we will discuss what to do if the flash drive does not open, it says insert the disk into the device. This problem is quite common on home and work computers, so it is important to know how to solve it. After all, it can happen completely by accident, and a device for storing and transmitting information tends to be urgently needed at the most inopportune moment.
Reason for error
But before we find out how to fix this problem, we will know its causes and consequences, which can prevent the problem from reoccurring in the future.
- Most often this happens because the flash drive has some damage. That is, long-term operation, mechanical failure, or software failure can act as such. For example, if you have been using the device for a very long time, and quite actively, then there is a possibility that its useful life has expired. Or if it comes into contact with water or hits a tile, resulting in the destruction or damage of some parts of the flash drive, you can also get this problem. A software failure will most likely indicate either improper use of the device or the above-mentioned expired service life.
- The last reason can also be caused by a virus attack. In the modern world, there is a wide variety of malicious codes that make the life of a computer, laptop, or tablet user darker. They affect, block, and destroy various sectors in the program, thereby making normal use of the product impossible.
Very often, the cause of problems with flash drives is viruses in the computer.
Despite the fact that the reasons can roughly be divided into two large groups, we will correct the current situation along one chain: from the simplest methods to the most advanced. It turns out that if the first method in the list did not help you, then you need to move on to the second, then to the third, and so on. Please note that some instructions may require an active internet connection to complete. Make sure in advance that some kind of antivirus is pre-installed on your computer.
In general, to begin with, since we are already talking about security programs, download and install an antivirus utility right now. Then conduct a full scan of your laptop or computer and remove any threats found (if there are any, of course). Then repeat the scanning procedure, only then proceed with the remaining actions.
It is also worth warning you that the information on the device will be completely erased. It will most likely not be possible to restore it, since the problem is serious. In any case, you can try to recover data using special file recovery utilities. Some manufacturers release them for their devices, making them available on the official website for downloading and installation on a personal computer.
How to fix?
- First, you should make sure that the problem lies in the flash drive itself. It is possible that it is not the device that is damaged, but the drive, USB input or any other connector. To do this, try installing it in a different input, or better yet, in a different computer or laptop. If you cannot start your information storage device on any of them, then the problems are related to it.
- If your computer sees the flash drive, but says insert disk, and everything else is fine, then you can try reinstalling the operating system, returning it to factory settings, or changing inputs and ports on the PC. That is, you solve the problem that you can diagnose. If your strength is not enough, it is better to turn to specialists, masters who have more experience in this field.
- So, if the problem lies in the flash drive, then we will need additional tools to work with.
But first, you should make sure whether the computer sees your flash drive. See if the special indicators on it are lit? Do notifications arrive on the operating system desktop? If a problem occurs when starting the flash drive program, when trying to open it, then everything is fine for now, you can move on to the next step. Otherwise, most likely, the device has become unsuitable for further use. You can try contacting the product manufacturer to determine possible solutions. - According to standard procedures for checking any type of gadget, conduct a full scan of the flash drive for viruses. If necessary, remove the threats found and scan for malware again.
- Just in case, look to see if the lock is installed using a special lock button on the device body. If it is, then change its position and try opening it in Explorer again.
- Now launch the “Control Panel”, go to the “System and Security” tab, select “Fix common computer problems” at the very top of the list that appears. In the new window, click on the “Device Settings” item located in the equipment and sound block. Follow the prompts in the dialog box to check for errors in this category. If they exist, then using their code you can find a solution on the Internet. Otherwise, move on to the next point.
- Also check for installed drivers for reading the flash drive.
Go back to the “Control Panel” and find the “Device Manager” item using the search. In the storage devices tab, find your flash drive, right-click on it and click “Update Drivers.” They can also be downloaded, if necessary, from the gadget manufacturer’s website. If the update does not help, then click “Delete” in the same list. After that, remove the gadget and connect it to the PC again. - Install the ImageUSB program on your computer, designed to clone information from one flash drive to another.
It can also help with recovery. Acronis True Image is an analogue of this application, you can use it too. - So, the flash drive does not open, it says insert disk. What are we going to do? We will try to format the device. Right-click on the flash drive icon and select “Format”. Leave the standard parameters in the window that appears and click “Start”. Wait until the procedure is completed and try using the product again.
- If the standard formatting method did not help you, then you should seek the help of third-party utilities. It is worth noting that when formatting, it is better to use the “fast” cleaning method (selected using a checkbox), since after this there is a chance to restore the information using various specialized programs.
- If none of the methods help you, then contact the support service of the device manufacturer. Or you can call a specialist, go to a repair center, where they will also try to help you.
Conclusion
Friends, today we discussed in detail the question of what to do if the computer sees a flash drive, but says insert disk. We learned that the cause of this problem can be grouped into two large groups:
- software and hardware problems;
- damage from a virus attack.
The solutions can also be briefly described as follows:
- Make sure there are no problems with the ports and inputs of the computer.
- Checking a flash drive using standard Windows tools or any other OS you use.
- Removing and reinstalling (updating) the read-write driver.
- Virus checking and cleaning.
- Copying data using third-party utilities.
- Formatting using standard methods, as well as programs from other developers.
- Data recovery using special applications.
- Seek help from the manufacturer, specialists and craftsmen.
Source: https://nastroyvse.ru/devices/raznoe/pri-otkrytii-vstavte-disk-v-ustrojstvo.html
Different file systems
Windows recognizes the flash drive, but prompts you to format it first. This is due to the fact that the file system on the computer is NTFS, and the file system on the flash drive is RAW. This happens due to a logical error in the media.
You can format it right away, but if the flash drive contains important documents or memorable photos, this option is not suitable.
There are a couple of ways to recover information:
- A program for recovering deleted data (there are a lot of them on the Internet, after installation you need to follow the instructions).
- Convert the file system to the original one.
The operating system has a built-in utility chkdsk , here are the steps you need to take:
- run command line as administrator;
- enter the command “chkdsk T: /f” (T is the name of the flash drive, it may be different for everyone).
This usually helps and the original system is restored. If a message in the format “chkdsk is not valid for RAW disks” appears, recovery is impossible. You need to return to the first point and then format the drive.
Checking ports in BIOS
But the matter can be complicated by the fact that even the Device Manager may display error information, which most often reports that the device is disabled. At the same time, it may not be possible to activate it through the RMB menu on the selected element, and the system will remind you with enviable consistency that there is no connected media. The removable device in this case may not be recognized only because the use of USB ports is disabled in the primary system, for example, by the computer administrator, so that the user does not accidentally introduce virus threats into the system.
To fix the problem, go to the BIOS/UEFI settings immediately after turning on your desktop computer terminal or laptop, find in the advanced settings (Advanced) something like USB Legacy Support or USB Storage Detect and set this parameter to the active state (Enabled), then save changes (F10 + Y).