Diagnostic methods and search for reasons for disk loading
Why not? The first thing that comes to mind at such moments is to see if everything is in order in the Task Manager. By sorting all processes by percentage of HDD load, there is a chance to find the culprit. Well, any schoolchild knows the “Ctrl-Alt-Delete” combination.
Task Manager
On the Processes tab, sort the Disk column in descending order and find the processes that load the local disk as much as possible.
By right-clicking on the desired line, you can immediately cancel the task and see if it helped or not. The worst thing is when the disk is loaded by the System process (ntoskrnl.exe), then identifying the cause can be difficult and the options listed in the article will come in handy.
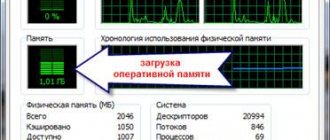
If you need to see a graphical summary, go to the Performance tab:
Resource Monitor
Another option is to look at the Resource Monitor. In such cases, it is used less often, but if the need arises, it can be opened by clicking the “Open Resource Monitor” link in the lower left corner of the window in the previous screenshot, or running perfmon /re :
Here we open the Disk tab, sort in descending order by the “Total (bytes/s)” column and find processes that are actively using the hard drive. In the middle part of the window, you will see the specific files that are currently being read or written to by the selected process.
On the right in the dynamics you can also see graphs of the exchange rate with the disk and the queue length. The disk queue should usually not exceed 2, otherwise the disk system is overloaded and incoming I/O requests cannot be processed in time.
System Monitor
For advanced users, you may want to examine the performance counters in System Monitor. You can run it using the perfmon .
The average person usually does not need to use these advanced Windows performance diagnostic tools, so the matter is most often limited to the usual Task Manager.
CPU usage for no reason
It happens that in the standard Task Manager utility, processes that load the CPU are not visible, but the processor is still loaded at 100 percent for no reason. In such cases, you can turn to third-party programs .
Ways to resolve bootmgr or ntldr is missing error
Process Explorer is a program presented directly by Microsoft that will show absolutely all existing processes on the user’s PC and help get rid of them.
Let's look at the program in more detail.
System idle process is the % indicator of system inactivity . At the top of the screenshot you can see that the central processing unit (CPU) is not under load. This is normal operation of the PC, taking into account that there are no “heavy” programs running on it.
Interrupts is the percentage of system interrupts (during normal operation it should not exceed a couple of percent). In the second part of the screenshot, its indicator is several times higher than the norm, therefore, it is the culprit for the PC slowdown.
It is also common that the system slows down due to the svchosts.exe process. various viruses are often disguised as it . Next, we'll figure out how to get rid of them.
Once you have found the process that is loading your PC, you can begin to reduce CPU usage.
If the problem is Interrupts, then most likely the drivers are to blame , or rather their incompatibility with Windows or conflicts with each other.
It is worth paying attention to the drivers: chipset, motherboard, video card, Wi-Fi module, sound and network adapter.
Disabling indexing and Windows Search
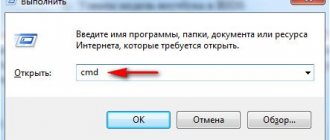
A frequently discussed topic, by the way. Judging by user reviews, this is often where the reason for the constant disk load at 100% lies. Initially conceived to speed up the process of searching for files, the Windows Search service can significantly load the system drive with its activity. You can stop this, again, by pressing the familiar “Win + R” combination and entering “cmd”. In the command line window that appears, you must enter net.exe stop “Windows search” and confirm by pressing “Enter”. After a short wait, the service will stop, but system search activity can be stopped completely by disabling indexing on disk. You can do this, as before, by right-clicking on the disk, and on the “General” tab, uncheck the indexing option.
Finding and removing viruses
If the CPU load problem is a virus, then it can be tracked in the manager or Process Explorer. Viruses are often disguised as system processes so that the user cannot remove them. Most often, this process is svchosts.exe, which creates problems with recognizing a virus in it, even for an experienced user.
Fixing the error - unable to connect to the proxy server
To recognize viruses, you need to boot into “ Safe Mode ”.
If you have Windows XP, 7 , when booting your PC, press F8 so that a “black” window appears, in which you select to boot in “Safe Mode”.
Windows 8, 8.1, 10 – you need to press Win+R, enter the msconfig command, go to the “Boot” section, click on Windows OS and check the “ Safe Mode ” box, save and restart the PC.
Once you are in Safe Mode, you can start scanning for viruses. There are enough programs on the Internet that check your PC for viruses without installation. One of these is Dr.Web Cureit. This can help relieve stress.
Temporarily disabling antivirus software
A surge in activity in antivirus programs often causes the local disk to become completely loaded. This is especially true if a full scan is in progress. Typically, identifying the load from antivirus software is quite simple in the Task Manager or Resource Monitor, as described above. After this, you need to try to temporarily disable the antivirus or remove the process there in the Task Manager, and evaluate its impact on the performance of the disk subsystem. If the cause is identified, you need to change the settings of the anti-virus software - mode, scanned file types, scanning aggressiveness, etc., or look for and try alternative software.
For an example setup in Symantec Endpoint Protection:
Main reasons for maximum load
There are many reasons for processor load and reduced performance. Among the main ones are:
- Driver malfunction;
- Many applications run in startup mode;
- The system is being attacked by viruses;
- The operating system is loaded by antiviruses;
- Hard drive problems;
- Peripheral equipment malfunctions, which affects the operation of the processor;
- There are many applications running at the same time;
- The problem is in the program code;
- Applications running in the background take up a lot of resources;
- The reason is a hardware malfunction;
Note! The performance of the processor can be affected by several reasons.
Driver problems
Each element of the computer operates under the control of a separate program, which contains all the algorithms for interaction with other devices. Such programs are called drivers, and sometimes the reason for the processor load lies in them. To fix the problem with faulty drivers, follow these steps:
- Go to the official website of the manufacturer and download the new version of the software for the device;
- Reinstall the driver and restart your computer;
Note! New driver versions do not always work correctly due to insufficient optimization of the program code. When downloading, pay attention to the “stable” mark. Its presence means that the program code is optimized and when using it there should not be any conflicts with the system.
Some drivers are difficult to find on your own and nothing is clear on the developer’s websites. In this case, use third-party applications that search for and install missing software.
A large number of programs in startup
Among modern applications installed on a PC, there are increasingly software products that, after installation, begin to work in startup mode. It means:
- The program automatically starts when the computer is turned on;
- In startup mode, the application gains access to the Internet, downloading updates without notifying the user;
One or two applications won't put much stress on the CPU, but 5 - 10 will become a serious problem. The problem is resolved like this:
- Press Ctrl+Alt+Delete at the same time;
- Launch “Task Manager”;
- Select the “Startup” tab;
- Select unnecessary programs and click the “Disable” button;
Viral activity and virus miners
Working on the Internet is accompanied by the risk of catching a virus that loads the processor, interfering with its operation. Most often, viruses are disguised as system processes, and identifying them even with the help of an antivirus program is extremely problematic. In this case, the following action will help:
- Restart the system and load Windows 7 in “Safe Mode”;
- To do this, during the reboot, press the F8 key, after which we select the mode we need;
- After activating the operating system, check it for viruses. To do this, it is not necessary to download and install separate antivirus software. There are services on the Internet that allow you to do this without installation on your computer. Dr.Web offers a similar service;
Antivirus activity
The operation of the central processing unit (CPU) can also be affected by the operation of the antivirus. The fact is that even when the system is idle, when the user does not perform any actions, the antivirus routines do their job, monitoring the system in search of the enemy. If the computer is weak or the antivirus is not configured correctly, failures may occur during operation. You can eliminate them this way:
- We configure the operation of the antivirus by choosing economy mode or disabling unnecessary elements;
- We change the antivirus to a less resource-intensive one;
- We update computer hardware to new ones;
There are no other effective ways without the risk of damaging the OS or antivirus.
The hard drive is loading the processor
The hard drive affects the processor in two cases:
- The hard drive fails, causing the performance of the OS and, as a result, the processor to suffer;
- OS updates are being installed, which affects the performance of the processor;
The first problem is solved by purchasing new equipment. Yes, it is expensive, but over time the hard drive will completely fail, and you simply will not be able to start the computer. The second problem is resolved like this:
- We wait for the download and installation to complete, after which we continue to go about our business;
- Disable auto-downloading of updates;
There should be no other reasons for the drop in processor power due to the hard drive.
Problems with peripheral equipment
When connecting third-party equipment - a mouse, keyboard, printer or scanner, the drivers may not install correctly. Because of this, conflict situations arise in the operation of the peripheral device and the OS, which leads to the allocation of additional processor resources to solve the problem.
Steps to resolve the problem:
- We turn off the peripheral equipment one by one and monitor the response of the processor. If after disconnecting a device the load disappears, reinstall the drivers;
- The drivers on the device are installed, but do not work correctly. This shows up in Device Manager;
Often, the computer itself signals that drivers are installed incorrectly, but you simply do not pay attention to this, continuing to work on programs that are not native to the equipment.
A huge number of running processes
The simplest reason why processor overload occurs. The fact is that each process, even not visible to you, takes a certain amount of energy from the processor, forcing you to monitor its actions. Resources are not unlimited and at some point the computer will begin to slow down, thereby indicating overload. It’s easy to deal with the problem - close unnecessary applications. This will unload the processor and the performance of the operating system will return to normal. It is not necessary to close all applications. Choose those that are least used at the moment or those that are quick and easy to open when the need arises.
Important! Develop the habit of not being lazy and closing unnecessary pages on the Internet, applications that are no longer needed. You will notice how your PC's performance will increase and its performance will stabilize.
Software type problem
Software-type problems include unstable operation of a particular application. For example, Chrome loads your CPU at 100 percent. In this case, closing the application, deleting it, and then downloading a new version will help. Often such troubles arise due to the installation of unlicensed software in which the program code is damaged.
Such an application does not work optimally, taking away extra resources from the processor that were not required when running the licensed product. If reinstallation does not help, then the problem is not in the program. Most likely, the computer is infected with a virus or the hard drive is becoming unusable.
Running background system processes
After turning on the computer or laptop, Windows automatically performs a huge number of system processes, and they do not stop even when the user does not perform any active actions. The System.exe process is responsible for their operation, which is checked first when suspicion arises.
They cannot be disabled, since the operation of the OS directly depends on them, be it Windows 7 or Windows 10. Other operating systems are built on a similar principle. The following things affect the workload of this process:
- Windows Automatic Update Service;
- Operation of anti-virus programs;
- Action of viruses;
Optimizing or eliminating these causes will return your system processes to normal, stabilizing your PC.
Obsolescence of the computer and processor in particular
As in the case of a hard drive, the processor does not last forever and its working resource is gradually spent. This happens due to:
- Long service life of equipment;
- Inappropriate conditions for maintaining equipment;
- Manufacturing defects;
- The computer worked in intensive mode, subjected to constant overloads;
All this cannot have a positive effect on the operation of the equipment. You can solve a problem related to the technical side of the process using the following algorithm:
- Clean the system unit by removing all dust and dirt using a vacuum cleaner. Pay special attention to cooling systems, since an increase in the temperature of the processor overloads it, gradually disabling it. You can determine whether the processor is heating up or not using special applications, which are available in large numbers on the Internet. If cleaning does not help and the equipment continues to heat up, change the thermal paste covering the top of the processor;
- Check the functionality of the OS when running simple applications such as Notepad or Paint. If the “Process Manager”, when starting them, shows the processor load at least 50%, and it does not drop, I recommend paying attention to new computer models, replacing the old hardware with new ones;
A step-by-step check of the PC for all the reasons listed above will reveal the problem and performance will return to normal. The main thing is not to rush, carefully performing all stages of checking the malfunction.
You can also read articles on the topics: The computer does not boot beyond the motherboard splash screen and The light on the motherboard is blinking.
Disabling Windows Updates
This is also a good solution to the problem. For many, the hated updates from Windows Update often ruin the lives of ordinary users. In what cases can you expect high load on the disk subsystem:
- when automatically scanning the system for installed patches;
- when downloading updates from the Internet;
- directly when installing updates.
You may be surprised by the high activity if you have set Windows Update to fully automatic installation mode.
You can disable Windows Update through the Services snap-in. Again, type “Win+R” on the keyboard and enter services.msc . By right-clicking on the service name, you can disable it by selecting “Disabled” in the context menu.
Similar result using commands:
sc stop wuauserv
sc config wuauserv start= disabled
Programs that actively use the disk
Despite the fact that this item is relatively rarely the reason for the load on the HDD in Windows 10, I recommend starting with it, especially if you are not an experienced user. Check to see if some installed and running (perhaps in startup) program is causing this.
To do this you can follow these steps
- Open the task manager (you can do this by right-clicking on the start menu and selecting the appropriate item in the context menu). If you see a More Details button at the bottom of Task Manager, click it.
- Sort the processes in the “Disk” column by clicking on its title.
Please note that it is not one of your own installed programs that is causing the disk load (i.e., it is first in the list). This could be some kind of antivirus that performs automatic scanning, a torrent client, or simply malfunctioning software. If this is the case, then you should remove this program from startup, perhaps reinstall it, that is, look for the problem with disk load not in the system, but in third-party software.
Also, any Windows 10 service running through svchost.exe can load the disk 100%. If you see that this particular process is causing the load, I recommend looking at the article about svchost.exe loading the processor - it provides information on how to use Process Explorer to find out which services are running through the specific svchost instance that is causing the load.
Disabling telemetry
In fact, telemetry has a small effect on the disk, but it still exists. There are rare cases when collecting telemetry loaded the hard drive so heavily, however, disabling it will not be unnecessary. This can be done through the Registry Editor. Again the combination “Win + R”, then enter regedit. The ultimate goal is to create a key that prohibits telemetry. To do this, you need to find an item called “DataCollection”, located at:
HKEY_LOCAL_MACHINE/SOFTWARE/Policies/Microsoft/Windows/DataCollection.
This is where you need to create a new DWORD value called AllowTelemetry, set this key to "0" and restart your computer.
Disk is 100% loaded on Windows 10: why, what to do and how to fix the problem
The stability of Windows and the programs with which the user interacts directly depends on the error-free operation of the hard drive. There is an issue in the Windows 10 operating system that has been carried over to the new Microsoft system from Windows 8.1. We are talking about loading the hard drive at 100% for no apparent reason while the computer is running.
In the “Task Manager” you can see to what extent various components of the computer are loaded, including the hard drive. If the hard drive is 100% loaded, the computer will begin to slow down greatly even when processing the interface. Every action will occur with a delay, and even simple work at the computer will become a real torture. In this case, a certain service may load the hard drive to its maximum capacity, or the problem will arise for no apparent reason.
If the disk is 100% loaded, there are several ways to get rid of the problem. They will help solve a problem that occurs briefly or persists for a long time.
Disabling file indexing and stopping search in Windows
Most often, the problem with the hard drive loading 100% occurs due to the Windows environment looping the file search process. In such a situation, you need to disable search for one time, if the situation does not repeat each time you boot the computer, or completely disable file indexing.
To stop the looping search in Windows 10 and reduce the load on your hard drive you will need:
A message will appear on the screen indicating that the Windows Search service has stopped. At this point, you need to launch the Task Manager and check if the problem persists. If your hard drive is still at 100% capacity, you can try disabling file indexing completely.
To stop file indexing on Windows 10, do the following:
- Press the combination Windows + R on your keyboard to launch the “Run” line;
- Next, enter the services.msc command in it to open the utility for interacting with services;
- In the list of services, find “Windows Search”, right-click on it and select “Properties” from the drop-down menu;
- In the “General” column, you need to stop the service by clicking on the corresponding button in “Status”, and then switch the “Startup type” to the “Disabled” position and click “OK”.
After this, indexing of files on the computer will be disabled even after a reboot. It is worth noting that disabling this option does not leave its mark, and searching for files on your computer will begin to take a little more time.
Disabling the SuperFetch service
Also often on Windows 10 the disk is loaded to 100% due to the SuperFetch service. It first appeared in the Windows 7 operating system, and its task is to increase the loading speed of folders, files and applications. When your computer is idle, SuperFetch minimizes resource consumption by programs that are not in use.
In practice, SuperFetch is of dubious benefit, especially on powerful computers. However, this service may cause problems loading your hard drive. To disable the SuperFetch feature:
- Launch “Services”, to do this, press the Windows key combination + R and enter the command services.msc;
- After the service management utility opens, find SuperFetch in the list of available ones;
- Double-click on it with the left mouse button and stop it, and then switch the “Startup Type” to the “Disabled” position.
Next, you just have to save the changes you made and restart the computer to test whether disabling the SuperFetch function affected the hard drive boot.
Disabling MSI mode
If the operating system is installed on a solid-state hard drive (SSD), then there should be no problems loading it. Moreover, this situation occurs due to the MSI mode, which is initially enabled in the Windows 10 operating system. Some SSDs may not complete I/O commands on their own when MSI mode is enabled and must be disabled.
To disable MSI mode on Windows 10 you need to:
- Press the Windows + R key combination on your keyboard and enter the command devmgmt.msc in the “Run” line, then press Enter;
- The “Device Manager” will open, in which you need to expand the “IDE ATA/ATAPI Controllers” menu;
- Next, you need to go to the properties of the standard SATA HCI controller by right-clicking on it and selecting the appropriate item;
- After that, go to the “Driver” tab in the top menu and click on the “Information” button;
- A window will open asking you to make sure that you are using a standard Microsoft driver. This is indicated by the inscription “Storahci.sys” as the executable driver file;
- Then you can close this window and return to the controller properties, where you need to switch to the “Details” tab;
- On it we need to copy the “Path to device instance” property. Save the value that is displayed when you go to this drop-down list item;
- After this you will need to launch the Registry Editor. To do this, press the Windows key combination + R and enter the regedit command;
- Next, in the left part of the registry, you need to follow the following path: HKEY_LOCAL_MACHINE\SYSTEM\CurrentControlSet\Enum\PCI\AHCI Controller Value\Device Parameters\Interrupt Management\MessageSignaledInterruptProperties
Please note: The folder name “AHCI Controller Value” will be a combination of letters and numbers , which was copied in step 7 of the instructions; - Having reached the required folder, in the right part of the registry window, double-click on the MSISupported parameter with the left button. In the window that opens, change “Value” to “0”.
When the instructions described above are completed, you must save the result and restart the computer for the changes to take effect.
(83 votes, average: 4.67 out of 5)
OkeyGeek.ru
Disabling the Connected User Experiences and Telemetry service
Another service for collecting diagnostics, or rather tracking a user, which is unlikely to be useful to anyone. The previous name of the service was Diagnostics Tracking Service. In the Task Manager, in the “Services” tab, it is called “DiagTrack”. We turn it off by selecting “Stop”. Now that it is temporarily suspended, you need to select “Disabled”, and by going to the “Recovery” tab, do not forget to put “Do not perform any actions” in the First Failure menu.
Similar actions can be performed using the commands:
sc stop DiagTrack
sc config DiagTrack start= disabled
Read a detailed article about disabling all telemetry in the “top ten” here.
Stopping Windows Performance Recorder (WPR)
WPR - aka Windows Performance Recorder, aka another telemetry. There is no need to explain what it actually does, everything is already clear. Again, the command line in the “Run” window and the next command:
WPR –cancel
Unfortunately, this method will only pause this service for the current session of use, and this action will have to be repeated the next time the system starts.
Read more about command options on the Microsoft website.
Updating SATA AHCI controller drivers
Since a detailed analysis of all possible reasons has begun, it is impossible not to touch on this topic. The most common causes of problems in Windows OS - blue screens (BSOD), freezes, slowdowns - are outdated device drivers.
The standard SATA AHCI controller driver (storahci.sys) is located in the Device Manager when its “native” driver is not installed on the motherboard. This driver is enough to not cause problems during operation in most situations, but for that matter, simply installing or updating the motherboard drivers often solves the problem of 100% disk loading.
Before installing the driver:
After
After updating drivers, restarting Windows is required.
CPU load due to overheating
The key parameter for stable operation of a computer is its temperature. If the CPU begins to overheat, then the user notices unstable system operation, freezes, blue screens and sudden PC shutdowns.
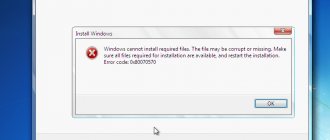
How to fix error 0x80240017 in Windows
To find out the CPU temperature, you should use third-party programs, for example Aida 64.
A computer can overheat for several reasons :
- Pollution . A computer or laptop requires constant cleaning (every 6-12 months), because during use dust accumulates in it, which impairs the operation of coolers and heat transfer of the radiator, thereby contributing to overheating. Solution : take the computer to a service center to clean it, or open the side cover yourself and carefully but thoroughly remove all accumulated dust. (If you are the owner of a laptop, you will have to take it to the service center)
- Cooler malfunctions . The main task of the cooler is to continuously supply cold air to the radiator to cool the CPU. If it malfunctions, the computer begins to overheat. You can verify the malfunction yourself; you should open the side cover of the computer and see if the cooler rotates normally (if there are any creaks or crackling noises). Solution : If the cooler is really faulty, you should immediately contact a service center to replace it.
- High room temperature . This problem is very relevant in the summer, it is hot at home and outside, therefore, the cooler will draw in hot air. Because of this, its cooling efficiency decreases significantly. Solution : You can open the side cover of the computer yourself and point a regular fan there. Special cooling stands are produced for laptops.
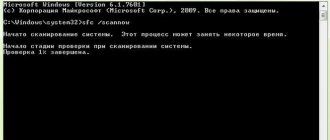
Disk check
It is also worth checking the integrity of the hard drive and the built-in file system check utility chkdsk. This is especially true if the computer has often been suddenly disconnected from the power supply during operation. You can check the disk by entering at the command line:
chkdsk.exe drive letter: /f /r
Screenshot with the utility launch keys:
Warning: The utility must be launched with administrative rights. If the system disk or the disk on which files are currently open is scanned, the utility will warn you about this and offer to scan after the next OS reboot. If the /R switch is selected and the disk is large, the scan may take a very long time.
Of course, no one forbids using third-party utilities, for example, TestDisk or SSDLife for owners of SSD drives - there are already a huge number of similar programs, both paid and free, but that’s not what we’re talking about today.
Other possible solutions
In addition to all of the above, we will consider all possible reasons for disk congestion, even the smallest ones. Disabling additional user tracking options can also give the system disk some fresh energy. You can do this by typing the key combination “Windows + I”, then in the “Privacy” section, look for what is currently enabled.
Setting your privacy options
Turn off notifications
Also, after pressing “Win + R” in “Windows Settings”, it would be a good idea to look at the settings for various notifications. They are located in the “System” section on the “Notifications and Actions” tab.
Disabling OneDrive
If you believe user reviews, the OneDrive service may also be involved in disk load. This phenomenon is quite rare, which is why it is described here, at the very end of the article. Disconnecting from this service is quite simple: usually its icon is located in the lower right corner of the screen, right-clicking the mouse will open its context menu, in which you should select “Options”. On the “Account” tab there is the same “Unlink OneDrive” link, and then the “Unlink account” button will appear. You can also completely uninstall Microsoft OneDrive in Programs and Features in Control Panel.