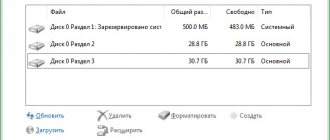
Reserved section
Microsoft Reserved Section. Microsoft Reserved Partition (MSR). One of the purposes of a partition is to be used in case of disk type conversion (simple-dynamic).
Since the UEFI specification in the GPT structure does not allow space to be reserved between partitions for OS needs, Microsoft uses a specialized MSR partition for these purposes.
It is a partition invisible in the usual Disk Management snap-in, which is used for the needs of the operating system. Not mapped to any file system. One of the purposes of a partition is to be used in case of disk type conversion (simple-dynamic). If you convert a basic (simple) disk to a dynamic one, the system will reduce the size of the MSR and use the freed up space to create a new partition on which to place the base of the dynamic disk. How is the MSR size calculated?
Manually creating EFI and MSR partitions on a GPT disk
Because the system does not boot correctly, we will need an installation disk with Windows 10 (Win 8 or 7) or any other boot disk. So, boot from the installation disk and on the installation start screen, press the key combination Shift + F 10 . A command prompt window should open:
Let's launch the disk and partition management utility:
Let's display a list of hard drives in the system (in this example there is only one, disk . An asterisk ( * ) in the Gpt column means that the disk uses a GPT partition table).
Let's select this disk:
Let's display a list of partitions on the disk:
In our example, there are only 2 partitions left in the system:
- MSR partition - 128 MB
- Windows system partition – 9 GB
As we can see, the EFI partition is missing (deleted).
Our task is to delete the remaining MSR partition so that at least 228 MB of free space remains unallocated on the disk (for MSR and EFI partitions). You can delete the remaining partition using graphical GParted or directly from the command line (that’s exactly what we’ll do).
Select the partition to delete:
Select partition 1 And delete it: Delete partition override
Let's make sure that only the Windows partition remains:
Now we can manually recreate the EFI and MSR partitions. To do this, in the context of the diskpart utility, run the following commands:
create partition efi size=100
Make sure that the 100 MB partition is selected (the asterisk opposite the Partition 1 line):
list partition select partition 1 format quick fs=fat32 label=”System” assign letter=G create partition msr size=128 list partition list vol
In our case, the Windows partition is already assigned the drive letter C :, if this is not the case, assign it a letter as follows:
select vol 1 assign letter=C exit
Main section
Basic data partition (Partition PatititonTypeGUID is EBD0A0A2-B9E5-4433-87C0-68B6B72699C7). Main data section. The partition on which the Windows OS was installed (in our system it is visible as the C: drive). Contains the complete OS directory structure: Program Files, Program Files (x86), ProgramData, System Volume Information, Windows, Users, that is, all OS data. Since the partition is the main and system one, it is formatted exclusively in the NTFS file system. However, partitions of the “Basic data partition” type can contain not only OS files; all newly created partitions through Disk Management are marked with this type. Partitions of this type can contain FAT32/NTFS file systems.
How to remove an encrypted disk. How to remove EFI partition from USB drive
I came across a strange hard drive, it seemed like it was Linux or MacOS. I deleted all the partitions, but one, using standard tools (Disk Utility and Disk Management) could not reach 200 meters.
In the context menu, select Delete Volume
... inactive.
Delete an encrypted EFI partition in Windows 7
You can use the console program
diskpart
.
1. Run cmd as administrator
2. Enter in cmd – diskpart
.
Diskpart
will launch in a new window
list disk – look at the list of disks select disk # – select the desired disk. instead of # we indicate the disk number clean - deletes all partitions or volumes on the disk list partition - checks that all partitions are deleted
4. Check the result in Disk Management
.
5. All partitions have been deleted.
efi partition efi partitions efi partition disk efi partition windows table mbr partitions system efi partition gpt efi system partition efi encrypted efi partition delete partition efi create efi partition format efi partition encrypted efi system partition partition efi mac efi partition mac os boot partition efi format efi partition fat32 format the efi system partition fat32 the efi system partition is formatted ntfs creating an efi partition format the efi system partition in fat32 format installed the efi system partition efi hard drive partitions restoring the efi partition delete an encrypted efi partition how to restore an efi partition open an encrypted efi partition how to delete an encrypted efi system partition size efi partition partition with efi in linux remove efi partition mount efi partition
The situation is as follows. Every time we try to install the UEFI operating system on Hackintosh or Apple computers, it creates an EFI partition on the selected partition of the disk, which will subsequently be displayed in the BIOS. It doesn’t matter whether you installed Windows on your Hackintosh or not - the partition has already been created.
EFI partitions are created by:
- OS X loaders for Hackintosh;
- Windows with UEFI installation;
- Linux with UEFI installation;
Since almost all modern motherboards have UEFI bios, almost everyone is susceptible to this phenomenon. I tried to install Windows several times without success, which created a number of EFI sub-partitions on each partition. In the list you can see 3 EFI NO NAME partitions, which I need to delete.
And everything would be fine, well, just think, they hang in the BIOS list and hang, but the difficulty was as follows. I was left with an unmarked space on the disk that, due to these EFI subpartitions, did not want to be attached to the disk.
I would like to note that you can format partitions to which EFI is attached in a Mac as many times as you like - it will not bring any result. Even when you reformat to NTFS, the partitions remain - you can see this in the growing list in the BIOS with each installation from UEFI, and subsequently it becomes increasingly difficult for the BIOS to determine the correct option from the boot list and instead of starting the system we see a black screen, the same reaction It may also be when calling up the settings of the BIOS itself and the BOOT MENU.
I searched the Internet for a long time on this issue, but unfortunately I never found any working answer!
- Many people suggest formatting to NTFS, but this does not solve the issue - Windows does not erase EFI; they continue to appear in the list;
- They write to do a lot of things through the terminal, but unfortunately that doesn’t work either.
- One of the torrents even offers to remove it using R-Studio. It actually sees all partitions, but does not delete anything.
Quit Disk Utility if it is open! Enter the line into the terminal:
defaults write com.apple.DiskUtility DUDebugMenuEnabled 1
This line will enable the Debug menu item
But in fact, everything is on the surface and you just had to look through the disk utility menu. Let's move on to the solution.
To complete the task, we need the good old disk utility, which is available before 10.9 Mavericks; Yosemite and El Capitan simply don’t have it, and the function we need is cut out from the new utility.
But enthusiasts helped us and the old disk utility is now available to us. Download old disk utility for Yosemite and El Capitan
Download, transfer the utility to programs and launch. At the moment, there are no hidden partitions in the sidebar, even if we mount them using EFI Mounter-v2.app, we will not be able to edit or delete them.
Go to the top panel of the disk utility settings -> Debug -> And check “Show every partition”, this is the function that is responsible for showing hidden partitions.
After which we show hidden sections. For me these sections were called NO NAME, you may have noticed in the upper screenshots. that there were 3 of them. How to delete!
Select the section -> go to the Erase tab and format it into the usual “Mac OS Extended (journaled)”, after which the section will be available for editing. We repeat the operation for other unnecessary sections.
But don’t even think about deleting the topmost partition, which is signed by EFI - this is the Mac OS bootloader, without it the system will not start. If you still deleted it before turning it off, be sure to install it again.
After that, select the entire hard drive -> go to the tab, select unnecessary partitions and click minus “-” to delete.
Then we free any partition of the hard drive, format it, and delete it by pressing the minus sign. After all that has been done, click “+” and create a new partition; this sequence will help to attach all unallocated hard disk space to the partition.
As a result, we again type diskutil list
to show all partitions on your hard drive.
As you can see, the issue has been resolved. The HDD has only one most important EFI partition with a bootloader. Entries in the BIOS from the list of bootloaders are also deleted.
Hello! Windows 8.1 won’t boot on a laptop with a UEFI BIOS and I can’t do anything. When loading, an error appears on the screen File:\EFI\Microsoft\Boot\BCD... I studied all the Internet articles on this topic, but in my case nothing helps.
What have I done?
- I booted from the Windows 8.1 installation disk and searched for the installed operating system with the bootrec /RebuildBcd
, and the error “
Scanning installed Windows systems completed successfully.”
Total number of detected Windows systems: 0 » - I deleted a partition (300 MB), an encrypted (EFI) system partition containing all Windows 8.1 bootloader files with the del vol
, then applied Automatic Boot Repair, the system re-creates this partition, but does not boot. I made this section active in the command line, which also did not help. - I also formatted the same partition (300 MB), Encrypted (EFI) with the command format fs=FAT3
and created it again. - I tried to write a new boot store for Windows 8.1 with the command bcdboot.exe C:\Windows
, where (C:) is the partition with the Windows 8.1 operating system installed and I again got the error Failed when copying boot files.
I entered commands that were successful, but Windows did not load.
bootrec /FixMbr
bootrec /FixBoot
I don’t know what else to do or how to restore the Windows 8.1 bootloader. Maybe you can give me some advice?
Hello friends! My name is Vladimir and I will answer this question.
If your Windows 8.1 does not boot and you have used all available tools to restore the bootloader, then you can delete the 300 MB encrypted (EFI) system partition, as well as the 128 MB MSR partition, that is responsible for booting the system and create them again.
In Disk Management you can only see the 300 MB encrypted (EFI) system partition, the 128 MB MSR partition is visible only in the command line when you enter the “lis par” command.
Note: If you do not have experience, do not perform this operation unless necessary, use other methods from the about section first. If you want to experiment on a working laptop, then do not start working without first creating a backup copy of these partitions, but rather create a .
We will delete and recreate partitions:
1. Partition (400 MB) containing the Windows 8.1 recovery environment (you can get rid of this partition altogether and, if necessary, use the recovery environment located on the bootable media with Win 8.1).
2. Partition (300 MB), encrypted (EFI) system partition containing all Windows 8.1 boot loader files.
3. Service partition MSR (Microsoft System Reserved) 128 MB, required for GPT disk partitioning.
We boot the laptop from and in the initial system installation window press the keyboard shortcut Shift + F10,
A command line window opens, enter the commands:
diskpart
lis dis (lists physical disks).
sel dis 0 (select a 931 GB laptop hard drive, and a second 14 GB drive - a bootable USB flash drive for Windows 8.1).
lis par (shows all partitions of the selected disk, we will delete the first three partitions).
sel par 1 (select the first section
del par override (delete the partition, to delete the ESP and MSR partition or the laptop OEM partition, you must specify the override parameter)
sel par 2
del par override
sel par 3
del par override
That's it, we deleted all three hidden sections.
Now, if we select a disk and enter the lis par command, we will see only two partitions on the laptop’s hard drive:
Section 4 - installed Windows 8.1
Partition 5 is a hidden recovery partition with factory settings.
We create a new encrypted (EFI) system partition of 300 MB, as well as a 128 MB MSR partition
Enter the commands:
diskpart
lis dis (display a list of disks).
sel dis 0 (select the laptop hard drive).
create par efi size=300 (create an encrypted (EFI) system partition of 300 MB).
format fs=fat32 (format it to the FAT32 file system).
Sometimes when you plug in a USB drive it shows EFI
and FAT32/NTFS. It's strange that if your USB is in this state, it's better to fix the format before using it to transfer data, as people might get confused about all the two new partitions showing up on their PC.
But Windows » Disk Management
does not allow you to delete this section. When you go to Disk Management by right-clicking on the problematic USB drive, you will find that all the options are greyed out. You can't delete volumes, and you can't "Shrink Volume" or "Expand Volume" to merge with other partitions.
It's OK. There is another way: DiskPart
to help.
Run command line as Administrator
>type
DiskPart
Then you want to list all the disks connected to your computer, enter the following command: DiskPart
List of disks
It displays all the drives on your system. Find your USB drive and select the drive
Select drive x (drive #)
Here is my USB drive showing as Disk 2, so for me I enter " select disk 2"
", Yours may be different.
Then enter
Clean
To completely erase the disk. It is normal if sometimes the DiskPart report finds an error: The system cannot find the specified file. See the system event log for more information.
As long as Disk Management shows all unallocated data for the USB drive, you have successfully destroyed the USB drive. This time it's time to prepare for reformatting.
Depending on your USB needs, FAT32 is a common universal format that is suitable for storing files on OS platforms.
That's all. Now your USB will no longer show two partitions when connected to a PC. You have successfully removed the EFI partition.
Push Button Reset section
An optional hidden partition designed to restore the system to the original "Invisible" recovery partition. MSR. Designated Microsoft Reserved. This partition is used for the needs of the operating system. For example, the partition is used in case of disk type conversion (simple-dynamic).
