Preliminary work
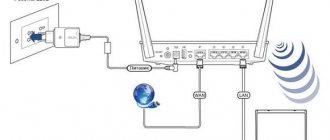
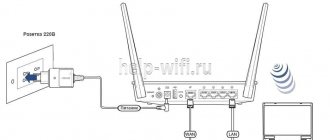
It’s worth starting with the fact that the Netis WF2780 router itself needs to be connected to the computer if it has just been purchased and has not even been unpacked. Try to take into account the length of the cable from your provider, as well as the network cable that comes with it if you connect the router to your computer via a local network. Use the instructions below to navigate the connection process yourself without any difficulty.
Read more: Connecting a router to a computer
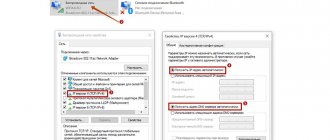
Once the router is detected by the computer, or at least ready to be configured, there is one more important step you will need to perform on the PC itself before moving on to the Netis WF2780 web interface. You need to enable automatic settings for obtaining an IP address and DNS servers so that no conflict situations arise when configuring protocols from your provider. Read more about this in the article at the link below.
Read more: Windows Network Settings
⇡#Technical characteristics
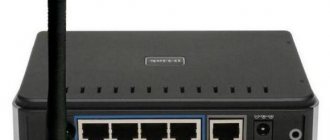
The netis WF2780 hardware is based on Realtek chipsets - perhaps the most affordable and widespread. According to information on the Internet, in this case a combination of an RTL8197DN CPU, an RTL8367RB gigabit switch and two radio modules is used: RTL8812AR (2×2:2 802.11ac draft) and RTL8192ER (2×2:2 802.11 b/g/n). This is practically a reference design from Realtek itself, which can be found in many products. Well, netis WF2780 is distinguished by the presence of four external antennas, two for each band. Perhaps for some this will be the deciding factor when purchasing.
| Router netis WF2780 | |
| Standards | IEEE 802.11 a/b/g/n/ac (2.4 GHz + 5 GHz) |
| Chipset/controller | Realtek RTL8197DN (660 MHz) + RTL8367RB + RTL8812AR + RTL8192ER |
| Memory | RAM 64 MB/ROM 8 MB |
| Antennas | 4 × external fixed 5 dBi; length 85 mm |
| Encryption | WEP/WPA/WPA2, WPS; 6 × guest network; WDS, TD+WDS |
| Maximum speed | 802.11ac: up to 867 Mbps, 802.11n: up to 300 Mbps, 802.11g: up to 54 Mbps |
| Interfaces | 5 × 10/100/1000 Mbit/s Ethernet |
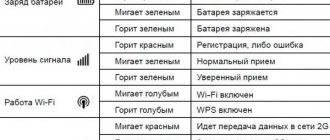
| Indicators | Power, 2 × Wi-Fi, 4 × LAN, WAN, WPS, status |
| Hardware buttons | Reset settings, WPS |
| Dimensions (W x D x H) | 145 × 155 × 33 mm (without antennas and stand) |
| Weight | 263 g |
| Nutrition | DC 12V 1A |
| Price | 3,900 rubles |
| Possibilities | |
| Access to the Internet | Static IP, DHCP, PPPoE, PPTP, L2TP; WISP + PPTP/PPPoE |
| Services | "Yandex.DNS"; WOL |
| Port forwarding | Virtual Server, Port Triggering, UPnP, DMZ (MAC/IP); IPTV LAN-Port, VLAN, IGMP Proxy; port mirroring WAN/LAN → LAN |
| QoS support | WMM; shaper (by IP) |
| Dynamic DNS Services | DynDns, NO-IP |
| Operating mode | Router, bridge (AP) + PPPoE; Wi-Fi repeater |
| VPN forwarding, ALG | PPTP, L2TP, IPSec |
| Firewall | Filtering by MAC, IP + TCP/UDP/ICMP protocol, URL |
Authorization in the Internet center
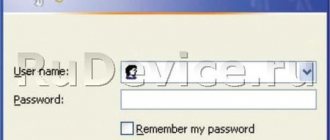
Netis has one feature related to the use of non-standard passwords to log into the web interface, which is why many users have difficulties during the first authorization. However, the password and login itself are always indicated on the router sticker or branded box. Additionally, you can use third-party sites that will help you find relevant information. You can familiarize yourself with all the methods in another article on our website.
Read more: Determining the login and password to log into the router’s web interface
Repeater mode
The router can operate in repeater (repeater) mode. In it, it distributes Wi-Fi and provides a wired connection to the same network as the main router. WF2780 works with routers from any manufacturer and expands their coverage area well.
Setting procedure:
- Click “Wireless Mode”, open “Wi-Fi Settings”.
- Set “On” opposite “Wi-Fi connection status”, in the “Radio mode” field select “Repeater”, in the “Configuration” line select “Manual”.
- Click “AP SCAN”, wait for a report on all available networks, select the one you need, click “Connect”.
- Transfer all security settings from the main router - fill in the “Authentication Type” (usually “WPA2-PSK”), “Encryption Type” (usually “AES”), “Key Type” (most often “ASCII”) and enter the password from the access point.
- Save changes.
It is recommended to go to the web interface of the main router, open the settings tab and enter all the necessary parameters from the screen. Most often, errors when connecting Netis WF2780 in repeater (repeater) mode are associated precisely with incorrectly entered values.
Quick setup
If you only need to set the basic router parameters necessary for correct access to the Internet via a wired connection or Wi-Fi, select the fast mode that is available in the Netis WF2780 web interface. Then the complete configuration process will look like this:
- After successful authorization, expand the drop-down menu and select the optimal interface language.
- Under the inscription “Internet connection type”, mark with a marker the protocol that your provider provides to you. This information is usually included in your service plan or contract with instructions from your internet service provider. If you cannot find it, use the company’s technical support to clarify the details.
- If you selected a dynamic IP address, you do not need to configure it further, since all parameters will be obtained automatically.
- In the case of a static IP, enter the address itself, the subnet mask and DNS server. The provider must provide this information to the user or leave printed instructions with all the data.
- When using PPPoE, which is popular in the Russian Federation, you only need to enter the login and password received from your Internet service provider to establish a connection.
- After setting up your Internet connection type, go down and activate the wireless access point. Give it a name and set a password of at least eight characters.
Then save all changes and reboot the router for them to take effect. Wait until it is fully turned on and proceed to checking the network. If it is missing, it means that the settings were set incorrectly or the signal from the provider is not received for some reason. Check the configuration, and if necessary, contact the company and clarify whether you have already received access to the Internet.
Factory reset
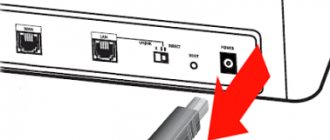
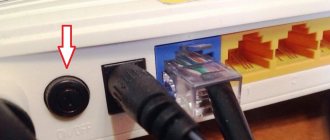
If something goes wrong during operation, you can reset the settings to factory settings and try to reconfigure the router. For this purpose, Netis has a separate Default button located next to the LAN ports. It can be clamped with a toothpick or pencil. To reset the settings, you need to hold the button down for 10 seconds. After this, the router will reboot itself. As soon as you see that the indicators have gone out and then come back on and started flashing, you can release the button.
The button we need is protected from accidental clicks
A factory reset will remove all configurations you've customized and any firmware you've installed over the factory version.
If you received a used device, it is recommended to reset the settings immediately. This way your configuration will be cleaner, and there will be less chance of discovering some kind of problem during operation.
Manual configuration of Netis WF2780
The Netis WF2780 Internet Center has a huge number of different parameters that allow you to create a flexible configuration. It is recommended to use them for those users who need to set other settings or who cannot use the Wizard described above.
Step 1: Network Settings
You should start with the same network properties of your Internet connection if the quick setup option is not suitable. You will still have to refer to the previous instructions, since it is there that we tell you what values you need to select for each protocol.
- To begin, through the left menu of the “Advanced” section, go to the “Network” category.
- There you are interested in “WAN”, where first of all you need to select a wired connection type and specify the Internet protocol in the drop-down menu.
- The protocol itself is configured below in the displayed fields according to the same principle that we talked about earlier.
- Owners of DHCP (dynamic IP) can go to advanced settings.
- There is a tool that allows you to clone your computer's MAC address and manually change the DNS if required. Do not change server addresses just like that, as this may affect access to certain sites.
- If necessary, select PPPoE, use the specified drop-down list.
- After this, simply enter the username and password that you received when you signed an agreement with the provider. Check the “Connect automatically” checkbox if you want the router to automatically log into the network after each reboot without having to re-enter the password.
After making changes to your wired connection, immediately proceed to checking your Internet connection by opening any site of interest. If it does not open, the properties are specified incorrectly, the cable is not connected, or the provider has not yet provided access to the network.
Step 2: LAN Settings
Some users prefer to use Wi-Fi without connecting the Netis WF2780 router to a computer via a network cable. Then setting up a local network is not necessary and you can simply skip this step.
- If you are sure that more than one device will be connected to the router via LAN, check the standard settings by going to the “LAN” category. The IP address 192.168.1.1 should be specified there and have a subnet mask of 255.255.255.0. Make sure that DHCP is active and that the range of IP addresses does not affect the previously specified 192.168.1.1.
- IPTV also belongs to the local network. This option should be enabled when the router is connected to a TV with SMART TV or a special set-top box that allows you to watch TV via the Internet. Select the mode that corresponds to the instructions for the device, set additional parameters and assign a LAN port, which will be used exclusively for IPTV, and you will not be able to access the regular Internet from a computer through it.
- If you need to further configure security rules and access control for a specific local network IP address, it is recommended to reserve a permanent number for it by specifying the MAC address of the device through a special settings section. A list of equipment added in this way will appear below.
- Finally, all that remains is to make sure that the router’s operating mode is in the “Router” state, since this is necessary for correct access to the network.
Step 3: Wi-Fi
In the Quick Setup Wizard for Wi-Fi, you can only set a name and password, which does not always suit users. Then you will have to resort to the full version of the web interface, where you will have to find these parameters.
- Through the “Wireless Mode” section, open “Wi-Fi Settings”. Here, make sure that the access point is in active mode or completely disable it if it is not needed. Pay attention to the authentication type. You can choose the recommended security protocol and create a password, or leave the network open, but then any user will have access to it.
- When choosing an authentication type, it is better to install WPA2-PSK, since this is the newest and most reliable encryption protocol. There is no need to change the type or key, so all that remains is to enter the password.
- In the wireless network settings there is a category “Filter by MAC addresses”. Here you can choose whether to restrict access to Wi-Fi for some devices or completely block all incoming connections except those specified. This implementation will allow you to leave the network open, but at the same time make it open only to home computers and mobile devices, placing them in a separate table. Other clients simply will not be able to connect if their physical address is not in the table.
- Fast Wi-Fi connection is possible thanks to WPS technology. In the corresponding menu you can activate it and enter an additional PIN if you wish. Here you can add equipment by pressing just one button.
- Navigate to the Multi SSID category to configure the Guest Access Point. Separate parameters are set for it, including a name and authentication type.
- In advanced options, only the transmit power should be changed, setting the value to maximum. The remaining parameters are intended for experienced users and are configured extremely rarely.
Step 4: Advanced Settings
There are a number of parameters in the web interface of the Netis WF2780 router that I would like to highlight in a separate step, since they are rarely accessed. The first one is called "Bandwidth". Here the user can configure the incoming and outgoing signal speed for certain devices according to a schedule, thereby setting restrictions. Such regulation will help to correctly distribute Internet speed between all connected devices if you need to give certain priority. In the default state, speed is distributed evenly.
Owners of virtual servers will be able to configure a demilitarized zone, FTP server and other parameters in the “Forwarding” section. There is nothing for an ordinary user to do here, and it is not recommended to change the existing items, as this may affect the overall performance of the network.
The last item of additional settings is “Dynamic DNS”. It connects to the web interface if a profile has been previously registered on a special website that provides DDNS services. After this, the account data is entered into the Internet center and the router is assigned a new address. Most often, connecting to such a service is necessary to gain remote access to the router settings, which you can read about in more detail below.
Read more: Setting up a remote connection to a router via the Internet
Step 5: Security Options
Almost every web interface of any router has at least several parameters responsible for security. Netis WF2780 also has similar items, and some users may need to change them:
- Through the left menu, move to “Access Control”. Here the first category is called “Filter by IP Addresses”. Activate this rule and set its behavior if there is a need to block or allow certain sources by their Internet addresses. Please also specify the schedule and ports if required. A list of all clients is displayed in the table below.
- Next is “Filter by MAC Addresses”. In its implementation, this menu is similar to the previous one, only instead of IP, the physical address of the equipment that you want to block or for which you need to open access is indicated here.
- The last item is “Domain Filter”, which is essentially an analogue of parental control. Here a list of sites is created by keywords or full addresses, access to which should be completely blocked or allowed only on a schedule. All entered rules will be displayed in the table in the same way as in the two previous paragraphs.
When making any changes, do not forget to click on the “Save” button to apply the new settings, otherwise they will be lost immediately after switching to another menu of the Internet center.
Step 6: System Settings
The final stage of configuring Netis WF2780 is viewing system parameters. Some of them need to be changed now, while others will have to be addressed in the future.
- To begin, expand the “System” section and open the first category “Software Update”. If at some point a new firmware file is released on the official website for the router model you are using, you must download it through this menu to update the configuration.
- Next, go to “Backup”. This section is especially relevant for those who have changed many different access control settings. By clicking just one button, you can download the router settings file and save it to local or removable storage. If necessary, the configuration can be restored through the same menu by loading the same file.
- Use the Diagnostics tool to check whether packets are being sent to a specific IP address or site. Here you just need to enter the target and check the stability of the network.
- We have already mentioned above about remote control of the router. If a static IP service is connected, it is not necessary to connect DDNS; instead, you can simply enable access through the “Remote Management” menu.
- Edit the system time when a schedule has been set for the security rules. There you will need to specify the correct time and date for the schedule to work correctly.
- It is recommended to change the username and password to access the Internet Center. Just don’t forget the data you enter, otherwise you will have to return the router to its original state to reset.
- As for restoring standard settings, this happens through “Factory Settings”. This resets absolutely all items, including network, Wi-Fi and access control settings.
- Upon completion of interaction with the Internet center, all that remains is to reboot the router so that all changes take effect and you can proceed to using it comfortably.
We are glad that we were able to help you solve the problem. Add the Lumpics.ru website to your bookmarks and we will be useful to you. Thank the author and share the article on social networks.
Describe what didn't work for you. Our specialists will try to answer as quickly as possible.
⇡#Testing
Wi-Fi settings are standard: automatic channel selection with a width of 40 MHz (802.11n) and 80 MHz (802.11ac), WPA2 encryption, access points are not isolated, WPS and guest networks are disabled, other parameters are left at default. Stands with Ixia IxChariot 6.7 software (High Performance Throughput profile) were in direct visibility at a distance of four meters from each other. Their configuration has not changed. First stand: Intel Core i7-2600K, 12 GB RAM, ASUS PCE-AC68 (A in the table), Windows 7 SP1 x64. Second: Intel Core i7-4700HQ, 12 GB RAM, Windows 8.1 Update 1 x64, Realtek RTL8168 (R in the table).
| Router netis WF2780 | |||||||
| Streams | 1 | 2 | 4 | 8 | 16 | 32 | 64 |
| Average Wi-Fi speed 802.11ac 5 GHz, Mbit/s | |||||||
| A→R | 310 | 314 | 321 | 355 | 360 | 380 | 380 |
| R→A | 291 | 356 | 388 | 393 | 393 | 391 | 382 |
| A ↔ R | 391 | 396 | 400 | 404 | 401 | 392 | 375 |
| Average speed of Wi-Fi 802.11n 2.4 GHz, Mbit/s | |||||||
| A → R | 146 | 164 | 174 | 161 | 179 | 170 | 163 |
| R → A | 94 | 129 | 153 | 131 | 147 | 145 | 139 |
| A ↔ R | 111 | 140 | 148 | 132 | 147 | 169 | 133 |
In general, everything is not bad. Wi-Fi 802.11ac speeds are surprisingly stable and good, while Wi-Fi 802.11n performance was predictably less stable, although still good. However, if you compare the netis WF2780 with other routers with a similar configuration of Wi-Fi modules, then such a comparison will not be entirely in its favor. In the direction from the router to the client - and this is a typical usage pattern - it is noticeably ahead of, for example, ZyXEL Keenetic Ultra II/Giga III. To be fair, we note that these models are in different “weight” and price categories - the same Giga III is almost twice as expensive as the WF2780.
The Internet access speed for direct connection and PPPoE at its peak reaches 900 and 800 Mbit/s, respectively. The PPTP connection reaches up to 200 Mbit/s, but there was a hitch with L2TP. For the first time in our memory, the test server “indignantly rejected the L2TP connection from the router - we are already accustomed to RFC violations, but it has never come to this. So I had to use the backup option and connect the router via L2TP to the Beeline home Internet. This way you can’t find out the upper speed limit, but you can clearly see that this ISP netis WF2780 copes with the maximum currently available tariff of 100 Mbit/s.
Conclusion
The netis WF2780 router is a typical “Chinese” router, inexpensive and very simple. There are no complaints about the hardware. She's good enough, but not great, of course. But with the firmware, as usual, not everything is smooth. Firstly, it’s really not very functional, although it does have a couple of interesting features. Secondly, it is not very safe out of the box, which is bad, since the average consumer doesn’t really think about it anyway. In addition, the manufacturer has already had problems in this area. However, with all its shortcomings, the netis WF2780 remains one of the most affordable solutions currently supporting Wi-Fi 802.11ac 2 × 2. It can be recommended to undemanding users, those who do not need a VPN connection to their provider.
How to configure a Netis router via 192.168.ll
For the convenience of further work, I would recommend immediately changing the interface language to Russian. This is done by simply selecting a language from the drop-down list at the top of the netis.cc page.
Internet connection
All basic Netis settings are located right on the start page. First of all, this is the configuration of the Internet and wireless networks.
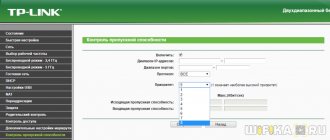
To connect the router to the Internet, you need to select one of the types:
- Dynamic IP
- Static IP
- PPPoE
- Other
Which one you have, you need to look at the contract for the provision of services with the provider - depending on this, you will need to enter certain data for connection. You also need to find them out from your operator.
Here you can activate MAC address cloning. This is done if the provider binds a specific connected computer to your contract. In this situation, to change it, you need to call technical support. To avoid this, check the “MAC Clone” box and it will automatically be copied from the main computer.
Setting up wifi network Netis
The next block is the wifi settings on the Netis router. The model I presented supports two frequency ranges, so here you can set data for two networks at once. Namely
- SSID (network name)
- Security (must be checked ON)
- Password
Initially, the two networks will work simultaneously, but later they can be activated separately in the Netis advanced settings.
After entering all the parameters, click on the “Save” button, after which two new wifi networks will appear in the field of view of all devices with a wireless module.