Setting up The Bat for Yandex. Posts
If this does not happen, right-click on the name of the newly created account and select “Synchronize all folders”:
Then restart the program.
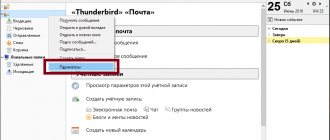
10. After you have launched the program again, go again to the properties of the newly created account in order to indicate in which folders sent and deleted letters, as well as drafts, will be stored. To do this, while in your account, go to the “Mailbox” menu, and then select “Mailbox Properties”.
In the window that opens, go to the “Mail Management” section and select a match for the “Sent Items” and “Trash” folders, and also check all the boxes marked in the image below:
In the “Deleting” subsection, you need to specify which folder to move emails to when deleting. To do this, you need to click on the “Browse” button in two fields (“Normal deletion” and “Alternative deletion”) and select the “Deleted Items” folder from the folders of your mailbox:
After that, uncheck the “Use alternative deletion for old emails” checkbox and check the “Automatically compress folders after emptying” and “Mark deleted emails as read” checkboxes:
Go to the “IMAP Settings” section and activate the “Compress IMAP folders when changing the current folder” option. You can fill out the remaining points at your discretion.
Then, in the “Options” section, check the “Synchronize folders at startup” checkbox.
Set up an email program using the POP3 protocol.
To set up Yandex collection. Mail in The Bat via POP3
, follow these steps:
1. Launch The Bat!
. If you launch it for the first time, the program itself will prompt you to create an account to work with. If you want to leave the first two dialog boxes at their default settings, simply skip these pages by clicking Next and OK:
2. If you already have one account configured in your email program and you want to set up another, or this is not the first time you are launching the program, you need to go to the account management menu. To do this, go to the Account menu and select New Mailbox.
3. In the account creation window, you must enter the name of the mailbox and click on the “Next” button:
4. In the next window, enter your name and your email address (or one of your email addresses) or the address of your domain mailbox if you are using Mail for Domains. What you write in the “Name” field, the recipients of your letters will see in the “From” field.
5. In the new window you need to select the POP3 protocol and specify the addresses of the mail servers:
pop as the Incoming mail server *****
.
Specify smtp as the Outgoing mail server . *****
.
Be sure to check the box next to "My SMTP server requires authentication for sending mail"
. Click Next.
6. Then you need to indicate your login and password to access the mailbox in the appropriate fields: User and Password/
Note!
If your mailbox address is *****@***ru, then you only need to indicate the first part -
login
.
If you use Mail for domains, you need to specify the full address of your mailbox as your login (username), for example, *****@***ru
.
7. In the next window, leave the default settings and go to “Next”:
In the last window you should go to advanced settings, to do this, select “Yes” and go “Next”:
8. In the window that opens, in the “General Information” section, in the “Full Name” column, your first and last name should be indicated.
9. Then you need to go to “Mail Management” and indicate that when downloading letters, the mail program should leave copies of letters on the server. To do this, you need to make the “Leave letters on the server” option active.
After that, go to the “Transport” section and set the parameters for a secure connection. For each server you need to select the “Secure on special” connection option. TLS port." For a POP server you need to specify a port 995
, and for SMTP -
465
.
After this, you need to go to the SMTP server authentication parameters by clicking on the “Authentication” button opposite it, and make sure that in the “SMTP Authentication” item there is a checkmark and the “Use mail receiving parameters” option is selected.
Apply the settings by clicking “OK” in all windows. The mail program is ready to work with your mailbox.
Antispam for The Bat!
Despite the fact that the email client from Ritlabs is one of the most secure solutions of this kind, filtering unwanted emails is still not the program’s strong point. Therefore, in order to prevent spam from entering your email inbox, you should use third-party extension modules designed specifically for such purposes.
The AntispamSniper plugin currently copes best with its responsibilities for protecting against unwanted email messages. Read about what this plugin is, how to install, configure and work with it in The Bat! in the corresponding article on our website.
Lesson: How to use AntispamSniper for The Bat!
Setting up the program
Maximum flexibility and the ability to configure almost all aspects of working with mail are some of the main advantages of The Bat! in front of other mailers. Next, we will look at the main parameters of the program and the features of their use.
Interface
The appearance of the email client is absolutely inconspicuous and it certainly cannot be called stylish. But in terms of organizing a personal workspace, The Bat! can give odds to many of its analogues.
Actually, almost all elements of the program interface are scalable and can be moved by simply dragging them from one place to another. For example, by grabbing the left edge, the main toolbar can be dragged to any area of the visual representation of the email client.
Another way to add new elements and reorganize them is through the Workspace menu bar item. Using this drop-down list, you can clearly determine the location and display format of each component of the program interface.
The first group of parameters here allows you to turn on or off the display of auto-viewing windows for letters, addresses and notes. Moreover, for each such action there is a separate key combination, also displayed in the list.
The following are settings for the general layout of elements in the window. With just a couple of clicks, you can completely change the layout of the interface components, as well as add new components.
The “Toolbars” item deserves special attention. It allows you not only to hide, show, and also change the configuration of existing panels, but also to create completely new ones - personalized sets of tools.
The latter is possible using the “Customize” sub-item. Here, in the “Configure Panels” window, from dozens of functions in the “Actions” list, you can assemble your own panel, the name of which will be displayed in the “Containers” list.
In the same window, in the “Hot Keys” tab, you can “attach” a unique key combination to each action.
To customize the view of the list of letters and the email messages themselves, we need to go to the “View” menu bar item.
In the first group, consisting of two parameters, we can choose which emails to show in the email list, as well as what criteria to sort them by.
The “View threads” item allows us to group letters with a common characteristic into message threads. This can often make working with large volumes of correspondence much easier.
“Letter header” is a parameter in which we are given the opportunity to determine what information about the letter and its sender should be contained in the header panel of The Bat! Well, in the item “Columns of the list of letters...” we select the columns shown when viewing email messages in a folder.
Further parameters of the “View” list relate directly to the format for displaying the contents of letters. For example, here you can change the encoding of received messages, enable the display of headers directly in the body of the letter, or specify the use of a regular text viewer for all incoming correspondence.
Fundamental Parameters
To go to a more detailed list of program settings, you should open the “Configuring The Bat!” window, located along the path “Properties” - “Settings...”.
So, the “Basic” group contains parameters for autostarting the mail client, displaying the The Bat! in the Windows System Tray and behavior when minimizing/closing a program. In addition, there are some settings for the Bat interface, as well as an option for activating birthday alerts for members of your address book.
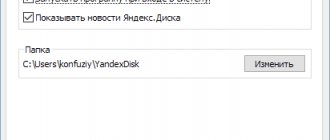
In the "System" section, you can change the location of the mail directory in the Windows file tree. In this folder The Bat! stores all its general settings and mailbox settings.
Settings for backing up emails and user data, as well as advanced settings for mouse buttons and sound alerts are also available here.
The “Programs” category is used to set specific associations of The Bat! with supported protocols and file types.
A very useful feature is “Address History”. It allows you to fully monitor your correspondence and add new recipients to your address book.
- Simply choose where you want to collect addresses from to create a message history - from incoming or outgoing mail. Mark mailboxes for these purposes and click the "Scan folders" button.
- Select specific folders to scan and click Next.
- Then select the period for which you want to save the chat history and click “Finish”.
Or uncheck the only checkbox in the window and also complete the operation. In this case, correspondence will be tracked for the entire time the mailbox was used.
The “List of Letters” section contains parameters for displaying email messages and working with them directly in the list of The Bat! All these settings are also presented as subsections.
In the root category, you can change the format of email headers, some parameters of the list's appearance and functionality.
The “Date and Time” tab, as you might guess, is used to configure the display of the current date and time in the list of The Bat! emails, or more precisely in the “Received” and “Created” columns.
Next are two very specific categories of settings - “Color Groups” and “View Modes”. Using the first, the user can assign unique colors in the list for mailboxes, folders and individual letters.
The “Tabs” category is intended for creating your own tabs with letters selected according to certain criteria.
The most interesting sub-item in the “Mail List” is “Mail Ticker”. This function is a small creeping line placed on top of all system windows. It displays information about unread messages in your mailbox.
In the “Show MailTicker (TM)” drop-down list, you can select modes for displaying the line in the program. The same tab allows you to specify which letters with what priority, from which folders and with what statute of limitations will be displayed in the Mail Ticker ticker. Here you can completely customize the appearance of such an interface element.
The “Letter Tags” tab is intended for adding, changing and removing distinctive marks to letters.
In addition, the appearance of these same tags is completely customizable here.
Another and quite significant group of parameters is “Editor and Viewing letters”. This contains the settings for the message editor and the message viewer module.
We will not delve into each item in this category of parameters. Let us only note that on the “View and Editor of Letters” tab you can customize the appearance of each element in the editor and the content of incoming letters.
We simply place the cursor on the object we need and change its parameters using the tools below.
Next comes the settings section that every The Bat user should definitely become familiar with - “Extension Modules”. The main tab of this category contains a list of plugins integrated into the email client.
To add a new module to the list, you need to click on the “Add” button and find the corresponding TBP file in the Explorer window that opens. To remove a plugin from the list, simply select it on this tab and click “Delete”. Well, the “Configure” button will allow you to go directly to the list of parameters of the selected module.
You can configure the operation of plugins in general using the sub-items of the main categories “Virus protection” and “Spam protection”. The first of them contains the same form for adding new modules to the program, and also allows you to determine which letters and files need to be scanned for viruses.
Actions to be taken when threats are detected are also set here. For example, having found a virus, the plugin can cure infected parts, delete them, delete the entire letter, or send it to the quarantine folder.
The Anti-Spam tab will be useful to you when using several extensions to remove unwanted emails from your mailbox.
In addition to the form for adding new antispam plugins to the program, this category of settings contains parameters for working with letters, depending on the rating assigned to them. The rating itself is a number, the value of which varies within 100.
This way, you can ensure that multiple anti-spam extension modules work as efficiently as possible.
The next section, “Attachment Security Settings,” allows you to determine which attachments are prohibited from opening automatically and which can be viewed without warning.
Additionally, the warning settings when opening files with extensions you define may be changed.
And the last category, “Other Options,” contains a number of subcategories for specifically configuring The Bat email client.
Thus, on the main category tab, you can configure the display of the quick response panel in some functional windows of the program.
Other tabs are used to manage conversion tables used when reading letters, set up confirmations for various actions, add request forms and create new keyboard shortcuts.
There is also a “SmartBat” section where you can configure the built-in The Bat! text editor.
Finally, the “Incoming Letters Analyzer” tab, which completes the list, allows you to configure the incoming correspondence analyzer in detail.
This component of the email client groups and sorts large volumes of messages from specific recipients into folders. Directly in the settings, you can adjust the parameters for scheduling the analyzer to run and cataloging screened emails.
In general, despite the abundance of various parameters in The Bat!, you are unlikely to have to understand absolutely all of them. It’s enough just to know where you can configure this or that program function.
We are glad that we were able to help you solve the problem. Add the Lumpics.ru website to your bookmarks and we will be useful to you. Thank the author and share the article on social networks.
Describe what didn't work for you. Our specialists will try to answer as quickly as possible.
Setting up mail ru mail in the bat
And so let's start setting up mail.ru mail in the bat. To connect a mailbox, you need to launch the program and select the “Mailbox” section in the top menu. After clicking on it, a list should open, from which we will be interested in the “New mailbox” item. By clicking on it, a dialog box will open.
First of all, you need to come up with a name for the account (you can enter any name), but leave the Home directory as default. This is where your mail will be stored.
In the next window you must enter your name, postal address and organization. Click “Next” and proceed to the next step, where you will need to specify the details for connecting to the service.
They should be entered correctly: – specify the IMAP4 protocol (POP3 is also possible, but it has a number of disadvantages and requires other settings); – “Server for receiving mail” – imap.mail.ru; – “SMTP server address” – smtp.mail.ru; – in the “My SMTP server requires authentication” checkbox, put a tick.
Now click on “Next” to move to the next stage, where you will need to enter authorization data. In the appropriate paragraphs, enter your email address (including the “@” symbol and domain name) and password for your email account.
At this point, setting up the bat box is almost complete. At the final step, the program will ask if the user wants to check other settings. We agree.
A window with general settings will open, where we will be interested in the “Transport” item. There will be a couple of drop-down menus in which you need to select “Secure connection special.” port (TSL)".
Next, click on the “Authentication” buttons next to each item one by one. In both the first and second cases, check the box, and in the drop-down menu select “SMTP Authentication (RFC-2554).
Next, in all settings windows, click on “OK”, after which the mail will be configured and ready for use. That's all, setting up the bat mailbox is complete, now you don't need to constantly go to the mail.ru website and check your mail, just launch TheBat.
If there’s something you don’t understand or you can’t set up your mail.ru mailbox in thebat, here’s the link – https://help.mail.ru/mail-help/mailer/tb
Using “The Bat” you will receive mail almost instantly. In this case, the program itself will notify you of new letters, and you will not have to look at your email client every time to find out about new correspondence, as you need to do in the case of the web version.
source