Common login methods on a Lenovo laptop
The most common and well-known way to enter the BIOS is to press the Delete key on the keyboard. However, some computer and laptop manufacturers, including Lenovo, have defined other login methods for their systems.
When choosing a Lenovo manufacturer when purchasing, you must remember that the computer equipment of this company is produced, as a rule, with an already installed operating system. If you want to reinstall software on your laptop, you may encounter a problem: almost all modern models ignore the operating system you want, trying to return the computer to the original one. This is why you will need the ability to enter the BIOS yourself to get around this problem.
Depending on the Lenovo model, you can enter the BIOS in several ways:
- press and hold the F1 or F2 keys;
- press the DELETE button;
- press the Novo Button.
a Novo Button on their panel or side edge . Finding it is not difficult. The manufacturer has highlighted it with a corresponding design - a curved arrow.
If you need to get into the BIOS on a Lenovo laptop, then instead of the power button you need to press the Novo Button. When booting, the system will enter the BIOS.
Please note that the BIOS will not appear on the monitor immediately. To enter the program, you need to perform one more step - find in the “ Novo Button ” menu the option to boot the laptop “ BIOS Setup ”, which is selected with the mouse button. After making your selection, press the Enter key on your keyboard. You are logged into the software.
Lenovo IdeaPad Z580 laptop: a home machine at the right price
If you're looking to buy a laptop that combines style and entertainment at an affordable price, the Lenovo IdeaPad Z580 is a great choice. Attractive appearance, good ergonomics, durable body, excellent performance - a laptop from Lenovo has all these qualities.
The build quality of the Z580 is also good, and despite some give in the plastic panels (the laptop comes in both aluminum and plastic casings), the chassis of the model is quite durable. The laptop offers bold, glossy lines and is one of the brightest budget laptops on the market.
Hidden under the attractive appearance of the IdeaPad Z580 are:
The laptop, while not lightweight, is 33mm thick and weighs about 2.5kg. Battery life – 5 hours.
Important! Based on real-world gaming tests, this is one of the fastest budget laptops around. If a buyer needs a fast laptop for everyday tasks without breaking the bank, the Lenovo IdeaPad Z580 will not disappoint.
How to enter the BIOS on a Lenovo laptop from the Windows 8.1 operating system
This login method is not as common as the previous ones, but, nevertheless, it is successfully used by both ordinary users and programmers. It is proposed by experts for cases where the laptop keyboard or BIOS entry keys are faulty. Let's look at how to enter the BIOS in this case.
Logging into the program requires the following steps:
- Boot a laptop with Windows 8.1 already installed.
- Select “ Settings ” with the mouse pointer in the lower right corner of Win 8.1.
- Go to “ Change user settings ” and select “ Update and recovery ”.
- Select with the mouse pointer “ Recovery ” - “ Special boot options ”.
- Then you need to reboot the system by selecting “ Restart now ”.
- The Diagnostics tab will appear on the monitor . Here you need to select the “ UEFI Firmware Settings ” function.
- Reboot the laptop again.
After completing a number of the listed steps, you will be taken to the BIOS. Please note that this login is only available for Lenovo laptops running Windows 8.1.
How to boot a Lenovo laptop from a flash drive?
Hello!
Today I decided to prepare simple, but at the same time very useful instructions that should be useful to all owners of Lenovo laptops. We will boot the Lenovo laptop from a flash drive. I have such a laptop, so I can show everything with a real example. Since many models of modern laptops do not have a CD/DVD drive, many people have a question: how to install Windows? How to boot a laptop for system recovery, virus scanning, diagnostics, etc. All this can be done from a regular flash drive. Moreover, if your laptop has a drive, then it is better to use a flash drive to install Windows or boot the laptop from some other boot disk. Moreover, everyone has flash drives, but a blank disk still needs to be found.
Booting a Lenovo laptop from a USB drive is as easy as booting from a disk. There is practically no difference.
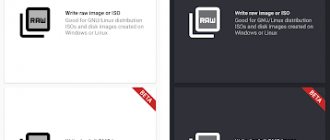
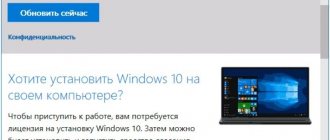
First, we need to make a bootable USB flash drive. Simply put, write an .iso image of Windows or another system/program to a USB drive. You can look at the example of creating a bootable drive with Windows 10. To write .iso to a flash drive, I recommend using the following programs: Media Creation Tool (for loading and burning Windows 10), WinSetupFromUSB, UltraISO, Rufus, Windows USB/DVD Download Tool. Of course, any computer can be booted from such a drive. Not only Lenovo.
Booting a Lenovo laptop from a flash drive via BIOS
Most often, this operation is performed by specialists in order to cure a laptop from viruses. Various software are recorded on removable media, but booting from it is usually not so easy. The problem is that all the latest Lenovo laptop models, starting from the 2013 release, have UEFI BIOS software that has certified Secure Boot security keys. They allow you to boot your laptop only when using a licensed Windows 8 installation disc.
In order to boot from media in such a BIOS, you need to disable Secure Boot in it by following these steps:
- Immediately after turning on the laptop, press two keys Fn + F2 on the keyboard or use the BIOS entry via the Novo Button.
- After entering the “ InsydeH20 Setup Utility ” (as a rule, this is what is installed in all the latest Lenovo models), go to the “ Security ” section.
- Then select Disabled position Secure Boot , thereby disabling the security protocol.
- Boot section, change the installed “ UEFI ” option to “ Legacy Support ”.
- Save the changes you have made by going to the “ Exit Exit Saving Changes option in it . From the options offered by the computer, select “ Yes ” and wait until the reboot occurs.
- We insert the removable drive into a free USB input and again get into the BIOS by pressing the keys required for this Lenovo model.
- In the “ Boot ” section we see the flash drive that appears. As a rule, it is listed in the menu as a USB HDD. By simultaneously pressing the Fn + F6 keys, we determine the media first in the list of devices for booting the system.
- We repeat the steps described in paragraph 5.
After all the steps have been completed, the laptop will begin the next boot from the flash drive.
Please note that for some Lenovo models, disabling just one Secure Boot option may not be enough. To boot the system from removable media, you may need to enable compatibility mode.
In various models it may be called CSM OS, CSM Boot, Legacy BIOS, UEFI and Legacy OS, or simply CSM.
Guide: Installing Windows 7 from a USB flash drive to a laptop
Interested in installing Windows 7 from a flash drive to a laptop? This means that your computer does not have a drive or it is broken.
Content:
What to do in a situation where it is not possible to boot from a CD? There is a solution: you can install the operating system from a flash drive.
Before we begin describing the process of installing Windows from a Flash card, we will list all the main stages of this process, and then consider them in more detail:
- First: preparing the laptop for installing the operating system (in this case, Windows 7)
- Second: preparing a flash drive
- Third: setting up UEFI to load the operating system from a Flash card.
- Fourth: the installation itself.
Note: UEFI is a replacement for legacy BIOS.
First, you need to transfer all the necessary files and documents from drive C to drive D. Usually they are located in the “My Documents” and on the “Desktop” folders. The installation files for some applications should be found in the Program Files folder.
Alternatively, you can transfer all important information to another flash drive (not the one from which the installation is taking place).
First, delete or copy all the necessary information from the flash card, because files and folders will be deleted from it automatically in preparation for installation. The flash card must be at least 4 GB in size.
Then you will need Windows 7 installation files and folders, preferably a disk image in iso format, and the UltralSO utility for installation (you can download it by typing an identical request in the search). All is ready? Then let's get started:
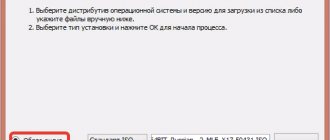
Download, install and run the utility. Here's what you'll see:
Click "Trial Period". A new window will open in which you need to select “File” - “Open” and point to the image from which the operating system will be installed.
Next, select “Boot” and click “Burn disk image.”
Then insert the flash drive into the computer and select “Format”. After the process is completed, click “Burn”.
The process will end and you will have a flash drive with the Windows 7 operating system downloaded onto it. Now you can move on to the next stage, the installation itself.
You can’t just insert a flash drive into your computer; the computer needs to boot from it when you turn it on. How to do it? Using UEFI. It is on every computer. It contains all the vital settings. One of them is the boot order. We will stop there.
To enter UEFI, press a specific key on your keyboard when the system boots. (This key is different on many laptops; it is displayed on the screen. Usually it is F2 or Esc). When you enter, a menu will open to you; you will immediately recognize it by its blue or gray color.
Many people do not have time to press the Windows login key in time and the computer simply boots. In this case, you should reboot and try again.
After logging in, you should enter the menu and find the boot order of devices in the settings. Here are some screenshots for example:
Use the arrows to select the device to boot first. For beginners, there is special help on navigating UEFI. She is always in a visible place.
Choose USB-HDD. Then exit UEFI using the “Save and Exit” button. All changed information will be saved. The computer will automatically restart. Now we move on to the next step, the very final one.
If you did everything correctly and set the settings correctly in UEFI, then you will see the message “Press any key to boot a CD or DVD.” Of course, in English, so a screenshot is attached:
It may happen that the installation image contains other utilities besides Windows 7. In this case, you need to select the item that is suitable to start the installation.
The good news is that the computer will perform almost all of the operations listed below automatically. And all the settings that you don’t like can be changed to your taste after the installation is complete.
Select the language and click the install button.
A window will open in which you need to select which version of Windows 7 you will install. Click on the one for which you have a security key. Often it is glued to the inscriptions on the bottom of the laptop. The system will prompt you for it before completing the installation.
You don't have to enter the key right away. You can do this within a month.
A window with a license will pop up, check the “Agree” box and move on.
Then select the full installation.
Next, you should select the disk partition in which the “Seven” will be installed. Click "Disk Settings". Usually, beginners have difficulties here, so let’s take a closer look at this point.
It happens that on a hard drive, in addition to the standard partitions (C, D, E), there are several more. This is due to the fact that when restoring the system, it was possible to restore the computer to its standard settings.
Some find a hidden size of up to 100 megabytes. The operating system itself is responsible for its creation. The section performs the function of system encryption. There is a program in the section that can decode it.
But you should get rid of it. Before installing Windows, it is necessary to prepare the hard drive for the operation in advance. This can be done using the Acronis Disk program.
In the window that appears, click “Format”. A warning will pop up that all data will be destroyed, but now it doesn’t matter, because we have a backup copy of all data. Click "OK".
When formatting occurs, feel free to click next.
We format the disk and move on.
The installation will take some time. After it, a window will pop up in which the user will be required to enter names: his own and the computer’s.
If you wish, you can create a password. In order not to forget it, you will be asked to come up with a hint for it.
Choose a security mode, date and time.
When the network card driver is installed, you must select the type of connection.
To ensure that, after installing Windows, the laptop boots from the hard drive and not the flash drive at startup, you should return the UEFI settings to their original state. This completes the installation of Windows 7 on the laptop!
As you can see, there is nothing complicated about installing an operating system from a flash drive. The main thing is to carefully follow the listed points, and you will succeed. Once is enough to remember the whole process.
The next time you need to install an operating system from a Flash card, you will do it automatically.
Installing Windows 7 from a USB flash drive to a laptop: A guide to action
geek-nose.com
BIOS capabilities in Lenovo laptops
Since the main task of BIOS software is to test the laptop, the program itself is displayed on the monitor in the form of a table, divided into a number of additional tabs. They inform the user about the laptop configuration, show the main technical characteristics of this model, make it possible to boot and configure the security system. All these sections are displayed on the screen as “ Information ”, “ Configuration ”, “ Boot ”, “ Security ”, “ Exit ”.
Pay attention to an important detail. When moving into the BIOS, the mouse connected to the laptop stops working, so while in the software menu, navigation is carried out using buttons with pointers. It must be remembered that in all configurations without exception, the changed settings begin to work only after they are saved and the laptop is rebooted.
Remember that BIOS, like any other software, requires regular updates. Do not use dubious sites and blogs to download. All products installed in Lenovo laptops can be downloaded and updated from the manufacturer’s official website. And it is preferable to do this on the same computer where you are going to change the software. The BIOS version can be found by going through the POST procedure by pressing the Pause/Break key.
You already know how to enter the BIOS.
Installer download
The first problem that you may encounter is persistent loading from the hard drive and ignoring the disk or flash drive inserted into the drive with the distribution of the operating system, for example Windows XP/7/10. This happens because the BIOS is not configured correctly, namely, the boot order is set incorrectly. We need to first enter the BIOS setup. This is done at the initial stage of booting the laptop, a few seconds after turning it on, before loading FREE Dos.
The system will write that to enter the BIOS (or SETUP) you must press the DEL key or one of the “F1-F12” buttons, usually F2 (depending on the model). On Lenovo G500 series models, you need to press the OneKey Recovery key when the laptop is turned off, and on some models Fn+F2(F12) works.
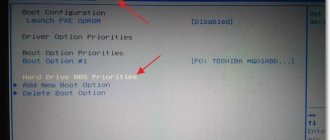
Next, find the “Boot menu” and set the boot priority there. To do this, look for the inscription “First boot device”, go into it and select “CD\DVD-Rom” from the list that appears. Sometimes the boot device selection list is not offered, then we simply go to the “CD\DVD-Rom” position and move it to the very top by pressing the +\- keys.
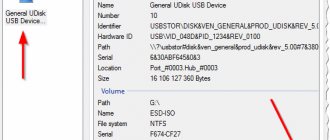
To select a flash drive, you need to find it by its model name and also move it to the top. By the way, the flash drive may be located in the hard drive subsection (Hard Drive, HDD). Then we simply find an exit from the SETUP program - select “SAVE ALL and EXIT” -> “Yes”. Or just the “F10” button. For a one-time boot from a flash drive, you can not go into the BIOS, but instead press F9 and select the boot device from the menu:
For G500 series models, and indeed in general, it is recommended to first reset all settings to default (“Load Defaults”) and only then set the desired boot priority. Also check that on the “Startup” tab the “UEFI/Legacy Boot” value is set to “Legacy Only”, otherwise the installer may not start.
Installing "OS" on a dedicated partition
To install the operating system on the partition that we created, you need to select it using the ones indicated in the figure below, and then press the “Enter” key.
After this, you will have to wait a while until the formatting process is completed. You can go get some coffee for now. This is preparation for installing Windows XP on a laptop.
Putting your hard drive back at the top of your list
After formatting is completed, the installation program will begin copying files to the laptop's hard drive. You will then be prompted to reboot by pressing the Enter key. Or it will start automatically. After rebooting, a message will appear: “press any key to continue.” There is no need to do this, otherwise you will have to reinstall the operating system from the disk onto the laptop.
After turning on the computer, you need to go to the BIOS again, select the “Boot” tab and return the hard drive to the top of the list. Then press the “F10” key to exit the settings for saving parameters and confirm exit.
A notification with a new design will appear, and immediately after it a window with parameters and settings for language and regional standards will be activated.