07/15/2020 windows
If a yellow exclamation mark is displayed next to the device name in the Device Manager of Windows 10, 8.1 or Windows 7, and the device properties indicate “This device cannot start. (Code 10)." Additional information may also be displayed, such as “This request is not supported,” “Device has timed out,” or other information. Typically, the problem can be fixed, but this is not always easy.
This instruction details how to fix the error “This device cannot start” code 10 for various types of devices in Windows 10, 8.1 and Windows 7; most likely, one of the methods will solve the problem.
- Simple ways to fix error Code 10
- Fixing an error in the registry of Windows 10, 8.1 and Windows 7
- Video instruction
Easy Ways to Fix Code 10 Error in Device Manager in Windows 10, 8.1 and Windows 7
First of all, you should try the following simple steps to fix the problem in question:
- If the "This device can't start" error occurs in Windows 10 or 8.1, and only after shutdown or sleep mode, but disappears after a reboot, regardless of which device we are talking about, one of the following may help: Disable the feature "Quick start".
- Manual installation of chipset drivers, Intel Management Engine (for Intel computers and laptops), power management (often required for laptops). You should download these drivers from the official website of the laptop or motherboard manufacturer (if you have a PC) and install them manually. Important: even if you have Windows 10 installed, and the official website contains drivers for the previous version of the system, you should still install them.
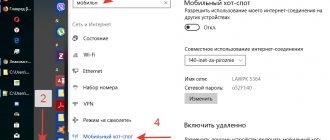
Additionally, if the problem occurs with a USB device or Wi-Fi adapter, and not regularly (that is, it may disappear), try this option: go to Control Panel - Power Options, click “Configure power plan” next to the name of the current scheme, and then go to Change advanced power settings.
In the next window, pay attention to the settings of the wireless network adapter (if the problem is with the Wi-Fi adapter) and “USB Settings”.
Set the values to "Maximum" as in the image above, and then apply the settings and restart your computer.
Eliminating the error “Code 10”
Let's consider all the ways to fix the problem.
device Manager
Error “Code 10” when installing the driver can be removed by updating the driver version:
- Right-click on the Start menu icon, select “Device Manager” .
- Find the device associated with the error.
- A window will appear on the screen where you need to select “Automatically search for updated drivers” .
Right-click on it and open the item “Update drivers” .
In most cases, this solves the problem. If the system could not find the software, but you know which device is having problems, download the software for it manually and install them.
Cleaning the registry
Another method is to clean the system registry:
- Download and install CCleaner on your computer.
- Launch it.
- Go to the "Registry" section.
- Run a scan and let CCleaner fix them.
System update
Install the latest updates for your operating system. This also resolves the problem. In Windows 10 this is done like this:
- Press the key combination Win+I to open the System Settings window.
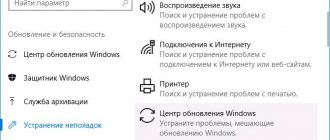
- Open the "Update and Security" .
- Select Windows Update and install the latest updates if available.
Removing the latest drivers
If the error appeared after installing new drivers, then:
- Open Control Panel.
- Click on the link “Remove programs” .
- Click on the column title “Installed” .
- The first applications in the list will be those that were recently installed.
- Find the software among them and remove it.
Checking the device operation
Check the device whose software is causing the error is operational. Connect it to another computer.
Viruses
Be sure to check your system for malware. There are many utilities and programs for this. I recommend downloading the free Dr.Web Cureit and running a scan of your computer. He will identify all threats and eliminate them.
Fixing the "This device cannot start" error in Registry Editor
The next method to solve the problem is to use the Registry Editor. Before doing this, I recommend creating a system restore point or a registry backup, they will help if something goes wrong.
The following shows an example of actions for the case when an error is reported by a USB device (or several such devices at once), and after that there are sections corresponding to other types of devices, where you should perform the same actions if error code 10 occurs with another device:
- Launch the registry editor, to do this you can press the Win+R and enter regedit .
- Go to the registry key (folders on the left) HKEY_LOCAL_MACHINE\SYSTEM\CurrentControlSet\Control\Class\{36fc9e60-c465-11cf-8056-444553540000}
- In the right side of the registry window, delete the UpperFilters and LowerFilters , if any, by right-clicking on them and selecting “Delete”.
- In case the problem is with a USB input device (mouse, keyboard, graphics tablet, etc.), follow the same steps in a similar location in section {745a17a0-74d3-11d0-b6fe-00a0c90f57da} .
- Close Registry Editor and restart your computer.
Please note that in step 2 I specified a subkey named {36fc9e60-c465-11cf-8056-444553540000}, which corresponds to USB controllers and the con does not occur with a USB device, in the same registry location there are the following subkeys where you should perform the specified steps:
- 4d36e972-e325-11ce-bfc1-08002be10318 - network adapters
- 4d36e968-e325-11ce-bfc1-08002be10318 - video cards
- 4d36e96c-e325-11ce-bfc1-08002be10318 - audio and video devices
- 4d36e96f-e325-11ce-bfc1-08002be10318 - mice
- 4d36e96b-e325-11ce-bfc1-08002be10318 - keyboards
- 6bdd1fc6-810f-11d0-bec7-08002be2092f - cameras and scanners
- 4d36e967-e325-11ce-bfc1-08002be10318 - hard drives
- 4d36e96a-e325-11ce-bfc1-08002be10318 - hard drive controllers
- 4d36e96d-e325-11ce-bfc1-08002be10318 - modems
- 4d36e978-e325-11ce-bfc1-08002be10318 - serial and parallel ports
- 4d36e97b-e325-11ce-bfc1-08002be10318 - SCSI and RAID controllers
- 4d36e97d-e325-11ce-bfc1-08002be10318 - system buses and bridges
After making changes, do not forget to restart your computer.
Two fixes for graphics device driver error code 22
- Use your keyboard to go to Device Manager
- Remove the CMOS battery to reset the BIOS
Fix 1: Use your keyboard to go to Device Manager
- Restart your computer.
- If you are logged in automatically, skip to step 3; otherwise, wait a while until the login screen appears, then (enter your password and) login.
- On your keyboard, press Alt and F4 and connect the keys several times to make sure that all programs that start are closed.
- Hold the Windows key and press R to open the Run window.
- Type devmgmt.msc and click Enter to open Device Manager.
- Wait a few seconds to make sure Device Manager is open, then press Tab once to save your selection to the device list.
- Press D twice to go to the Video Adapters category.
- Tab right arrow key to expand the category and tab right arrow again to go to the first device in the category.
- Press Alt + A together to open the action menu.
- Tab down arrow press once to select Enable device (note that if you have the wrong device, that device will be selected Disable). Then click Sign In to enable it.
- Voila! Your screen should appear normally now. If it doesn't work, you can press the power button to turn off and restart your computer, and then carefully repeat the steps above to better fix the problem.
Be careful you don't make a mistake or press the wrong keys!
Fix 2: Reset BIOS by removing CMOS battery
If attempts with Fix 1 fail, to fix a disabled graphics device, you may need to remove the CMOS battery to reset the BIOS to default settings. This requires some skill. You can follow the instructions below:
- Turn off your computer.
- Disconnect all power sources (remove all cables).
- Open your computer case to reveal the hardware inside.
- Locate the CMOS battery. On desktop PCs, the CMOS battery is usually located in an open case on the motherboard (see example below).
Example - CMOS battery on a desktop PC On laptops, finding the battery case may not be as easy. Some models have a small sliding tray on the body, which makes it easier to dismantle. Some may be covered with something as protection (see example below).
Example - CMOS battery on a laptop
- Remember which direction the battery is installed. Typically the engraved side, the positive side, faces up. Then remove the CMOS battery from the main board (most can be simply removed).
- Wait about a minute or two for the CMOS to reset to its default values.
- Place the battery back into the case, close the computer case, and turn on the computer. Your BIOS should have reset itself by re-enabling the graphics device.
How to fix Code 22 error (Error 22)
Sometimes Code 22 blue screen errors related to hardware can be caused by corrupted random access memory (RAM). If you are experiencing random computer reboots, beeping sounds on startup, or other computer problems (in addition to BSOD 22 errors), then it is highly likely that your memory is corrupted. In fact, almost 10% of application crashes on Windows OS are caused by memory corruption.If you have recently added new memory to your computer, we recommend temporarily removing it to make sure it is not the cause of the Code 22 error. If this action clears the BSOD, then that is the source of the problem, and therefore the new memory is either incompatible with some other device. either your equipment or is damaged. In this case, you will need to replace new memory modules.
If you did not add new memory, the next step is to run a diagnostic test on your computer's existing memory. A memory test will scan for severe memory failures and intermittent errors that could be causing your Blue Screen of Death 22.
Although recent versions of Windows include a RAM test utility, I highly recommend using Memtest86 instead. Memtest86 is a BIOS-based testing software, unlike other test programs that run on Windows. The advantage of this approach is that the utility allows you to check ALL operating memory for Code 22 errors, while other programs cannot check memory areas occupied by the program itself, the operating system and other running programs.
How to run Memtest86 to scan for memory corruption causing STOP 22 errors:
- Take an unused USB flash drive and connect it to your computer.
- Download the USB image of Windows MemTest86 .
- Right-click on the image file and select " Extract to current folder ". Extract the folder to any location where you can easily access it (for example, your Desktop).
- Open the extracted folder, launch the ImageUSB utility and select the connected USB drive to create a bootable disk. WARNING: This action will erase all data on the USB drive.
- Memtest86 will be installed on the USB drive , after which you can start checking the possible sources of Code 22 errors.
- Reboot your computer using the installed USB drive.
- Memtest86 will begin testing the memory for errors.
- Follow the commands on the screen.
If all the above steps fail and Memtest86 finds memory corruption, then it is highly likely that the Code 22 Blue Screen error is caused by bad memory. In this case, you need to replace the failing memory to eliminate BSODs 22.
For further assistance, this tutorial video from Corsair shows you how to run Memtest86:
https://www2.corsair.com/training/how_to_memtest/6