Any digital storage medium, be it a regular flash drive or a hard drive, is not protected from failures in its operation. It may happen that when you try to open folders or files, the error “Disk access is denied” appears. In such cases, an inexperienced user immediately despairs of restoring the device’s functionality and runs to a technician for help or simply buys a new drive. But this is not at all necessary. This article will tell you how to fix the “Disk access denied” error in Windows 7. But it’s worth clarifying right away that the instructions that will be provided below are suitable not only for the “seven”, it is also feasible in other versions of the operating system systems from Microsoft.
How to solve the "Disk access denied" problem
Before talking about ways to fix the error, you need to understand the reasons why it can happen. They are as follows:
- insufficient user rights;
- software malfunctions;
- the drive is infected with a virus;
- the drive is damaged.
If the first three reasons can be dealt with through some manipulations in the operating system, then if the drive itself malfunctions, nothing can be done. In some cases, of course, you can send the device in for repair and hope that it can be fixed.
Recovery
If the problem occurs on a non-system drive, but it contains important information that will be lost when formatted, use standard Windows tools or third-party programs to fix the error.
Windows tools
Basically, the standard chkdsk utility helps fix problems with formatting in RAW.
After checking, the computer will repair damaged sectors and the NTFS file system on the problematic volume.
Important! This method is effective if the flash drive or hard drive has been formatted in NTFS.
The chkdsk utility will also help when the system disk is damaged. But for this you will need a boot disk or flash drive.
- Start the computer from a bootable USB flash drive or disk → Select “System Restore”.
- Additional options → command line → enter chkdsk drive_letter: /f
.
In the recovery environment, the partition letters are different from the names of the logical drives. To avoid mistakes, open the list of computer partitions in the command line.
Enter diskpart → list volume → the list will indicate which disk is the system one.
Third party programs
There are third-party programs that help restore the NTFS file system if for some reason it was reformatted to RAW. They do not damage the user’s information stored on the volume, unlike the chkdsk utility, which can “affect” them during the recovery process.
MiniTool Power Data Recovery
Important! This method is most effective if the RAW file system appears on a flash drive.
TestDisk
This is a multifunctional free utility that works with hard drive partitions using a large number of options. The program is presented in a portable version, so it does not require installation. Main disadvantage
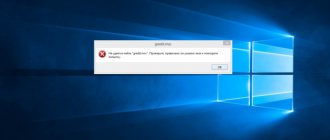
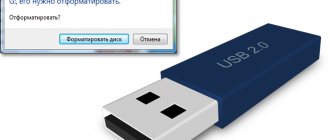
If at one point you connect your removable drive with a bunch of important information to your computer, you see the message “To use the disk in drive n:, first format it. Do you want to format it?”, then this article is just for you.
Restoring a flash drive after converting it to RAW format.
First, let's figure out what RAW is. After all, everyone is accustomed to seeing familiar file systems on their drives, such as NTFS, FAT32. They are used for both SSD solid state drives and hard drives and flash drives.
The file system is needed so that the disks can function and communicate with the computer. Thanks to it, the computer translates information into binary code, which it understands and with which it can work, and the user already sees the result of this work: photographs, text, videos, audio recordings, games and applications. What exactly is RAW? Without going into too much detail, RAW is a glitch, a system error. Let's figure out why this problem occurs.
Method 1: using standard OS tools
If an error appears when you try to open a partition on your hard drive, “Access denied” may appear due to restricted user rights. Moreover, most often this is exactly the case. By the way, this happens not only with a solid-state drive, but also with a regular flash drive. In this case, the problem can be solved without resorting to using third-party software, but directly using the tools of the OS itself.
First of all, you need to check disk access. This task can be accomplished as follows:
- Double click on "My Computer". If there is no such shortcut on your desktop, then open the “Explorer” file manager and go to the “My Computer” section in the left panel.
- A list of disk partitions and external drives will appear. Right click on the one you need.
- In the menu that appears, select “Properties”.
- A new window will appear where you need to go to the “Security” tab.
- In the window interface, find the “Change” button. It is located under the “Groups or Users” list.
- Review all the options and see if there are any restrictions. If they are, then correct them.
- Click OK and close all windows.
This should help resolve the "Disk access denied" error. However, if you did not notice any restrictions or simply could not change them correctly, then you can use the second method:
- Open the system registry. Press Win+R and in the window that appears, run the regedit command.
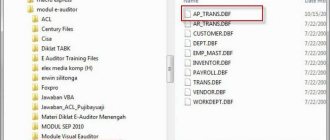
- In the window that appears, you need to go to the HKEY_CURRENT_USER folder, then to SOFTWARE, then to WINDOWS, CURRENTVERSION and EXPLORER_MOUNTPOINTS2. There will be a folder with your drive letter. Go to it.
- You will find a directory called SHELL. It must be removed. This is done simply: select the folder and press the Delete key.
After this, all that remains is to restart the computer. If the problem was that the virus replaced the files in this directory, then the error will disappear.
Clean boot system
Sometimes a clean boot of Windows can help fix error 0x80070057, i.e. without third-party services and processes:
- Click “ Win+R ” and specify “ msconfig ”;
- select selective startup without unchecking the box next to “ Load system services ”;
- Click on the “ Services ” section, check the “ Do not display Microsoft services ” option, then “ Disable all ”, confirm the operation and restart the PC.
Recovering a missing Steam api dll file
Method 3: Format and restore data
It happens that access problems arise due to some system failures. In this case, the best option would be to format the drive. However, to prevent data from being lost, it is better to restore it before doing so. In this article, the R-Studio program will be used for such purposes.
- Launch the application.
- Select the drive from which you would like to recover information.
- Files suitable for recovery will appear on the right. Select the one you need and right-click on it.
- From the list of options that appears, select “Restore”.
- In the new window, navigate to the folder where the files will be transferred.
- Click Yes.
After recovering all important data, you need to format the flash drive. This is done through Explorer.
- Open My Computer.
- Right-click on the section.
- From the menu, select the "Format" option.
- In the window that appears, click “Start”.
All that remains is to wait until the formatting process is completed, after which the partition or drive should work properly.
System Restore
A radical way is to return the system to its original state (using Windows 10 as an example). It is better to use this option as a last resort, when other methods have not resolved the problem, because as a result you will get a clean OS with or without personal data (based on the chosen installation method).
Let's get started:
- call the menu by pressing “ Win+I ”;
- go to the “ Update/Security ” block;
- click on “ Recovery ”;
- Click “ Start ”, you will see a message asking you to set the OS reset parameters.
1st method - completely clearing the system volume of files and reinstalling the OS without using a distribution disk, 2nd method - quick installation of Windows 10 while saving user files and program settings (applications are not saved).
There is one more way to call the OS reset dialog without even logging into it. Everything happens on the login screen. To access the option, click on the “ Reboot ” icon while holding down “ Shift ”. Then click on the “ Diagnostics ” icon, then click on “ Return the OS to its original state ”.
Advantages of the method: no installation flash drive/disk required, and fully automatic execution.
There is only one minus - if you delete a system image or find a file in damaged sectors of the hard drive, you will not be able to do a quick reinstallation, but in Windows 10 it is possible to use a couple of additional tools: a system recovery disk (which is rare, because usually there is none) and system backup through OS tools on a volume other than the system volume.
It is also possible to use a restore point.
On Windows 10 the procedure is as follows:
- right-click on the “ This PC ” icon and then on “ Properties ”;
- click on “ System protection ”;
- in the “ System Properties ” window, click on “ Restore ”;
- If you agree to the recommended restore point (you will see a filled circle next to the “Recommended restore” option), immediately click on “ Next ”.
Otherwise, select the option “ Select a different recovery point ” by left-clicking on the empty circle next to it and clicking on “ Next ”, in the window, left-click on the line with the desired recovery point and click on “ Next ”.
Click on “ Done ”.
In Windows 7 the algorithm is slightly different:
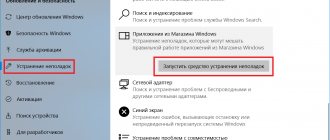
- go to the “ Control Panel ” and click on the “ Recovery ” block;
- select the desired point ;
- then follow the wizard's instructions.
How to fix the error - file is too large for the target file system