There are many programs available to control screen brightness, contrast, and temperature according to lighting conditions to create the ambiance needed for long-term computer use. I already talked about f.lux and ScreenTemperature . This article contains 6 more programs for controlling the brightness and contrast of screens in Windows 10.
RedShiftGUI
RedShiftGUI is a free program that allows you to easily control brightness and color temperature. In addition to manual settings, it automatically adjusts brightness and color temperature based on lighting conditions. The program works on both Windows and Linux.
Changing brightness settings on a laptop
It is worth taking into account that depending on the manufacturer, the overall brightness level and possibilities for customization will vary greatly.
Option 1 – Change the brightness level using hotkeys
In the vast majority of laptops, in order to change the brightness, you need to use a combination of several function keys. For example, by holding down the “Fn” button, you can use the arrows to adjust the brightness level of the monitor. Despite the fact that along with the Fn button there may be completely different input keys, the screen brightness symbol is always depicted as a sun symbol.
Option 2 – adjust brightness using the control panel
You can also change the brightness using the display settings through the control panel. In this case, you need to do the following:
- Go to the Control Panel menu (in the Windows 10 search, enter “panel” and select “Control Panel” from the list).
- Open the screen control option – the icon labeled “Screen”.
- In the window that opens, find and open the “Brightness Settings” item.
- After which, you will find yourself in the laptop power consumption settings menu. At the bottom of the window that appears there will be a slider that is responsible for brightness settings.
- Next, you will need to set the monitor brightness level to a comfortable level and exit the settings. All new settings will take effect immediately.
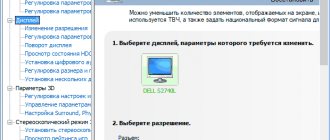
In my case, there were no “Display” settings, there was an Intel HD graphics setting:
Option 3 – change the brightness using the video card driver
All modern laptops run on a basic video adapter from Intel, AMD or Nvidia. It is with the help of the driver preinstalled on your laptop that you have the right to independently change the display color settings, making it brighter or more saturated.
If you are using a video adapter from AMD
Using a driver from AMD, you can change the standard settings for image clarity on the display. Due to the fact that the company has released a huge number of driver updates, the items in the settings panel may vary greatly. For example, in Catalyst 10.2, to apply the new options for brightness settings, you need to visit the Color menu. To get to the driver settings menu, just short-click the right mouse button while on the desktop and select “Catalyst Control Center”.
If you are using a video adapter from NVIDIA
- Right-click on the desktop and select “NVIDIA Control Panel” from the context menu.img8
- In the navigation panel that appears, in the left row, select “Customize desktop color settings.”
- You will be offered several displays to choose from, if you have more than one, where you will need to select the one you need, and then click on the “Use NVIDIA Settings” item. After which you will have access to display settings, which include brightness, contrast and gamma. For all the specified settings to take effect, you will need to click the “Apply” button.
Option 4 – If all of the above options do not suit you
If you were still unable to adjust the display brightness using the function keys or all the adjustments made to the driver were ineffective, then most likely you are faced with a problem with your video card driver. This can happen after updating drivers to the latest version. One way to resolve this problem may be to roll back the video card software to a previous version or completely remove it and clean install it.
PangoBright
PangoBright is a free brightness control utility for Windows. This software is recommended if you mostly work in the dark. If you use multiple desktops, the utility allows you to adjust the brightness for each monitor.
Thanks for reading! Subscribe to my channel on Telegram and Yandex.Zen . Only there are the latest blog updates and news from the world of information technology.
Also, read me on social networks: Facebook , Twitter , VK , OK .
SunsetScreen what kind of program
One of the most popular and convenient programs for such situations is SunsetScreen.
This is a free application for the Windows operating system that can help automatically or manually reduce the intensity and color of the monitor in the evening. The software contains a dozen presets for any period of time and manual adjustment of brightness and tone. SunsetScreen can be downloaded in two versions: a regular modification of the program and a portable one.
Installing the program Adjusting monitor brightness
For the program to work properly you need:
Run the SunsetScreen installation file and click the “Next” button.
Confirm the license agreement.
Select the installation path, check the boxes next to possible shortcuts.
Wait for the installation to complete and restart your computer. After the program is fully installed, you can launch it and start setting up.
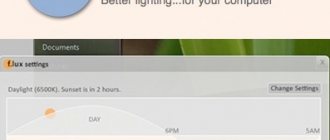
The program interface is very simple, any user can understand it.
Respect for the post! Thanks for the work!
Want more posts? Find out technology news? Read reviews of gadgets? For all this, as well as for promoting the site, purchasing a new design and paying for hosting, I need help from you, loyal and grateful readers. Read more about donations on the special page .
It is possible to become a patron to support the blog with a monthly donation, or use Yandex.Money , WebMoney , QIWI or PayPal :
Thank you in advance! All funds raised will be used for the development of the site. Project support is a gift to the site owner.
Windows Operating System Tools
The standard method for any laptop is using the Windows interface. You can set different brightness levels for mains and battery operation. The advantage of this setup is that it is the same for any device, be it an old laptop for working with documents, or a powerful machine for the most resource-demanding games.
To get to the settings interface, follow the simple instructions:
- Press the Windows button to open the Start menu, or use the icon on the screen to do so.
- Open Control Panel.
- In the list presented, find the “Power Options” category and open it.
- You will be taken to the laptop power management menu. The brightness sliders you need are at the very end of the list. Place them in the required position and close the window.
Adjusting brightness using standard Windows 7 tools
To set the brightness of a laptop or all-in-one PC using standard 7 tools, the first step is to go to Control Panel . You can go to the Control Panel through the Start or type control Run
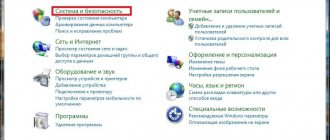
After launching the Control Panel , you need to go to the “ System and Security ” section.
Next, go to the “ Power supply ” section.
You can now increase or decrease the screen backlight.
To do this, set the “ Screen Brightness ” slider to a position that matches your monitor backlight preferences.
You can also go to the power plan and set the brightness at which the laptop will operate on battery power or mains power.
Master's answer:
In order to optimize the perception of text and graphic information produced by the monitor screen, it is necessary to correctly adjust the image contrast. This way you can protect your eyes from unnecessary strain and fatigue.
Unlike computers, where setup is quite easy and simple, with laptops and netbooks things are somewhat different.
If you are the proud owner of a laptop, then you probably know that its keyboard is equipped with the necessary buttons for setting parameters. A significant drawback is the fact that with their help it is possible to improve only the brightness. To change the screen contrast, you will have to make changes in the driver settings of the video card installed on your computer.
If your laptop has an Nvidia graphics card, adjust the contrast using the video driver control panel. This can be done as follows: right-click on the desktop with your mouse or touchpad and in the window that opens, find the line “Nvidia Control Panel”.
To go to the next menu item, “Adjust desktop color settings,” use the link on the left side of the window that opens. Click on the “Use Nvidia settings” command and adjust the contrast using the slider to the state you need.
If your laptop is equipped with an ATI graphics card, the setup will be slightly different. First, find and download the latest version of the Catalist video driver from the Internet. Its control panel features are quite similar to Nvidia's. In the left half of the program window, find and select the Color tab. And now everything is simple: use the slider to adjust the contrast in the Contrast item suggested by the program to the required level. Be sure to save your changes.
If your netbook has a built-in Intel Graphics video card, follow the following diagram in the settings. In the proposed video driver settings, click on the “Graphics characteristics” item. In the window that opens, select the Color Settings line. Click on it with your mouse. Using the slider, adjust the contrast of the monitor screen as you see fit.
Sometimes it happens that increasing the contrast needs to be done immediately. For example, while watching videos, photos, videos. In this situation, use the functions of the application with which you are viewing this file. Contrast can be easily adjusted by following the following sequence. From the menu item, select Options. In the window that opens, find and select “Image settings.” This setting applies to many programs.
How to change monitor resolution
Often, liquid crystal matrices are designed to work with a certain monitor resolution. The exact number is written in the “passport” for your laptop. It is possible to violate this value, but this will lead to image errors.
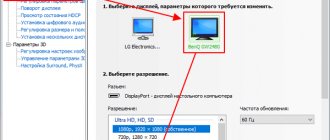
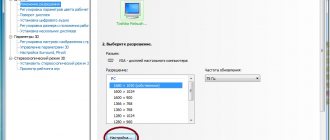
So you've decided to change your monitor resolution. To do this, right-click anywhere on the Desktop. In the menu that appears on the screen, select “Personalization”. Next, in the dialog box that appears, follow the Screen link and select the font size that is convenient for you by moving the cursor to the desired point.
The next step is to configure the screen settings. Follow the link in the top left corner. In the window that opens, specify the resolution that corresponds to the technical specifications of your laptop.
After all steps are completed, save the settings. The screen resolution will change automatically after closing the windows.
Enlarging the laptop screen.
If the selected parameters still cause inconvenience in operation, you should test the functionality of your device.
Device interface
The vast majority of laptop computers are equipped with special keys that can be used to adjust the brightness of the laptop monitor. As a rule, this can be achieved by combining a special service key FN and one of the regular buttons. This depends on the laptop model - each manufacturer has its own way of seeing the convenience and ergonomics of control.
Fn is located at the very bottom of the keyboard, on the same row as the Control and Alt keys. The second button should symbolically depict (in addition to the main symbol) the sun. There should be two of them - one to increase the brightness, the second to decrease. On some device models, you can change the screen settings using the Fn combination and the up-down and left-right arrows.