How to check the webcam online on this site?
To check your webcam online, allow the flash application (at the top of the page) access to your camera and microphone.
To do this, click on the “Allow” button in a special dialog. After this, the signal from the web camera will be automatically checked and you will see a report on the screen. It will contain the result of the camera test for the presence of video and audio signals. If the camera is working well, you will see a corresponding message. If one or both signals are missing, the application will notify you of these problems. In addition, you can test the webcam yourself by simply seeing the video from it, and also making sure that there is an audio signal using a special sound scale on the right side of the application.
WebcamMicTest
| Service name: | WebcamMicTest |
| Manufacturer (author): | Webcam and Mic Test® |
| Status: | For free |
| OS support: | Windows XP,7,8,10 |
| Interface language: | English Russian… |
| Safety: | No viruses |
| Similar services: | — |
| Link to service/website: |
…
…
It’s very simple - follow the link and click on the big green “Check webcam” button...
All that remains is to allow the site to connect to the camera...
...and that’s it - you will see yourself on the screen (if the camera is working, of course).
You can also check your microphone on this site - the “Test Microphone” menu item.
I recommend
Click on “Play” and a heartbreaking sound will begin to broadcast from the speakers, which will be immediately recorded by a microphone - a straight line will turn into a nervous curve. This means that the microphone works wonderfully and is working properly.
Possible problems when checking the web camera.
If you do not see the application and/or it does not load for you, then check whether Adobe Flash Player is installed in your browser, which is required for the checker to work correctly.
If you have allowed access to the device, but one or both signals are not received, then the problems may be the following:
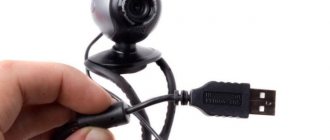
- The webcam is not connected or is not connected correctly. Check the connection or try plugging the camera into a different USB port.
- The necessary drivers are not installed or damaged. In general, this problem is rare, but nevertheless, we advise you to check the availability and relevance of drivers in the settings of your operating system (For Windows - “Device Manager” or through the control panel).
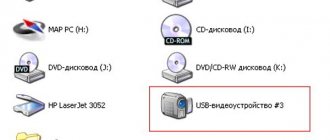
- Flash application tests another device. It often happens that another device is connected to the computer, or there are drivers that can be listed as a multimedia device. In these cases, the camera test program may make a mistake and select the wrong device by default. To fix this problem, right-click on the application and go to Settings:
Then, on the microphone and camera tabs, check that the selected devices are correct:
If another device is selected, then open the drop-down list, click on the correct name, then click the “Close” button and reload the page:
Troubleshooting camera and microphone problems
Most problems are related to the lack of access by the online service, or the entire browser, to the recording devices. If, out of fear, you did not allow the use of the camera, then instead of a real video you will receive an error message: “The camera is not authorized. Please check your media resolution settings." In the Google Chrome browser, chromium browsers (Yandex, Opera) and Mozilla Firefox, click on the padlock to the left of the site name in the address bar:
In the “Camera” block, select “Allow” from the drop-down list. If everything worked in the online test, but the camera does not work on your other site, then a similar procedure must be performed while on that site.
It’s the same with the microphone; if access is denied, the error “Microphone not detected. Please check if your microphone is connected correctly or if your drivers are installed and updated correctly." Just do the same steps for the microphone.
Access settings in Windows 10
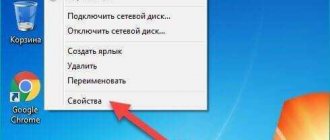
In previous versions of Windows there were no restrictions on the use of media devices in any programs. In Windows 10, you may have accidentally prevented the browser from using your camera or microphone. Right-click on the “Start” button and select “Settings”, then go to “Privacy -> Camera”:
In this settings window the following must be enabled:
- “Allow access to the camera on this device” - enable globally for the entire computer
- “Allow applications to access the camera” - On.
- “Select Microsoft Store apps” - relevant for programs from the Windows Store. The Microsoft Edge browser should be set to "On" if you are using it
- “Allow classic applications to access the camera” - be sure to enable the camera in Chrome, Opera, Firefox, Maxton, etc. browsers.
Also, here you can see which program last used the webcam.
Exactly the same parameters are used to configure the microphone.
Blocking by antiviruses
Some antivirus and antispyware software further restrict the use of recording devices to protect against spyware. The settings will differ depending on the antivirus used. For example, the popular Bitdefender Total Security software has separate settings for the microphone and webcam:
There are different names, for example “Access Camera and Mic”, “AntiSpy”, etc. Maybe you accidentally blocked the camera when you first asked for permission from the antivirus. Find the appropriate settings and correct the situation.
Video and sound are slow
If everything is fine on the test site, but when you actually use the camera on streaming services, your interlocutors write that the video is shown jerkily, then you do not have enough Internet connection bandwidth. In order not to go far, the same service has a speed test. Click on the picture of the planet:
The service will test your Internet connection and show the final results on the same page. IObit tests the speed between your computer and the nearest server. Excellent for testing connections from Russia to Europe, because the nearest server is located in Warsaw.
There are two speeds: download and upload. The quality of the video from the camera is affected by the download speed, i.e. transferring information from a laptop to the Internet. You can roughly determine the quality of the Internet:
- Less than 100 Kbs: sites open slowly, video freezes
- 500 Kbs: it is possible to use the camera with sound not at maximum settings
- 1 Mbs: the camera works with a resolution of 640×480 30 fps without dropping frames and with sound
- 10 Mbs: you can shoot FullHD video with quality 1920×1080 pixels
Internet speed mainly depends on your ISP. Wireless Wi-Fi Internet will be faster if you move closer to the signal source: router or Wi-Fi access point.
If all else fails
If none of the above helped, here are some tips:
- Make sure your webcam is turned on if there is a switch
- Reinstall the driver for the camera. No separate drivers required for microphone
- Using the exception method, launch another browser or the built-in Microsoft Store Camera app.
- Connect your device to a different USB port
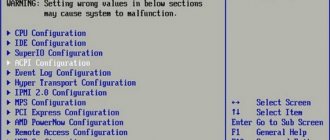
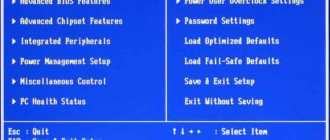
- On a laptop, make sure that the camera is displayed in the “Device Manager”, or you may need to activate the “Web Camera” item in the BIOS
- Increase the recording level and microphone gain in “Control Panel -> Hardware and Sound -> Manage Audio Devices”
- Temporarily disable your antivirus
- It is possible that the webcam may break or the cable may break.
If the light indicator near the camera is always on, then be sure to check the system for viruses; Windows may have a spyware virus that exclusively works with media devices.
How does the online camera test work?
Testing the camera is quite simple. Since Flash technology allows you to work with multimedia devices, it provides special algorithms for checking the presence of a signal. As a matter of fact, these algorithms are used when checking your webcam on this page.
When you allow the flash drive to access your webcam, it immediately begins to receive and analyze visual and audio information streamed from your computer. If one or both signals are not received or are received, but the screen is dark and/or the sound scale does not respond, then the web camera diagnostic result is displayed on the screen. This report describes what exactly is present/absent and gives a verdict. If everything is in order, you will see green checkmarks.
WebcamTest
The following online service for checking the functionality of a webcam. If the webcam is detected by the service, a window will appear on the screen in which the Flash Player plugin will need to be allowed to work with the webcam.
If you see a message, as in the screenshot below, then the webcam was not detected by the service, and therefore you need to double-check the correct connection and the availability of drivers. If this does not help, then this also indicates that it is not working.
Why do you need to check your webcam?
Often, when purchasing a new multimedia device, you need to check how the web camera works and whether it works at all. The same applies to the need to check the microphone on the webcam . And here a slight cognitive dissonance arises, because in most cases this simplest operation turns into a problem, because... Without a direct call to someone on Skype and other instant messengers, it is quite difficult to check the camera. But, you see, it’s stupid to bother your friends with a request to confirm the presence and quality of the signal. free online webcam checking service comes in You don't need to install anything or fiddle with the settings: just go in and check it out.
Also, the need to check the webcam arises when reinstalling the device on a new computer or in a different port. The fact is that the device is not always accurately identified and most often it does not work correctly. In these cases, our online diagnostic service will be an indispensable tool when debugging and configuring a video device.
You can check the webcam here without registration, which distinguishes this site from similar analogues. Of course, this is not required often. However, we advise you to bookmark our service just in case. Also, you can always find testcam.ru in any search engine using the phrases “check webcam online”, “check webcam”, “check webcam”, etc.
Program for working with the camera in Windows 10
Windows 10/8 has a built-in program for webcams, called “Camera”. We go to the search for the “Start” button and write “camera” in the line
We launch the program and see our face:
By the way, the built-in program is quite functional; it can be used to take HDR pictures with a timer and record HD video. But it may turn out that your build of Windows 10 will not come pre-installed with this application. Then you need to go to the Microsoft Store:
- write in the search bar of the Start menu: “store” and select “Microsoft Store”
- in the store search, write “camera” and select the “Windows Camera” application
- install and run the program.
How to turn on the webcam?
Everything is very simple! In 90% of cases, to activate it, you just need to turn on the application that works with the webcam. But you are unlikely to succeed the first time. The camera will not work right away. In order for it to work, you need to configure not only the camera, but also the laptop itself.
If the operating system is installed
Everything can go smoothly and quickly if you purchase a laptop with Windows 7 or 8 already installed.
How to set it up?
- First you need to enter the device manager;
- Your camera will be located at the end of the list;
- Right-click the small triangle icon;
- Next, click “enable” (See the picture below)
What to do if Windows 7 or 8 is not installed on your laptop?
If the operating system is not installed
First, you need to install the operating system, and then configure everything yourself.
The first step is to work with the drivers for the camera of this laptop.
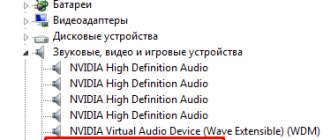
Most often, during installation of the operating system, those drivers that are installed automatically must be replaced with new ones. To find out whether the drivers are correct, you need to launch the device manager:
- Using the Win+R button combination, launch the “Run” dialog box.
- After that, in the “Open” line we write the command: devmgmt.msc.
- The Device Manager of the Windows 7 or Windows 8 operating system will appear.
- Next, we analyze the presence of all devices with a pronounced yellow exclamation mark. The presence of this sign indicates that the computer recognizes the device, but it is not active because the required driver is not available.
What to do?
- First, right-click;
- Then click “Update drivers” and look for the necessary drivers on your PC;
- If the operating system does not find them, then you need to go to the website of your laptop manufacturer and in the “Support” section click on the model of your device;
- Next you should go to “driver and software downloads”;
- There we find the necessary webcam driver, download the installer and open it;
- After all this, you need to restart your computer.
If the entire algorithm of actions is followed correctly, the camera should work.