Here you are trying to connect to Wi-Fi from your phone or tablet. But you see an “IP configuration error” when the IP address is obtained endlessly or the address is not available at all. More often such problems can be seen on the Android operating system. And I will immediately answer why this happens. The smartphone sends a request to the router to provide it with an IP, mask and DNS. This is how the router works. Without a set address, the router will not know where to send information packets.
It's like living in a deep forest and ordering packages. The postman simply won’t know where to deliver them. By default, the DHCP function is enabled on all Internet centers. That’s exactly what she’s giving out all these addresses. But sometimes it happens that the function is disabled or it is broken. And on Android, in the network settings, it is set to obtain an autonomous IP address.
In this case, we have three options if we are unable to connect to the router:
- Go ahead and reboot your router - just unplug it and plug it back in after 2 minutes. If it doesn’t help, read the instructions below.
- Register the IP address manually on the phone;
- Enable DHCP on the router.
This is what we will talk about today. I will tell you everything in detail, with pictures and explanations. But let's probably start with the phone.
Setting network settings on your smartphone or tablet
The disadvantage of this method is that if you manually set the settings on one phone, it will work. But if you try to connect other devices, you will also have to register an IP, mask, etc. on them.
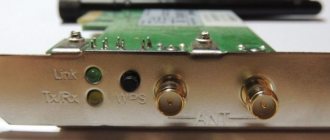
- First we need to find out the IP address of our router. To do this, you can look under the body of the device and look at the label.
- If a DNS address is indicated there, and not an IP, then you can find out through a computer or laptop. Connect to the router via a wire that will need to be plugged into the LAN port.
- Press the key combination “Win + R” on your laptop or computer.
- We enter the command “CMD”.
- In the console, enter “ipconfig” and press “Enter”. Remember the IP from the “Default gateway” line. In my case it is 192.168.1.1, but yours may be different.
- Go to "Settings".
- Now go to the section where you have a Wi-Fi connection. Click on your connection and delete it.
- Now, as usual, click on your network to connect. But don't rush to enter your password. First, click on the arrow in the “Advanced Settings” section.
- Click on "IP Settings" and select "Custom" to enter the settings manually.
- First, enter the IP gateway of your router in the field. For me it is 192.168.1.1. And then the phone's IP address. But you need to enter the same value as the gateway, just change the last digit to any other number, but not 255. I set it to 128, but you can also set it to 16, 18, 28, etc. If, for example, your gateway (router IP) is 192.168.0.1, then the phone’s IP address should be set as 192.168.0.*any number* - for example 192.168.0.124.
- Now let's scroll to the very bottom.
- For DNS we put 8.8.8.8 in the first line, and 8.8.4.4 in the second - these are DNS addresses from Google. They allow all applications on the smartphone to work correctly and websites to open correctly.
- At the very end, scroll up, enter the password and connect.
Additional solutions
As practice shows, in most cases it is resetting the TCP/IP parameters that helps, but this can eliminate the problem itself, but not the cause of its occurrence.
Each user should pay attention to the following:
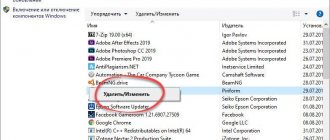
- Do you have software installed that uses a network connection for its purposes? Some smartphone users report that the problem was solved after removing the Bonjour program.
The same applies to other utilities, for example, various operating system optimizers and clients.
- Try disabling your antivirus software, including Firewall.
- Try manually removing the network adapter from Device Manager, then clicking the “Update hardware configuration” button and/or restarting the computer.
- Check that your software drivers are up to date; details on how to do this can be found in this article.
- Check for all important updates for your operating system.
How to enable DHCP on a router?
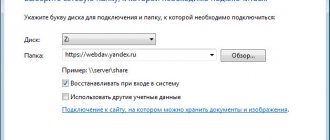
This is the most reliable method, since after this any device will be able to work on a wireless network without problems. First, we need to connect to the router via wire. I have already written above how to do this. Next, open the browser on your computer or laptop and enter the IP or DNS address of the router in the address bar.
Let me remind you that it is located under the router body on the label. You will be asked to enter your login and password for the “Admin Panel”, it is located there. Further instructions will differ slightly from the company that produced the Internet center.
TP-Link
On older models: select “DHCP” and enable the mode. Next “Save”.
On new models – “ Advanced settings” – “Network” – “ DHCP server” . Activate and save.
D-Link
On older models, select “Network” . Next is “ LAN” and in the “ DHCP server” to the “Allow” . Don't forget to click the "Apply" button. On new firmware everything is the same, but first you need to go to the “Advanced settings” section.
ASUS
“Local network” – “DHCP server” – set “Yes”. In the lower left corner, click “Apply”.
The adapter does not have valid IP settings: what is the problem?
This situation can occur either when the current connection is configured incorrectly (it does not matter whether Wi-Fi access or a wired Ethernet connection is used) or when problems arise on the part of the provider.
In both cases, it will be reported that the connection does not have valid IP settings.
To check in the network connections section from the RMB menu on the selected network, you need to select the status bar, and then click on the details button in the new window. Next, you should see if the IP address, gateway, and DHCP and DNS server fields are filled in.
If the IP address contains a combination other than 192.168 and beyond (for example, 169.254, etc.), such a connection will not work, and the problem is that the protocol is incorrectly configured on the terminal itself. If there are no values for the specified servers, we can assume that the problems occurred on the provider’s side (“the DHCP server crashed”).
Zyxel Keenetic
At the very bottom, select the second partition with two computers. Next, go to the second tab “Segments”. Click on the first group “ Home”.
In the “DHCP Server” , enable the function and apply the settings.
Retrieving IP Parameters
If a malfunctioning connection receives its IP address automatically, then the problem in question can be solved by simply updating the IP address received from the router or provider. To do this, follow these steps.
- Launch Command Prompt as an administrator and use the following commands in order.
- ipconfig /release
- ipconfig /renew
Close Command Prompt and check if the problem is resolved.
Often this method does not help, but at the same time it is the simplest and safest.
A rarer solution
I'll tell you from my own experience. I had this problem when I reflashed my router. At the same time, there was Internet on the computer that was connected via wire. But I still couldn’t connect to the wireless network. I went into the settings, downloaded new firmware, and it also did not work. Although I installed it from the official website.
So if you previously updated the firmware manually or through the device’s Web interface system, then it’s worth resetting the settings to factory settings. Just hold down the “ Reset” for 15 seconds. We wait five minutes and configure it again. Not all firmware fits smoothly on the router.
Removing and reinstalling the network card driver
- Win+R;
- devmgmt.msc;
- In the “Network adapters” section, select our adapter. Now, very carefully, if you are connected via Wi-Fi, then select the adapter labeled: “Wireless”, “Wi-Fi” or “802.11”. If you have a wired connection, select a network card. Right-click and select “Update Drivers”. If this does not help, then delete it.
And now about installing a new driver. The drivers for the built-in network card should be installed after rebooting the PC. But if this does not happen or you have removed the Wi-Fi module, then go to a friend who has the Internet and download the software from the Internet.
The network adapter driver for a laptop can be downloaded from the official website of the laptop manufacturer. You can also connect to the router via wire and download “Firewood” this way. To search, enter the name of the model in the line of any “search engine” and go to the site.
For PC things will be a little more complicated. To do this, you need to know the name of the motherboard. Since this is where the Wi-Fi module is usually embedded. To do this, enter the following commands on the command line:
wmic baseboard get Manufacturer wmic baseboard get product
This will tell you the company that made your motherboard and its model number. Next, simply enter this name into the search engine and download the found drivers.
Still won't connect to WiFi
If the IP does not work and takes a long time to connect, after following all the above instructions, then this may happen in cases of system failure of the Android phone. The system begins to malfunction due to viruses or third-party programs. This is especially significant when all devices and other phones and tablets connect, but yours does not. Then it's worth resetting some settings. Go to “Settings” – “System” – “Reset settings”.
Now reset each item one by one. First, reset the “Wi-Fi, mobile Internet and Bluetooth ” settings. We reboot the phone and try to connect to the router’s network again. Then we reset according to the second point - and so on. Finally, if all else fails, reset to factory settings.
Problem with Avast antivirus
There is a lot on this issue on the forums, some users say that the problem began precisely after installing the Avast antivirus. Therefore, there are a number of recommendations:
- Go to “Settings” – “Troubleshooting”;
- Check all the boxes in the standard value section as in the picture above and click “Reset”.
- If this does not help, then remove the program itself from your PC and download the latest version from the official website, and then install it again.
- Right-click on the Avast icon and turn off offline mode.
If the problem is in the antivirus program, then try some other antivirus. There are and will always be problems in programs, and there is no point in waiting for developers to fix them.
Rebooting the Router
Often the problem can be solved by rebooting the router, but not always. If the problem remains after a reboot, you should go further in the article, but the “reboot” must be done correctly.
- You can reboot by clicking on the button in the left or right corner of the router’s administration panel. For those who don’t know, the “admin panel” can be launched by entering a simple IP address in the browser’s address bar: “192.168.1.1” and logging in with the username and password: “admin”;
Review and configuration of the D-Link Dir-320 modem
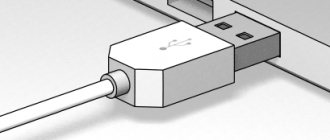
- You can disconnect the router from the power supply and wait 30-60 seconds, then turn it on and try to connect again.
If rebooting does not help, you should reset the gadget to factory settings. There are also 2 methods: using the administration panel or by pressing the special “Reset” button on the back panel of the router. This button is often hidden in the body, and to press it you need to use a toothpick or a needle.
Using the Asus router administration panel as an example, you should do the following:
- go to the address “192.168.1.1” and log in;
- go to the “Advanced” - “Administration” tab;
- open the “Settings” tab;
- press the button: “Reset” opposite the first line “Factory settings”.
In the case of a physical button, the reset is carried out differently depending on the router model. You need to do this with the router turned on or off. Information about this is on the w3bsit3-dns.com forum or in the device instructions. It’s worth taking a toothpick or a needle and using it to press the “Reset” button on the back panel of the router. Finding the button is very easy - it is a deep small hole near the Ethernet port or connector for connecting the power supply. You need to press the button and hold it in this state for about 30 seconds, then turn on the router.
Important! After resetting the router to factory settings, all settings that the user had previously set will be lost.
Resetting TCP/IP protocol settings
The first thing you should try when a message appears that the network adapter does not have valid IP settings is to reset the network settings, in particular the IP protocol (and WinSock) settings.
Attention: if you have a corporate network and the administrator is in charge of setting up Ethernet and the Internet, it is not advisable to perform the following actions (you can reset some specific parameters necessary for work).
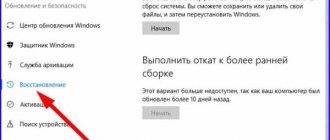
If you have Windows 10, I recommend using the function provided in the system itself, which you can find here: Reset network settings in Windows 10.
If you have a different version of the OS (but it is also suitable for the “ten”), then follow these steps.
- Launch Command Prompt as an administrator, then run the following three commands in order.
- netsh int ip reset
- netsh int tcp reset
- netsh winsock reset
- Restart your computer
Also, to reset TCP/IP settings in Windows 8.1 and Windows 7, you can use the utility available for download on the official Microsoft website: https://support.microsoft.com/ru-ru/kb/299357
After restarting your computer, check to see if the Internet is working again and, if not, if the troubleshooting shows the same message as before.
Why Android can't get an IP address
An error while obtaining an IP address occurs when a user connects to a Wi-Fi network using the built-in wireless data exchange module. The Android device scans available nearby connections and offers a list of detected networks to the user to choose from. When a specific Wi-Fi network is selected and a password is entered, the gadget tries to obtain an IP address for itself in the selected network.
If any problem occurs, the device cannot obtain an IP address on the Wi-Fi network. The device automatically disconnects from this network, then reconnects and once again tries to obtain an IP address. And such attempts do not stop.
Increase
There are many ways to fix the error in obtaining an IP address when connecting to a network via Wi-Fi on an Android device. It is important to correctly understand the causes of this error.
Read There is no Internet via WiFi on Android
There are several reasons that can cause an error when obtaining a Wi-Fi IP address. Below are the main options:
- The reason may be the Wi-Fi router. If this product cannot assign the appropriate IP address to the gadget, then an error may occur when receiving it in Android.
- The most basic option is an incorrectly entered password for the Wi-Fi network. It is possible that one of the characters is missing, a lowercase letter is entered instead of a capital one, or an incorrect number is entered. Passwords are case sensitive. You need to check your passwords carefully before pressing “Enter”.
- An error occurred while obtaining an IP address due to network security measures.
- The problem is related to poor Wi-Fi network coverage or conflicting IP addresses with other devices connected to the same network.
- An error in obtaining an IP address while connecting to a Wi-Fi network may be due to the device’s attempts to obtain an IP address automatically. The mobile gadget has DHCP (dynamic IP address) enabled, which is why a vicious circle arises. The Android device keeps trying to connect, but cannot do so. This will continue until the error is corrected.
How to fix the error
Depending on the version of Windows, the methods for fixing the error may vary. The following are the most optimal solutions to the problem for each OS.
Windows 10
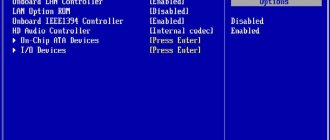
In Windows 10, it is better to resolve the problem through the BIOS settings:
- Enter the BIOS by pressing the appropriate key on the keyboard.
- Depending on the BIOS version and motherboard model, the design and location of items and partitions may vary, but the algorithm presented here is almost universal. Open "Advanced".
- You need to go to the “Onboard Devices Configuration” section.
- To enable the network card, you must specify the value “Enabled” opposite “Onboard Lan”.
Windows 8
In Windows 8, the following method will help you deal with the error:
- You need to enter the short command “cmd” in the search bar, and then open “Command Prompt” using administrator rights.
- Next, you need to sequentially execute the short commands “ipconfig /release” and “ipconfig /renew”.
- After closing the Command Prompt, try to establish an Internet connection again.
Windows 7
In the case of Windows 7, the best solution to the problem is as follows:
- You need to sequentially open “Start” -> “Accessories” -> “Control Panel” -> “All items ...” -> “Network and Sharing Center ...”.
- Having opened the network card status window, click LMB on the “Properties” button.
- Find the item you need, then select it and click “Properties” again.
- As a result, a window will appear in which you can set your own parameters.