Cropping an image
To do this, double-click on it with the left mouse button. The “Working with Pictures” – “Format” tab will open. In the “Size” group there is a “Crop” button; click on the arrow under the word itself.
There will be several options in the list that opens. The simplest one is “Cutting”. Click on this item.
After this, black markers will appear along the edges. By moving them, you can cut them the way you need.
In order to maintain proportions and cut, for example, the top and bottom equally, hold down the Ctrl key and move the black marker, which is located in the middle of the top edge, to the center.
Accordingly, on the right and left, everything is done in the same way - by holding Ctrl and moving the black marker, which is located on one of these faces.
If you hold down Ctrl and drag one of the corner markers, then the drawing will be cropped equally on all sides.
To exit the cropping mode and remove the black markers along the contour, press the “Esc” button or click the mouse anywhere else on the document page.
How in
Computers November 3, 2016
When working with the text editor MS Word, you have to face the task of editing images. Therefore, quite often users have to puzzle over the question of how to crop a picture in Word or how to rotate an image without using third-party programs.
But this is not a problem at all, because MS Word provides standard tools for quickly cropping pictures, aligning them, and also removing unused image fragments. As a result, you can get the desired result without installing additional software and forever close the question of how to crop a picture in Word.
Let's first try to understand what pruning is. And then, how to crop a picture in Word 2010 or later versions of this software product.
About the concept of “pruning”
So, cropping is the process of removing part of a drawing that does not need to be displayed in the document by reducing its vertical and horizontal sides, as well as other shapes or smoothing. Typically, cropping is used to quickly hide unwanted parts of a graphic image or remove them from a document.
Cropping images in Microsoft Word 2010
In MS Word 2010, the image cropping feature has been significantly improved compared to previous versions. Therefore, using this product release, you can already learn how to crop a drawing along the contour.
In Word 2010, it is also possible to use cropping proportions and fill for the contours of the shape that is subject to change. So, for example, you can trim a picture to the shape of any shape available in the standard set of the office suite.
Video on the topic
Cropping a picture along the contour of a figure
This can be done not only in the standard way, but also using any of the figures that are in the corresponding list.
Select the object and click the “Crop” – “Crop to Shape” buttons. Then select one of the available shapes in the list and click on it.
The image will look like this in a non-standard way.
How to crop a picture in Word
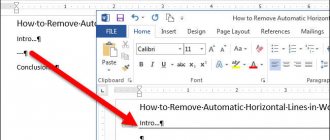
- Select the picture you want to crop. The Format tab will open.
How to crop a picture in Word – Crop a picture in Word
- On the Format tab, click the Crop in the Size group.
How to crop a picture in Word – Crop button
- Cropping markers will appear around the image.
How to crop a picture in Word – Markers for cropping a picture in Word
- Click, hold and drag the desired marker to crop a picture in Word .
How to crop a picture in Word – Crop a picture in Word
- Crop button again , or click on the empty field. The picture will be cropped.
How to crop a picture in Word – Cropped picture in Word
Use corner markers to horizontally and vertically in Word
How to crop a picture in Word – Corner markers for cropping a picture horizontally and vertically
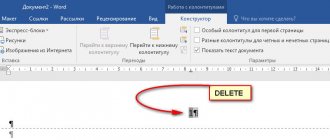
Removing cropped parts of an image
After you remove unnecessary parts, they do not disappear from the part page, but simply do not appear on the document page. But if you select an object and click on the “Crop” button, you can again see what it was like in its original form.
In order for no one else to see the source except you, you need to get rid of unnecessary parts, that is, delete them.
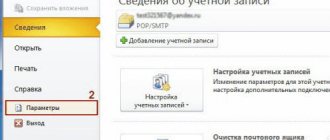
This is done as follows. Double-click on the picture to go to the “Working with Pictures” tab. In the Modify group, click the Compress Pictures button.
A window like this will open. In it, check the boxes next to “Apply only to this picture” and “Delete cropped areas of pictures” and click “OK”.
If you have cropped several pictures in the document, then you do not need to check the box “Apply only to this picture” in order to perform this action for all pictures.
Now, when you try to crop the picture again, after clicking the corresponding button, it will not be shown in its original form.
How to crop a picture in Word
When working with Microsoft Word, there is often a need to insert a picture or drawing and fit it to the existing text.
And if there are usually no problems with inserting images, their adjustment often creates problems for users. In this material you will learn how to crop a picture or drawing in Word. The material will be useful to users of modern versions of Word, such as Word 2007, 2010, 2013 and 2020.
In order to crop a picture or drawing in the Word editor, you need to select this image with the mouse, go to the “Format” tab and click on the “Crop” button there.
As a result, special elements that are used for cropping will appear on the picture you select. They will be located in the corners of the picture, as well as in the middle of each side. Left-click on one of these elements and, without releasing the button, drag in the direction in which you want to crop the image.
After you release the mouse, it will become clear how the image size will change after cropping. If this cropping option suits you, then press the Enter key to confirm the changes. If you want to crop the picture differently, then click on the cropping element again and move it to a different position.
To undo cropping of a picture, simply use the Ctrl-Z key combination.
Resize the picture without cropping it
If the large size of the pictures inserted into a Word document simply does not suit you, then cropping is not the only option. You can simply change their size.
This is done with the help of markers that appear along the contour if you click on it with the mouse. When resizing, remember to hold down the Ctrl key to maintain the aspect ratio.
If you need to make an image of a certain height and width, then select it and go to the “Working with Pictures” tab. In the "Size" group, enter the required values in the appropriate fields.
Please note that by changing, for example, the height, the width value will also change. This happens because in the default settings the option to save proportions is selected. To remove it, click on the small arrow to the right of the “Size” group name.
Next, in the “Scale” section, uncheck the “Maintain aspect ratio” box and click “OK.”
Now you can specify the dimensions of the sides as you need.
I hope these methods will be enough to crop the picture. Remember that MS Word is a text editor; if you need to perform any other manipulations with the image, it is better to use one of the graphic editors, for example, Photoshop or Paint.NET.
Rate this article:
About the author: Oleg Kaminsky
Webmaster. Higher education with a degree in Information Security. Creator of the portal comp-profi.com. Author of most articles and computer literacy lessons
- Related Posts
- How to number pages in Word
- Line numbering in Word
- How to put a cross in a square in Word
Crop an image in the office
Crop image margins
- Use Insert
>
Picture
to add a picture to an Office file (such as a Word document, PowerPoint presentation, or Excel workbook). - Right-click the image. A pop-up menu appears with two buttons directly above or below the menu. Trimming
- one of the buttons.
- Select harvest button.
Black crop marks appear at the edges and corners of the image.
- Crop the image by doing one of the following:
Pull inward on the side trim handle Trim two adjacent sides at the same time Pull inward on the corner trim handle Uniform cutting on two parallel sides at once Hold down Ctrl and drag the side crop handle inward You can also expose the image or add margins around the image by dragging the crop handles outward rather than inward.
- (Optional) To change the position of the cropping area, either change the cropping area by dragging the edges or corners of the cropping rectangle, or move the image.
- When you're done, press Esc or click anywhere in the document outside of the image.
Note.
Crop tools are not available for shapes, but in Office 2010 and later, you can resize a shape and use the
Edit Points
to achieve a crop-like effect or to customize a shape. For more information, see Using Edit Points to Edit or Crop a Shape .
Trim to a shape, such as a circle
See Crop an image to its shape.
Other types of crops
Select a title below to open it and view detailed instructions.
Cropping an image to a regular photo size or aspect ratio makes it easy to fit into a standard picture frame. You can also use this tool to preview how an image will fit a specific aspect ratio before cropping.
- Use Insert
>
Picture
to add a picture to an Office file (such as a Word document, PowerPoint presentation, or Excel workbook). - Click on the picture.
- Click Working with drawings
>
Format
and in the
Size
, click the arrow under
Crop
. - From the menu that appears, select Aspect Ratio
, then click the ratio you want.
A crop rectangle will appear showing how the image will look when cropped at the selected aspect ratio.
- If desired, adjust the crop area using the crop handles as described in the "Cropping an Image" section.
- When you're done, press Esc or click anywhere in the document outside of the image.
After you crop an image, the cropped areas remain part of the file and are hidden from view. You can reduce the file size by removing the cropped areas from the image file. This also helps prevent other people from viewing parts of the image that you have removed.
Important:
If you delete the cropped areas and later change your mind, you can click
the Undo
button to restore them. The deletion can be canceled until the file is saved.
- Select the image or images from which you want to remove cropped areas.
- Click Image Tools
>
Format
and in the
Customize
, click
Compress Images
. A dialog box with compression options will appear.If you don't see the Picture Tools
and
Format
, make sure you
select
an image. You may have to double-click the image to select it and open the
Format
.
Also, if your screen size is reduced, you may only see the Compress Images
. - In chapter Compression options
Make sure the
Remove cropped areas from images
.To remove crops only for the selected image or images, rather than all images in the file, select the Apply to this image only check
.
Optionally select Resolution
.
- Click OK
.
See also
Insert pictures
Add a picture to a Word document
Reduce image file size
Use Word Layout Options to Move Images
Wrap text around images in Word
Crop image margins
- Use Insert
>
Pictures
to add a picture to an Office file (such as a Word document, PowerPoint presentation, or Excel workbook). - Click the image, then click the tab Image format
on the toolbar ribbon.
- On the tab Image format
select
Crop
.Black crop marks appear at the edges and corners of the image.
- Crop the image by dragging any crop handle inward. If you drag one of the corner handles, it will trim two adjacent sides at the same time.
- Click to the side of the image to see the cropped image.
Note.
Once you crop an image, the cropped portions are hidden but remain part of the image file. To permanently remove the cropped portion and reduce the image size, see the "Removing cropped areas of an image" section later on this page.
Trimming to a specific shape
See Crop an image to its shape.
Remove cropped areas of an image
Even after parts of an image are cropped, the cropped parts remain as part of the image file. You can reduce the file size by removing crops from the image file. This also helps prevent other people from viewing parts of the image that you have removed.
Important:
Deleting cropped areas of an image cannot be undone. Therefore, you should only do this after you are sure that you have made all the necessary crops and changes.
- Click the image or images from which you want to remove cropped areas.
- On the tab Image format
click
Compress Images
.(If you don't see the Image Format
, make sure you select an image.)
- Check the box Remove cropped areas of images
.
To remove crops from only the selected image or images, rather than all images in the file, select Selected Images Only
.
See also
Insert images in Office for Mac
Move, rotate, or group an image, text box, or other object in Office for Mac
Change the size of a picture, shape, text box, or WordArt
Control text wrapping around objects in Word for Mac
In Word for the web and PowerPoint for the web, you can perform simple image cropping—cutting off unwanted areas of the image. However, only desktop applications can remove cropped areas from an image.
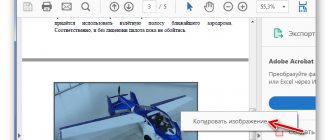
Crop image
- Right-click the image and select Trim
in the toolbar floating above the image.
Crop option in Word
Crop option in PowerPoint
- Hover your mouse over one of the black crop handles that appear around the edges of the image.
When you do this, your mouse pointer will look something like this:
- Corner trim handle:
- Side trim handle:
- To trim each side, drag the black crop handle inward.
- When you're done cropping, right-click the image again and select Trim
to save changes.
,
How to take a screenshot in Word
Now let's see how to insert a screenshot into Word directly from the text editor window.
In the top menu, open the “Insert” tab, in the “Illustrations” group there is a “Snapshot” tool. Left-clicking on the Snapshot tool will open the Available Windows window, which displays thumbnails of open windows on your computer screen.
The preview displays thumbnails of all currently open (expanded) applications.
To insert a screenshot into a Word document, you need to perform two steps:
- Click the mouse cursor in the place in the Word document where you want to insert the screenshot.
- In the "Available Windows" collection, left-click on the desired thumbnail.
That's it, inserting a screenshot into Word is complete.
Only one screenshot is added to a Word document at a time. To add a second screenshot, click again in the desired location in the document, and select the desired image from the “Available Windows” collection.
Now you can start formatting the image. After switching to the “Format” tab, the user has the opportunity to format the image in a Word document.
The inserted image can be rotated at a certain angle, and the appropriate layout options for the text can be selected. In the “Picture Styles” group, click on the “Picture Border”, “Picture Effects”, “Picture Layout” buttons, select the necessary options to bring the image into the desired form, according to your preferences.