Hi all! Recently my router broke and I had to look for a replacement. Since I understand that this device will be with me for many years, I approached the choice thoroughly and seriously. As a result, out of 20 models, I chose the Giga router from Zyxel Keenetic. Since there is no clear information or good review on the Internet, I decided to write my own.
In general, today we will inspect it, connect it, configure it and test it. If you have any additions or questions, write in the comments. Also, if you are already the happy owner of this router, then write your review there.
Unpacking and Inspection
The router is in this beautiful box. By the way, I don’t recommend throwing away the box right away if you don’t want to have problems with the warranty. It also contains a lot of important information that you may need in the future.
Inside the box, a standard set awaits us: a network cable, a power supply, the device itself and a user manual written in Elvish. Why in Elvish? – yes, because the average user will not understand a ton of technical concepts that are described there. I will try to write in ordinary rural language.
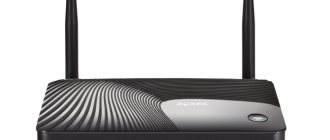
Giga Keenetic was specially designed so that it can be easily placed in the middle of a beautiful room - the design is simple, classic, suitable for any interior. Now let's take a closer look at it.
Routing Testing
First, we ran Giga II routing tests, measuring inbound throughput using one and five streams. Thus, using an IP protocol, the data transfer rate per stream reached 740 Mbit/s, with an increase in the number of streams to 5 – 850 Mbit/s. If you use the PPTP protocol, the routing speed is reduced to 170 Mbit/s. An L2TP connection loads the system even more. stronger and the speed decreases to 140 Mbit/s. Considering that most tariff plans do not provide speeds higher than 100 Mbit/s, such a reserve can be considered a reserve for the future rather than a requirement of the time. Interestingly, the hardware platform itself has a performance reserve for further increasing speed; this can be seen from the processor load, which is far from the maximum.
Routing speed for five streams
Performance and Features
I bought the Keenetic Giga router primarily because of its fairly powerful processor. If anyone doesn’t know, new routers most often use the WPA2 encryption method, which can greatly slow down the speed - because the router needs to constantly encrypt and decrypt data packets. Inside there is a MediaTek MT7621AT processor with two MIPS1004Kc cores at 880 MHz.
Plus, it should perform well with a large number of connected devices - after all, each connection needs to be processed as quickly as possible. The device can simultaneously distribute two networks in two bands: 2.4 and 5 GHz. I'll tell you briefly:
- 4 GHz is the most common frequency. It has an average speed and a long range, but if there are a large number of neighboring routers, it can start to emit noise or pick up interference.
- 5 GHz is a more noise-resistant frequency. Suitable for gaming and connecting Smart TV due to high speed. But there is one drawback - the range is lower than that of 2.4 GHz.
You can read more about frequencies here.
As you understand, both of these frequencies are needed, as they have their own pros and cons. You can set your own names and passwords for each network. However, devices connected to different networks will be able to exchange data between the two networks. All this is achieved through the latest wireless module – MediaTek MT7615DN.
It has an AC1300 class that can boost speeds up to 400 Mbps (802.11b/g/n) when using the 2.4 GHz frequency, and has speeds of 867 Mbps (802.11a/n/ac) when using the 5 GHz frequency. Similarly, there is support for MU-MIMO - a technology that allows you to transmit data simultaneously in several streams.
I recommend reading about MIMO in more detail here.
We also have 4 antennas with a gain of 5 dBi, which should be enough for a 4-5 room apartment. The only downside I can note is that the antennas cannot be unscrewed. Therefore, if you want to strengthen them, you will have to disassemble the router and disconnect the antennas from the board, which is not very convenient.
All local ports have a speed of 1000 Mbps. Likewise, the WAN (Internet) port has a similar speed.
| Exact model name | KN-1010 |
| CPU | MT7621A 880 MHz, 2 cores |
| RAM | 256 MB DDR3 |
| Flash memory | 128 MB |
| 2.4 GHz standards | 802.11 b/g/n |
| 5 GHz standards | 802.11ac/b/g/n |
| Maximum speed at 2.4 GHz | 400 Mbit |
| Maximum speed at 5 GHz | 867 Mbit |
| Multi-streaming | MU-MIMO |
| Number of antennas | 4 |
| Transmitter power | 20 dBm |
| Antenna gain | 5 dBi |
| USB | 2.0 and 3.0 |
| LAN ports | 4 x 1000 Mbit per second |
| SFP port | 1 |
| Internet port | 1 |
| Mobile Internet | There is support for 3G/4G USB modems |
| DSL | Only using (ADSL2+/VDSL2) Keenetic Plus DSL |
| Nutrition | DC 12V 2.5A |
| Dimensions | 21.4 × 15.4 × 3.3 cm |
| Modes | Router, WISP client/media adapter, access point, repeater |
Conclusion
The third generation Zyxel Keenetic Giga is a multifunctional device that supports modern technologies. It is able to satisfy the needs of the most demanding user.
pros
The advantages of Kttnttic Giga include:
- reliability;
- simplicity, flexibility of configuration;
- Russian-language interface;
- multifunctionality.
Minuses
No deficiencies found.
Additional chips
- DLNA server – we connect a hard movie to USB and watch it on a TV, phone, computer.
- FTP – file server.
- SMB v.1/2/3, AFP 0 – the ability to remotely access printers.
- Print server – here I think everything is clear.
- IPv6 (6in4) – the ability to use new generation IP addressing.
- Parental controls, filtering, telemetry protection, Yandex.DNS, SkyDNS - I’ll tell you more about this thing below.
- BitTorrent client Transmission – connect your hard drive and download torrent files to it.
- VLAN – virtual local network.
- VPN server (L2TP/ IPSec, PPTP, OpenVPN) – if you need a free VPN, you can see my selection here (you can use these settings in this router).
- Entware is a repository for Linux applications.
- Keenetic Plus modules - many additional utilities that help manage and control the network on the router. They can be freely removed or installed on the router firmware.
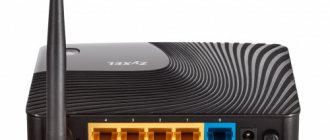
Appearance
Before we start connecting, let's look at the appearance of the device and get to know it better. I advise you not to skip this step so that you do not get confused in the future.
- Reset button – to reset the settings to factory settings, you just need to hold it down for 10 seconds. This procedure is worth doing if you took it from a friend, acquaintance or bought it secondhand.
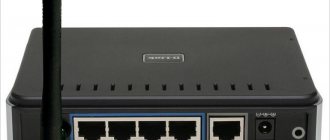
- 4, 3, 2, 1 – LAN ports for connecting local devices: computers, laptops, TVs, printers, CCTV cameras – in general, all devices that will be in your home.
- Internet ports - you can use any of them, but separately. One is designed for connecting to twisted pair, and the second (SFP) is for connecting to fiber. I repeat once again that they work separately and cannot be used at the same time!
- Input for the power supply - there is no need to turn it off at night or for some time. The device can work continuously all the time.
Next, let's turn it over and look at the indicators that will help you in case of any connection problems.
- Power – the device is turned on or off.
- Internet – whether there is an Internet connection or not.
- “FN1” and “FN2” are special indicators that can be manually assigned in the settings. By default, they respond to connections to USB ports.
- Wi- Fi – I don’t think it’s worth writing about “it’s on or it’s not on.” If it blinks quickly, it means data is being transferred via a wireless network. If it blinks rarely, then there is a connection via WPS. So if you are hacked via WPS, you will see it!
- Wi- Fi button – helps you quickly connect via WPS. If you simply press this button once, the WPS connection mode will start. If you hold it down for 3 seconds, you can disable or enable the entire WiFi network.
Now let's look at the sidebar.
- Buttons “FN1” and “FN2” - they can be reconfigured to any function in the settings. But by default they will safely disable the USB drive or modem.
- USB (Blue) is USB 3.0 with a speed of 90 MB per second. USB (gray) is USB 2.0, which is most often used to connect USB modems.
- Side antennas – 4 antennas in total.
A short review of Zyxel Keenetic GIGA III: appearance, characteristics, equipment, price
The first thing I want to share are the impressive characteristics of the model:
- Wi-Fi 300 + 867 Mbit/s, 802.11a/b/g/n/ac standards.
- Automatic distribution of clients between 2.4 and 5 GHz bands.
- Four power amplifiers and specially designed 5dBi antennas for better coverage.
- Dynamic selection of the optimal Wi-Fi radio channel.
- USB 3.0 and 2.0 ports for drives, printers and 3G/4G modems.
- File server up to 80 MB/s, Time Machine, torrent client, DLNA / UPnP AV.
- IPTV and Smart TV support.
- Yandex.DNS and SkyDNS protection.
- Automatic prioritization of IntelliQoS traffic.
On the front there are indicators for some connectors, buttons and functions: power, Fn button, Internet presence, network activity at 2.4 and 5 GHz, two USB connectors. Above for hardware connection of devices without a password.
There are only 7 status indicators for different outputs and functions on the front
What's behind: in the center there are 4 outputs for the home network, on the left there is a small hole with a button for resetting the settings to factory settings, on the right there is a blue output for the Internet cable. Next is the output for the power adapter and the button itself to turn on the device.
Separate from the local slots there is an output for the Internet provider cable
On the side you will see a pair of Fn buttons, as well as two USB slots. The delivery set is classic: the Giga device itself, instructions, Ethernet cable, power adapter. Approximate price - 4400 rubles.
The model has two USB outputs of different versions
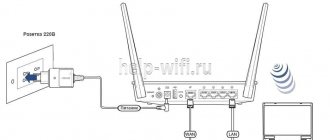
Connecting to a router
To connect to the Internet you can use 4 methods:
- Connect the cable from the provider to a regular WAN port (3).
- Connect the optical cable from the provider to the SFP port (3).
- Use a USB 3G/4G modem and connect it to the USB port on the side (11).
- Use aDSL connection to your telephone line. To do this, you can use Keenetic Plus DSL and connect to a USB port. If you have another aDSL modem, then you need to configure it in “Bridge” mode and connect to the WAN port (3).
Now you need to connect all local devices - this can be done in two ways:
- Use a network cable and connect to one of the LAN ports.
- Use Wi-Fi.
To set up, I will connect my laptop to the LAN port using the network cable that comes with the kit. But you can connect to it from your phone, tablet or from the same laptop via Wi-Fi. The network name and password for it are on the label under the case.
⇡#Technical characteristics
ZyXEL Keenetic Giga II, and at the same time the simple Keenetic II along with Keenetic Ultra, is based on the Mediatek (formerly Ralink) RT6856 MIPS processor operating at a frequency of 700 MHz. In addition, it has a pair of PCI-E and USB interfaces, supports hardware NAT acceleration, and also has a gigabit network interface connected to the Realtek RTL8367RB switch. The Ralink RT5392 radio module in this case provides support for Wi-Fi 802.11 b/g/n (up to 300 Mbit/s) with a MIMO 2×2:2 configuration. All this is spiced up with 256 MB of DDR2 RAM and 16 MB of system flash memory. Taken together, we get a good modern hardware platform. It works under the control of the NDMS system, which is internally somewhat different from most firmware used in routers.
| Router ZyXEL Keenetic Giga II | |
| Wi-Fi standards | IEEE 802.11 b/g/n (2.4 GHz) |
| Chipset/controller | Mediatek/Ralink RT6856 (700 MHz) + RT5392; Realtek RTL8367RB |
| Memory | RAM 256 MB/ROM 16 MB |
| Antennas | 2 x detachable omnidirectional 5 dBi; RP-SMA; 2x2:2 MIMO |
| Safety | 64/128-bit WEP/WPA/WPA2, 802.1x, 802.1Q, WPS |
| Wi-Fi speed | 802.11n: up to 300 Mbps, 802.11g: up to 54 Mbps, 802.11b: up to 11 Mbps |
| Interfaces | 5 x 10/100/1000 Mbps LAN/WAN, 2 x USB 2.0 |
| Indicators | Power, Network status, 1 x Wi-Fi, 5 x LAN/WAN, 1 x USB |
| Hardware buttons | Power, Wi-Fi + WPS off, factory reset, FN button |
| Dimensions (WxDxH) | 158x110x32 mm |
| Weight | 270 g |
| Nutrition | PSU AC 100-240 V, 50/60 Hz, 0.5 A; DC 12 V, 1.5 A |
| Guarantee | 1 year |
| Price | 3,300 rubles |
Login to settings
Once you have connected to the device's network, you can begin configuration. To do this, you don’t need to install anything and you just need to go to the router’s Web interface. Open any available browser and enter my.keenetic.net into the address bar. You can also use one of the addresses: 192.168.1.1, 192.168.0.1 or 192.168.10.1.
NOTE! If after logging in you are asked to enter your username and password, then most likely someone has used it before. Find the reset button (1) on the router and press it for 10 seconds. The device must be turned on.
Pre-installed torrent client
Thanks to the presence of a torrent client pre-installed in the router, you can organize something similar to NAS network drives by connecting a hard drive or flash drive to the USB port. In the web configurator, in the Applications > BitTorrent Client menu, select the Enable checkbox and select the directory to store the files. You can specify the entire media. To add a torrent, you need to enter the address 192.168.1.1:8090 in the address bar of your browser or click on the “Manage Icons” button. In the menu that opens, select the torrent file and click OK. If your TV supports the DLNA protocol, you can make files available to it. To do this, through the web configurator in the “Applications > DLNA Server” menu, check the “Enable” checkbox and specify the folder (or the entire USB drive) in the “Directory for media files”.
Wi-Fi setup
To do this, select “Home Network” on the left. Next you should see two networks: 2.4 GHz and 5 GHz. For each, you can set a separate name and password. You can even set the same values. To improve reliability, it is best to use the “WPA2-PSK” encryption type. Here you can also set a work schedule - for example, turn off the network at night. On the other hand, the device can safely work at any time.
Setting up the ZYXEL Keenetic Giga III router
Now you need to configure the router. First of all, let's secure the wireless network by setting a password for wi-fi. Then you will need to find out what type of connection is used to access the Internet, is it PPTP, L2TP or PPPOE. You can find out by calling your provider (this is the organization with which you entered into an agreement to provide Internet services). So, let's start setting up the router.
Setting a password for wi-fi
The ZYXEL Keenetic Giga III router is dual-band, which means that the router supports 2 operating frequencies for wireless connections, 2.4 GHz and 5 GHz. 5 GHz allows for higher throughput, but has a shorter range than 2.4 GHz; 2.4 GHz is more susceptible to interference. 5 GHz is not supported by all devices. You can select both, and depending on the circumstances, change the wireless connection on the devices. I offer Video instructions for setting up a Wi-Fi password on the ZYXEL Keenetic Giga III using the ZYXEL Keenetic Omni II router as an example.
Let's also take a written and illustrative look at setting up a wi-fi password on the ZYXEL Keenetic Giga III in two frequencies. 1. On the Web interface, click on the “ Wi-Fi network 2.4 GHz access point network settings . 2. Check to see if the box next to “ Enable access point ” is checked, then in the “ Network name (SSID) ” field, come up with and specify a name for the wireless network; this name will then light up when you connect to the network. I advise you to indicate the frequency used in the name of the network, for example: “imya seti 2.4”. 3. “ Network security ” - WPA2-PSK . 4. Now you need to set a password for the wireless network. In the “ Network key ” field, we come up with and enter a password. 5. “ Channel width ” - “ 20 MHz ”. 6. Click “ Apply ”.
7. Click the “ 5 GHz access point ” tab. 8. Check if the box next to “ Enable access point ” is checked, then in the “ Network name (SSID) ” field, come up with and specify a name for the wireless network. I advise you to indicate the frequency used in the name of the network, for example: “imya seti 5”. 9. “ Network security ” - WPA2-PSK . 10. Now you need to set a password for the wireless network. In the “ Network key ” field, we come up with and enter a password. 11. “ Channel width ” - “ 20/40/80 MHz ”. 12. Click “ Apply ”.
Setting up PPTP
I offer Video instructions for setting up the PPTP on the ZYXEL Keenetic Giga III using the example of the ZYXEL Keenetic Omni II router.
Let's also take a written and illustrative look at setting up a PPTP on the ZYXEL Keenetic Giga III . 1. Internet shortcut in the bottom menu . 2. Select the “ PPPoE/VPN ” tab and click “ Add connection ”.
3. In the window that appears, check the checkboxes opposite “ Enable ” and “ Use to access the Internet .” 4. In “ Description ” enter any words in Latin, for example “Host”, “ Type (protocol) ” select “ PPTP ”, “ Connect via ” select “ Broadband connection (ISP) ”. 5. Below you are asked to indicate your user name (in the “ Username ” line) and password (in the “ Password ” line). You will also need to specify the server IP address (in the “ Server Address ” line). All of the above data is provided by the provider (the organization that provided the Internet). All this data is usually specified in the contract with the provider. If for some reason you couldn’t find them, you need to call the provider’s hotline and find out how you can get them. 6. “ Configuring IP parameters ” - “ Automatic ”. 7. After you have entered all the necessary data, click the “ Apply ” button.
Setting up PPTP with a static IP address
Let's look at setting up a PPTP connection with a static IP address on the ZYXEL Keenetic Giga III . Typically, a static IP address is provided to legal entities, or as an additional service to the basic tariff to individuals. 1. Internet shortcut in the bottom menu . 2. Select the “ PPPoE/VPN ” tab and click “ Add connection ”.
3. In the window that appears, check the checkboxes opposite “ Enable ” and “ Use to access the Internet .” 4. In “ Description ” enter any words in Latin, for example “Host”, “ Type (protocol) ” select “ PPTP ”, “ Connect via ” select “ Broadband connection (ISP) ”. 5. Below you are asked to indicate your user name (in the “ Username ” line) and password (in the “ Password ” line). You will also need to specify the server IP address (in the “ Server Address ” line). 6. Since the connection uses a static IP address, select “ Manual ” opposite “ Configure IP parameters ”. 7. Specify IP addresses and DNS. All of the above data is provided by the provider (the organization that provided the Internet). All this data is usually specified in the contract with the provider. If for some reason you couldn’t find them, you need to call the provider’s hotline and find out how you can get them. 7. After you have entered all the necessary data, click the “ Apply ” button.
L2TP setup
I offer Video instructions for setting up the L2TP on the ZYXEL Keenetic Giga III using the example of the ZYXEL Keenetic Omni II router.
Let's also take a written and illustrative look at setting up an L2TP on the ZYXEL Keenetic Giga III . 1. Internet shortcut in the bottom menu . 2. Select the “ PPPoE/VPN ” tab and click “ Add connection ”.
3. In the window that appears, check the checkboxes opposite “ Enable ” and “ Use to access the Internet .” 4. In “ Description ” enter any words in Latin, for example “Host”, “ Type (protocol) ” select “ L2TP ”, “ Connect via ” select “ Broadband connection (ISP) ”. 5. Below you are asked to indicate your user name (in the “ Username ” line) and password (in the “ Password ” line). You will also need to specify the server IP address (in the “ Server Address ” line). All of the above data is provided by the provider (the organization that provided the Internet). All this data is usually specified in the contract with the provider. If for some reason you couldn’t find them, you need to call the provider’s hotline and find out how you can get them. 6. “ Configuring IP parameters ” - “ Automatic ”. 7. After you have entered all the necessary data, click the “ Apply ” button.
Setting up L2TP with a static IP address
Let's look at setting up an L2TP connection with a static IP address on the ZYXEL Keenetic Giga III . Typically, a static IP address is provided to legal entities, or as an additional service to the basic tariff to individuals. 1. Internet shortcut in the bottom menu . 2. Select the “ PPPoE/VPN ” tab and click “ Add connection ”.
3. In the window that appears, check the checkboxes opposite “ Enable ” and “ Use to access the Internet .” 4. In “ Description ” enter any words in Latin, for example “Host”, “ Type (protocol) ” select “ L2TP ”, “ Connect via ” select “ Broadband connection (ISP) ”. 5. Below you are asked to indicate your user name (in the “ Username ” line) and password (in the “ Password ” line). You will also need to specify the server IP address (in the “ Server Address ” line). 6. Since the connection uses a static IP address, select “ Manual ” opposite “ Configure IP parameters ”. 7. Specify IP addresses and DNS. All of the above data is provided by the provider (the organization that provided the Internet). All this data is usually specified in the contract with the provider. If for some reason you couldn’t find them, you need to call the provider’s hotline and find out how you can get them. 7. After you have entered all the necessary data, click the “ Apply ” button.
Setting up PPPOE
I offer Video instructions for setting up the PPPOE on the ZYXEL Keenetic Giga III using the example of the ZYXEL Keenetic Omni II router.
Let's also take a written and illustrative look at setting up a PPPOE on the ZYXEL Keenetic Giga III . 1. Internet shortcut in the bottom menu . 2. Select the “ PPPoE/VPN ” tab and click “ Add connection ”.
3. In the window that appears, check the checkboxes opposite “ Enable ” and “ Use to access the Internet .” 4. In “ Description ” enter any words in Latin, for example “Host”, “ Type (protocol) ” select “ PPPOE ”, “ Connect via ” select “ Broadband connection (ISP) ”. 5. Below you are asked to indicate your user name (in the “ Username ” line) and password (in the “ Password ” line). All of the above data is provided by the provider (the organization that provided the Internet). All this data is usually specified in the contract with the provider. If for some reason you couldn’t find them, you need to call the provider’s hotline and find out how you can get them. 6. “ Configuring IP parameters ” - “ Automatic ”. 7. After you have entered all the necessary data, click the “ Apply ” button.
Setting up PPPOE with a static IP address
Let's look at setting up a PPPOE connection with a static IP address on the ZYXEL Keenetic Giga III . Typically, a static IP address is provided to legal entities, or as an additional service to the basic tariff to individuals. 1. Internet shortcut in the bottom menu . 2. Select the “ PPPoE/VPN ” tab and click “ Add connection ”.
3. In the window that appears, check the checkboxes opposite “ Enable ” and “ Use to access the Internet .” 4. In “ Description ” enter any words in Latin, for example “Host”, “ Type (protocol) ” select “ PPPOE ”, “ Connect via ” select “ Broadband connection (ISP) ”. 5. Below you are asked to indicate your user name (in the “ Username ” line) and password (in the “ Password ” line). 6. Since the connection uses a static IP address, select “ Manual ” opposite “ Configure IP parameters ”. 7. Specify IP addresses and DNS. All of the above data is provided by the provider (the organization that provided the Internet). All this data is usually specified in the contract with the provider. If for some reason you couldn’t find them, you need to call the provider’s hotline and find out how you can get them. 7. After you have entered all the necessary data, click the “ Apply ” button.
Phone app
You can also set up the device from your phone - to do this, go to the AppStore or Google Play and find the “My.Keenetic” application. Install and launch it. You can also receive a download link via the QR code, which is located on the bottom of the device or on the box.
The settings are made in the same way, so I won’t talk about them in detail. The phone's settings are a bit limited, but the program is quite convenient for control. You can monitor who is connected to your device, as well as the speed of the Internet and Wi-Fi. And of course, make minimal changes - for example, change the Wi-Fi name and password.
Remote access
Method 1
Find the section where "KeenDNS" is located. Select a domain name. Next, indicate “Operation mode” - it is best to indicate “Via cloud”. Be sure to check the “Allow access from the Internet” checkbox and save. At the very end, you will be able to access this router through the previously selected DDNS - this method is good if you have a gray IP.
Method 2
- Install the phone application and connect to the device's Wi-Fi.
- We go to the settings via the Web interface.
- On the left, select “Management”, and then “General Settings”. We enable the cloud service.
- In the list, add a device that will have remote access - for example, your smartphone or tablet, connected to the Wi-Fi network at the very beginning.
NOTE! If this component is not there, then go to “System Components” and install “Keenetic Cloud and KeenDNS Cloud Service Agent”.
Authorization via SMS
This point will be interesting for law firms. By law, all public networks belonging to legal entities and individual entrepreneurs must undergo authorization via SMS. This router allows you to do this by connecting to third-party services. I have already written a separate article on setting up SMS authorization and you can read it here.
Testing
First, let's look at the test results when using different connection types. As we can see, the winners are “IPoE” and “PPPoE”, which do not use encryption. This speed should be enough for many years to come.
Well, the most important thing is testing the Wi-Fi network. For tests, I used regular file transfer, as well as a program for testing speed on a local network.
If anyone needs it, here is a link to instructions for testing Wi-Fi and local network.
It’s clear that the 5 GHz frequency is in first place. 2.4 GHz stays around 180 Mbps. This is understandable, since we use a channel width of 20 MHz. You could try manually setting the setting to 40 MHz, but then the tests might turn out to be implausible. However, when using a wider channel, the device may catch more interference.
⇡#Testing
To test Wi-Fi, standard stands with Ixia IxChariot 6.7 software (High Performance Throughput profile) were used. Configuration number one: Intel Core i7-2600K, 12 GB RAM, ASUS PCE-AC68 (indicated as A in the table), Windows 7 SP1 x64. Configuration number two: Intel Core i7-4700HQ, 12 GB RAM, Windows 8.1 Update 1 x64, Realtek RTL8168 (indicated as R in the table). The stands were in direct visibility at a distance of four meters from each other. In the router settings, WPA2 encryption and auto channel selection were enabled, and WPS was disabled. The USB 3.0 port has been, as always, switched to USB 2.0 mode to reduce interference. All other settings were left unchanged, and the set of components was the same as shown in the screenshots in the gallery above. The test results are shown in the table below. In general, everything is fine, although the steady decrease in speed in the direction from the adapter to the router is somewhat surprising, but the latter is apparently not to blame for this.
| Zyxel Keenetic Ultra II Router | |||||||
| Streams | 1 | 2 | 4 | 8 | 16 | 32 | 64 |
| Average Wi-Fi speed 802.11ac 5 GHz, Mbit/s | |||||||
| A -> R | 245 | 250 | 259 | 293 | 342 | 386 | 394 |
| R -> A | 271 | 434 | 480 | 535 | 531 | 514 | 510 |
| A<->R | 390 | 455 | 497 | 527 | 492 | 471 | 458 |
| Average speed of Wi-Fi 802.11n 2.4 GHz, Mbit/s | |||||||
| A -> R | 160 | 157 | 164 | 163 | 180 | 183 | 176 |
| R -> A | 161 | 172 | 189 | 196 | 194 | 181 | 193 |
| A<->R | 163 | 186 | 178 | 203 | 189 | 194 | 182 |
To test network operation with drives, we used the usual LanShuo INIC-3609 box with a Kingston SSDNow V+200 SSD with one NTFS volume. For this test, the router's USB port was, as usual, switched to native USB 3.0 operating mode. Read speeds for SMB and FTP were 45 MB/s and 48 MB/s, respectively, as promised in the device description, which truly “turns the Ultra II into an affordable alternative to home NAS drives.” The recording speed is, of course, lower, but also not bad - 21 and 29 MB/s for SMB and FTP. The speed of direct connection to the Network reached 930 Mbit/s, PPPoE was at the level of 650 Mbit/s, and PPTP (without MPPE) and L2TP hovered at the level of 600 Mbit/s. However, literally in the coming days, ZyXEL developers are going to release a firmware update that will improve the performance of IPoE/PPPoE hardware acceleration, which will be especially noticeable in duplex.