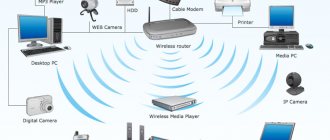
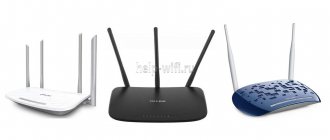
This is the second most popular router, which is praised throughout Russia. Its advantage is its low price, stable operation - both over a wired network and over Wi-Fi. DIR-615 is perfect for both home and small office. It is possible to connect 4 computers or devices via a wired network and up to 15 machines via a wireless one.
The setup is quite simple and does not take much time. The developers tried to make automatic customizable firmware. In this case, you can make a more detailed configuration that will control data flows on the network. The article will be divided into two parts, in the first we will tell you how to quickly set up the Internet and Wi-Fi.
The second part will be intended for more detailed settings: blocking sites, filtering connected devices, connecting TV and much more.
NOTE! The setup is quite simple, but if you have any difficulties or have questions about this router, write them below in the comments and I will answer them right away.
Appearance
First, let's take a closer look at our beast, find out what indicators and holes it has, and what they are intended for. This is necessary so that in the future you can easily understand what is wrong if the network or Internet is disconnected.
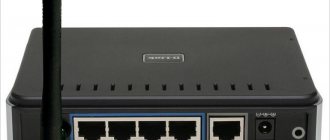
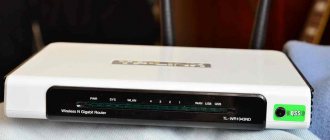
Front end
The picture shows the DIR-615S N300 model, but they have approximately the same structure, so you won’t get confused. Let's start with the indicators, arranged from left to right:
- Power: Lights up – it means it’s on,
- Doesn't light - off.
- Off means the network is turned off.
- Flashing – wireless network connection using WPS.
- On - there is a connection.
- Lights up – there is traffic.
These indicators constantly show that the router is operating correctly.
Back panel
- ON and OFF button
- VDC connector for power.
- Button to enable WPS - an encrypted secure protected network. This function is not needed for home use.
- 1-4 LAN ports, for connecting a computer or other devices via twisted pair cable.
- The yellow connector for the Internet cable of your provider.
Connecting and entering the interface of the control panel and router settings
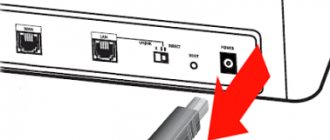
In order to independently configure the router for operation, you need to perform a few simple steps. First, connect the power cable to the router and turn it on. If the row of lights on the front of router D does not light up, you need to turn on the power using the button on the rear panel. If you plan to connect and configure the router via a cable connection, then use the network cable supplied with the dir router and connect the router to the PC.
Appearance of the Rj 45 patch cord (cable included with the router). Cable for connecting the Internet to the router
WAN and LAN connectors of the D-link dir 615 router
We insert the end of the cable into one of the black LAN connectors, of which there are 4 on the router, and the 2nd end must be connected to the output of the network card of the PC or laptop. The Internet cable from your provider must be connected to the yellow WAN connector.
Reset old settings
The next step is to make adjustments to the router settings. You need to go into the router settings, but before that you need to reset the existing settings, which, quite possibly, have already been made. To ensure that they do not interfere with the current work process, it is necessary to return the dir router to its factory state. To do this you need to reload the settings. This simple procedure is performed using a thin sharp object, a match or a needle, with which we press the RESET key located in the device body. The button must be held down for about 10 seconds, this will allow the router to restart the settings.
RESET button D-link dir 615
Router control menu
If you don’t know how to enter the router’s control menu d link dir, then:
- just launch your existing browser
- enter the following IP address of the router: 192.168.0.1. press Enter
log into the router interface, copy and enter https://192.168.0.1 into the browser address bar
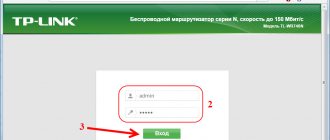
A window will appear on the screen asking for a login and password. Their initial value is admin\admin .
router authorization window, enter Login - admin / Password - admin
When you enter this data, the settings of the D-link router will open in front of you. If you are visiting there for the first time, then perhaps the entire menu will be presented in English. Using the appropriate options, you can change the language to Russian or Ukrainian.
Select the desired language from the drop-down menu
In addition, a window may appear asking you to change the password to enter the settings menu to your own. Enter a suitable password, but don’t forget to write it down somewhere, for example, on your phone, so that you don’t lose access to the menu in the future if you need to set up a new router d.
Setting up the Internet on the router
Having completed all the previous steps of the instructions, you will approach the main task - how to set up a router for the Internet. First of all, check which connection method is used by your operator. There may be several of them:
- Dynamic IP
- Static type
- PPPoE
- L2TP
To do this, contact technical support or go to their web page. If the operator supports the dynamic IP protocol, then for your DIR 615 router the setup will only involve administering the wi-fi network. The Wifi router will start distributing immediately from the moment you connect the cable from the operator, and you only need to configure the Wi-Fi network.
If your provider does not support dynamic IP, the setup procedure continues further.
- The first step is to go to the “Getting Started” section. There you will make sure the Ethernet cable is connected,
- Click on the “Next” button. A list of connections will open where you select your option.
select the connection type from the drop-down list
- If you have PPPoE and IP address provided by provider, then you need PPPoE+Static IP. If ip is missing, then - PPPoE + Dynamic IP. With an L2TP connection, dir 615 settings are made in exactly the same order.
Select PPPoE connection type
- Then you need to indicate the IP characteristics provided by the operator; if this service is not included in the tariff, then this window may not appear.
- Then click “Next”.
When the “Address of local provider resources” window appears, you can add addresses there; if you don’t understand this, or you simply don’t need them, then the wifi setup continues after clicking on the “Next” button. A window will appear where you need to specify a name for the connection and a login with a password. This information is provided by providers. When you click the “Details” button, a menu with advanced settings opens. If you went there for fun as an ordinary user, then you will not need unnecessary settings, so you can ignore this tab.
After this, testing of your Internet connection will begin, where you will be asked to activate the Yandex.DNS filtering system. If this matters, then you can configure the d link dir 615 router, making changes that can later be changed to the current ones.
How to setup
NOTE! If this router was previously used by someone else, then you need to reset the settings to factory settings. To do this, on the bottom, find a hole with the inscription RESET. Take a needle or paperclip and press into the indentation. Hold this for about 10 seconds until the router stops flashing. After this, proceed with the settings of the D-Link DIR 615 router.
- Launch any browser and enter the IP address of our device in the address bar – 192.168.0.1;
- You will now be greeted by the Initial Setup Wizard. Just click "START" .
- Choose language.
- Next you will be asked to enter a new administrator password. Come up with one that you can easily remember or write it down. Do not leave the field empty to avoid hacking your device from the outside. In the Network name (SSID) field, enter the name of the Wi-Fi network.
- The next step gives you the choice of connection. We put in the “Connection method” – “Wired connection” . That is, the Internet is connected via a wire. A little lower in the “Operation mode” , select “Router” . You can poke around and see what other connection options are available, but this is the most common option.
- After that, click "NEXT".
- You can change the mask and IP of the device, or simply continue working with the old data.
- The next step is setting up the Internet. In the “Internet connection type” , you must indicate all the connection data used by your provider. This information is contained in the agreement with the Internet provider. You can also call the hotline number and clarify the connection details. Depending on the selection in the first field ( PPPoE, IPv6 PPPoE, PPPoE Dual Stack, PPPoE + Dynamic IP ( PPPoE Dual Access )) there will be settings that need to be entered. There is nothing complicated here and don’t be alarmed, just enter what is specified in the contract in the connection section.
- Click “NEXT”.
- Now we set up the wireless network. Enter the name of the WIFI network and password. You can immediately set a speed limit for devices that will be connected to Wi-Fi.
- Let's move on.
- The next step is necessary if you want to connect your TV through this Router. If not, then just uncheck the boxes and click next. To configure LAN ports for IPTV/VoIP, select and check the box “A set-top box is connected to the device . If you are connecting via VLAN, click “Use VLAN ID” and enter the data (the provider has all this information in the contract for this service).
- The next step is setting up IP telephony, if your provider provides this option. Uncheck the boxes and move on or make the settings in the same way as in the previous step.
- You will again be asked to come up with a more complex password for the admin panel.
- Next you will see all the entered data. You can click on the button “SAVE FILE WITH SETTINGS " and use them in cases of reset.
- Click “APPLY”.
- Now you will see a window like this if everything is entered correctly and the Internet is working. If there are any problems, you can re-check the connection by clicking on the “CHECK AGAIN” button.
If there is no connection, then the problem may be with the provider. Just call technical support, the number is indicated in the contract. You can also call tech. D-Link support, the number will immediately appear on this page.
Setting up the Internet on D-link DIR-615
The first thing you need to do is find out what connection technology your provider uses . Dynamic IP, static, PPPoE (used by Dom.ru and other providers), L2TP (for example, used by the Beeline provider). I already wrote how to find out the connection technology. You can simply call the provider’s support and ask, or look on the official website.
If you have a connection using the popular Dynamic IP technology, then the router should distribute the Internet immediately after connecting a cable from the provider to it, and all you have to do is set up a Wi-Fi network (see below in the article). If you do not have a Dynamic IP, then you need to configure it.
Go to the Start - Click'n'Connect . Check if the Ethernet cable is connected and click Next .
Select your connection from the list. If, for example, you have PPPoE and the provider also provides an IP address, then select PPPoE + Static IP. If there is no IP, then simply select PPPoE + Dynamic IP. Or the same with L2TP.
Next, indicate the IP parameters that the provider provides and if it provides them (you may not have this window). Click Next .
If the “Addresses of local provider resources” window appears and you do not want to add addresses, or do not know what they are, then just click Next . A window will appear in which you need to specify the connection name, login and password. This information is also provided by the provider. You can click on the Details button to open more advanced settings (MTU and others).
Next you will check your Internet connection and the option to enable the Yandex.DNS filter. This is optional. In any case, you can change these settings later. I showed this example of setting up a PPPoE connection on a D-link DIR-615. Your settings may differ from those that I have.
If after setting up the Internet through the router does not work, the connection status is “without access to the Internet,” or sites simply do not open, then check the settings from your provider. You may have chosen the wrong connection type, or set some parameter incorrectly.
As you can see, there are much more problems with PPPoE, L2TP, PPTP and Dynamic IP than with Static IP technology.
One important point: if you had a high-speed connection on your computer with which you connected to the Internet, then now you don’t need it. Our D-link router will establish this connection and simply distribute the Internet via cable and Wi-Fi.
You can always change the provider settings through the same Click'n'Connect quick setup wizard, or on the Network - WAN , selecting and editing the desired connection.
It is advisable to save the settings:
If the Internet is already working through the router, then you can start setting up a Wi-Fi network.
Setting up Wi-Fi and changing the password on D-link DIR-615
All we need to do is change the name of the Wi-Fi network and set a new password to protect our Wi-Fi.
Go to the Wi-Fi - Basic settings . Here we will change the name of our Wi-Fi. In the SSID , enter the name of your network. Click the Apply .
Next, go to the Wi-Fi - Security Settings , and in the “PSK encryption key” , specify the password that will be used to connect to Wi-Fi. The password must be at least 8 characters. Write down your password immediately so you don’t forget it.
Save your settings. System - Save . If you don’t configure anything else (the setup of the D-link DIR-615 may be completed at this point), then reboot the router. System (menu item at the top, near the logo) - Reboot .
That's it, the wireless network is configured. You can also look at a more detailed article on setting up Wi-Fi.
You can also change the administrator password, which is used to access the router settings. If you did not change it, or changed it but have already forgotten, then you can do this on the System - Administrator Password .
Enter the new password twice and click Apply . Don't forget to save your settings.
Be sure to write down this password somewhere. If you forget it, you will not be able to access the control panel and will have to reset the settings.
Manual setting
If you want to reconfigure the router, you can do this from the main menu.
- Go to settings, then “ WAN” .
- Select existing connections and delete them.
- Click the add button and select the connection type from the list.
- Next, carefully enter the connection settings and find out about them from the provider.
Everything is done in approximately the same way as in the previous instructions.
Setting up the router
All router settings are carried out via the web interface. For the D-Link DIR-615, it may differ slightly in appearance depending on the firmware version, but the main points are common in any case.
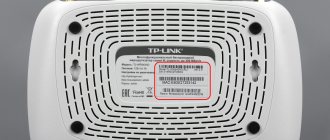
In order to enter the web interface, you must enter the router's IP address in the address bar of any browser. In most cases this is 192.168.0.1. You can find out the exact default settings by turning the router over and reading the information located on the tab in the middle of the bottom of the device.
There you can also find out the login and password for connecting to the device, and other useful information about it. It is to these parameters that the router configuration will be returned in the event of a reset.
By logging into the router's web interface, you can begin setting up your Internet connection. The device firmware provides two ways to do this. We will tell you more about them below.
Quick setup
To help the user successfully navigate the setup and make it as simple and fast as possible, D-Link has developed a special utility that is built into the firmware of its devices. It's called Click'n'Connect. To launch it, just go to the appropriate section on the router settings page.
After this, the setup proceeds as follows:
- The utility will prompt you to check whether the cable from your provider is connected to the WAN router port. Once you are sure that everything is in order, you can click on the “Next” button.
- On the newly opened page you will need to select the connection type used by the provider. All connection parameters must be contained in the contract for the provision of Internet access or in additions to it.
- On the next page, enter the authorization data provided by the provider.
Depending on the previously selected connection type, additional fields may appear on this page, where you will also need to enter data from the provider. For example, if the connection type is L2TP, you must additionally specify the VPN server address.
- Review the main parameters of the created configuration again and apply them by clicking on the corresponding button.
After completing the above steps, you should be able to connect to the Internet. The utility will check it by pinging the google.com address, and if everything is in order, it will move on to the next step - setting up the wireless network. During this process you will need to perform the following actions:
- Select the router operating mode. In this window, you just need to make sure that the checkbox next to the “Access Point” mode is checked. If you do not plan to use Wi-Fi, you can simply turn it off by selecting the option below.
- Come up with a name for your wireless network and enter it in the next window instead of the default one.
- Enter the password to access Wi-Fi. You can make your network completely open to anyone by changing the parameter in the top line, but this is highly undesirable for security reasons.
- Check the entered parameters again and apply them by clicking on the button below.
The final step in quickly setting up the D-Link DIR-615 router is setting up IPTV. It consists in the fact that you just need to specify the LAN port through which digital television will be broadcast.
If IPTV is not needed, you can skip this step. The utility will display a final window in which you need to apply all the settings made.
After this, the router is ready for further operation.
Manual setting
If the user does not want to use the Click'n'Connect utility, the router firmware provides the ability to do this manually. Manual configuration is designed for more advanced users, but for a novice user it will not be difficult if you do not change parameters whose purpose is unknown.
To set up an Internet connection, you need to:
- On the router settings page, go to the “Network” section of the “WAN” submenu.
- If there are any connections on the right side of the window, check them and delete them by clicking on the corresponding button below.
- Create a new connection by clicking on the “Add” button.
- In the window that opens, specify the connection parameters and click on the “Apply” button.
Again, depending on the selected connection type, the list of fields on this page may vary. But this should not confuse the user, since all the information necessary to enter it must be previously supplied by the provider.
It should be noted that access to detailed Internet connection settings can also be obtained from the Click'n'Connect utility by moving the virtual switch at the bottom of the page to the “Details” position. Therefore, the difference between quick and manual settings comes down to the fact that in quick settings, additional parameters are hidden from the user.
The same can be said about setting up a wireless network. To access them, you need to go to the “Wi-Fi” section of the router’s web interface. The further procedure is as follows:
- Enter the “Basic Settings” submenu and set the network name there, select the country and (if necessary) specify the channel number.
In the Maximum Number of Clients field, you can optionally limit the number of network connections allowed by changing the default value.
- Go to the “Security Settings” submenu, select the encryption type there and set a password for the wireless network.
At this point, the wireless network setup can be considered complete. The remaining submenus contain additional parameters that do not need to be changed.
Security Settings
Compliance with certain security rules is an essential condition for the successful operation of a home network. It should be noted that the settings that are present in the D-Link DIR-615 by default are sufficient to provide its basic level. But for those users who pay increased attention to this issue, it is possible to configure security rules more flexibly.
Basic security settings in the DIR-615 model are set in the “Firewall” section, but during setup you may need to make changes in other sections. The principle of operation of a firewall is based on traffic filtering. Filtering can be done both by IP and MAC address of devices. In the first case it is necessary:
- Enter the “IP Filters” submenu and click on the “Add” button.
- In the window that opens, set filtering parameters:
- Select protocol;
Set the action (allow or deny);
- Select the IP address or range of addresses to which the rule will be applied;
- Specify ports.
Filtering by MAC address is much easier to configure. To do this, you need to enter the “MAC filter” submenu and do the following:
- Click on the “Add” button to create a list of devices to which filtering will be applied.
- Enter the MAC address of the device and set the filter action type for it (allow or deny).
At any time, the created filter can be disabled or enabled again by checking the corresponding checkbox.
If necessary, the D-link DIR-615 router can also restrict access to certain Internet resources. This is done in the “Control” section of the device’s web interface. To do this you need:
- Enter the “URL filter” submenu, enable filtering and select its type. It is possible to both block a list of specified URLs and allow access only to them, blocking the rest of the Internet
- Go to the “URL addresses” submenu and create a list of addresses by clicking on the “Add” button and entering a new address in the field that appears.
In addition to those listed above, the D-Link DIR-615 router has other settings, changing which affects the level of security. For example, in the “Network” section in the “LAN” submenu, you can change its IP address, or disable the DHCP service.
Using static addresses on a local network with a non-standard router IP address will make it much more difficult for unauthorized persons to connect to it.
To summarize, we can conclude that the D-Link DIR-615 router is a good choice for the budget consumer. The features it provides will suit most users.
We are glad that we were able to help you solve the problem. Add the Lumpics.ru website to your bookmarks and we will be useful to you. Thank the author and share the article on social networks.
Describe what didn't work for you. Our specialists will try to answer as quickly as possible.
The computer does not connect to the Internet after setup
Perhaps you have the wrong IP address and network mask set in the network card settings. To do this, you need to set up automatic search and installation of this data. We act according to the instructions.
Windows XP
- Click Start.
- Next “Control Panel” , then “Network” and “Internet connections” and then “Network connections” .
- Right-click on the connection and select “Property”.
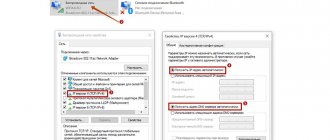
- Next, in the “General ” tab, look for “Internet Protocol (TCP/IP)” , click once with the left mouse button and then on “Properties” .
- We check the boxes as in the picture below: “Obtain an IP address automatically” and “Obtain a DNS server address automatically” .
- Click OK.
Windows 7
- “Start”, then “Control Panel” and click on “Network and Sharing Center” .
- Select the viewing type “By Category” in the upper right corner.
- Click on “Network and Sharing Center” .
- Next, “Changing adapter settings” .
- Right click and “Property” .
- Select “Internet Protocol Version 4 ( TCP/ TPv4)” , then “Property” and check the boxes as if configured in XP.
WAN setup
Quick setup
When you enter the web settings menu, you can quickly configure the Internet by going to the “Get Started” section and the “Click'n'Connect” subsection.
We select the WAN network and enter the data from the contract with the service provider - login, password, server address (if available). When setting up for Rostelecom or Dom.ru (these providers provide Internet using the PPPoE protocol), you need to delete the existing connection, and then create a new one by selecting this type and entering all the necessary data.
Beeline
Beeline provides its subscribers with access to the global network using the L2TP standard. To configure the D-Link DIR 615 router for Beeline, the following instructions are relevant:
- Launch the web settings menu through the browser. If it is not in Russian, then you can change the language.
- Next, go to the “Click'n'Connect” item in the “Getting Started” section.
- Select the connection type. In this case it is “L2TP + Dynamic IP”. Proceed to the next point by clicking on “Next”.
- Enable automatic retrieval of the DNS server address by checking the corresponding box.
- Next, you need to fill in the information to connect to the Internet. They are specified in your agreement with the provider. Here we will need a username, password and server address. You can set any name for the connection at your discretion.
Rostelecom and Dom.ru
Setting up the D-Link DIR 615 router for the Internet provider Dom.ru and Rostelecom is done in the same way, since both operators provide Internet using the PPPoE standard. Detailed instructions:
- Open the web interface.
- At the bottom we find the item “Advanced settings”, click on it.
- Go to the “Network” section, “WAN” subsection. Add a new connection by clicking on the corresponding button at the bottom right. Existing connections must be deleted, if any.
- The connection settings menu will open. In the first line you need to select the type - PPPoE.
- Below under the heading “PPP” we indicate the data from the agreement with the provider - username and password. The remaining points can be left unchanged.
- Save the settings and exit. Now you can check the availability of the Internet by going to any website. The indicator on the device body should also light up, signaling access to the Internet.
Configuring VLAN groups
You can configure subnets that will use different LAN ports. For this:
- In the Dlink menu, select “Advanced” , and then “VLAN”.
- Next, click on lan .
- Select the ports that you want to put in a separate group and uncheck them.
- Now we create a new VLAN using the ADD button.
- Fill in the values.
- We apply the setting and now the network is divided into two, due to the ports.
Remote access
An excellent opportunity for system administrators to manage and change settings in the router.
- To do this, in the “Advanced” select “Remote access” .
- Next, click “Add” .
- In the first field, select the IP protocol that will be used by the remote computer.
- If you enable “Open access from any external host” , then you can access the router from any computer on the Internet. If you remove the value, you need to enter the IPv4 address or IPv6 address, as well as the network mask of the connected machine from which external control will be carried out.
- Also indicate the port for the router through which the connection will be made, as well as the protocol. The standard is HTTP.
- Click “SAVE” .
Authorization
After connecting, you need to configure your router. For these purposes, a simple and intuitive graphical web interface is used.
To open it you need:
- enter 192.168.0.1 (default router address) in the browser address bar. D-link recommends using Internet Explorer or Firefox, but any browser will do;
- • enter login/password (admin/admin by default).
If the router has a different address or the login or password has been changed and you do not know them, reset the settings by pressing the reset button on the back panel of the device for 10-15 seconds. More details about resetting at the end of the article.
Filtering by MAC addresses
This will prevent careless freeloaders from connecting to the network, even if they know the password. Filters are set by MAC address.
- Go to “Firewall” and click on MAC filter.
- Click “ADD” to create a new rule.
- If we set “Deny” , then this computer will not have access to the router’s network. If we set “Allow” , then the user with this MAC address will have access to the Internet from the network.
- Enter the MAC device and click “SAVE”.
Reset
If your settings are incorrect, or you have forgotten your password or administrator login, you can reset your device to factory settings.
It can be done:
- from the web interface;
- “hardware”, which is especially useful when for some reason access to it is impossible. For a hard reset, press the reset button and hold it for 10-15 seconds.
The capabilities of the D-link DIR 615 are extensive and allow you to use it for a wide range of tasks, but setting up your home Internet yourself is not at all difficult, even if you have very little experience, thanks to the intuitive, well-thought-out interface.
Parental control
If your child likes to climb harmful sites, clogging his young head with prohibited information, then you can set a rule that will prohibit visiting the URL.
- In the menu go to “Firewall” .
- Next is the URL filter.
- Move the switch to enable the filtering rule.
- In the filters section, enter the addresses that will be banned in the format: www.plohoysayt.ru or plohoysayt.ru.
- Now these sites will be blocked.
- You can block all sites except certain ones. This is useful for the office when workers work in a certain range of sites.
DC++
There remains the last and optional stage of setting up the DIR-615 router for the MTS provider, which is necessary for the correct functioning of DC++.
- Go to “NETWORK SETTINGS” and in the “Add DHCP Reservation” subsection enter the name of the desired PC in the “Computer name” form and the IP assigned to it.
- In the main menu, go to the “VIRTUAL SERVER” section and activate the “ADVANCED” tab.
- In the first line, check the box and enter the name of the network and IP of the computer that you reserved earlier.
- In the “Private” and “Public” fields, enter the port number – 4000, specify “Protocol” as “Both” and save the changes.
For the second and third devices, the port number increases by one - 4001, etc.
Update and flashing
- Updating the router firmware is easy. In the “System” we find “Software Update”.
- Check the box “Automatically check for updates” .
- Or simply click “Check for update” .
- We wait for some time and as soon as everything is ready, click “APPLY SETTINGS”.
You can also do a manual update if there are problems with autosearch.
- Download the firmware from the official website - https://www.dlink.ru
- In the same section in the left window “Local update” .
- Select the file, upload it and click “UPDATE SOFTWARE”.
Specifications
| Microprocessor | RTL8196D @ 390 MHz |
| Allowed Internet connections | PPTP/L2TP - static and dynamic |
| PPPoE - static and dynamic | |
| IPv6 PPPoE | |
| Stat. and dynam. IPv4 | |
| Stat. and dynam. IPv6 | |
| Inner memory | 32 MB |
| Functionality and support | RTSP |
| UPnP IGD | |
| DHCP | |
| DNS relay | |
| Dynamic DNS | |
| VLAN | |
| SIP ALG | |
| Internet port | WAN 10/100BASE-TX |
| Application | UDPXY |
| Filtration | IP |
| IPv6 | |
| 4 network ports | LAN 10/100BASE-TX |
| 2 Antennas | 5dBi gain |
| Nutrition | 12V DC 0.5A |
| Frequency Range | 2400 - 2483.5 MHz |
| Data transfer rate | Up to 300 Mbps via IEEE 802.11n technology |
Preparing the router for operation
Preparing the D-Link DIR-615 router for operation takes place in several steps, common to all devices of this type. It includes:
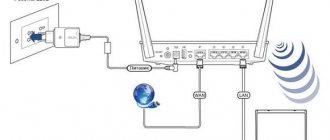
- Selecting a location in the room where the router will be installed. It must be installed in such a way as to ensure the most uniform distribution of the Wi-Fi signal in the planned network coverage area. In this case, it is necessary to take into account the presence of barriers in the form of metal elements contained in walls, windows and doors. You should also pay attention to the presence of other electrical appliances near the router, the operation of which may interfere with signal propagation.
- Connecting the router to the power supply, as well as connecting it with a cable to the provider and computer. All connectors and physical controls are located on the rear panel of the device.
Panel elements are labeled, LAN and WAN ports are marked in different colors. Therefore, it is very difficult to confuse them.
- Checking the TCP/IPv4 protocol settings in the network connection properties on your computer. Automatically obtaining an IP address and DNS server address must be set.
Typically, these parameters are set by default, but it still doesn’t hurt to make sure.
Read more: Connecting and setting up a local network on Windows 7
Having completed all the described steps, you can proceed to directly configuring the router.