Author
Yuri Sanaev
System Administrator. Sales manager of computers and wi-fi equipment. Work experience – 10 years. Knows everything and even more about hardware and software.
TP-Link produces reliable and high-quality routers that are inexpensive and easy to use. Before use, it is important to correctly connect and configure the TP-Link router. In step-by-step instructions, we will analyze the technical characteristics of the routers of this company, get acquainted with possible connectors and indicators, and also consider all the subtleties of manual and automatic configuration.
Features and Specifications
TP-Link routers are presented in different price segments, from budget to premium. Depending on the capabilities and technical characteristics, they are suitable for solving different problems - setting up Wi-Fi in a small apartment or a wireless network in a large office. The devices offer different Wi-Fi speeds - from 150 to 3000 Mbit/s and support Internet speeds from 100 to 3000 Mbit/s.
The devices have different modes - they can be used not only to set up a wired or wireless network, but also in repeater or access point mode.
TP-Link routers work with different types of connections - with their help you can set up a connection via fiber optic, telephone line or USB modem.
An important feature of the company’s products is ease of setup. You can create a connection, select an operating mode, and set parameters for a wired or wireless network both through the WEB interface and in a mobile application (for models in the mid- and premium price segment). The web interface for all routers has a quick setup wizard, with which even an inexperienced user can set up a connection.
The additional functionality of TP-Link routers is very wide. The technique can be used to access IP TV, create VPN tunnels, guest networks, configure file, media, FTP and print servers (via USB) or to solve other problems.
You can compare models and choose the most suitable one to solve your problems on the manufacturer’s website at https://www.tp-link.com/ru/home-networking/wifi-router/?page=1
Connecting a router: features
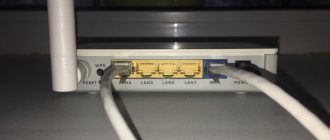
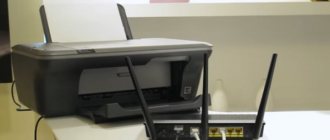
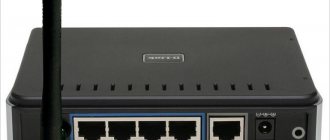
There are several outputs on the back wall of the router; we are most interested in LAN1-LAN4 (they are yellow in the picture below) and INTRNET/WAN (blue).
So, using a cable (see picture below, white) we connect one of the LAN outputs of the router to the computer’s network card. Connect the cable from the Internet provider that enters your apartment from the entrance to the WAN output.
That's all. Yes, by the way, after turning on the device, you should notice the LEDs blinking + a local network should appear on the computer, without access to the Internet for now (we haven’t set it up yet).
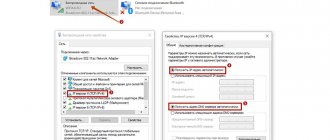
Now you need to go to the router settings. To do this, in any browser, type in the address bar: 192.168.1.1.
Then enter the password and login: admin. In general, in order not to repeat myself, here is a detailed article on how to enter the router settings; by the way, all the typical questions are discussed there.
Connection
Before connecting, the router must be properly installed indoors. If you plan to set up a wireless network, it is recommended to place the device in the center of it. This will ensure a uniform signal in all rooms. If necessary, the router can be hung on the wall - on the bottom side of most models there are holes for vertical mounting.
The device must be placed so that the Ethernet or power cable is not stretched, as it can be pulled out by careless movement. There is no need to put the device in a niche, mount it too high or move it close to the wall - this will make it difficult to access the buttons on the case.
After installation, you need to connect a cable from the supplier to the router. The telephone wire is connected to the ADSL connector, the Ethernet cable is connected to the WAN port. Next, a network cable is routed from the LAN connectors to similar inputs on the PC system unit or other devices. The power adapter is connected to the connector on the case and then plugged into the outlet. If there is a power button, you need to press it to start the router, otherwise it will work immediately after connecting to the network.
Before you start setting up, you need to prepare an agreement received from the provider and find in it the data for establishing a connection. If it is not there, you can clarify the necessary information by calling the service provider’s support line.
How to connect TP-Link TL WR841N to a computer?
So, to install a TP-Link router you will need:
- Insert an Internet cable into it
- Connect to a computer via wire or laptop/smartphone via wifi
- Configure Internet connection type
- Set wireless network settings
Let's get straight to the practice of setting up a router. First of all, you need to connect an Internet cable from your provider to the TP-Link WR841n router. If previously it was inserted directly into the network connector of the computer, now the Internet will go to the router, and through it via WiFi to other devices. Therefore, we remove the wire from the network card on the back of the PC and insert it into the WAN port on the router. TP-Link TL-WR841N has one and is highlighted in blue from others for ease of perception
Next, we take the Ethernet cable that came with it from the box (it is also called a twisted pair or patch cord) and connect one end of it to any of the yellow LAN connectors. For others, into the computer’s network card, that is, where the cable from the provider was previously installed.
Login to router settings
To set up an Internet connection on your router, you need to know how to connect to TP-Link to complete this task. All operations with the device are performed through the WEB interface.
Instructions:
- Launch any browser and enter the IP address 192.168.0.1 or 192.168.1.1 in the address bar.
- A window will appear in which you need to fill in your credentials. If the router is new, then the values with .
- Press the enter button.
A web interface will open in which the user can establish a connection to the Network and configure the TP-Link router for further work.
Depending on the router model, there are 3 types of interface – blue, green and black. The instructions are similar, but the names and locations of the sections may differ. If the user is interested in setting up for a specific router model, it is better to find a manual specifically for it.
Read what to do if you can’t access TP-Link settings.
Advanced TP-Link router settings
We list a number of additional device settings. The list is common for most TP-Link models, but there are exceptions:
- Channel. You can set values from 1 to 11. The default is usually Automatic. If it is not installed, it is better to select it. So, if one of the channels is heavily loaded (for example, neighboring devices use it), then your router switches to another.
- Wireless network mode: 802.11n, 802.11g, 802.11 b. You can choose any one, they are compatible with each other.
- You can also configure your router to act as a repeater to transmit and amplify the signal from another router, expanding your network. Suitable if you have an extra TP-Link router; otherwise, it’s easier to purchase a special repeater.
- MAC address filtering. Used to block users by address.
Automatic setup
Automatic or quick setup of a TP-Link router is the easiest way to set up an Internet connection. A step-by-step wizard will help even inexperienced users create a connection.
Instructions:
- Click “Quick Setup” or “Quick Setup”.
- Select time zone.
- Set "Connection type". If the router supports this function, click “Auto-detection” so that it independently selects the connection type.
- If your provider uses Dynamic IP, you will not need to provide any other information. If Static IP, PPPOE, PPTP or L2TP are selected, you will need to enter additional data - login, password, IP address, etc., depending on the connection method. This information can be obtained from your service provider.
- Select "Do not clone MAC address".
- Set up a wireless network - specify a name, enable encryption, create a password. If the router operates on two frequencies, repeat the procedure for the wireless network on the second frequency.
- Check that the settings you have made are correct, if everything is correct, click “Save”.
The quick setup of the router is complete. Depending on the router model and the type of web interface, some steps may not be present or they will differ. If any difficulties arise, the instructions for a specific model will contain a more detailed description.
Step-by-step router setup
Getting into the menu or reconfiguring an already working TP-Link model is no more difficult than choosing the right Wi-Fi router; all the user needs is to open any convenient browser on a connected computer or laptop and carefully follow the instructions.
Login to “Settings”
To open the “Settings” of the TP-Link router and within a few minutes start distributing Wi-Fi, the owner of the device must:
- Enter the standard IP TP-Link 192.168.0.1 in the address bar of the browser and press Enter. If nothing happens, you should look for the correct address that allows you to enter the “Settings” of the router, on the device case, original packaging, or in the instructions.
- In the new window, click on the first text field.
- And enter the login admin in it, and the same password in the bottom, then click on the “Login” button. If the data is not suitable or has been changed during operation, you should use new ones or check the stickers on the router or box again.
- Fabulous! The user was able to enter the “Settings” of the TP-Link router, which means there is not much time left before Wi-Fi distribution. On the main page, the owner of the router will see detailed information about the device - in particular, the model name and version of the firmware used.
Quick setup
To configure your TP-Link router without unnecessary difficulties and questions, you should use the “Quick Setup”:
- Go to the appropriate menu section.
- Click on the “Next” button.
- On the first page, select your country in the top drop-down menu.
- In the second - a city or settlement of another type.
- In the third - the provider with which you plan to connect to the Internet.
- The fourth is the type of connection. There may be several options here, and the easiest way to find the right one is to contact the service provider.
- Now click on “Next”.
- The owner of the TP-Link router will have to, depending on the connection conditions, fill out the information in accordance with the contract - for example, enter your login, password and IP address assigned by the provider in the editable fields. The latter can be either static.
- So and dynamic - then you will need to specify a little more data. In order to configure your TP-Link router faster, you should also check with your operator.
- On the next “Settings” page, you need to enable wireless broadcasting - otherwise you won’t be able to distribute Wi-Fi via a TP-Link router.
- Set a network name that is visible to all connected devices.
- Select the number of channels - it is better to leave the parameter as default or set it in the range 7–11.
- Data transfer mode - it is recommended to set it to “Mixed”, which includes the maximum number of options.
- And the channel width - set by default or stop at the largest available value.
- In the “Protection” field, the owner of the TP-Link router, who is setting up Wi-Fi, can either disable password protection of the signal and make the network accessible to everyone.
- Or set your own password - you will need to enter it on each connected device. In the same section, you can subsequently change the password on the router.
- By clicking on “Finish”, the user will begin distributing Wi-Fi.
Tip: As part of the “Quick Settings”, it is recommended to set the parameters for pairing the router and phones and tablets using WPS technology - enable, disable this option or change the PIN code.
Advanced Settings
You can supplement the “Quick Settings” of your TP-Link router or do without them altogether by setting Wi-Fi distribution parameters manually. The router owner needs:
- Go to the “Network” section, then to the WAN subsection. Here you will need to select the connection type.
- And, as shown above, enter your installation data.
- In order for them to be saved in the system, each time you make subsequent changes, you must click on the “Save” button located at the bottom of the page.
- In the LAN subsection, specify the IP address to which you can later connect the router, and select a subnet mask.
- In IPTV - open, if necessary, a port for a digital set-top box.
- In “MAC Address Cloning,” the owner of a TP-Link router will be able to copy the network card number, which is especially useful if the provider blocks Internet access based on this parameter.
- In the “Wireless Mode Settings” subsection of the TP-Link router, set a special name for each of the available subnets.
- In “Wireless Protection” - set the data encryption method and create a password.
- And in “Advanced settings” - determine the power of the router (for a small apartment, medium will be enough).
- In the “Firewall” subsection of the “Protection” section, enable the built-in firewall.
- And in the following tabs set the filtered ranges of IP addresses.
- And domain names.
- In the “Time Settings” subsection, included in the “System Tools” section, select the time zone.
- And set the date and time manually.
- Or by receiving data from one of the exact time servers.
- That's almost all. Other useful settings for TP-Link routers include the ability to reset to factory state.
- And changing the administrator login and password required to enter “Settings”.
- Upon completion, the user can simply close the menu and begin connecting Wi-Fi on all devices or reboot the TP-Link router with new parameters by clicking on the button in the “Reboot” subsection.
The short cable connecting the laptop or computer to the router can be disconnected: the device is fully configured and ready to distribute the Internet both via wire and in the form of a Wi-Fi signal.
Manual setting
Step-by-step manual configuration of a TP-Link router is more flexible than automatic configuration. In it, the user has access to more parameters that can be changed, in contrast to the quick one, where only basic settings are presented.
You can manually configure TP-Link on a laptop or computer using step-by-step instructions:
- Click "Basic setup".
- Click “Auto-detection” to have the router manually detect the connection type. If there is no such option, you need to ask your provider what kind of connection it supports and select the required type from the list. Typically this is a “Dynamic IP”, it is automated and does not require any data entry.
- If you select “Static IP”, you will need to manually fill in the IP, subnet mask, gateway and DNS server.
- PPPOE connection requires a login and password provided by the service provider.
- When installing L2TP or PPTP connections, fill in the username, password and IP. If the IP address is static, additionally enter the subnet mask, gateway and preferred DNS server.
- After making changes to the router, save the changes.
For the settings to take effect, the router will be rebooted.
You can reconfigure the router to a different connection type in the “Network” section, “Internet” tab.
Manual setup TP-Link N300
The Quick Setup Wizard for TP-Link N300 class routers, unfortunately, does not provide configuration flexibility, so many parameters simply remain unaffected. There are several reasons for this, the most important of which is that many additional settings are simply not needed by a certain group of users or are edited extremely rarely. We take into account that situations may arise when you may need to access other items in the router’s web interface, so we have divided the manual configuration process into steps so that you can find the one you need.
Step 1: Network (WAN Settings)
The initial setup of a wired network is the most important stage of manual configuration, because it determines whether access to the Internet will appear at all. If you were unable to edit certain items in the Wizard discussed above or you now need additional settings, follow these steps:
- Open the “Operating mode” section, where check the “Wireless router” item with a marker. This is the main purpose of the router, which is why we choose this option.
- Next, move to “Network”, where you are interested in the first category “WAN”. Expand the Connection Type drop-down menu. Through it, determine the WAN protocol that your provider provides to you. Depending on the protocol, the displayed form is already filled out. In the case of a static IP, you will need to enter the address itself, write the subnet mask, gateway and DNS server. Then don’t forget to click the “Save” button.
- We will separately consider other popular protocols. The only available option that does not require additional configuration is a dynamic IP address. All parameters are obtained automatically, and the current IP and gateway values can be monitored through the “Status” menu in the same web interface.
- In the Russian Federation, many Internet service providers provide the PPPoE protocol. For it, set the username and password received when connecting to the Internet itself. You can choose how the connection will be made: automatically or you will have to enter the same authorization data each time.
Step 2: Local Network
The local network should also be given a little time, since the standard values do not always correspond to the required ones. Typically, checking and changing the settings in this category is performed only by those users who are going to connect Internet television or computers via a network cable to the router.
- First, open the “Network” section and select the “LAN” category there. Make sure the IP address is 192.168.0.1 and the subnet mask is 255.255.255.0. There are no other options in this menu.
- The next submenu is “IPTV”. Change the settings here in accordance with those received in the instructions from the provider providing access to television. When finished, be sure to apply the changes.
- Using the same principle as in the quick setup mode, the MAC address is cloned, if required.
This completes the change to the local network. Be sure to click “Save” if any changes have been made.
Step 3: Wireless Network
The next step in configuring TP-Link N300 series routers is setting the wireless network parameters. By default, Wi-Fi will be activated, but sometimes it is simply not needed or there is a need to change the network name and/or password.
- Through the left menu, go to the “Wireless Mode” section and select “Basic Settings”. Here you can completely turn off Wi-Fi by marking the corresponding item with a marker, and also change its name. There is no need to change the mode and channels unless you are configuring for WDS. Then the channel must be fixed, and you can set one of the available ones.
- Next comes “WPS”. This is a convenient technology that allows you to quickly connect to your router without using a password. You can add a device directly from this category or set a PIN code that will be used for the connection. It is not necessary to disable WPS if you do not need it, because this technology does not have any impact on the overall performance of the network.
- It is important to devote time to Wi-Fi security by going to the “Wireless Security” section. Here we advise you to select the recommended encryption method by marking the highlighted item with a marker. If necessary, change the password to your own, which will consist of at least eight characters. If the network should be open, simply o, after which the password will be removed. The average user does not need to change anything else here.
- In the case when Wi-Fi operates in open mode, it may be necessary to configure filtering of physical addresses of devices so that only home equipment connects to the wireless network. To do this, in the “MAC Address Filtering” section you will need to select the “Allow” mode and create a table of trusted devices, that is, those that are actively used in the house. This also works in the opposite direction: connections are prohibited for the specified MAC addresses, and this rule will not apply to all other purposes.
- In “Wireless Mode Statistics” you will see all users who are currently connected to the router, as well as how much traffic they have consumed. This menu will also allow you to find out the physical address, which is used for filtering according to the rule described above.
- “Guest Network” deserves special attention. This is a separate wireless connection for which you enter your own name and set the level of protection. This Wi-Fi is designed only for certain groups of users, so there are a number of specific parameters for it.
- For example, you can isolate the network or set a schedule according to which the network will be open. If you decide to set this time, be sure to check your clock settings next.
After making all the changes, apply them and check that Wi-Fi is working. If the settings have not changed automatically, you will need to reboot the router, and after turning it back on, everything should function properly.
Step 4: DHCP Settings
DHCP is an important technology built into the TP-Link N300 router, as well as all modern network devices. Its purpose is to provide each connected device with a unique IP address, which is necessary for special network security rules or for normal optimization with the operating system, so that information does not appear on the screen that the IP is already in use. Configuring DHCP only takes a few minutes:
- Open the “DHCP” section and select “DHCP Settings” there. Here, make sure that the technology is enabled and that the range of IP addresses set does not overlap with the main address of the router (192.168.0.1). If necessary, change this range, for example, from 192.168.0.10 to 192.168.0.64. Such a list will be sufficient to provide each connected equipment with a unique IP address. You don't need to change any more settings in this section.
- Use the DHCP Client List if you need to view all local connections and their IP address relationships. This can be useful, for example, for setting further rules for protecting the router.
- The last submenu of the section is “Address reservation”. It is necessary in order to assign a specific address to a certain device, which will not change when connected again. The purpose of this setting also depends on further protection rules.
Step 5: Securing the Router
Many users neglect the router's security settings because they do not think that anyone will want to hack it or make an unauthorized connection. However, access control involves filtering not only external devices, but also internal ones, which can be useful, for example, if it is necessary to organize parental control. Therefore, we advise you to familiarize yourself with all the following points and decide which of these should be changed.
- First, open “Protection” and select “Basic protection settings” there. Make sure that all the options present here are activated. Any of them should be changed only if there are reasons for this. Usually this is required only by experienced users, so we will not dwell on this section in detail.
- The same applies to the “Advanced protection settings” menu. Here you control the filtering of external connections, setting the number of transmitted packets per second. This should only be changed by experienced users.
- In the “Local Management” category, you can select which users will be able to connect to the web interface of the TP-Link N300 router to change settings. Access can be opened to everyone, and if necessary, simply enter the MAC address of the equipment from which you can connect.
- The last setting item is “Yandex.DNS”. This is a proprietary domain name system from Yandex, which allows you to safely use the Internet. By default it is enabled, but if you disable it, nothing will change for the average user, so there is no point in considering the submenu.
- To set up parental controls, go to the appropriate section. There a general rule and physical addresses of devices to which access control will be applied are established.
- Scroll down to create a restriction schedule and select a list of sites that will be denied access. This setting is carried out at the personal discretion of each user, and it will not be difficult to understand it, since the principle of creating a table is quite simple.
- Restrictions for connecting specific devices to the router are carried out through the “Access Control” menu. Here you first need to set the “Node”, that is, select the current router for which the rules will apply.
- Then go to "Target" and click "Add" to generate the list.
- In it, set the blocking mode, for example, IP address, specify the target, add a description and port (optional).
- If the blocking should not be permanent, go to the “Schedule” category and there set up the already familiar table by days and hours.
Step 6: System Tools
The final stage of configuring the TP-Link N300 is editing system tools. This is necessary in order to establish the normal functioning of the router, ensure the functionality of the protection rules, and is also recommended simply for familiarization, since in the future, most likely, you will need to access this menu to change any parameters.
- First, open the System Tools section and select Time Settings. There, make sure that the system time matches the real time. As we said earlier, this is necessary to ensure the normal operation of the protection rules schedule.
- If you just bought your router, you probably don't need to update the software, but you may need to soon. Then go to the “Firmware Update” menu, upload the file received from the official website there, and click “Update”.
- You should go to “Factory Settings” in situations where you need to restore the standard settings of the router, for example, if after the changes the device’s performance has been disrupted.
- Through “Backup and Restore” a separate file is created with all the current router settings. This option will be especially relevant for those who have set a large number of protection rules and are afraid of losing them if the router parameters are suddenly reset.
- In the “Reboot” category, you can not only send the router to reboot, but also set a schedule for when this process will occur automatically. This will be relevant, for example, when many devices are always connected to the router at the same time and it is necessary that sometimes it resets the cache and clears the memory for better operation, which is exactly what is done during a reboot.
- The last step is to change the password for authorization in the web interface. We recommend doing this to limit access to settings for any user, as this can disable parental controls or remove access control rules.
The basic parameters of the TP-Link N300 router can also be set through the mobile application, having previously connected via Wi-Fi. If you are satisfied with this option, we recommend that you go to the separate thematic instructions at the link below.
Read more: Configuring TP-Link routers via phone
We are glad that we were able to help you solve the problem. Add the Lumpics.ru website to your bookmarks and we will be useful to you. Thank the author and share the article on social networks.
Describe what didn't work for you. Our specialists will try to answer as quickly as possible.
Setting up via mobile application
You can manage TP-Link routers using an application for Android and iOS. This is a functional program that does not work with all router models. To see the list of supported devices, you need to open the application page on Google Play or the App Store.
Among the program features:
- viewing the router status;
- setting the status for connected users;
- setting up parental controls;
- creation of guest networks;
- control the router from a long distance;
- setting up the router: creating a connection, name and password for the Wi-Fi network;
- Manage your wireless network in real time: view connected users, block unwanted clients.
To work with the router, you need to download and install the application on your smartphone, and then launch it. The application will require registration via email.
To control the router, you just need to connect to it via Wi-Fi. If you need to set up a new device, you need to plug it in and then connect to the standard wireless network that appears (the name and password are on a sticker on the bottom of the router).
Now you need to launch the application. The router will appear in the list of detected devices. To start managing it, you need to enter your login and password (“admin”/“admin” or set by the user).
The main page shows a network diagram. You can tap on any connected device and block it if you don't want it.
In the “Management” tab, you can enable or disable the wireless network, change the password or name, and make it open.
In the “Parental Controls” section, you can add or disable devices to which the settings are applied. The rules are configured via the browser.
The Blocked Clients tab shows blocked devices.
The “Internet Connection” section is used when setting up the router for the first time. Here you select the connection type (Dynamic IP, Static IP, etc.) and enter the data (username, password, IP address, etc.) provided by the provider. More in-depth settings are performed via the WEB interface.
In the “System” section, you can reset the router to factory settings, reboot, and change passwords for logging into the application and the web interface.
Setting up the Internet connection type on TP-Link WR841n
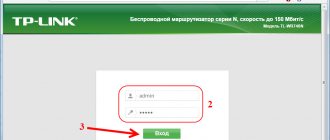
To set up the TP-Link TL-WR841N, you can use the CD included in the kit - it has a convenient step-by-step installer that will be just right for a beginner. However, since we decided to do this without a disk ourselves, we turn the router over and on its bottom we find information for entering the settings of the TP-Link router.
In this case, we need to type the address “https://tplinkwifi.net” in the browser and enter the login/password admin/admin. You can also log into the WR841N admin panel using its standard IP address “192.168.0.1” or “192.168.1.1”, depending on the model.
I talked about all possible connection problems here - read it if you can’t open the login address.
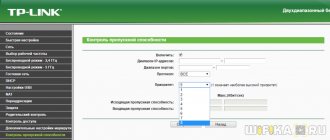
Next, I will provide two screenshots with examples of settings for different TP-Link routers - for the old and new firmware. The fact is that the admin panel was recently updated and it may be difficult for a newbie to navigate the installation based on old pictures. At the same time, the old version is also very common. Therefore, we will definitely show you how to configure TP-Link through different types of web interfaces.
Select the “WAN” item in the “Network” menu section and make the basic parameters for connecting the TP-Link router to the Internet. To do this, you will need to set the connection type, login, and password. Perhaps the information about the IP address, mask and gateway - all this should be specified in the contract for the provision of Internet services from your provider, or you can simply call their technical support and find out this data for configuration. As an example, I will give the most popular ones.
How to configure a TP-Link WR841N router for Rostelecom and Dom.Ru - PPPoE
If your service provider is Rostelecom or Dom.Ru, then when setting up you need to select the PPPoE type. It requires you to enter your username and password.
TP-Link router configurations for Beeline - L2TP or PPTP
For Beeline you need to install L2TP and, in addition to the login and password, specify the host name for the connection - tp.internet.beeline.ru
Dynamic and Static IP
Two more types of connection to the provider. With a dynamic address, you don’t need to enter anything at all - just select this item and proceed to setting up wifi. If you have been given a static IP to access the Internet, then the information that is specified in the contract will be useful here - ip, mask, gateway, but more on that a little later.
Next, in the “LAN” section, enter the desired IP address for your router on the local network and the mask - you can leave everything by default, it doesn’t matter.
And in the next paragraph “Clone MAC address” you can replace the MAC address of the router with the address of the computer - in the networks of some providers it is still required to use one MAC address, which was registered when concluding a contract for the provision of services. As a result, if you start the router, the Internet simply will not work - this section is precisely for this case.
Wi-Fi connection and settings
Creating a wireless network on TP-Link routers is performed during the quick setup process, but if the user has not done so, he can configure the Wi-Fi network later in the WEB interface of the router.
TP-Link routers can operate in one or two bands, which means you can create one or two Wi-Fi networks on them.
Guide using the Archer C20 dual-band router as an example:
- Click “Select operating frequency”, specify both frequencies or select one.
- Click "2.4 GHz Wireless Mode". Check the “Enable” field, enter the name of the network, enable SSID broadcasting so that the created Wi-Fi network is visible in searches on connected devices. If you remove the label, the network will not be visible to others, but you will need to enter its name and password manually on your equipment.
- Click "Wireless Security". Select the “WPA/WPA2-Personal” type, create and enter a password.
- Select 5 GHz wireless mode, repeat the steps to create and protect the network described in steps 2-3.
For single-band routers, you do not need to select an operating frequency. In their web interface, you need to click “Wireless Mode”, turn on the network, enter your name and password, and choose whether to hide the SSID or not.
The order of actions may vary slightly, but I do it in this order:
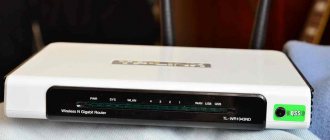
- — First, turn on the router; to do this, insert the power cable with one side into a special socket (make no mistake, there is only one of these), and the other side into the outlet. Usually there is a power button on the back, press it, some of the lights should light up.
- — Then we take the Internet cable, which we should already have installed in the house or apartment, and plug it into the slot on the back of the router. This slot is highlighted in a separate color.
- — Now we take the network cable that comes with the kit. We insert one side into any free slot on the back of the router, and insert the other into the network connection slot on the PC or laptop.
- - After that, we move on to installing drivers. Insert the installation disk and launch the quick setup program.
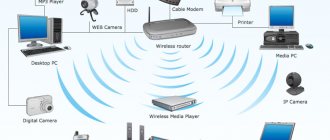
This is the connection diagram:
Watch the pictures carefully and repeat the same thing for yourself.
We launched the disk; as a rule, it contains several settings for different routers. Choose your model.
In the next window, select the language and click start installation.
After other windows appear, always click next. A check and configuration of parameters will appear, and the checkboxes indicating successful installation will light up.
Carefully fill out all the pop-up windows or check the box “I didn’t find the settings I needed.”
If you see such a window, then you need to select the connection type. You can find out what type of connection you have by reading the contract you entered into with your provider. The most popular is PPPoE. But to be sure, be sure to check, or you will simply not complete the installation.
Now let’s move on to the most unpleasant part: look for your login and password for access in the agreement with the provider and enter it in the appropriate windows. Click next again (if such a window does not appear, then just move on).
In the next window, write the name of your network in English letters.
We come up with a password to access our network.
Now we confirm our data.
Let's be a little patient and just wait, at this stage the final setup is underway.
So in about 5 minutes we completely configured the router and the network is ready for use. After successful setup, you can close the program. Remove and remove the installation disk and disconnect the network cable that connected the router and computer.
We check the wi-fi network using any supporting device (smartphone or laptop), make sure that the network is working and you can access the Internet. Now you can place the router in a place convenient for you.
Setting up IP TV
If the router supports IP TV, the user will be able to set up viewing interactive television on all of their devices connected to the wireless network.
Management:
- Connect the IP TV set-top box to the LAN connector on the router body.
- In the web interface, open “Network” - “IP TV”.
- Enable “IGMP proxy” (if there is no button, skip step).
- Select the LAN connector to which the set-top box is connected.
- For most providers, select the “Bridge” mode and save the changes.
- Some service providers (Rostelecom) require the VLAN ID value to be specified when connecting. You need to find out this parameter from a support specialist, and then select “802.1Q Tag VLAN” instead of “Bridge” mode.
- Disable “VLAN TAG for Internet”, in the “VLAN ID for IP TV service” field enter the value received from the provider. Select a port for IP TV. Save changes.
Depending on the web interface, to open the “IP TV” tab, you will need to go to the “Advanced Settings” section and then to “Network”.
Change Password
Changing the password must be done so that strangers do not gain access to the router and change its settings. To do this you need:
- Open the “System Tools” tab.
- Select "Password".
- Enter your old login and password (if the router is new, you need to enter “admin/admin”).
- Specify a new login, create, enter and repeat a new password.
- Save changes.
The new login and password must not be longer than 15 characters and contain spaces.
Setup procedure
It is recommended that before starting the setup process, you roll back the existing router settings to the factory state.
The algorithm for performing a reset is as follows:
- Armed with a thin wire or other similar sharp object, for example, a straightened paper clip, press the “Reset” button;
- Hold the button for about ten seconds;
- Wait for the router restart to complete;
- Ready! After a reboot, the router settings will be default.
To configure the router you need to perform the following sequence of actions:
- Launch a browser on your computer and type “192.168.0.1” or “192.168.1.1” and click “Enter”;
- In the window that appears, type the name and access code; in both fields, after resetting the router settings, you must type “admin”;
- Click “Submit”;
- After this, the Wi-Fi interface of the device will appear, where all further actions are performed, but before they begin, it is recommended to update the device’s firmware.
Repeater mode
Repeater mode (repeater, signal amplifier) is a convenient option that allows the router to receive and amplify the wireless signal from the main router to expand its coverage area.
This mode is not available on all TP-Link router models. You can find out about its availability in the technical specifications of a specific device or in its web interface. If the device has several operating modes, it will have an “Operating Mode” section. You need to open it and find “Signal Booster”, select and click “Save”.
The router will reboot. In the “Status” tab you will see that the operating mode has changed to “Wi-Fi signal booster”.
Now you need to open “Wireless Mode”, select “Network Connection” and launch “Search”. If necessary, you can manually enter the main network name and MAC address. When the router finds it, you need to click “Connect”, enter the password and click “Save”.
Now the router should connect to the existing Wi-Fi network and expand it.
Firmware update
Updating the router firmware is performed in two ways - automatic (some models) or manual. New versions for manual updating should only be downloaded from the official website at https://www.tp-link.com/ru/support/download/. Downloading software from other resources can lead not only to the breakdown of the router, but also to infection of the computer with viruses or the installation of malware.
Instructions for automatic firmware update:
- Open "Advanced Settings" and go to the "System Tools" section.
- Select "Firmware Update".
- Click “Check for updates.”
- If a new version of the software is found, a corresponding notification will appear and a proposal to install it. You need to confirm the action, and then wait for the download and installation of the firmware to complete.
It is recommended to update online only with a stable Internet connection, connecting to your provider via cable. Wireless networks are less reliable, and a loss of connection can cause the update process to fail and cause the device to break.
Manual firmware update guide:
- Download the official website of the manufacturer https://www.tp-link.com/ru/support/download/.
- Select the device type and router model name, go to the device page and in the “Firmware” tab download the latest version of the software. Unpack the archive and extract the file.
- Open “Advanced settings” - “System tools” - “Firmware update”.
- Click “Browse”, specify the path to the firmware file, click “Update”.
- Wait for the process to complete.
It is forbidden to turn off the router while installing the update. This may cause it to break.
The process of updating the firmware of a TP-Link Wi-Fi router
The router has a built-in firmware update mechanism. It is very comfortable. Software updates are designed to fix past coding errors, add new functionality, and sometimes improve the appearance of the web interface.
The “Firmware Update” item is located in the “System Tools” section. Before downloading new firmware from the official website, you must first find out what version of the equipment is in this router. This is important, since updating the firmware to unsuitable hardware can damage the device. On the company’s official website, you need to select the type indicated in the “Equipment version” section.
Hardware version and buttons for firmware update
After downloading the necessary firmware, you need to specify the file using the “Select file” button, and then click “Update” and wait for the process to complete.
Share Tweet Email Pin
Reset
Resetting the router settings is performed if the device does not work correctly after installing new firmware, a technical failure, or incorrect user actions.
Instructions:
- Open “Advanced Settings”, select the “System Tools” tab.
- Click "Backup and Restore".
- Click "Restore factory settings".
The router will reboot, its parameters will be returned to their original settings, and user settings will be erased. The router will have to be configured again.
Some models support device recovery in a different way. If there is a “Reset” button on the device body, you need to press it and then hold it down for at least 10 seconds until the indicators on the body blink. The router will reboot and reset the settings to factory defaults.
Setting up a Wi-Fi network on a TP-Link router
When the connection to the Internet is established, you can move on to the final stage of work - Wi-Fi settings.
To do this you need to do the following:
- Through the control panel, go to the wireless connections subsection, select the settings tab. In the English version of the interface, these items are designated as “Wireless” and “Wireless Settings”.
- Set the name of the network and select your region.
- Leave the default data unchanged and confirm the settings.
- Select the wireless modes security tab and set the encryption type to “WPA/WPA2”.
- Enter the created access code and confirm the new parameters.
Advice. To protect the router interface and prevent intrusion by third parties, it is better to change the identification combinations that give access to administrative settings. To do this, go to the system tools tab and select the “Password” sub-item. Then you will need to enter new keys and save them, and then restart the device.