Photoshop is a program that allows you to change photos beyond recognition. However, the first tool that anyone who wants to learn how to edit an image should become familiar with is selection and cutting. In this article we will look at ways in which you can cut out both simple and complex objects, as well as scale them.
How to cut a simple object in Photoshop and paste it onto another image
To edit an image in Photoshop and then move it to another picture, you first need to learn how to make a selection. Below we present three simple methods that anyone can master.
1. Using the Rectangular Marquee or Oval Marquee tool. This method is suitable if you need to select and cut out a simple image of a geometric shape.
To do this, right-click on this icon (second from the top).
Select the area you need.
Then move the selected area to another picture, or simply drag it to the adjacent tab.
2. Using the “Magic Wand” tool. This tool is considered one of the simplest. However, its main advantage, in addition to the ease of learning, is the speed of the manipulations. In addition, this function is available in all versions of the program. Thanks to an intelligent algorithm, the editor independently determines the shades of pixels bordering other parts of the photo. Therefore, its use is recommended for bright, multi-color photos. How to make a selection using the Magic Wand?
Before you start, select the picture from which you need to transfer the object to another image, as well as the background.
Find the basic toolbar (located on the left side of the screen), click on the fourth element from the top and select “Magic Wand”.
Next, you need to click on the required area of the image to make a selection appear. Remember that this tool works by searching for pixels that match the color, so it is best used to select large objects - grass, sky.
If the “Magic Wand” did not select the entire area, then add the missing area to the general selection. To do this, you need to hold down the Shift key and simultaneously right-click on the unselected area.
In order to move the selected area to another picture, change the tool to the cursor (the first one on the base panel). Left-click the selected area and move it to the adjacent tab.
3. Using the Quick Selection tool. This method is considered one of the simplest and most convenient. It belongs to the category of basic ones, and therefore all editor users who want to fully master the program need to learn how to work with it.
You might be interested in: Introducing Photoshop! Toolbar!
Step-by-step instructions for “Quick Selection”:
This tool is located in the same tab as the “Magic Wand”. We remind you of the path: “Toolbar” - “Selection” - “Quick selection”. This function works on the principle of a brush, which allows you to make a shaped selection along contrasting borders. You choose the size and diameter of the area that will be captured.
Once you have selected a tool, move your cursor over the desired area.
You can add selection boundaries either by stretching or by left-clicking on adjacent areas.
If you are not satisfied with the result, then to cancel the action, press the hotkey combination “Ctrl+D” and try again.
Move Tool - Photoshop tutorials and everything about Photoshop
Move tool is designed to move various objects in Photoshop: shapes, layers, selected parts of the image. This tool allows you to move an image layer from one open document to another open document.
It seems that the Move is very simple and there is simply nothing to know about it. This is true. The main purpose of the tool is to drag objects, or rather the Layers on which these objects are located. But the speed and efficiency of your work depends on the skillful use of the Move , that is, on quickly and effectively switching between layers. The tool also has a very useful function that allows you to align and distribute selected objects.
The Move tool can be activated through the toolbar, or by pressing the hotkey (V) , but to temporarily switch to this tool in most cases, just hold down the Ctrl .
Tool settings panel
Each tool has its own settings panel. Let's look at the settings of the Move .
1. Automatic layer selection (Auto SeLect Layer) . If this option is enabled, the object and layer on which you clicked are automatically selected. This function is very useful if you have many layers in your working document and it is difficult to find the desired layer in the Layers . Just click on the desired object in the working document and it will automatically be selected in the Layers . This way you can switch between layers and move them with one click. In this case, we must remember that the topmost layer under the cursor is selected.
2. Automatic group selection (Auto SeLect Groups) . All layers in the Layers can be combined into groups, that is, put them in folders for ease of work. If this option is enabled, a group of layers is automatically selected, of course, if you have created groups.
Note: in older versions of Photoshop (I have CS2), the Layer and Group positions are in the drop-down menu (picture below).
3. Show transformation frame (Show Transform Controls) . Shows a transform frame around the selected object. In this case, the frame has markers for changing the shape of the object. If you drag any marker, the Free Transform , allowing you to change the size and proportions of the current object. Essentially, this option simply calls the Free Transform . Simply click on the desired object and immediately begin changing the shape. Therefore, if you often need to change the size of objects or rotate them, then it is better to enable this option.
4. Now let's move on to the bunch of icons on the right. In fact, they are not difficult to understand and they are very useful. If you have several layers with different objects and you need to align them or make the same distance between them, then these buttons are just what you need.
Let's take a closer look at these functions. They are divided into two types: Align and Distribute . You can align it along the edge of something, or distribute it among yourself. That is, all these functions only work if multiple layers are selected (hold down the Shift to select multiple layers in the Layers ). In turn, you can align and distribute horizontally or vertically.
1. The first three buttons are responsible for the horizontal alignment of objects. Alignment options include top (A), center (B), and bottom (C).
2. The second three buttons are responsible for vertical alignment of objects to the left (D), center (E) and right (F).
3. The third group of buttons is responsible for aligning the distance between vertically located objects relative to the top line (G), center (H) or bottom line (I) of objects.
4. And the last group of three buttons is responsible for aligning the distance between horizontally located objects relative to the left edge (J), center (K) or right edge (L) of objects.
Moving an Image
The easiest and most common way to drag an image from one document to another is using the Move .
With the tool active, click on the photo you want to move. Then, using your mouse and holding down the left button, drag the image into the document window of another photo. When you release the mouse button, the image will be placed in another document. In this case, the image will be installed in the place where you release the mouse button. Shift key while dragging (it is very important to release the Shift after the mouse button).
That's all. I hope you found this review of this tool helpful.
Author: Vladimir Nesterov
Source of the lesson: www.photoshop-virtuoz.ru
photoshop-virtuoz.ru
How to cut out a complex object in Photoshop
In order to cut out a complex object, there are several variations of actions. Below we will look at the most common and least labor-intensive of them.
1. Using the Mask tool.
An object that is classified as complex cannot usually be cut using the Lasso. Therefore, if, for example, you need to cut out a person or animal from a photo, then use a mask to select it. How can it be accomplished?
Go to the editor, open the image you need using the “Open” tab in the “File” menu.
Then pay attention to the “Layers” window (with standard settings it is located in the lower right corner). You will see that a new layer has appeared with a thumbnail of the open picture. If this layer is not selected, then click on it once with the left mouse button.
Select the "Quick Mask" icon from the side menu.
After that, select a brush of any shape. Set the “opacity” and “pressure” to 100 percent, and then outline the required area. The color of this brush after clicking on the “Quick Mask” will become black, and the selected area will be highlighted with a translucent red layer. To accurately cover the contour of the selected area, change the brush size and also change the pressure (for example, in order to outline a translucent fabric, you need to set this parameter to 50%).
Once you have selected the object, left-click on the Quick Mask icon. You will see that the entire selected area is covered around the perimeter with dotted lines.
Now you can cut the selected area to another layer or move it to a completely different picture.
2. Using the Magnetic Lasso tool.
This instrument belongs to the group of more complex ones. However, the benefits it will bring you are worth the few minutes spent learning it.
You might be interested in: 3 Easy Ways to Blur the Background in Photoshop
The essence of this tool is a special algorithm that searches for the edge of an object, and not pixels of similar color. This allows you to make a more accurate selection of a complex area.
How to use Magnetic Lasso?
Choose a photo that will have a difficult subject to isolate. At the initial stage, as a training, it is better to choose pictures with objects that strongly contrast with the background. This will make it easier for you to set boundaries.
Zoom in on the image (In the View menu, click the Zoom In tab), and then select Magnetic Lasso.
Move the circle pointer to the edge of the object and click to set the starting point for creating the border.
Then release it and simply move the cursor along the edge of the object. Gradually a selection will be created.
The outline will automatically close when the first lasso point connects to the last.
If you need to remove part of the background that may be inside an object, press the Alt button and select it using the magnetic lasso - the subtraction mode will turn on without canceling the previous selection.
Now you can easily cut and paste this area into another picture.
Plastic filter
The Liquify filter allows you to distort certain areas of the image: shift, move, rotate, reflect, bulge and wrinkle pixels. It is used to create caricatures, retouch and correct photographs, and perform artistic effects.
The filter dialog box is called by the command Filter -> Liquify. All tools are located on the left side of the window, and their settings are made on the right side.
In Fig. Figure 18 shows an example of using the Liquify filter to create a puppet effect.
The eyes were enlarged using the Bloat tool. To treat each eye, you need to use a fairly large brush, the size of which should exceed the size of the eye (Fig. 19).
Rice. 19. Using the Bloat Tool to Enlarge Eyes
It is better to set the brush speed quite low - in the example we used a value of 30. You should perform several mouse clicks in different places of the eye, while maintaining its round shape.
The Pucker and Forward tools were used to make the mouth smaller. Puckering is applied to the corners of the mouth, with a few clicks made on each of them. To narrow the mouth even more, you need to move the corners of the mouth towards each other with the Forward tool - fig. 20.
Rice. 20. Using the Warp Tool to Reduce the Mouth
The same tools used to make the mouth smaller are used to narrow the nose. As you work, you may need to reduce the brush size for more detailed processing. To sharpen the chin, the Forward tool was used.
To complete the effect, the whites, pupil and iris were processed using the Burn and Dodge tools, and the image was color corrected in the Hue/Saturation dialog box.
In addition to creating caricatures, the listed tools are often used to correct photographs. So, in Fig. Figure 21 shows an example of correcting a portrait of a man.
Rice. 21. The original portrait of a man (a) and the result of its correction with the Plastic filter (b)
Rice. 22. The process of portrait correction with the Deformation tool: a — reduction of the earlobe; b - lower lip tightening
The following fragments were processed with the Forward tool:
- earlobes - to make them smaller and press them closer to the head (Fig. 22a);
- lower lip - to change its shape (Fig. 22b).
The Pucker tool was used to process other fragments:
- several clicks were made on the mole to reduce it, the size of the brush was slightly larger than the mole itself (Fig. 23a);
- To reduce bags under the eyes, the Pucker tool was used in conjunction with the Freeze and Thaw Mask tools. To protect a fragment of the image from action, the desired area is painted over with the Freeze tool. So, in Fig. 23b protects the eye from exposure, protection is indicated in red. The treatment is carried out in several clicks along the lower border of the eye. After the correction is completed, the protection is removed with the Thaw Mask tool.
In addition to correction, the Liquify filter can be used to create various artistic effects. In Fig. Figure 24 shows the result of processing lily petals with the Twirl tool. By default, rotation is clockwise; to rotate in the opposite direction, you need to hold down the Alt key (in Mac OS - Option). The stamens and pistil are processed with the Bloat tool.
Rice. 23. The process of correcting a portrait with the Wrinkling tool: a - reducing a mole; b - reduction of bags under the eyes, the protected area is indicated in red
Rice. 24. The original image of lilies (a) and the result of its processing with the Plastic filter (b)
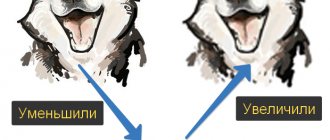
How to make a cut out object smaller in Photoshop
Reducing (or enlarging) a cut object is very simple. To do this, use the key combination “CTRL + T” and use the mouse to shrink it to the desired size. There is another way.
Open the “Editing” tab and select “Transform” there. After activating this function, the boundaries of the object are highlighted and will be surrounded by small squares. Move the cursor over any area of this border, and then hold down the left mouse button. Pull the piece inward to make it smaller. If you need to maintain proportions, then hold down “Shift” during transformation. To save your changes, press the Enter key.
Now, having learned Photoshop tools that allow you to select the desired area and cut it onto another image, you can create various collages. This function will be useful for both designers and ordinary users who decide to realize their creativity with the help of the editor.
Source