Why merge routers?
Sometimes a single signal source is not enough to cover all desired zones or connect all client devices:
- Wi-Fi does not reach parts of the room with a complex configuration or remote areas;
- There are not enough physical ports connected via cable.
Anyone who has had to deploy Wi-Fi in a large office, apartment, house, or in geographically dispersed areas has probably encountered this. The solution in such a case is to expand the network by installing additional equipment.
There are several options for connecting 2 routers to one wireless network:
- Cable connection of the required number of routers. To do this, you will have to stretch the cable between the routers. This task is not always feasible - pulling the cord can be inconvenient, especially between floors or buildings. But a wired link is the most stable way to connect two network devices, providing a reliable high-speed exchange channel. If stability and the ability to simultaneously connect many devices to the network are important, then cable connection is the best method.
- Connecting two routers over the air via Wi-Fi. For this purpose, the bridge mode provided by communication protocols is used, also known as WDS or bridged networking, a wireless client or a signal repeater. These modes are essentially identical, but different equipment manufacturers call and implement this functionality differently in the router firmware.
Briefly, the method for connecting two different routers to the same network is as follows:
- There is a Wi-Fi distribution and a main router-server connected to the Internet cable.
- The network needs to be expanded. In the range of the antenna signal of router number 1, router number 2 is installed, which will “continue” Wi-Fi from the first one and distribute the wireless signal to a previously inaccessible area.
- Router 2 is connected to 1 Ethernet cable or using a Wi-Fi bridge.
Why connect several routers into one network?
In some situations, to build a network or high-quality Wi-Fi coverage, one router may not be enough. In the sense that it will not be able to provide the desired range of Wi-Fi network coverage or the required number of ports for network devices. Some rooms or premises may not have a Wi-Fi signal. This is familiar to those who created a Wi-Fi network in a large house, apartment or multi-room office. In such a situation, you need to install additional equipment and somehow expand the network. It's not difficult to do this.
There are several options that we will consider in this article:
- The first is connecting two or more routers using a cable. It will be necessary to lay a network cable from one router to another. This is not always convenient. But this is the most reliable and stable way. If you need a stable network with good speed and for a large number of devices, then it is best to connect the routers with a cable.
- The second method is to connect routers via Wi-Fi. In this case, a connection in bridge mode (WDS), client, or repeater mode is used. Essentially, it's the same thing. It’s just that on routers from different manufacturers, these settings are implemented differently.
So, we have a main router to which the Internet is connected, and it distributes the Wi-Fi network. We need to install another router, for example, in another room or on another floor. This second router will somehow strengthen the Wi-Fi network of the main router and serve to expand one network in remote areas.
We can connect the second router to the first via cable or Wi-Fi.
Let's now take a closer look at both connection methods.
How to connect routers via Wi-Fi
This technique of connecting two separate routers is most often used because of its convenience: there is no need for chiselling and drilling walls or laying a power cord.
Let's take a representative of the TP-Link product line as the main router. P3
By the time you start configuring the bridge, the “main” modem should already be configured itself and “distribute” the Internet to clients.
The second important point: to connect two routers to the same network, you should configure a static channel. Usually the default value is Auto, you need to select one of the available ones in the list. Generally, the standard channel is 6, so choose a value higher than this.
If the second router also belongs to the TP-Link family, the channel changes in the settings:
- In the main menu, find the “Wireless” section.
- Next, go to the “Wireless Settings” tab.
- In the window that opens, find the “Channel” item. Set the desired number.
- Apply the changes made.
In other routers the principle is similar.
Next, you should configure a second router, which will act as a repeater client in WDS mode. To do this, you need to perform the following sequence of actions:
- Enter your device settings.
- Change the internal IP address. The change is necessary to avoid network collisions: there should not be devices with the same IP address, otherwise a conflict will arise. If the local IP of the first router is 192.168.0.1, the other is assigned an address from 192.168.0.2 and higher. It is important that both are within the same subnet.
- After applying the settings, log into the web interface using the newly assigned IP.
- Go to the wireless mode settings in the corresponding tab.
- If desired, specify the Name (“SSID”) of the second network.
- In the “Channel” column, enter the same number as on router number 1.
- ABOUT.
- Activate the “mother” network discovery button (“Search”).
- Select the correct Wi-Fi connection SSID of the master router and click the “Connect” button.
- Enter password.
- Apply and save the data. The device will reboot.
- After that, enter the menu again and check the status. The status page should show the active status of WDS.
If the manipulations are done correctly, then the setup is complete: you have connected 2 routers to one common network.
But there is one caveat: when connected via Wi-Fi, the network will work, but if you connect a network device to router 2 via a cord, it will not connect to the Internet.
To eliminate this drawback, you should turn off the built-in DHCP server on router 2 so that its clients receive addressing directly from the first one.
Next, go to the configuration interface and turn off the DHCP server.
The router pairing process is complete.
It is important to choose the correct location for device 2 so that the signal from the first one reaches it with sufficient strength.
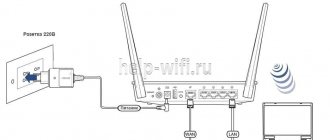
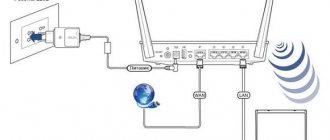
We connect two routers to the PC and configure them
The setup itself begins with the need to connect two routers to a computer. Moreover, the parameters are first set on the main router, and then on the secondary router. The setup procedure is as follows:
- We connect the device and PC using a network cable;
- We enter the settings;
- Check the IP and subnet mask address;
- Configuring DHCP.
- Save and disable the router.
Configuring a DHCP server is carried out only if you want to receive a LAN-to-WAN connection. If you settled on the second type, then there is no need to change the parameters.
After work with the first router is completed, you need to connect the second router. In this case, the procedure will change slightly. Once you enter the IP address field, you need to change it a little. This is done as follows:
- When setting up LAN-to-LAN, the last number of the last block of the address changes.
- When setting up LAN-to-WAN, the last number of the penultimate block of the address changes.
The increase is by one unit. Please note that this is done specifically for the secondary router! Next, you need to configure DHCP on the second router. Depending on the selected network type, it must either be disabled altogether, or its IP must also be changed.
Just connecting two routers is not enough. It is also important to make sure that they do not jam each other's signal. To do this, you need to choose different communication channels for them. This completes the configuration of routers. All that remains is to arrange them.
Before connecting two routers in this way, it is important to note that they are connected to each other using a cable.
Therefore, stock up on optical cable and think about how to run it around the room so that it does not interfere with anyone.
Cable connection
Wired pairing is possible in two ways:
- LAN-to-LAN connection method;
- LAN-WAN method.
In the first case, a network is created between routers connected to LAN ports with Ethernet cords.
In the second, a cable is laid between the WAN interface of the second router and the LAN port of the first.
LAN-to-LAN method
First, determine which device will act as the head one. Choose a router with an Internet cord coming into it.
Next, connect the LAN port of the master to the LAN interface of the slave.
Let’s assume that the Internet is configured in advance on the “host”. The next steps will be:
- Connect to the web interface of gadget number 1.
- Check if the DHCP server is enabled; if it is disabled, activate it.
- Save settings.
- Connect to gadget number 2.
- Disable DHCP on it, similar to the wireless method. The addressing will be taken from the head router.
- Also, by analogy, change the local IP address of the device.
- Apply the settings and re-enter the configurator.
- Check the operating status of the device. It must receive a network address from the main one and perform the function of a wireless access point.
LAN-WAN method
The WAN port of router 1 and the LAN port of router 2 are connected. Again, we assume that the necessary settings have been made on the main modem and DHCP is enabled.
The sequence of actions will be as follows:
- Go to the menu of gadget 1 and check the operation of the DHCP server. By default, the service is always enabled, but if it is inactive, the function should be enabled and the changes applied.
- Go to the gadget menu 2 and on the WAN network parameters tab, select the dynamic type of IP addressing request. We save the data.
- In this case, you DO NOT need to disable the DHCP function.
- We check the range of local DHCP server addresses on both routers so that they do not overlap. For example, if the addressing range is 192.168.0.2…199 on the master, 192.168.0.200…254 should be entered on the slave. If this condition is not met, addressing conflicts may occur.
- Apply the settings. You can reboot the gadget.
As a result, both will run on an access point, but they will become interconnected within a single subnet and allow clients to use all resources.
Creating a Wi-Fi bridge
The configuration of the “Master” device in the case of creating a WI-FI bridge is no different from those specified in the “Base station” - “Repeater” paragraph. Let's look at how to configure a client station using an Asus device as an example:
- In the open web interface, go to the menu item “ Additional settings ” - “ Administration ”. On the tab that opens, make active the checkbox next to the “ Media Bridge ” item and click “ Save ”.
- It is worth considering that this item is only available in routers that support this function.
- Next, select the settings item “Wireless network” – “WDS” and specify the following connection settings:
- “ Access point mode ” - WDS only;
- “ Enable wireless bridge ” - yes;
- “ List of remote APs ”—specify the SSID of the first device.
- Click “ Apply ”. A reboot will occur to apply the changes.
Web interface - what is it?
Subtleties and tips
Connecting multiple routers within a network is a good way to increase the range and number of possible connections. Some people hope to improve the speed of their Internet connection in this way, but a second router will not help solve this issue. The fact is that providers limit the speed of incoming and outgoing flows at the level of their backbone equipment, and it will not change - no matter how many “clients” there are.
Another important point concerns internal speeds. Most civilian models of network devices support two speed standards when connecting to a LAN:
- 10/100 megabits;
- 1000 megabits.
It should be taken into account that a device connected to a gigabit port, but designed for 100 Mbit, is not capable of delivering above 100 Mbit, and more often the actual speed will be even lower. Take this into account when designing a wired link: the speed of the channel to the client equipment will depend on the “thickness” of the channel between the main and the second. For the same reason, it is better to use a gigabit router as a master router, and a hundred-megabit router as a slave router.
You also need to keep in mind that there are two types of network cable:
- four-wire;
- eight-core.
Four wires are the minimum number possible according to Ethernet standards for data transmission. The maximum data transfer speed over such a cord is 100 megabits. To achieve gigabit channel thickness, use a standard eight-core UTP or STP cable.
The latter (Shielded Twisted Pair) carries additional shielding under the braid. It protects the wires from external electromagnetic interference and makes the signal more stable, but the STP wire is more expensive.
There are also nuances in setting Wi-Fi speeds. There are four main modes of operation of wireless access points. The names of the modes begin with 802.11, and then the letters are indicated:
- b;
- g;
- n;
- ac.
Their differences are in the maximum possible speed of information transfer:
- standard a - speed 54 Mbit, used for Wi-Fi 5 GHz;
- standard b - 5.5 and 11 Mbit;
- g standard - 54 Mbit on 2.4 GHz networks, backward compatible with b;
- standard n - up to 150 Mbit in 2.4 GHz networks and up to 600 Mbit at 5 GHz;
- AC standard is a modern development of wireless technology with data transmission at speeds of up to 6.77 Gbit per second.
Of course, these values are correct under ideal conditions, but in reality the speeds are lower. Therefore, in any case, you should take into account what standard the network equipment is capable of operating. If both routers support 802.11ac, then the speed of their interaction will be maximum.
And if there is an ac gadget at one end, and one that supports only n at the other, the speed limit will hit the “ceiling” of the technology - 150/600 Mbit. With a g-router it is even smaller, only 54 Mbit and without support for 5 GHz networks.
Most routers are able to negotiate protocols and communication speeds automatically. But if there are connection problems, you should set the settings manually, obviously removing possible collisions.
The next important point is hardware compatibility. Despite the fact that the standards and protocols are well known and described, their implementation among network equipment manufacturers may differ, and some devices interact with each other with limitations or errors. Therefore, when selecting gadgets for organizing a network bridge, it is advisable to adhere to the principle of “one network - one manufacturer,” and even one model. The router firmware version also matters.
Method 1. Connect via WiFi.
This method, in my opinion, is the most correct - one device simply expands the WiFi network coverage of another. In general, initially there was simply a repeater (repeater) mode, which was either supported or not. Then a new technology appeared - WDS, which manufacturers of wireless devices began to actively implement in their creations. WDS (Wireless Distribution System) is a special technology that allows you to expand the coverage area of a Wi-Fi wireless network by combining several access points (or several WiFi routers) into one network without the need for a wired connection between them. The main requirement when organizing such a network is that all base stations of the WDS network must be configured to use the same frequency, encryption method and encryption key. As a result, in order to connect a router via WiFi, the first one should simply distribute a wireless network and no additional settings need to be made on it. And the second one must be able to work in repeater mode, or support WDS technology, which is actually almost the same thing. You can find out whether your device can do this either on the manufacturer’s website or by looking through the settings. As an example, I'll look at two wireless routers that can be connected to others via WiFi. The first is Asus RT-N12 D1, which can work as a repeater. And the second example is TP-Link, which supports WDS technology (TL-W741ND, TL-W841ND, TL-W941ND, TL-W1043ND).
Connecting an Asus router to a network via WiFi
In order to switch Asus into repeater mode, you need to go to the web interface, find the “Administration” section and on the “Operation mode” tab, check the “Repeater mode” checkbox:
Click the “Save” button and wait for the reboot. After that, click on the “Quick Internet setup” button. The following tab will open:
This is a list of available wireless networks. You need to find an existing network, enter the network key (password) and click the “Connect” button. After this, Asus must connect to the network, obtain an address and expand its coverage area.
Connecting a TP-Link router via WiFi
Most modern TP-Link models have WDS support. In order to configure the connection of one router through another, you first need to go to the “Wireless Settings” section of the web interface and check the “Enable WDS” checkbox:
Some more settings will become available to you below. Click the Search button and see a list of Wi-Fi wireless networks available for connection:
We find ours among them and click the “Connect” button. After this, you will be taken back to the Wi-Fi settings, where you will need to enter the network password and click the Save button. After this, TP-Link will connect to the second access point as a repeater and expand its wireless network coverage.
What to do if the network does not work
If after configuration the desired result is not achieved, and the network does not allow clients to access the Internet, does not issue addressing, and the routers do not connect to each other, and so on, then you should carefully double-check the configuration and go through all the steps above.
What you need to pay attention to:
- Make sure DHCP is configured correctly.
- Check that WDS is configured correctly.
- For a wired connection, make sure that the correct ports are connected, that the Ethernet cable is intact, and that the plugs are securely crimped.
- For wireless, check the status and check that you have chosen the correct SSID and entered the password for the main Wi-Fi.
If the connection speed is unsatisfactory, check:
- its meaning according to the tariff - the restriction may be at the provider level;
- modes/protocols supported by devices - the thickness of the internal channel is limited by the capabilities of the weakest network member;
- capabilities of a wired switch built into the router - older models have a “ceiling” of 100 Mbit;
- number of Ethernet cable cores: four-core cable operates at a maximum of 10/100 Mbit.
Intermittent and unstable Wi-Fi connection indicates:
- software or hardware incompatibility of devices;
- noisy air with a lot of interference;
- weak signal level between routers.
In the latter case, you need to find a way to move the equipment closer to each other. You should also check the wireless settings, select a less frequently used channel and increase the power of the point, if such an option is provided by the firmware.
Connection via LAN cable
Decide right away which router will be the “main” one. It is better to choose a device with more power, unless, of course, you have two identical models. There are two types of connection using a LAN cable - LAN-WAN or LAN-LAN, but the first is more popular, so we will start with it.
Setting up a LAN-WAN connection
How does this type of connection work? One of the routers becomes the main one - it receives the Internet, and the second device plays the role of a secondary network and receives data from the “main” access point.
This connection has the following advantages:
- The secondary network can be controlled and limited access to certain sites, for example if you are concerned about preventing children from accessing “adult” sites.
- The connection becomes more secure from outside interference.
- This connection method is in most cases recommended by experts, since it is considered the most correct and problems rarely arise when using it (compared to the LAN-LAN type).
To connect LAN-WAN, make sure that when the main router is running you can access the Internet without interference, and the following parameters are set in the settings (they are universal for most models):
- a server called DHCP is enabled;
- The IP address is distributed automatically.
If you are not sure that you have the same settings or do not know how to check them, follow these steps:
- Enter your IP address in your browser and you will see your device settings.
- In the LAN section there should be a checkmark next to the DHCP server.
- In the WAN section, the connection type is set to Dynamic IP.
We've sorted out the first router, let's move on to the second - it's better to reset all settings on it. This is especially true if you previously used the services of another provider (it could have completely different parameters). Therefore, press the Reset button located next to the connectors and hold it for about ten seconds, after which the basic settings will be restored.
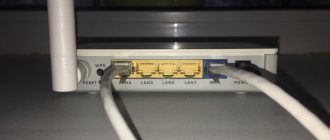
Now you need to properly connect both devices with a cable. In the main router we use a LAN connector, in the second - a WAN cell. Check the light indicators - on the body of each of them a light should light up next to the inscriptions of the same name.
In the main router we do not change anything else, but in the second we check whether the connection type is dynamic (we have already looked at how to do this earlier). Don’t forget to come up with a password to access the Internet - to do this, go to the settings in the Wireless section, Wireless Security.
LAN-to-LAN connection
This type of connection is different in that here the equipment for accessing the Internet is located in one network segment, and in the previous case, the second router created its own separate network. To establish a LAN-LAN connection in the main device, all data remains as default.
We change the parameters on the second router using the following steps:
- We connect it to the PC.
- We go into the equipment settings through the browser, disable the DHCP server.
- We change the IP address - increase by one the last digit in the original combination specified in the standard settings.
After this, connect both routers using a cable through the LAN ports; you will connect a cable for Internet access to the first and main device.
Safety
Don't forget about safety. Since there will be two wireless hotspots operating on the network, access to them should be properly protected.
Let us recall the general rules for creating a password:
- at least eight characters;
- the password contains upper and lower case Latin letters, numbers and special characters;
- the code is not an easily selected combination - name, birthday and other memorable dates, meaningful words, and so on.
In this case, it is advisable to come up with different passwords for each access point, although this will not be so convenient, because there is de facto one network. But different passwords will significantly increase security and make it more difficult for a potential attacker to hack the system. This is especially true for heterogeneous Wi-Fi systems with devices of different firmware - certain models are more vulnerable to attacks, and having penetrated one segment, a hacker can easily hack the second.
Connecting wireless Wi-Fi routers to a local network
Step 1
The first step is to determine whether your routers are compatible for bridging. You can look this up both in the router documentation and on the Internet. If you discover that your router does not support bridge modes (“bridge”/”repeater”), you can always download the DD-WRT program, it will help introduce this function if you are installing two routers, connecting them into one network.
Step 2
Install the routers nearby, this will make it much easier to perform further manipulations with the connection. Upon completion of the merger, the equipment can be returned to its place.
Step 3
Choose the main router from the two, the main thing is that it has stronger antennas, which will help you easily install a second router. After connecting the main router to the modem, connect it to one, shared local network of your PC, we carry out the manipulations as with a simple installation of a wireless network. Don't forget about the IP address, DHCP range, don't forget about the mask.
Step 4
Connect the second router to your PC or laptop using an Ethernet cable, but you do not need to connect the router to the modem. After that, open the router settings window on your computer. Find the Wireless and Internet tabs.
Step 5
If the router can support a bridge connection, then open the Network Mode (Wireless Mode/Connection Type) configuration and select Bridge Mode (Repeater Mode/Repeater Bridge)
Step 6
Check that the mask of the secondary router is identical to the main one. Set the IP range. (For example, the main router is 186.567.1.1 then the secondary router will be 186.567.1.5)
Step 7
Give the two Wi-Fi connections different names so you know which one is the main one, but the connection type passwords must match.
Step 8
At the final stage, it is worth installing the secondary router in place, but the distance between it and the main one should not exceed more than half the range of the main one.