In general, I used the following components for assembly:
— ASUS M5A97 R2.0 motherboard;
— AMD FX-8350 Black Edition processor, OEM;
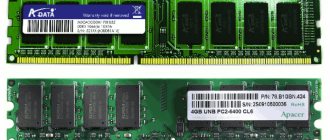
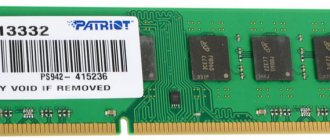
— RAM DIMM DDR3, 8GB (2×4GB), Kingston HyperX FURY blue;
— Zalman CNPS10X Performa cooler.
and so on, the remaining components do not affect this problem.
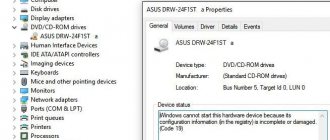
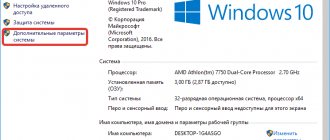
After I assembled everything, I didn’t see another 4 GB of RAM in the BIOS, i.e. instead of 8, there were 4GB. Having rummaged through the settings, I saw that the motherboard “sees” both memory sticks, but for some reason its final value was 4GB. Installing Windows did not bring any clarity, but made things even more confusing. Specifically, in the Properties of computers it was " Installed memory (RAM): 8 GB (3.90 GB available) ".
After looking at the resource monitor, I finally came to a dead end, 4 GB was occupied by “Reserved Equipment”.
I began to figure out step by step how to solve this problem and I will describe all my thoughts and actions step by step from the simplest and most obvious method to dancing with a tambourine. It should be noted that if in your case the BIOS does not “see” part or all of the RAM, then of all the methods, pay more attention to setting up the BIOS and the hardware. If the entire amount of RAM is available in the BIOS, but not in Windows, then among all the methods listed below, select only those that relate to Windows settings.
Check the bitness of the operating system.
First of all, in the system properties, look at the bit depth of the operating system. We must not forget that 32-bit Windows systems have a limit of 4 GB of RAM, and even if you install 16 GB, the computer will not see them (there are workarounds, but this is not about that now and they do not always work correctly).
If you want to use more than 4 GB of RAM, you must reinstall the system to 64-bit.
Windows version does not support installed memory capacity
If not all RAM is available to Windows, then first of all you should pay attention to the bit depth of the operating system, for example x86 (also called 32-bit) supports no more than 4 GB of RAM, and even if you install 8 GB, it can use the maximum 4GB.
Many users are unaware that each version of the Windows operating system supports a certain maximum amount of RAM. As noted above, x86 uses a maximum of 4 GB of RAM in all versions of Windows. Now let's take a look at RAM support in x64 bit operating systems:
Windows 7
- Starter x86 2 GB
- Home x64 8 GB
- Home extended x64 16 GB
- Professional x64 192 GB
- Corporate x64 192 GB
- Maximum x64 192 GB
Windows 8/8.1
- Home x64 128 GB
- Professional x64 512 GB
- Corporate x64 512 GB
Windows 10
- Home x64 128 GB
- Professional x64 512 GB
By checking your version of Windows with the information in the table, you can make a conclusion, and if this is not a solution to your problem, then read the article further.
Your version of Windows has a RAM limit.
Each version of Windows has its own limit of RAM it can work with, for example:
Maximum available amount of RAM on Windows 7
| Windows 7 version | X86 | X64 |
| Windows 7 Ultimate | 4 GB | 192 GB |
| Windows 7 Enterprise | 4 GB | 192 GB |
| Windows 7 Professional | 4 GB | 192 GB |
| Windows 7 Home Premium | 4 GB | 16 GB |
| Windows 7 Home Basic | 4 GB | 8 GB |
| Windows 7 Starter | 2 GB | Not available |
Maximum available amount of RAM in Windows 8
| Windows 8 version | X86 | X64 |
| Windows 8 Enterprise | 4 GB | 512 GB |
| Windows 8 Professional | 4 GB | 512 GB |
| Windows 8 | 4 GB | 128 GB |
Therefore, first of all, check the installed version of Windows .
How to use all installed memory in the simplest ways?
Much more important issues when not all RAM is available are problems with connecting memory sticks or their incorrect operation. First, make sure that the motherboard is designed for the installed volume, and also check the tightness of the insertion of the strips into the corresponding slots. It would also be a good idea to perform a memory test, for which you can use Windows' own tool (mdsched) or third-party programs like Memtest86/86+.
If problems are not identified at this stage, pay attention to the bitness of the installed Windows modification. If you have a 32-bit version, which cannot work with RAM of more than 4 GB (unless you use special tools), no matter how much memory you install above this limit, the system will still not recognize it.
The optimal solution would be to install a 64-bit version of Windows. But in this case, previously installed programs may not work, and important files will have to be copied to another logical partition or to removable media.
Sometimes it happens that not all RAM is available due to incorrectly set memory usage options in the system configuration (msconfig).
In the configurator, on the boot tab, click the additional options button and check if the maximum memory checkbox is checked. If there is one, remove it, save the installed options and reboot the system.
As is already clear, part of the memory can be “eaten up” by a huge number of active background processes and services that are not visible to the user. First, disable all unnecessary components in startup (in Windows 7 and below, the corresponding tab in the configuration settings is used for this; in higher versions, “Task Manager”).
Just in case, look at the active components of the system in the programs and components section and disable the unused ones (Hyper-V module, Internet Explorer if you use another browser, print service if you don’t have a printer, etc.). Similarly, you can set the startup type to disabled for some other services (services.msc), but in this case you need to know exactly what can be deactivated and what cannot.
Check your motherboard's limitations.
Each motherboard has limitations in the amount of perceived RAM. Older ones can see a maximum of 4 GB of memory, others 16 GB, and there are already those that can work with 32 GB or more. Therefore, look at its capabilities in the documentation for the motherboard or on the manufacturer’s official website. Also note that the motherboard supports the operating frequency of the higher RAM.
Memory is used by the integrated video card
And perhaps another option why not all RAM is available is the use of the built-in graphics core for video memory.
As a rule, an integrated video card takes up 128-750 MB of video memory. That is, if you have 4 GB of RAM installed, and 3.87 GB is available, then draw the conclusion that the built-in video card is eating up. All this is not critical and you can simply close your eyes to it.
In cases where your computer or laptop has an additional discrete video card, you can try disabling the integrated one via the BIOS. Unfortunately, not all models support disabling the graphics core. But if you succeed, then the memory should become available in full. In some BIOS versions, it is possible to change the size of video memory used.
Well, that’s probably all, now you know the reasons why the available RAM is less than the installed one.
Share your situation and I will try to help. The best “Thank you” is your repost
Make sure there are no restrictions when loading Windows.
There are cases when restrictions are set when loading Windows, so part of the RAM may be inaccessible. To check this, press the key combination “Win” + “R” and enter “msconfig” in the line.
Then open the "Download" tab, click the "Advanced options" button.
In the window that opens, make sure that the checkbox next to the “Maximum memory” line is not checked.
You can try to enter the size of RAM you use in this field. In my case, this did not help; after I restarted the computer, the check mark remained and the value became 0.
The system does not see part of the RAM
The only way to get rid of this problem is to reinstall the OS to a 64-bit version. Then you will have more than 4 GB available.
There is also one trick to the system. Press Win+R and enter the msconfig command. Next, the “System Configuration” window opens. Go to the “Download” tab and click on the “Advanced options” button there.
This is interesting: How to find out what RAM is on your computer
Uncheck the “Maximum memory” checkbox.
Make sure the memory is working.
There are times when the RAM has failed or you have acquired a defective one, so check its functionality. Attention!!! All manipulations with RAM strips should be performed with the computer turned off. Take out all the memory sticks and plug one into the same port one by one, after changing each stick, turn on the computer and in the BIOS or in Windows, make sure that the computer sees this memory stick. Or, on another work computer, check each strip or all together.
Reset BIOS settings.
Another important point is resetting the settings to factory settings in the BIOS. Someone may say that they have never changed anything there and why reset something there. In fact, I know of cases where resetting to factory settings actually solves problems for which the solution is not obvious. In order to reset the settings, press the “Exit” button in the BIOS and in the menu that appears, select “Load default settings” or remove the battery on the motherboard for a few seconds and put it back.
Windows does not see RAM completely or partially - reasons
The most annoying and common problem is the situation when the user’s PC does not detect the pre-installed “RAM”. There may also be cases of “partial” shutdown, or display of only some part of the installed memory.
Reasons why the computer does not see RAM in whole or in part
The main prerequisites and causes of such problems may be:
- using an operating system whose bit depth does not allow the use of a large amount of memory;
- there are some restrictions on a certain amount of memory used;
- RAM is allocated to ensure the functionality of integrated or other equipment;
- the device’s motherboard has the ability to support only a limited amount of “RAM”;
- the board with this memory was installed incorrectly;
- failure of the RAM “plate” itself.
Each of these reasons can appear either individually or in combination with others. Therefore, it is recommended that each user have the necessary knowledge and skills to troubleshoot such problems, which significantly affect the performance of the entire device.
Cleaning the computer and checking connections.
Another effective way to make your computer see all the RAM is to clean the RAM sticks and ports from dust. Also, don’t forget to clean the processor, pull it out of the socket, and check if the legs are bent. Many will say that this method is the most ineffective, especially those who are assembling a new computer, like me. But it helped me. It turned out that either I inserted the processor incorrectly (although I can’t imagine how you can insert it incorrectly without breaking several legs), or I overtightened the bolts holding the cooler (I think this version is more likely to be true), or the computer decided I don’t know that I would have given him a few more hours. But only after I removed the cooler, pulled out and reinstalled the processor, and installed it without tightening the cooler bolts too much, everything worked and the BIOS, and with it, Windows saw the entire amount of RAM.
I really hope that this article will help you in solving problems related to RAM and you will spend less time fixing it. I would be grateful if you share your method of solving RAM-related problems in the comments.