device Manager
Go to Device Manager (read how to do this here). We find the video adapters installed on the computer in the list. We have the only integrated Intel adapter. To turn it off, right-click and select “Disable device”.
Although it makes no sense to disable the built-in card if the external one is not connected. First, connect the external adapter. But it is possible that even with a connected discrete video card, the monitor will turn off.
Installing a video card into a computer
Installing a video card into a computer is no more difficult than removing it. All the steps described above simply need to be performed in reverse order. Do not forget - all installation operations are performed with the power completely turned off. Procedure:
- Insert the video card into the PCIe slot on the motherboard (the lock will close on its own).
- Attach the video card to the case with several screws, connect connectors with additional power (if any) to the video card.
- Install the side cover of the case, connect the video cables and power cable to the computer power supply, switch the toggle switch on it to position
BIOS settings
Disabling the built-in video card is possible through the BIOS (or through the new version - UEFI).
In this article, we have written detailed instructions on how to use the integrated video adapter and solve problems that arise with it. It also describes how the video card works in the BIOS.
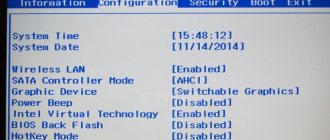
The settings for disabling the card are usually located in the Advanced tab, sometimes Config. You can enter the BIOS itself using the F2, F8 or other keys. It all depends on the laptop model. Disable the video card found in the BIOS by setting it to Disable. You may also need to move the external adapter to the first one in the list, which will be connected when the computer starts.
The entire process of disabling the card in the BIOS looks something like this.
Using BIOS or UEFI
[Instructions] How to distribute wi-fi from your phone: to a laptop, computer and other devices: detailed settings
Some laptop models allow you to disable the integrated graphics via BIOS settings. You can also do this for those who use UEFI Boot Secure. But the latter is less malleable.
The main problem is that there cannot be a universal instruction, since all BIOSes are different. It all depends on the manufacturer and motherboard of the laptop. And some don’t even have this option to disable the built-in graphics.
However, the general points (and even their names) may well be similar. So general recommendations for disabling the integrated graphics adapter in the BIOS or UEFI can be given. And you need to do the following.
- In the BIOS, look for the “Graphics Configuration” in the “Main”
- There we select the video card type “Discrete Graphics”
- Press “F10” and save changes
- Reboot the machine
Now after the restart, only the discrete video card should work. The integrated one should turn off. It is worth noting that the above are general recommendations.
In your BIOS, the required item may be in the “Advanced” or “Config” tab. So you'll have to search. In any case, if you don’t find it, then there is an opportunity to deal with the problem programmatically. And we'll talk about this now.
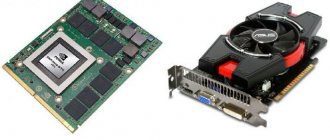
NVIDIA and Catalyst Control Center Utilities
It is best to use official utilities to control and edit the settings of internal PC elements:
- for NVIDIA video cards there is a utility of the same name;
- for AMD-based adapters – AMD Catalyst control center.
- NVIDIA
To manage graphics devices, you need to go to the “3D Settings” section. Here, in the line “Manage 3D parameters” on the “Global parameters” tab, in the drop-down menu, select the desired card and disable it.
- Catalyst.
Here, the shutdown is carried out through the “Power” (POWER) – “Switchable Graphics” section.
In the drop-down menu line you will see the name of the active video card and, just below, its characteristics. Next, at the bottom of the window, activate “high GPU performance.”
After this the message will appear:
The “Change” button is pressed.
Or in the “Switchable graphics adapters” menu in the “Other applications” line, enter the path to the file that runs on the removable graphics card.
Where to begin
Before disconnecting the built-in video card, you should make sure that the discrete one is working. Or perhaps even install it and connect it if this has not been done before.
- Disconnect the system unit from the network;
- Remove the side cover, gaining access to the top of the motherboard;
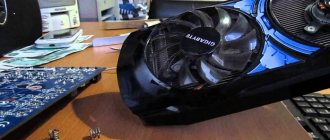
- Find a place to connect the video card (PCI slot, indicated by an arrow in the figure) and install it by snapping the latch;
- Assemble the system unit;
- Include a monitor in the new video adapter (on the computer)
- Find and install drivers for the card (if they are not installed automatically). It is best to use the included disc for this.
Slot for connecting a new video card to a PC
Only now, when the second, discrete, video card is working, can you disable the first, built-in one. It is worth noting that self-installation or replacement of the video adapter is available for any PC.
However, not all laptop models support this feature - this should be taken into account when purchasing them.
Thus, Acer, HP, Sony and Samsung brands allow the installation of a new graphics card, but, for example, Lenovo does not.
Options for disabling the video card
Basically, advice on how to disable a video card on a laptop comes down to managing the settings in the manufacturer’s proprietary utility. Such programs come pre-installed with the equipment along with the Windows operating system. But when you reinstall them yourself, they are not always returned, being limited to installing “naked” drivers. In addition, some computers are sold without any preinstallations.
In some cases, the discrete chip is turned off at the service center. For example, if it is damaged or the laptop freezes.
Then this option “falls off” due to the actual absence of a tool. True, there are several others left - the device manager, the utility supplied with the driver, the BIOS built into the motherboard. Which one to use in a particular case depends on preference or banal ease of use. After all, a disabled chip may be needed at any time and will have to be turned on again.
Method number 1. device Manager
The first method is considered universal: it works on all versions of Microsoft Windows, applicable for desktop and mobile PCs. If the system is Russian-language, even beginners will not have problems understanding the actions. This is why this option is most often recommended. If you search on the Internet for how to disable a discrete video card on your computer, first of all, a description is displayed of what exactly should be done in Device Manager.
Sequencing:
- left-click on the “Search” button;
- enter the name of the utility utility “Control Panel”;
- select the desired item from the drop-down list;
- then go to the “System and Security” category;
- open the “System” module (this is the “Device Manager”);
- in the window that opens, find the “Video adapters” category;
- click on the triangle and display a list of devices;
- select the integrated chip and click the right mouse button;
- In the drop-down list, click “Disable”.
That's it, it's done. They do the same thing when they need to understand how to disable a discrete video card on a laptop. Just select the appropriate driver. The name usually makes it clear which item to check. So, if the computer has an Intel processor installed and the user is learning how to disable the integrated video card, select the Intel HD Graphics <numbers> line (chip series depending on the laptop model).
Method number 2. Specialized programs
When figuring out how to disable a discrete video card, they often use the second option. Its essence is as follows. Along with the default video card drivers, special utilities are also installed. Depending on or "Catalyst Control Center" (for AMD). With its help, the user specifies the operating mode of the picture display system.
Options:
- discrete video card priority;
- automatic switching;
- integration becomes the main one.
After installing the drivers, the second method of operation is most often chosen. The rest are available for selection at the user's discretion. The step-by-step switching instructions look like this (example with an NVidia video card):
- On the desktop, press the right mouse button;
- Select “NVidia Control Panel” from the drop-down menu;
- it also often “hangs” in the tray, next to the clock;
- left mouse button to open the panel;
- in the window that appears, open the “3D Settings” menu list;
- select “Manage 3D settings”;
- then go to the “Global parameters” tab;
- Select “Preferred GPU” from the drop-down list.
All you have to do is click the “Apply” button, after which the changes will take effect. Sometimes you are prompted to restart your computer. If a user is looking for how to disable the integrated video card on a computer, the procedure is similar.
Method number 3. Device Drivers
If specialized programs do not work for some reason, you will have to configure them through drivers. The procedure is similar to the first method, so there will be no questions about how to disable the video card on a laptop or desktop computer.
Sequencing:
- open “Device Manager” (description of the procedure above, in the “Method No. 1” section);
- right-click on the name of the video chip to be disabled;
- Select “Properties” from the drop-down menu;
- go to the “Driver” tab;
- Click on the “Disable device” button.
That's it, the video card is no longer used. This method sometimes causes problems when trying to disable an active chip. If this is the case, all that remains is to “roll back” the Windows settings and figure out how to disable the built-in video card in the BIOS.
Disabling in BIOS
How to disable the built-in video card through BIOS? In reality, there is no universal instruction for all PCs and laptops. The fact is that the variety of BIOS models and versions has led to a large number of options for the sequence of actions to perform the required operation. In addition, not every laptop or computer has the ability to disable integrated graphics through the BIOS. We will describe only the general points:
- After entering the BIOS, you need to find a section called Config, Advanced Settings or something similar.
- The target item may be named Graphics Configuration, Integrated Graphics, OnBoard Video, VGA Adapter, or something else, but in most cases it will contain the word Graphics or Video.
- The value of the found parameter must be changed to Disabled.
- As for PC motherboards, to disable the integrated solution it is usually enough to change the Primary Display item to PCI-E.
- Don't forget to save the BIOS settings before exiting. Usually the F10 key is used for this.